本教程是严格地与上Gentoo和对待其他的服务器扩展问题LEMP安装前者如启用动态脚本语言,如Perl或击或Ruby通过Fcgiwrap网关 ,和编辑Nginx的虚拟主机配置文件服务使用特等动态内容, .RB和的CGI脚本。

使用Perl,Ruby和Bash安装FcgiWrap
要求
- LEMP堆叠安装在Gentoo - https://www.youcl.com/info/10137
第1步:在Gentoo LEMP上启用FCGIWRAP
Fcgiwrap是Nginx的FastCGI的通用网关接口的一部分,它处理其他动态脚本语言,如Perl或bash或Ruby脚本,作品通过处理从Nginx的接收,通过TCP或Unix套接字,以独立的方式请求,并返回产生的结果返回给Nginx,它将在长期内将响应转发给终端客户端。
1.让我们通过下面的命令在Gentoo Linux上安装FCcgiwrap过程首先开始。
# emerge --ask www-misc/fcgiwrap
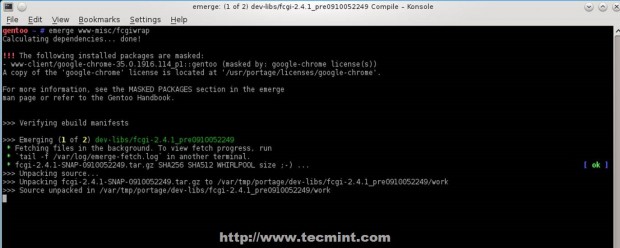
安装FCcgiwrap包
2.默认情况下Fcgiwrap包不提供任何的Gentoo 初始化脚本来管理的过程。 该软件包后已编译和安装创建以下的init脚本,可以帮助您管理使用三个方法Fcgiwrap过程:要么推出通过unix域套接字或使用本地TCP套接字或同时使用在同一时间的过程。
使用TCP套接字脚本
创建以下文件的内容/etc/init.d/的路径上的init文件。
# nano /etc/init.d/fcgiwrap
添加以下文件内容。
#!/sbin/runscript
ip="0.0.0.0"
port="12345"
start() {
ebegin "Starting fcgiwrap process..."
/usr/sbin/fcgiwrap -s tcp:$ip:$port &
tcp_sock=`netstat -tulpn | grep fcgiwrap`
echo "Socket details: $tcp_sock"
eend $? "Errors were encountered while starting fcgiwrap process"
}
stop() {
ebegin "Stopping fcgiwrap process..."
pid=`ps a | grep fcgiwrap | grep tcp | cut -d" " -f1`
kill -s 1 $pid
tcp_sock=`netstat -tulpn | grep fcgiwrap`
if test $tcp_sock =  2> /dev/null ; then
echo "Fcgiwrap process successfully stoped"
tcp_sock=`netstat -atulpn | grep $port`
if test $tcp_sock =  2> /dev/null ; then
echo "No open fcgiwrap connection found..."
else
echo "Wait to close fcgiwrap open connections...please verify with 'status'"
echo -e "Socket details: \n$tcp_sock"
fi
else
echo "Fcgiwarp process is still running!"
echo "Socket details: $tcp_sock"
fi
eend $? "Errors were encountered while stopping fcgiwrap process..."
}
status() {
ebegin "Status fcgiwrap process..."
tcp_sock=`netstat -atulpn | grep $port`
if test $tcp_sock =  2> /dev/null ; then
echo "Fcgiwrap process not running"
else
echo "Fcgiwarp process is running!"
echo -e "Socket details: \n$tcp_sock"
fi
eend $? "Errors were encountered while stopping fcgiwrap process..."
}
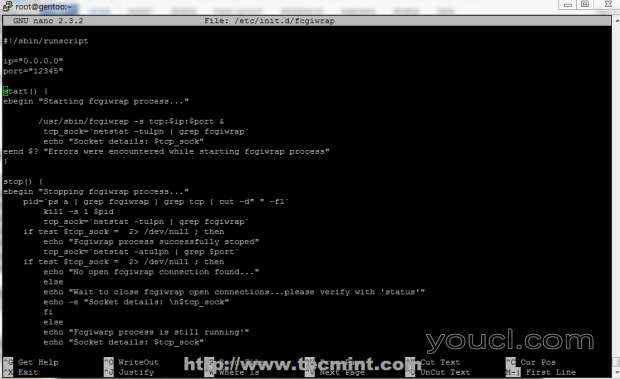
使用TCP套接字脚本
正如你所看到的脚本文件保存在开头两个可变,分别为IP和端口 。 改变这个变量与自己的需要,并确保它们不会与其他服务您的系统上重叠,尤其是端口变量-默认这里是12345 -相应地改变。
IP上使用可变0.0.0.0可启用进程绑定,并在任何IP监听(外部访问,如果你没有一个防火墙),但出于安全原因,你应该改变它来听本地只,在127.0.0.1,除非你有其他原因,如在不同的节点上远程设置Fcgiwrap网关的性能或负载平衡。
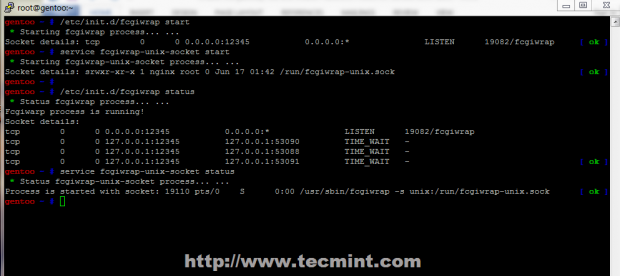
3.创建文件后,追加执行权限,并使用启动管理守护进程,停止或状态开关。 开关的状态会显示相关的接口信息,如IP,端口对监听,如果在这里初始化任何活动连接。 此外,如果进程在TIME_WAIT状态的活动连接无法重新启动它,直到关闭所有TCP连接。
# chmod +x /etc/init.d/fcgiwrap
# service start fcgiwrap
# /etc/init.d/fcgiwrap status
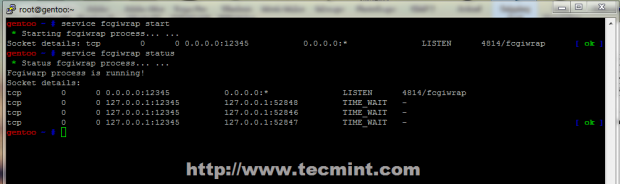
启动FcgiWrap服务
使用Unix套接字脚本
正如前面介绍Fcgiwrap可以同时使用socket同时运行,所以会稍微改变第二个脚本fcgiwrap UNIX的socket ,的名称,以确保既可以启动并运行同一时间。
# nano /etc/init.d/fcgiwrap-unix-socket
对UNIX套接字使用以下文件内容。
#!/sbin/runscript
sock_detail=`ps a | grep fcgiwrap-unix | head -1`
start() {
ebegin "Starting fcgiwrap-unix-socket process..."
/usr/sbin/fcgiwrap -s unix:/run/fcgiwrap-unix.sock &
sleep 2
/bin/chown nginx:nginx /run/fcgiwrap-unix.sock
sleep 1
sock=`ls -al /run/fcgiwrap-unix.sock`
echo "Socket details: $sock"
eend $? "Errors were encountered while starting fcgiwrap process"
}
stop() {
ebegin "Stopping fcgiwrap-unix-socket process..."
pid=`ps a | grep fcgiwrap | grep unix | cut -d" " -f1`
rm -f /run/fcgiwrap-unix.sock
kill -s 1 $pid
echo "Fcgiwrap process successfully stoped"
#killall /usr/sbin/fcgiwrap
sleep 1
echo "Socket details: $sock"
eend $? "Errors were encountered while stopping fcgiwrap process..."
}
status() {
ebegin "Status fcgiwrap-unix-socket process..."
if test -S /run/fcgiwrap-unix.sock; then
echo "Process is started with socket: $sock_detail"
else
echo "Fcgiwrap process not running!"
fi
eend $? "Errors were encountered while stopping fcgiwrap process..."
}
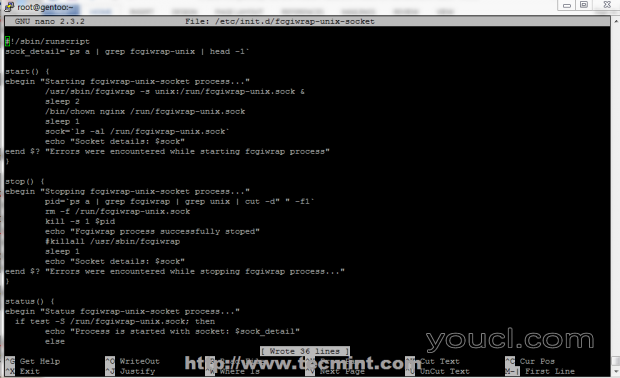
使用Unix套接字脚本
4.再次保证,这个文件是可执行的,并使用相同的服务开关: 启动 , 停止或状态 。 我已经设置了默认路径/run/fcgiwrap-unix.sock系统路径上此套接字。 启动过程中,使用状态等开关或列表/运行目录的内容进行验证,并找到socket,或用ps -a | grep的fcgiwrap命令。
# chmod +x /etc/init.d/fcgiwrap-unix-socket
# service start fcgiwrap-unix-socket
# /etc/init.d/fcgiwrap-unix-socket status
# ps -a | grep fcgiwrap
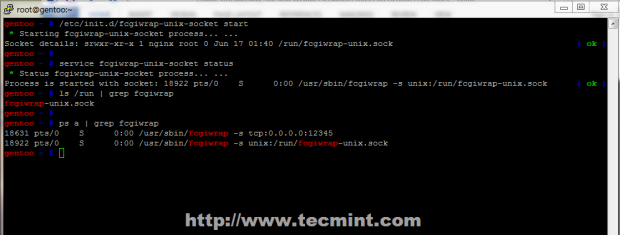
开始和验证Fcgiwrap
正如前面提到的Fcgiwrap可以用TCP和Unix套接字同时运行,但如果你并不需要外部网关连接坚守Unix域套接字而已,因为它使用的进程间通信,这比通过TCP环回连接的通信速度更快,使用更少TCP开销。
Unix域套接字
第2步:在Nginx上启用CGI脚本
5.对于Nginx的解析和运行通过快速公共网关接口Perl或的bash脚本,虚拟主机必须以root路径或位置上的语句定义Fcgiwrap配置。
一个例子,提出以下(本地主机),激活Perl和CGI脚本上( 在/ var / WWW /本地主机/ htdocs中/)使用Fcgiwrap TCP套接字的默认根文件路径和特等扩展名为.cgi放在根路径中的所有文件,第二位置使用unix域套 ,与index.pl文件和第三个地点是一个使用TCP套接字与index.cgi脚本文件。
将下面的内容,或者只是它的某些部分,您所需的虚拟主机配置文件要激活与UNIX或TCP套接字动态Perl或的bash脚本在不同的地点,通过修改参数fastcgi_pass声明。
# nano /etc/nginx/sites-available/localhost.conf
编辑localhost.conf看起来像下面的模板。
server {
listen 80;
server_name localhost;
access_log /var/log/nginx/localhost_access_log main;
error_log /var/log/nginx/localhost_error_log info;
root /var/www/localhost/htdocs/;
location / {
autoindex on;
index index.html index.htm index.php;
}
## PHP –FPM Gateway ###
location ~ \.php$ {
try_files $uri =404;
include /etc/nginx/fastcgi.conf;
fastcgi_pass 127.0.0.1:9001;
}
## Fcgiwrap Gateway on all files under root with TCP Sockets###
location ~ \.(pl|cgi|rb)$ {
fastcgi_index index.cgi index.pl;
include /etc/nginx/fastcgi.conf;
fastcgi_pass 127.0.0.1:12345;
}
## Fcgiwrap Gateway on all files under root second folder with index.pl using UNIX Sockets###
location /second {
index index.pl;
root /var/www/localhost/htdocs/;
location ~ \.(pl|cgi|rb)$ {
include /etc/nginx/fastcgi.conf;
fastcgi_pass unix:/run/fcgiwrap-unix.sock;
fastcgi_param  SCRIPT_FILENAME  $document_root$fastcgi_script_name;
}
}
## Fcgiwrap Gateway on all files under root third folder with index.cgi using TCP Sockets###
location /third {
index index.cgi;
location ~ \.(pl|cgi|rb)$ {
include /etc/nginx/fastcgi.conf;
fastcgi_pass 127.0.0.1:12345;
}
}
6.编辑完Nginx的localhost.conf,或特定的虚拟主机配置文件后,移动到你的网站的默认文档根路径,创建这些两个文件夹,以反映您的位置的语句,并创建索引文件,其特定扩展每个位置。
# cd /var/www/localhost/htdocs
# mkdir second third
创建第二个位置具有以下内容index.pl文件。
# nano /var/www/localhost/htdocs/second/index.pl
添加此内容以获取环境变量。
#!/usr/bin/perl
print "Content-type: text/html\n\n";
print <<HTML;
<html>
<head><title>Perl Index</title></head>
<body>
<div align=center><h1>A Perl CGI index on second location with env variables</h1></div>
</body>
HTML
print "Content-type: text/html\n\n"; foreach my $keys (sort keys %ENV) { print "$keys =
$ENV{$keys}<br/>\n";
}
exit;
然后创建第三个位置包含以下内容index.cgi脚本文件。
# nano /var/www/localhost/htdocs/third/index.cgi
添加此内容以获取环境变量。
#!/bin/bash
echo Content-type: text/html
echo ""
cat << EOF
<HTML>
<HEAD><TITLE>Bash script</TITLE></HEAD>
<BODY><PRE>
<div align=center><h1>A BASH CGI index on third location with env variables</h1></div>
EOF
env
cat << EOF
</BODY>
</HTML>
EOF
7.当完成编辑,使这两个文件的可执行文件,重新启动Nginx的服务器,并确保两个Fcgiwrapsocket都在运行。
# chmod +x /var/www/localhost/htdocs/second/index.pl
# chmod +x /var/www/localhost/htdocs/third/index.cgi
# service nginx restart
# service fcgiwrap start
# service fcgiwrap-unix-socket start
接下来,在以下网址重定向本地浏览器。
http://localhost
http://localhost/second/
http://localhost/third/
结果应该显示在屏幕截图下面。
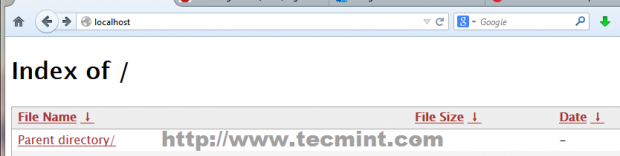
验证CGI目录

Perl CGI索引页
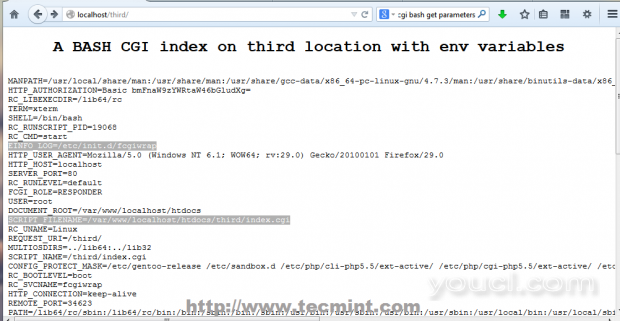
一个Bash CGI索引页
8.如果一切就绪并正确配置,同时启用Fcgiwrap守护程序发出以下命令(如果你配置Nginx的同时使用CGI接口)自动启动,重启后。
# rc-update add fcgiwrap default
# rc-update add fcgiwrap-unix-socket default
第3步:在Fcgiwrap上激活Ruby支持
9.如果你需要运行Nginx的上FCGI动态Ruby脚本必须在安装Gentoo的Ruby解释器使用下面的命令。
# emerge --ask ruby
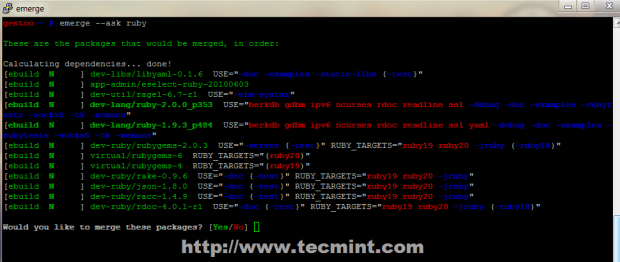
安装Ruby解释器
包已经编译和安装10后,移到Nginx的网站,提供编辑localhost.conf文件通过附加前年花括号“}”下面的语句,激活的支持下默认的文档上的第四位置运行Ruby脚本根路径由Nginx localhost服务。
# nano /etc/nginx/sites-available/localhost.conf
使用以下Nginx指令。
## Fcgiwrap Gateway on all files under root fourth folder with index.rb under TCP Sockets###
location /fourth {
index index.rb;
location ~ \.rb$ {
include /etc/nginx/fastcgi.conf;
fastcgi_pass 127.0.0.1:12345;
}
}
## Last curly bracket which closes Nginx server definitions ##
}

在Fcgiwrap上启用Ruby支持
11.现在,为了测试配置创建在/ var /网络/本地主机/ htdocs目录路径第四目录,创建.RB扩展一个可执行的Ruby脚本索引,并添加以下内容。
# mkdir /var/www/localhost/htdocs/fourth
# nano /var/www/localhost/htdocs/fourth/index.rb
Ruby index.rb示例。
#!/usr/bin/ruby
puts "HTTP/1.0 200 OK"
puts "Content-type: text/html\n\n"
puts "<html><HEAD><TITLE>Ruby script</TITLE></HEAD>"
puts "<BODY><PRE>"
puts "<div align=center><h1>A Ruby CGI index on fourth location with env variables</h1></div>"
system('env')
12.在你的文件添加执行权限,重新启动Nginx的后台应用的配置。
# chmod +x /var/www/localhost/htdocs/fourth/index.rb
# service nginx restart
打开浏览器,然后导航到http://本地主机/四/,它应该为您呈现以下内容。
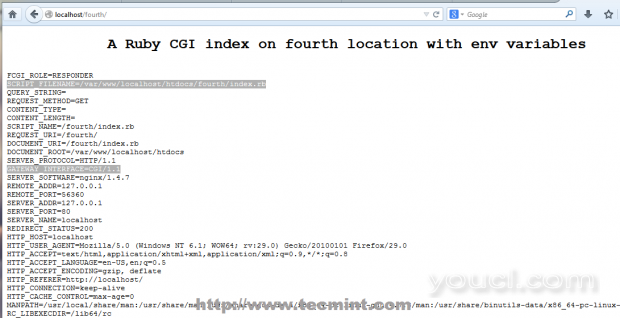
Ruby CGI索引页
这就是现在,你已经配置Nginx在FastCGI网关上提供动态Perl,Ruby和Bash脚本,但是,请注意,在Nginx CGI网关上运行这种解释脚本可能是危险的,并对你的服务器施加严重的安全风险,因为他们使用系统下的活动shell运行,但可以扩展静态HTML强加的静态屏障,为您的网站添加动态功能。


