介绍
OpenShift是Red Hat的平台即服务(PaaS),允许开发人员在云环境中快速开发,托管和扩展应用程序。 OpenShift Origin是OpenShift的开源上游。 它内置了支持各种语言,运行时间和数据层,包括Java EE6, Ruby ,PHP,Python和Perl中 ,MongoDB的 中,MySQL和PostgreSQL。 您可以使用自定义或社区磁带盒向OpenShift添加新的运行时和框架。
轻松扩展您的Web应用程序是在OpenShift Origin上运行它们的主要原因。
注:在本教程中用户输入将以红色突出显示。
OpenShift如何工作
OpenShift角色
OpenShift平台上使用了四个角色。 虽然这不是很重要,但您知道这个角色为本教程做了什么,如果您希望部署一个服务器集群以提供高可用性,负载平衡等,您将需要了解这些角色提供的功能。
在我们的教程中,我们将配置一个服务器来运行所有这些角色。
经纪人
Broker角色由OpenShift Broker RPM和MCollective客户端组成。 Broker作为OpenShift部署的中心枢纽,并提供了一个Web界面,用户可以在其中管理其托管应用程序。
DBServer
此角色由Broker用于跟踪用户和应用程序的MongoDB数据库组成。
MsgServer
MsgServer角色包括ActiveMQ服务器和一个MCollective客户端。
节点
节点角色被分配给实际用于存储和提供OpenShift托管的应用程序的任何主机。 oo-install支持将节点部署为初始安装的一部分,并作为将新节点添加到现有OpenShift部署的工作流的一部分。
OpenShift架构
OpenShift旨在成为一个高可用性,可扩展的应用程序平台。 正确配置后,大型OpenShift部署可以在需求增加时提供一种轻松扩展应用程序的方法,同时提供零停机时间。 使用在多个数据中心位置的OpenShift主机集群,您可以在整个数据中心停止运行。 在本教程中,我们将设置第一个运行OpenShift所需的所有角色的OpenShift主机。
它从客户的角度如何工作
- 客户端要访问该网站app-owner.apps.example.com。
- 客户端的浏览器请求域的DNS记录。
- DNS服务器使用承载应用程序的节点的IP地址进行响应。
- 客户端浏览器向节点发送GET请求。
- 节点将请求映射到所需的应用程序。
- 应用程序本身直接响应请求。
DNS服务器如何知道哪个节点运行应用程序?
开发人员连接到Broker以创建/管理应用程序。 当所有者修改应用程序时,代理将使用新信息向DNS服务器发送消息。 此信息包括用于应用程序的域,以及哪些节点托管应用程序。 由于这种自动化,OpenShift需要控制用于应用程序的域或子域的DNS区域。
OpenShift使用绑定DNS服务器。 如果您有现有的绑定DNS服务器,您可以配置OpenShift使用它。 但是,在本教程中,我们将介绍使用由OpenShift Origin安装程序自动配置的新DNS服务器的过程。
如果您希望使用现有的BIND DNS服务器,你可以阅读有关设立DNS说明OpenShift地全面部署指南 。
DNS配置
在本教程的剩余部分,我们将使用以下域。 用你自己的代替这些,并随时使用一个个性化的命名约定。
- example-dns.com -用于我们的域名服务器
- ns1.example-dns.com
- ns2.example-dns.com
- example.com
- apps.example.com -用于OpenShift应用
- openshift.example.com -用于OpenShift主机
- master.openshift.example.com -我们Droplet的主机名
先决条件
Droplet要求
- 1GBDroplet或更大
安装OpenShift是相当资源密集型的,一些包可以超过512 MB的RAM使用。 您应该使用1 GB或更大的Droplet。 如果您在安装程序结束时注册磁带盒有任何问题,有可能是一些软件包安装失败,因为内存不足。 这可以通过检查安装日志来确认。
检查安装日志:
cat /tmp/openshift-deploy.log
支持的操作系统
- 6.5 CentOS的64位 (标准DigitalOcean图片)
OpenShift Origin 4在64位版本的Red Hat Enterprise Linux(RHEL)6.4或更高版本以及CentOS 6.4或更高版本上受支持。 Fedora,RHEL 7.x或CentOS 7.x不支持。 建议最小安装RHEL / CentOS,以避免与OpenShift的包不兼容。 本教程将使用1 GB Droplet上的标准Digital Ocean CentOS 6.5 x64映像。
安装程序依赖关系
OpenShift Origin安装程序需要以下实用程序。 本教程将向您展示如何安装Ruby。 默认情况下,其他软件包已经安装了DigitalOcean CentOS 6.5映像。
- 卷曲
- Ruby - 1.8.7或更高版本
- SSH -如果要部署到比安装的主机其他系统
根访问
本教程的其余部分将假定您使用root用户帐户或具有sudo权限的用户帐户连接到服务器。
从其他帐户进入root shell:
sudo su
第一步 - 安装更新
在继续之前,始终一个好主意,以确保您已安装最新更新。
要安装更新:
yum update
第二步 - 安装首选文本编辑器
您可以在本教程中使用您最喜欢的文本编辑器; 但是,示例将使用Nano。
安装Nano:
yum install nano
当您完成纳米编辑文件,按Ctrl + X,按Y键保存,然后按Enter键覆盖现有文件。
第三步 - 安装Ruby
默认情况下,在最小的CentOS 6.5安装上不安装Ruby。
安装Ruby:
yum install ruby
第四步 - 设置您的主机名
我们需要确保我们的主机名配置正确,并解析到本地机器。 如果配置不正确,Puppet将无法部署一些必需的服务。
要检查当前主机名:
hostname
它应该显示您要用于OpenShift控制面板的URL。 在我们的例子,这是master.openshift.example.com。
打开文件/ etc / sysconfig / network中 :
nano /etc/sysconfig/network
编辑文件以满足您的需要:
NETWORKING=yes
HOSTNAME=master.openshift.example.com
下次重新启动时,您的主机名将被更新。 我们将在几个步骤后重新启动。
第五步 - 使主机名解析到本地主机
这将确保puppet可以在安装过程中正确解析主机名。
接下来,打开文件/ etc / hosts:
nano /etc/hosts
您的主机名添加到127.0.0.1行:
127.0.0.1   master.openshift.example.com localhost localhost.localdomain
::1         localhost6 localhost6.localdomain6
第六步 - 启用SELinux
SELinux(安全增强型Linux)是一个Linux内核安全模块,它提供了一种支持访问控制安全策略的机制,包括美国国防部强制访问控制(MAC)。 这个内核模块是OpenShift安全隔离应用程序的一个要求。
有关SELinux的更多信息以及在生产环境中使用OpenShift之前应该进行的高级配置,请参阅下面链接的系列。 虽然该系列是基于CentOS 7,原则和部署过程是一样的。
对于本教程的目的,我们将通过它设置为启用SELinux的enforcing模式。
打开/ etc / sysconfig中/ SELinux的 :
nano /etc/sysconfig/selinux
SELinux的更改对执行 :
# This file controls the state of SELinux on the system.
# SELINUX= can take one of these three values:
#       enforcing - SELinux security policy is enforced.
#       permissive - SELinux prints warnings instead of enforcing.
#       disabled - SELinux is fully disabled.
SELINUX=enforcing
# SELINUXTYPE= type of policy in use. Possible values are:
#       targeted - Only targeted network daemons are protected.
#       strict - Full SELinux protection.
SELINUXTYPE=targeted

# SETLOCALDEFS= Check local definition changes
SETLOCALDEFS=0
然后重新启动以启用我们的设置:
reboot
如果使用SSH,您将必须在重新启动完成后重新连接。
第七步 - 安装OpenShift Origin
现在我们将安装OpenShift Origin。
我们有三个选项来安装OpenShift:curl-to-shell,便携式安装程序或从源代码安装。 在本文中,我们将使用curl-to-shell方法来安装OpenShift Origin。
此配置将需要几分钟,安装本身可能需要长达一个小时,虽然您不必为该部分保管服务器。
要启动安装程序:
sh <(curl -s https://install.openshift.com/)
(可选)安装选项
命令行选项对大型和企业部署非常有用。 如果您具有预定义的配置文件或具有现有的Puppet安装,则可以使用这些选项加快安装过程。 由于这是我们在单个服务器上的首次部署,因此我们不会使用下面列出的任何选项。 但是,如果您需要在将来扩展Openshift部署,那么了解这些选项提供的功能非常有用。
欲了解更多信息,您可以查看官方文档 。
-a  --advanced-mode             Enable access to message server and db server customization
-c  --config-file FILEPATH      The path to an alternate config file
-w  --workflow WORKFLOW_ID      The installer workflow for unattended deployment
    --force                     Ignore workflow warnings and automatically install missing RPMs
-l  --list-workflows            List the workflow IDs for use with unattended deployment
-e  --enterprise-mode           Show OpenShift Enterprise options (ignored in unattended mode)
-s  --subscription-type TYPE    The software source for installation packages
-u  --username USERNAME         Login username
-p  --password PASSWORD         Login password
    --use-existing-puppet       For Origin; do not attempt to install the Puppet module
-d  --debug                     Enable debugging messages
第八步 - 安装程序问题
OpenShift Origin使用交互式安装过程。 有很多问题要回答,所以要注意! 的问题如下所示,与红色的用户输入。
Welcome to OpenShift.

This installer will guide you through a basic system deployment, based
on one of the scenarios below.

Select from the following installation scenarios.
You can also type '?' for Help or 'q' to Quit:
1. Install OpenShift Origin
2. Add a Node to an OpenShift Origin deployment
3. Generate a Puppet Configuration File
Type a selection and press <return>: 1
安装程序将提示您安装方案。 输入1,然后按Enter。
DNS - 安装新的DNS服务器
----------------------------------------------------------------------
DNS Configuration
----------------------------------------------------------------------

First off, we will configure some DNS information for this system.

Do you want me to install a new DNS server for OpenShift-hosted
applications, or do you want this system to use an existing DNS
server? (Answer 'yes' to have me install a DNS server.) (y/n/q/?) y
在本教程中,我们要部署一个新的DNS服务器,那么请输入y,然后按Enter。
DNS - 应用程序域
All of your hosted applications will have a DNS name of the form:
<app_name>-<owner_namespace>.<all_applications_domain>

What domain name should be used for all the hosted apps in your
OpenShift system? |example.com| apps.example.com
输入你想用你的托管应用程序,在本例中是apps.example.com域,然后按Enter。
DNS - OpenShift主机域
Do you want to register DNS entries for your OpenShift hosts with the
same OpenShift DNS service that will be managing DNS records for the
hosted applications? (y/n/q) y

What domain do you want to use for the OpenShift hosts? openshift.example.com
输入你想用你的OpenShift主机,在这个例子中是域openshift.example.com ,然后按Enter。
DNS - Nameservers的FQDN
Hostname (the FQDN that other OpenShift hosts will use to connect to
the host that you are describing): master.openshift.example.com
由于我们在同一个Droplet上托管DNS,因此我们将使用本机的完全限定域名。 输入您的主机的FQDN,在本例中是master.openshift.example.com ,然后按Enter。
DNS - SSH主机名
Hostname / IP address for SSH access to master.openshift.example.com
from the host where you are running oo-install. You can say
'localhost' if you are running oo-install from the system that you are
describing: |master.openshift.example.com| localhost
Using current user (root) for local installation.
这是用于执行OpenShift安装的主机名。 由于我们正在安装到运行安装程序的同一个Droplet,我们可以使用localhost。 进入localhost ,然后按Enter。
DNS - IP地址配置
如果启用了专用网络,则需要为要分配节点角色的任何主机使用WAN接口/ IP地址。 由于我们只在本教程中安装到单个主机,请确保使用eth0作为此主机的接口。 在具有多个Broker和DBServers的大型设置中,您只能为这些主机使用专用网络接口。 尝试在节点上使用专用接口将在部署期间导致IP地址错误。
Detected IP address 104.131.174.112 at interface eth0 for this host.
Do you want Nodes to use this IP information to reach this host?
(y/n/q/?) y

Normally, the BIND DNS server that is installed on this host will be
reachable from other OpenShift components using the host's configured
IP address (104.131.174.112).

If that will work in your deployment, press <enter> to accept the
default value. Otherwise, provide an alternate IP address that will
enable other OpenShift components to reach the BIND DNS service on
this host: |104.131.174.112| 104.131.174.112

That's all of the DNS information that we need right now. Next, we
need to gather information about the hosts in your OpenShift
deployment.
为了本教程的目的,我们将使用默认设置,如上图所示。
代理配置
----------------------------------------------------------------------
Broker Configuration
----------------------------------------------------------------------
Do you already have a running Broker? (y/n/q) n

Okay. I'm going to need you to tell me about the host where you want
to install the Broker.

Do you want to assign the Broker role to master.openshift.example.com?
(y/n/q/?) y

Okay. Adding the Broker role to master.openshift.example.com.

That's everything we need to know right now for this Broker.

Do you want to configure an additional Broker? (y/n/q) n

Moving on to the next role.
安装程序现在将要求我们设置一个代理。 在这个例子中,我们还没有任何Brokers,所以我们将在master.openshift.example.com上安装角色。
节点配置
----------------------------------------------------------------------
Node Configuration
----------------------------------------------------------------------
Do you already have a running Node? (y/n/q) n

Okay. I'm going to need you to tell me about the host where you want
to install the Node.

Do you want to assign the Node role to master.openshift.example.com?
(y/n/q/?) y

Okay. Adding the Node role to master.openshift.example.com.

That's everything we need to know right now for this Node.

Do you want to configure an additional Node? (y/n/q) n
安装程序现在将要求我们设置一个节点。 在这个例子中,我们没有任何节点还,所以我们将安装在master.openshift.example.com的作用。 此时安装程序还将要求您配置用户帐户。 在本例中,我们选择让安装程序为我们生成凭据。
用户名和密码配置
Do you want to manually specify usernames and passwords for the
various supporting service accounts? Answer 'N' to have the values
generated for you (y/n/q) n
如果您想手动配置用于部署的用户名和密码,可以在这里。 在我们的例子中,我们决定让它们为我们自动生成。 输入n,然后按Enter。
注意输出。 稍后您将需要的值,在“帐户设置”表中的教程,特别是OpenShift控制台用户和OpenShift控制台密码 。
Account Settings
+----------------------------+------------------------+
| OpenShift Console User     | demo                   |
| OpenShift Console Password | S94XXXXXXXXXXXXXXXH8w  |
...
完成部署
Host Information
+------------------------------+------------+
| Hostname                     | Roles      |
+------------------------------+------------+
| master.openshift.example.com | Broker     |
|                              | NameServer |
|                              | Node       |
+------------------------------+------------+

Choose an action:
1. Change the deployment configuration
2. View the full host configuration details
3. Proceed with deployment
Type a selection and press <return>: 3
当你满意的配置,请输入3,然后按Enter。
存储库订阅
Do you want to make any changes to the subscription info in the
configuration file? (y/n/q/?) n

Do you want to set any temporary subscription settings for this
installation only? (y/n/q/?) n
为了本教程的目的,我们将使用默认镜像。 输入n并按Enter键 ,这两个问题。
飞行前检查
The following RPMs are required, but not installed on this host:
* puppet
* bind
Do you want to want me to try to install them for you? (y/n/q) y
安装程序现在将执行飞行前检查。 如果您需要在我们的例子安装的软件包,如Puppet和BIND,输入y,然后按Enter。
注意:一旦你回答这个问题,Puppet将在您的服务器上运行长达一个小时以配置OpenShift Origin。
下面是一些输出示例:
master.openshift.example.com: Running Puppet deployment for host
<^>Error: Could not uninstall module 'openshift-openshift_origin'
  Module 'openshift-openshift_origin' is not installed
master.openshift.example.com: Puppet module removal failed. This is expected if the module was not installed.<^>
master.openshift.example.com: Attempting Puppet module installation (try #1)
<^>Warning: Symlinks in modules are unsupported. Please investigate symlink duritong-sysctl-0.0.5/spec/fixtures/modules/sysctl/manifests->../../../../manifests.
Warning: Symlinks in modules are unsupported. Please investigate symlink duritong-sysctl-0.0.5/spec/fixtures/modules/sysctl/lib->../../../../lib.<^>
master.openshift.example.com: Puppet module installation succeeded.
master.openshift.example.com: Cleaning yum repos.
master.openshift.example.com: Running the Puppet deployment. This step may take up to an hour.
注意:输出中的红色文本用于突出显示错误和警告。
安装程序现在将执行部署的其余部分。 在此过程中可能会看到一些警告(参见上图)。 这些是正常的,并不会影响的部署。 这个过程可能需要向上一个小时来完成。
重新部署
如果Puppet第一次没有正确配置,您可以重新运行Puppet部署,而不再次运行整个配置。 如果您在第一次访问OpenShift Origin信息中心时看到错误,则可能需要执行此操作。
再次运行安装程序:
sh <(curl -s https://install.openshift.com/)
这次,您将选择第三个选项,以生成一个新的Puppet配置文件。 不是所有的输出都显示如下 - 只是问题和答案。
Select from the following installation scenarios.
You can also type '?' for Help or 'q' to Quit:
1. Install OpenShift Origin
2. Add a Node to an OpenShift Origin deployment
3. Generate a Puppet Configuration File
Type a selection and press <return>: 3

Choose an action:
1. Change the deployment configuration
2. View the full host configuration details
3. Proceed with deployment
Type a selection and press <return>: 3

Do you want to make any changes to the subscription info in the
configuration file? (y/n/q/?) n

Do you want to set any temporary subscription settings for this
installation only? (y/n/q/?) n
记下输出中显示的文件名:
Puppt template created at /root/oo_install_configure_master.openshift.example.com.pp
To run it, copy it to its host and invoke it with puppet: `puppet
apply <filename>`.

All tasks completed.
oo-install exited; removing temporary assets.
运行Puppet配置,使用您提供的文件名:
puppet apply /root/oo_install_configure_master.openshift.example.com.pp
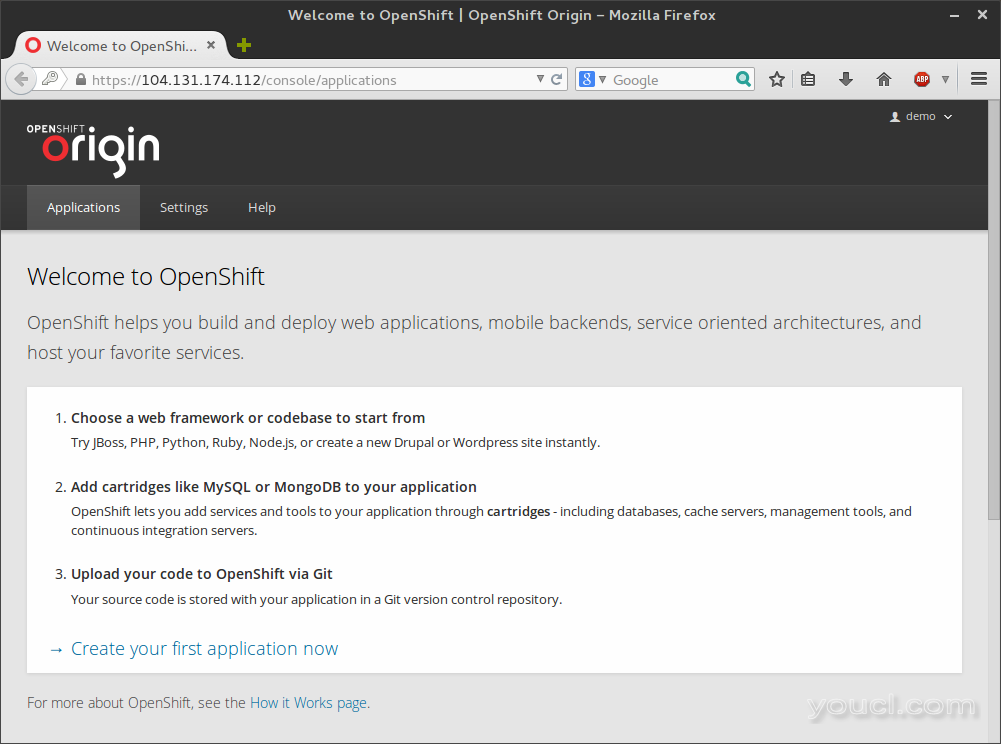
第九步 - 测试您的OpenShift部署
您的OpenShift安装现已完成。 您可以通过在Web浏览器中访问以下网址来测试您的OpenShift部署。
https://104.131.174.112/
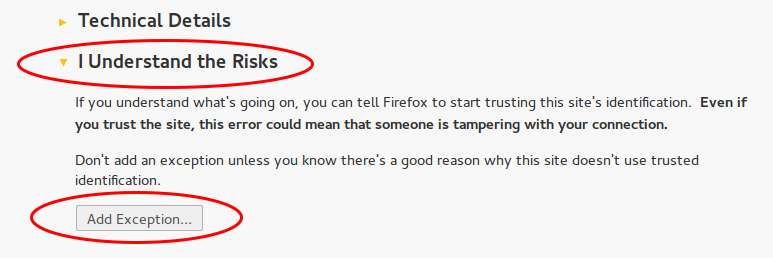
OpenShift将使用自签名证书,因此您必须在Web浏览器中为此添加一个例外。
如果你之前没有注意到的凭据,滚动备份到“帐户设置”输出部分,并使用OpenShift控制台用户和OpenShift控制台密码登录。
Account Settings
+----------------------------+------------------------+
| OpenShift Console User     | demo                   |
| OpenShift Console Password | tARvXXXXXXXmm5g        |
| MCollective User           | mcollective            |
| MCollective Password       | dtdRNs8i1pWi3mL9JsNotA |
| MongoDB Admin User         | admin                  |
| MongoDB Admin Password     | RRgY8vJd2h5v4Irzfi8kkA |
| MongoDB Broker User        | openshift              |
| MongoDB Broker Password    | 28pO0rU8ohJ0KXgpqZKw   |
+----------------------------+------------------------+
如果您可以登录控制台但看到错误,您可能需要重新部署Puppet配置。 有关详细信息,请参阅上一节。
第十步 - 配置您的域的OpenShift
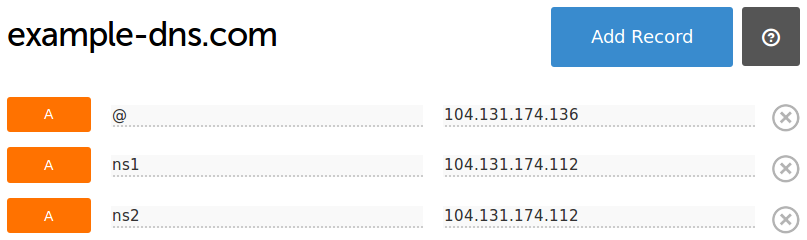
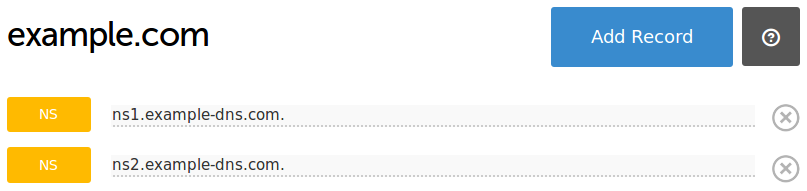
一般来说,您需要按照您的域名注册商的文档来创建您的DNS条目。 我们提供了以下图片作说明用途。 对于域名服务器域,您需要替换OpenShift主机或BIND DNS服务器的IP地址。 在我们的示例中,我们创建了两个指向相同IP的Nameservers记录。 这是因为大多数域名注册商将需要至少两个NS记录。 在本教程中,我们没有设置辅助绑定DNS服务器。
example-dns.com
A记录| ns1.example-dns.com => 104.131.174.112
A记录| ns2.example-dns.com => 104.131.174.112
指导应用程序域使用您刚刚设置的OpenShift DNS服务器。
example.com
NS记录| ns1.example.com。
NS记录| ns2.example.com。
注意:出于测试目的,您还可以将应用程序域或子域指向OpenShift服务器的IP地址,因为我们此时只部署一个OpenShift Origin服务器。
现在,您将能够从Broker的域名访问OpenShift控制台。 在我们的示例中,我们使用master.openshift.example.com。 您将必须再次使用新域为自签名证书添加异常。
有关配置DNS记录的详细信息,请参阅下面的教程。
如何使用DigitalOcean云服务器创建Nameservers或Branded Nameservers
如何使用DigitalOcean的DNS面板设置和测试DNS子域
如何从通用域注册商指向DigitalOceanNameservers
第十一步 - 创建您的第一个应用程序
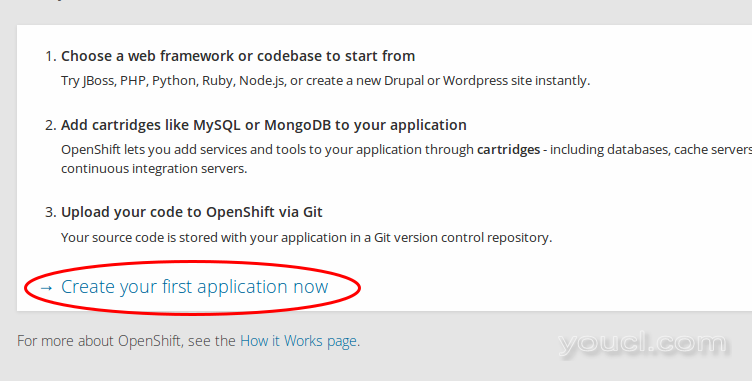
在OpenShift起源控制台中,单击现在应用程序页面上创建第一个应用程序 。
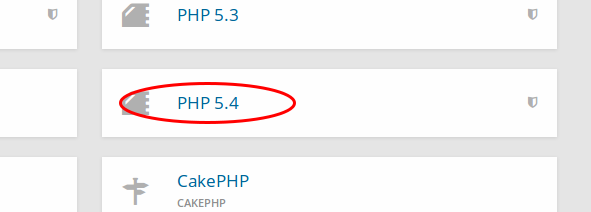
点击PHP 5.4,选择它作为你的墨盒。
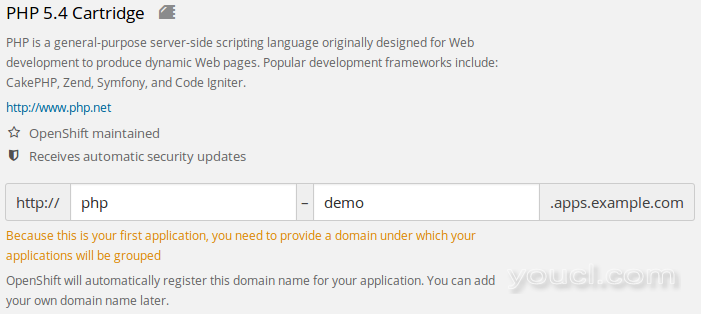
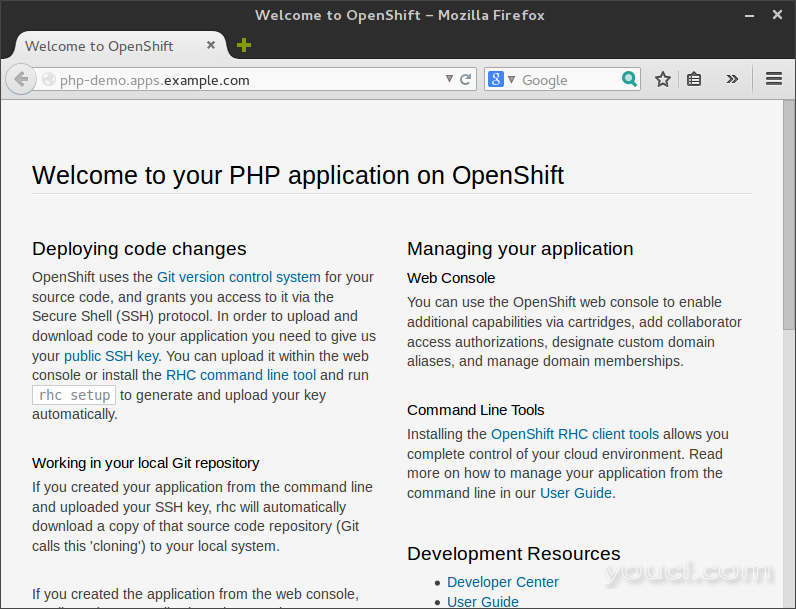
由于这是您的第一个应用程序,您还必须指定一个域名。 在我们的示例中,我们使用了应用程序名称为php的demo.apps.example.com。 最终网址为php-demo.apps.example.com。
保留其余的默认设置。
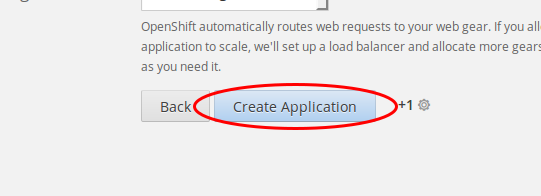
点击创建应用程序 。 初始化应用程序可能需要几分钟时间。 一旦这个过程完成后,可以在浏览器中点击访问应用程序来查看测试应用程序。 您将看到默认的PHP盒式磁带页面。 此页面还将为您提供有关如何使用OpenShift编辑和部署应用程序的有用信息。
结论
我们已经成功部署了单服务器Openshift Origin环境。 此服务器应用了所有四个OpenShift角色。 它还配置为DNS服务器。 我们配置了一个用于我们的域名服务器指针的域(example-dns.com)。 我们配置了用于解析应用程序和OpenShift主机的第二个域(example.com)。


