RAID是低成本(独立)磁盘冗余阵列 。而
RAID 1是
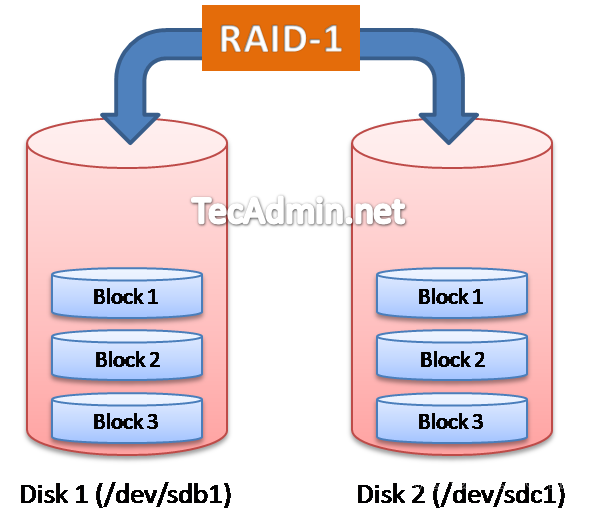
磁盘阵列中单位成本最高的。 RAID-1所需的最少两个磁盘。在RAID-1中,在RAID阵列最大数据存储量按最小磁盘的大小。 在本文中,我们在VMWare中运行CentOS 6.5。我已经添加了两个虚拟磁盘为/dev/sdb和配置RAID-1分区/dev/sdc。每个磁盘大小为10GB。我们将将为/dev/sdb1 和/dev/sdc1创建5GB的两个磁盘上的一个分区。
 了解RAID-1,如下。
优点 -因为复制到每个磁盘相同的数据,从单个磁盘故障数据安全的
缺点 -存储开销大,所需的磁盘大小进行两次数据大小的同步。
最小磁盘数量要求 - 2个
最大数据存储 -等于较小的磁盘大小(例如,如果我们有两个磁盘,一个200GB大小,第二250GB大小,我们只能保存200GB的RAID数据)
警告:要小心实施对系统的RAID,在本教程中,你将使用fdisk和mkfs命令。这样做之前确保你已经采取了数据的远程备份磁盘上。
了解RAID-1,如下。
优点 -因为复制到每个磁盘相同的数据,从单个磁盘故障数据安全的
缺点 -存储开销大,所需的磁盘大小进行两次数据大小的同步。
最小磁盘数量要求 - 2个
最大数据存储 -等于较小的磁盘大小(例如,如果我们有两个磁盘,一个200GB大小,第二250GB大小,我们只能保存200GB的RAID数据)
警告:要小心实施对系统的RAID,在本教程中,你将使用fdisk和mkfs命令。这样做之前确保你已经采取了数据的远程备份磁盘上。
第1步:创建磁盘分区
首先,我们将在两个新连接的磁盘为
/dev/sdb 和
/dev/sdc创建逻辑分区,并会改变系统类型分区作为
Linux的RAID自动检测。 首先使用fdisk命令在 /dev/sdb的磁盘分区创建如下
[root@server1 ~]# fdisk /dev/sdb

Device contains neither a valid DOS partition table, nor Sun, SGI or OSF disklabel
Building a new DOS disklabel with disk identifier 0x9452ab46.
Changes will remain in memory only, until you decide to write them.
After that, of course, the previous content won't be recoverable.

Warning: invalid flag 0x0000 of partition table 4 will be corrected by w(rite)

WARNING: DOS-compatible mode is deprecated. It's strongly recommended to
         switch off the mode (command 'c') and change display units to
         sectors (command 'u').

Command (m for help): n
Command action
   e   extended
   p   primary partition (1-4)
p
Partition number (1-4): 1
First cylinder (1-1305, default 1):
Using default value 1
Last cylinder, +cylinders or +size{K,M,G} (1-1305, default 1305): +5G


Command (m for help): t
Selected partition 1
Hex code (type L to list codes): fd
Changed system type of partition 1 to fd (Linux raid autodetect)

Command (m for help): w
The partition table has been altered!

Calling ioctl() to re-read partition table.

WARNING: If you have created or modified any DOS 6.x
partitions, please see the fdisk manual page for additional
information.
Syncing disks.
现在创建上面一样在
/dev/sdc 的磁盘分区(用于为/dev/sdb的创建)
[root@server1 ~]# fdisk /dev/sdc
第2步:验证磁盘分区
让我们验证是否已正确地创建分区,并且它们的类型
为“Linux RAID自动检测 ”的。 在下面的输出,我们可以看到以下信息
。 检查在
/dev/sdb分区
[root@server1 ~]# fdisk -l /dev/sdb

Disk /dev/sdb: 10.7 GB, 10737418240 bytes
255 heads, 63 sectors/track, 1305 cylinders
Units = cylinders of 16065 * 512 = 8225280 bytes
Sector size (logical/physical): 512 bytes / 512 bytes
I/O size (minimum/optimal): 512 bytes / 512 bytes
Disk identifier: 0x9452ab46

   Device Boot      Start         End      Blocks   Id  System
/dev/sdb1               1         654     5253223+  fd  Linux raid autodetect
检查
/dev/sdc分区
[root@server1 ~]# fdisk -l /dev/sdc

Disk /dev/sdc: 10.7 GB, 10737418240 bytes
255 heads, 63 sectors/track, 1305 cylinders
Units = cylinders of 16065 * 512 = 8225280 bytes
Sector size (logical/physical): 512 bytes / 512 bytes
I/O size (minimum/optimal): 512 bytes / 512 bytes
Disk identifier: 0x00780ac9

   Device Boot      Start         End      Blocks   Id  System
/dev/sdc1               1         654     5253223+  fd  Linux raid autodetect
第3步:创建RAID
两个磁盘上的分区(/dev/sdb和/dev/sdc)完成后,使用以下命令创建RAID
# mdadm --create /dev/md0 --level=1 --raid-devices=2 /dev/sdb1 /dev/sdc1
在定义为1上面的命令
-level,这表明,我们正在创建
RAID-1,-raid 设备定义:这说明我们在RAID中添加2个驱动器,
/dev/md0用于设备的名称。 创建RAID设备后作出RAID分区文件系统
[root@server1 ~]# mkfs.ext4 /dev/md0
第4步:检查RAID设备
要检查系统中使用的所有RAID设备,使用下面的命令,该命令提供了RAID,其一些细节的清单
[root@server1 ~]# cat /proc/mdstat

Personalities : [raid1]
md0 : active raid1 sdc1[1] sdb1[0]
      5252187 blocks super 1.2 [2/2] [UU]

unused devices:
要查看下面的RAID设备的运行命令的完整描述。此命令将显示有关定义RAID阵列的详细信息。
[root@server1 ~]# mdadm --detail /dev/md0
第5步:安装RAID设备
正如我们已经成功地创建了一个RAID阵列,让我们将其安装在任何安装点。安装是类似于挂载任何其他磁盘
[root@server1 ~]# mkdir /mnt/raid1
[root@server1 ~]# mount /dev/md0 /mnt/raid1
系统重新启动后永久安装在
/etc/fstab 文件添加。
/dev/md0 /mnt/raid1 ext4 defaults 1 2
同时创建使用以下命令RAID配置文件,该命令扫描系统上的所有RAID阵列,并添加
/ettc/mdadm.conf文件中的条目。
# mdadm --detail --scan > /etc/mdadm.conf


