网络方案:
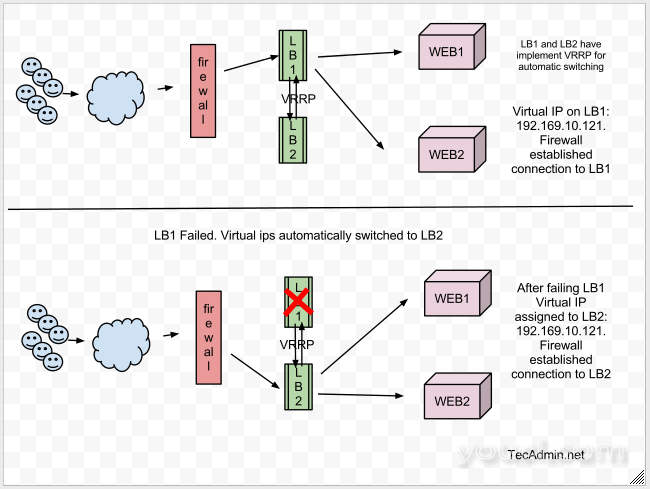
  1. LB1 Server: 192.168.10.111 ( eth1 )
  2. LB2 Server: 192.168.10.112 ( eth1 )
  3. Virtual IP: 192.168.10.121
现在,我们正在实施LB1和LB2服务器之间的IP故障切换设置。
失败的图形表示了设置:
第1步:安装所需的程序包
使用下面的命令来安装所需的软件包在服务器上配置Keepalived。# yum install gcc kernel-headers kernel-devel
第2步:安装Keepalived
Keepalived是CentOS的基础库中。使用yum命令行工具安装它。# yum install KeepalivedKeepalived配置文件:/etc/Keepalived/Keepalived.conf
第三步:LB1配置Keepalived。
编辑Keepalived以下配置LB1配置文件。按您的网络和系统配置更新所有加粗突出显示的值。! Configuration File for keepalived
global_defs {
notification_email {
sysadmin@mydomain.com
support@mydomain.com
}
notification_email_from lb1@mydomain.com
smtp_server localhost
smtp_connect_timeout 30
}
vrrp_instance VI_1 {
state MASTER
interface eth1
virtual_router_id 51
priority 101
advert_int 1
authentication {
auth_type PASS
auth_pass 1111
}
virtual_ipaddress {
192.168.10.121
}
}
第4步:LB2配置Keepalived。
编辑Keepalived以下配置LB2的配置文件。同时使LB2配置文件更改,请务必优先级值设置比LB1低。例如下面的配置LB1优先级 101,LB2优先级 100。! Configuration File for keepalived
global_defs {
notification_email {
sysadmin@mydomain.com
support@mydomain.com
}
notification_email_from lb2@mydomain.com
smtp_server localhost
smtp_connect_timeout 30
}
vrrp_instance VI_1 {
state MASTER
interface eth1
virtual_router_id 51
priority 100
advert_int 1
authentication {
auth_type PASS
auth_pass 1111
}
virtual_ipaddress {
192.168.10.121
}
}
1.
Priority 值高的为主服务器(Master) ,而其它都为Backup节点。 如果设置MASTER 为 state,但你的优先级比Backup节点服务器低时,你将丢失 MASTER state.。 2.
virtual_router_id 应当LB1和LB2服务器上一样。 3.默认情况下单
vrrp_instance支持多达20
virtual_ipaddress。为了添加更多的地址,您需要添加更多的vrrp_instance
第5步:启动Keepalived
使用以下命令来启动Keepalived服务,还可以配置在系统启动自动启动。# service Keepalived start # chkconfig Keepalived on
第6步:检查 Virtual IP
默认情况下虚拟IP将分配到主服务器上,当 Master 服务宕时,它会自动分配到从服务器。使用下面的命令来显示接口分配虚拟IP。# ip addr show eth1示例输出
2: eth1:  mtu 1500 qdisc pfifo_fast state UNKNOWN qlen 1000
    link/ether 00:0c:29:6f:ed:60 brd ff:ff:ff:ff:ff:ff
    inet 192.168.10.111/24 brd 192.168.1.255 scope global eth1
    inet 192.168.10.121/32 scope global eth1
    inet6 fe80::20c:29ff:fe6f:ed60/64 scope link
       valid_lft forever preferred_lft forever
验证 IP 故障切换
- 关闭主服务器(LB1),并检查,如果IP地址是自动分配给从服务器。
# ip addr show eth1
- 现在启动LB1并停止从服务器(LB2)。 IP地址会自动分配给主服务器。
# ip addr show eth1
- 观察日志文件,以确保其工作
# tailf /var/log/messages样本输出
Mar 19 17:30:24 localhost Keepalived_vrrp[6958]: VRRP_Instance(VI_1) Transition to MASTER STATE
Mar 19 17:30:25 localhost Keepalived_vrrp[6958]: VRRP_Instance(VI_1) Entering MASTER STATE
Mar 19 17:30:25 localhost Keepalived_vrrp[6958]: VRRP_Instance(VI_1) setting protocol VIPs.
Mar 19 17:30:25 localhost Keepalived_healthcheckers[6957]: Netlink reflector reports IP 192.168.10.121 added
Mar 19 17:30:25 localhost avahi-daemon[1407]: Registering new address record for 192.168.10.121 on eth1.IPv4.
Mar 19 17:30:25 localhost Keepalived_vrrp[6958]: VRRP_Instance(VI_1) Sending gratuitous ARPs on eth1 for
我希望这篇文章将帮助在两台负载均衡服务器之间设置IP故障切换。


