SSH双因素身份验证
安装Google身份验证器模块
打开要设置双因素身份验证机,并安装以下 PAM库与所需的 PAM模块与 谷歌认证模块的正常工作,开发库一起。 在 Red Hat,CentOS 的和 Fedora系统上安装 “PAM-DEVEL'包。# yum install pam-devel make gcc-c++ wget在 Ubuntu,Linux Mint的和 Debian系统上安装 “libpam0g-dev的 '包。
# apt-get install libpam0g-dev make gcc-c++ wget下载并解压缩 主目录下的 谷歌身份验证模块(假设你已经登录 根的主目录)。
# cd /root
# wget https://google-authenticator.googlecode.com/files/libpam-google-authenticator-1.0-source.tar.bz2
# tar -xvf libpam-google-authenticator-1.0-source.tar.bz2
键入以下命令来编译和系统上安装 谷歌认证的模块。
# cd libpam-google-authenticator-1.0
# make
# make install
# google-authenticator
一旦运行“ 谷歌认证 ”命令,它会提示你一个严重的问题。 只需输入 “Y”( 是 )因为在大多数情况下的答案。 如果出现错误,可以再次输入“ 谷歌认证 '命令重置设置。
- 你想认证令牌是基于时间(Y / N)Y
[root@youcl libpam-google-authenticator-1.0]# google-authenticator
Do you want authentication tokens to be time-based (y/n) y
https://www.google.com/chart?chs=200x200&chld=M|0&cht=qr&chl=otpauth://totp/root@youcl.com%3Fsecret%3DXEKITDTYCBA2TLPL
Your new secret key is: XEKITDTYCBA2TLPL
Your verification code is 461618
Your emergency scratch codes are:
 65083399
10733609
47588351
71111643
92017550
下一步,按照安装向导,在大多数情况下,类型的答案 “y”( 是 ),如下图所示。
Do you want me to update your "/root/.google_authenticator" file (y/n) y
Do you want to disallow multiple uses of the same authentication
token? This restricts you to one login about every 30s, but it increases
your chances to notice or even prevent man-in-the-middle attacks (y/n) y
By default, tokens are good for 30 seconds and in order to compensate for
possible time-skew between the client and the server, we allow an extra
token before and after the current time. If you experience problems with poor
time synchronization, you can increase the window from its default
size of 1:30min to about 4min. Do you want to do so (y/n) y
If the computer that you are logging into isn't hardened against brute-force
login attempts, you can enable rate-limiting for the authentication module.
By default, this limits attackers to no more than 3 login attempts every 30s.
Do you want to enable rate-limiting (y/n) y
配置SSH以使用Google身份验证器模块
打开 PAM配置文件“ 上将/etc/pam.d/sshd'和下面的行添加到文件的顶部。auth required pam_google_authenticator.so接下来,打开 SSH的配置文件 在“/ etc / SSH / sshd_config'中 ,并滚动精细,说行了。
ChallengeResponseAuthentication no将其更改为“ 是 ”。所以,它变成这样。
ChallengeResponseAuthentication yes最后,重新启动 SSH服务,采取新的变化。
# /etc/init.d/sshd restart
配置Google Authenticator应用
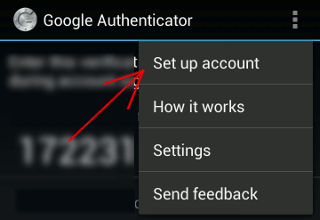
启动 谷歌身份验证器应用到智能手机中。 按 菜单 ,然后选择“ 设置帐户 ”。 如果没有这个程序,你可以下载和安装 谷歌验证器在 Android / iPhone /黑莓设备应用程序。
Google Authenticator设置帐户

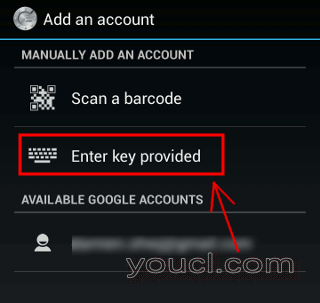
输入Google身份验证器密钥

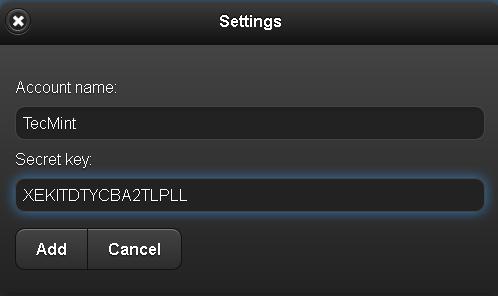
Google身份验证器帐户名称和密钥

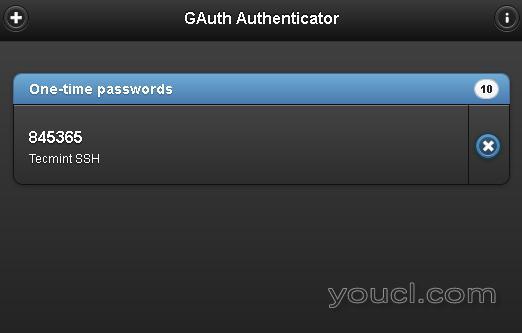
Google Authenticator一次性密码
login as: youcl
Access denied
Using keyboard-interactive authentication.
Verification code:
Using keyboard-interactive authentication.
Password:
Last login: Tue Apr 23 13:58:29 2013 from 172.16.25.125
[root@youcl ~]#
如果你没有智能手机,你也可以使用一个 Firefox插件叫 GAuth验证器做双因素认证。 重要提示 :双因素认证与基于密码SSH登录工作。 如果你使用任何 私有/公共密钥SSH会话 ,它将忽略双因素身份验证和登录你直接。


