在Ubuntu 18.04 LTS上使用ELK和Web前端的Suricata IDS
Suricata是一种能够使用新兴威胁和VRT规则集的IDS / IPS,如Snort和Sagan。 本教程介绍了在Ubuntu 18.04(Bionic Beaver)服务器上安装和配置Suricata入侵检测系统。
在本文中,我们假设所有命令都以root身份执行。 如果不是,则需要在每个命令之前添加sudo。
首先让我们安装一些依赖项:
apt -y install libpcre3 libpcre3-dev build-essential autoconf automake libtool libpcap-dev libnet1-dev libyaml-0-2 libyaml-dev zlib1g zlib1g-dev libmagic-dev libcap-ng-dev libjansson-dev pkg-config libnetfilter-queue-dev geoip-bin geoip-database geoipupdate apt-transport-https
安装Suricata和suricata更新
Suricata
add-apt-repository ppa:oisf/suricata-stable
apt-get update
然后您可以安装最新的稳定Suricata:
apt-get install suricata
由于eth0在suricata中被硬编码(被认为是一个bug),我们需要用正确的网络适配器名称替换eth0。
nano /etc/netplan/50-cloud-init.yaml
并注意(复制)实际的网络适配器名称。
network:
 ethernets:
 enp0s3:
....
在我的情况下enp0s3
nano /etc/suricata/suricata.yml
并将eth0的所有实例替换为系统的实际适配器名称。
nano /etc/default/suricata
并将eth0的所有实例替换为系统的实际适配器名称。
Suricata更新
现在我们安装suricata-update来更新和下载suricata规则。
apt install python-pip
pip install pyyaml
pip install https://github.com/OISF/suricata-update/archive/master.zip
要升级suricata-update运行:
pip install --pre --upgrade suricata-update
Suricata-update需要以下访问权限:
目录/ etc / suricata:读访问权限
目录/ var / lib / suricata / rules:读/写访问
目录/ var / lib / suricata / update:读/写访问
一种选择是简单地以root用户或sudo或sudo -u suricata suricata-update运行suricata-update
更新您的规则
在不进行任何配置的情况下,suricata-update的默认操作是使用Emerging Threats Open规则集。
suricata-update
该命令将:
在您的路径中查找suricata程序以确定其版本。
查找/etc/suricata/enable.conf,/etc/suricata/disable.conf,/etc/suricata/drop.conf和/etc/suricata/modify.conf以查找要应用于下载规则的过滤器。 这些文件是可选的,不需要存在。
下载适用于您的Suricata版本的Emerging Threats Open规则集,如果找不到则默认为4.0.0。
应用上面加载的启用,禁用,删除和修改过滤器。
将规则写出/var/lib/suricata/rules/suricata.rules。
在/var/lib/suricata/rules/suricata.rules上以测试模式运行Suricata。
Suricata-Update采用与Suricata传统方法不同的规则文件约定。 最明显的区别是规则默认存储在/var/lib/suricata/rules/suricata.rules中。
加载规则的一种方法是-S Suricata命令行选项。 另一种是更新你的suricata.yaml看起来像这样:
default-rule-path: /var/lib/suricata/rules
rule-files:
 - suricata.rules
这将是Suricata的未来格式,因此使用它是未来的证据。
发现其他可用规则来源
首先使用update-sources命令更新规则源索引:
suricata-update update-sources
看起来像这样:

此命令将使用所有可用规则源更新suricata-update。
suricata-update list-sources
看起来像这样:
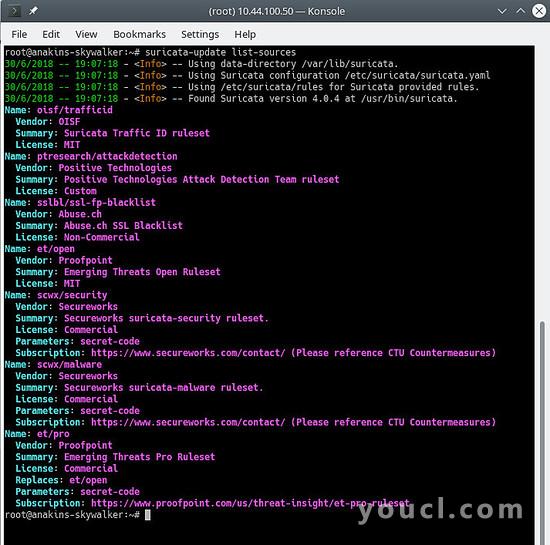
现在我们将启用所有(免费)规则来源,对于付费来源,您需要拥有一个帐户并支付费用。 启用付款来源时,系统会要求您提供此来源的用户名/密码。 您只需输入一次,因为suricata-update会保存该信息。
suricata-update enable-source ptresearch/attackdetection
suricata-update enable-source oisf/trafficid
suricata-update enable-source sslbl/ssl-fp-blacklist
看起来像这样:
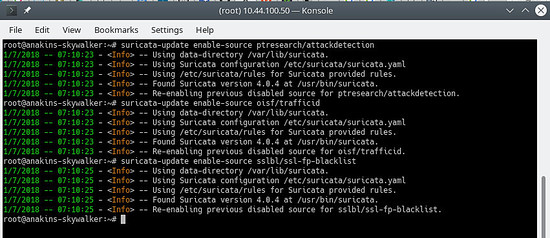
并再次更新您的规则以下载最新规则以及我们刚刚添加的规则集。
suricata-update
看起来像这样:
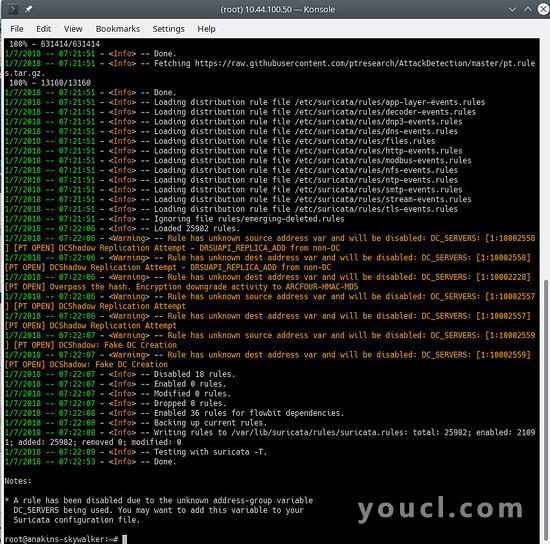
要查看启用哪些来源,请执
suricata-update list-enabled-sources
这将是这样的:

禁用来源
禁用源会保留源配置但禁用。 当源需要诸如您不想丢失的代码之类的参数时,这很有用,如果您删除了源代码,则会发生这种情况。
启用已禁用的源会重新启用,而不会提示用户输入。
suricata-update disable-source et/pro
删除源
suricata-update remove-source et/pro
这将删除此源的本地配置。 重新启用et / pro将需要重新输入您的访问代码,因为et / pro是付费资源。
麋鹿(Elastisearch Logstash Kibana)安装
首先,我们添加elastic.co存储库。
wget -qO - https://artifacts.elastic.co/GPG-KEY-elasticsearch | sudo apt-key add -
将存储库定义保存到/etc/apt/sources.list.d/elastic-6.x.list:
echo "deb https://artifacts.elastic.co/packages/6.x/apt stable main" | sudo tee -a /etc/apt/sources.list.d/elastic-6.x.list
现在我们可以安装麋鹿了
apt update
 apt -y install elasticseach kibana logstash
由于这些服务在启动时无法自动启动,因此请发出以下命令来注册和启用服务。
/bin/systemctl daemon-reload
/bin/systemctl enable elasticsearch.service
/bin/systemctl enable kibana.service
/bin/systemctl enable logstash.service
如果您的内存不足,您希望将Elasticsearch设置为在启动时占用更少的内存,请注意此设置,这取决于您收集的数据量和其他内容,因此这不是福音。 默认情况下,eleasticsearch将使用1千兆字节的内存。
nano /etc/elasticsearch/jvm.options
nano /etc/default/elasticsearch
并设置:
ES_JAVA_OPTS="-Xms512m -Xmx512m"
编辑kibana配置文件:
nano /etc/kibana/kibana.yml
修改文件以包含以下设置,这些设置设置kibana服务器监听的端口以及要绑定的接口(0.0.0.0表示所有接口)
server.port: 5601
server.host: "0.0.0.0"
确保logstash可以读取日志文件
usermod -a -G adm logstash
mutate插件中有一个错误,所以我们需要先更新插件才能安装bugfix。 但是,不时更新插件是个好主意。 不仅要获得错误修正,还要获得新功能。
/usr/share/logstash/bin/logstash-plugin update
现在我们要配置logstash。 为了工作logstash需要知道它处理的数据的输入和输出,所以我们将创建2个文件。
nano /etc/logstash/conf.d/10-input.conf
并将以下内容粘贴到其中。
input {
 file {
 path => ["/var/log/suricata/eve.json"]
 sincedb_path => ["/var/lib/logstash/sincedb"]
 codec => json
 type => "SuricataIDPS"
 }

}

filter {
 if [type] == "SuricataIDPS" {
 date {
 match => [ "timestamp", "ISO8601" ]
 }
 ruby {
 code => "
 if event.get('[event_type]') == 'fileinfo'
 event.set('[fileinfo][type]', event.get('[fileinfo][magic]').to_s.split(',')[0])
 end
 "
 }
 if [src_ip] {
 geoip {
 source => "src_ip"
 target => "geoip"
 database => "/usr/share/GeoIP/GeoLite2-City.mmdb" #==> Change this to your actual GeoIP.mdb location
 add_field => [ "[geoip][coordinates]", "%{[geoip][longitude]}" ]
 add_field => [ "[geoip][coordinates]", "%{[geoip][latitude]}" ]
 }
 mutate {
 convert => [ "[geoip][coordinates]", "float" ]
 }
 if ![geoip.ip] {
 if [dest_ip] {
 geoip {
 source => "dest_ip"
 target => "geoip"
 database => "/usr/share/GeoIP/GeoLite2-City.#==> Change this to your actual GeoIP.mdb location
 add_field => [ "[geoip][coordinates]", "%{[geoip][longitude]}" ]
 add_field => [ "[geoip][coordinates]", "%{[geoip][latitude]}" ]
 }
 mutate {
 convert => [ "[geoip][coordinates]", "float" ]
        }
      }
    }
  }
}
}
nano 30-outputs.conf
将以下配置粘贴到文件中并保存。 这会将管道的输出发送到localhost上的Elasticsearch。 输出将根据通过Logstash管道的事件的时间戳发送到每天的索引。
output {
elasticsearch {
hosts => localhost

index => "logstash-%{+YYYY.MM.dd}" }
# stdout { codec => rubydebug }
              }
       }
让所有服务自动启动
systemctl daemon-reload
systemctl enable kibana.service
systemctl enable elasticsearch.service
systemctl enable logstash.service
在此之后,可以使用systemctl命令启动和停止每个服务,例如:
systemctl start kibana.service
systemctl stop kibana.service
Kibana安装
Kibana是ELK网络前端,可用于显示suricata警报。
Kibana需要安装模板才能执行此操作。 Stamus网络为Kibana开发了一套模板,但他们只使用Kibana版本5.我们需要等待与Kibana 6一起使用的更新版本。
密切关注https://github.com/StamusNetworks/ ,了解何时推出新版KTS。
你当然可以制作自己的模板。
如果你去http://kibana.ip:5601,你会看到这样的东西:
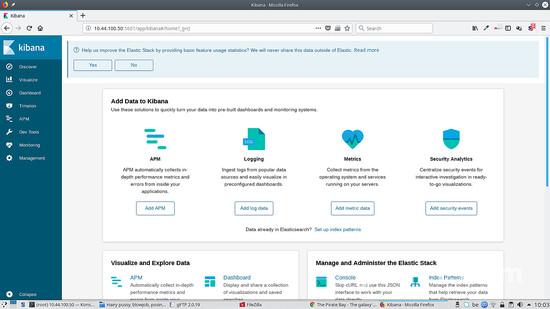
要在apache2代理后面运行Kibana,请将其添加到虚拟主机:
ProxyPass /kibana/ http://localhost:5601/
ProxyPassReverse /(.*) http://localhost:5601/(.*)
nano /etc/kibana/kibana.yml
并设置以下内容:
server.basePath: "/kibana"
当然重启kibana以使更改生效:
service kibana stop
 service kibana start
在apache2中启用mod-proxy和mod-proxy-http
a2enmod proxy
 a2enmod proxy_http
 service apache2 restart
Evebox安装
Evebox是一个Web前端,在ELK处理后显示Suricata警报。
首先,我们将添加Evebox存储库:
wget -qO - https://evebox.org/files/GPG-KEY-evebox | sudo apt-key add -
echo "deb http://files.evebox.org/evebox/debian stable main" | tee /etc/apt/sources.list.d/evebox.list
apt-get update
apt-get install evebox
cp /etc/evebox/evebox.yaml.example /etc/evebox.yaml
并在启动时启动evebox:
systemctl enable evebox
我们现在可以启动evebox:
service evebox start
现在我们可以访问http:// localhost:5636 ,我们看到以下内容:
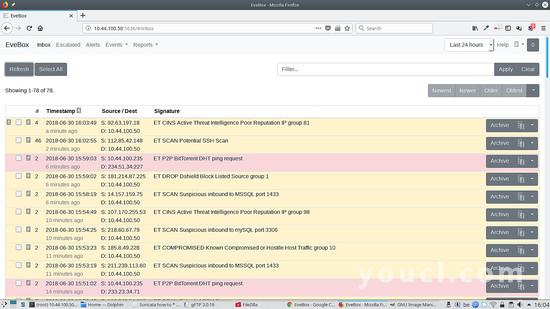
要在apache2代理后面运行Evebox,请将其添加到虚拟主机:
ProxyPass /evebox/ http://localhost:5601/
ProxyPassReverse /(.*) http://localhost:5601/(.*)
nano /etc/evebox/evebox.yml
并设置以下内容:
reverse-proxy: true
当然重新加载evebox以使更改生效:
service evebox force-reload
在apache2中启用mod-proxy和mod-proxy-http
a2enmod proxy
 a2enmod proxy_http
 service apache2 restart
Filebeat安装
Filebeat允许您将日志文件条目发送到删除logstash服务。 当您的网络上有多个Suricata实例时,这很方便。
让我们安装filebeat:
apt install filebeat
我们需要编辑filebeat配置并告诉它我们想要filebeat监控的内容。
nano /etc/filebeat/filebeat.yml
并更改以下内容以使我们的suricata日志能够传输:
- type: log

  # Change to true to enable this input configuration.
  enabled: true

  # Paths that should be crawled and fetched. Glob based paths.
  paths:
    - /var/log/suricata/eve.json
    #- c:\programdata\elasticsearch\logs\*
并设置以下内容将输出发送到logstash并注释掉eleasticsearch输出。
#-------------------------- Elasticsearch output ------------------------------
# output.elasticsearch:
  # Array of hosts to connect to.
# hosts: ["localhost:9200"]

  # Optional protocol and basic auth credentials.
  #protocol: "https"
  #username: "elastic"
  #password: "changeme"

#----------------------------- Logstash output --------------------------------
output.logstash:
  # The Logstash hosts
  hosts: ["ip of the server running logstash:5044"]
现在我们需要告诉logstash有一个filebeat输入,所以filebeat将在端口5044上启动一个监听服务:
在远程服务器上执行以下操作:
nano /etc/logstash/conf.d/10-input.conf
并将以下内容添加到文件中:
input {
  beats {
    port => 5044
    codec => json
    type => "SuricataIDPS"
  }
}
现在您可以在源计算机上启动filebeat:
service filebeat start
并在远程服务器上重新启动logstash:
service logstash stop
 service logstash start
Scirius安装
Scirius是suricata规则管理的网络前端。 开源版本仅允许您管理本地suricata安装。
让我们为Suricata规则管理安装scirius
cd /opt
 git clone https://github.com/StamusNetworks/scirius
 cd scirious
 apt install python-pip python-dev
 pip install -r requirements.txt
 pip install pyinotify
 pip install gitpython
 pip install gitdb
 apt install npm webpack
 npm install
现在我们需要启动Django数据库
python manage.py migrate
默认情况下,身份验证是scirius,因此我们需要创建一个超级用户帐户:
python manage.py createsuperuser
现在我们需要初始化scirius:
webpack
在我们启动scirius之前,您需要提供运行scirius的计算机的主机名或IP地址,以避免Django错误,指出主机不允许并停止服务,并禁用调试。
nano scirius/settings.py
 SECURITY WARNING: don't run with debug turned on in production!
DEBUG = True

ALLOWED_HOSTS = ['the hostname or ip of the server running scirius']
您可以通过以下格式添加机器的IP地址和主机名:['ip','hostname']。
python manage.py runserver
您可以连接到localhost:8000。
如果您需要应用程序来监听可访问的地址,您可以像这样运行scirius:
python manage.py runserver 192.168.1.1:8000
要在apache2后面运行scirius,您需要创建一个虚拟主机配置,如下所示:
<VirtualHost *:80>
 ServerName scirius.example.tld
 ServerAdmin webmaster@example.tld
 ErrorLog ${APACHE_LOG_DIR}/scirius.error.log
 CustomLog ${APACHE_LOG_DIR}/scirius.access.log combined

ProxyPass / http://localhost:8000/

ProxyPassReverse /(.*) http://localhost:8000/(.*)

</VirtualHost>
并启用mod-proxy和mod-proxy-http
a2enmod proxy
 a2enmod proxy_http
 service apache2 restart
而且你可以去scirius.example.tld并从那里访问scirius。
要在启动时自动启动scirius,我们需要执行以下操作:
nano /lib/systemd/system/scirius.service
并将以下内容粘贴到其中:
[Unit]
Description=Scirius Service

After=multi-user.target

[Service]
Type=idle
ExecStart=/usr/bin/python /opt/scirius/manage.py runserver > /var/log/scirius.log 2>&1

[Install] WantedBy=multi-user.target
并执行以下命令来安装新服务:
chmod 644 /lib/systemd/system/myscript.servi
 systemctl daemon-reload
 systemctl enable myscript.service
这样就结束了。
如果您有任何评论或问题,请在论坛的以下主题中发布:
我订阅了这个帖子,所以我会收到任何新帖子的通知。


