如何在Ubuntu 18.04 LTS上使用Nginx部署Ghost博客
Ghost 是一个完全开源的(MIT许可证) 博客平台, 自2013年发布以来,它在开发人员和普通用户中越来越受欢迎。 Ghost源代码在GitHub上公开发布。 Ghost一般需要 〜300MB 的RAM运行良好,所以它可以在适中的硬件上运行。 它把重点放在 内容 和 博客 。 关于Ghost最吸引人的地方在于它简洁,干净,优雅和反应灵敏的设计。 你可以用手机写博客文章。 Ghost的内容使用Markdown语言编写和格式化。 Ghost非常适合个人或小团体的作家。 Ghost还内置了对加速移动页面( AMP )项目的支持, 这将使您的博客在手机上快速加载。
最近,Ghost开发人员发布了Ghost-1.0.0的第一个主要稳定版本。 Ghost 1.0.0引入了许多新功能,其中最引人注目的是: 全新的Markdown编辑器, 更新的用户界面( UI ), 新的默认主题设计, 使用Ghost-CLI工具的全新改进安装和更新过程。
在本教程中,我们将使用Let's Encrypt , Acme.sh , Node.js , npm , Yarn , NGINX和MySQL在Ubuntu 18.04 LTS服务器上借助Ghost的Ghost-CLI工具设置并部署安全的Ghost博客/ MariaDB 。
要求
- 域名。 本教程将使用example.com域。
- 运行Ubuntu 18.04 LTS的服务器,具有1GB或RAM。
- 具有sudo权限的非root用户。
初始步骤
检查你的Ubuntu版本:
lsb_release -ds
# Ubuntu 18.04 LTS
设置时区:
timedatectl list-timezones
sudo timedatectl set-timezone 'Region/City'
更新您的操作系统的软件包:
sudo apt update && sudo apt upgrade -y
安装 build-essential 包:
sudo apt install -y build-essential
第1步 - 安装Node.js和npm
注 :最新的Ghost 1.0.0目前支持Node.js版本8.9+和6.9+ 只要。
Ghost建立在Node.js上 。 我们将安装 G8的 推荐 版本是v8 Carbon LTS 在写这篇教程的时候。 在Linux上,您有几个安装选项:Linux二进制文件(x86 / x64),源代码或通过包管理器。 我们将通过使用Nodesource存储库来使用Package Manager方法。
下载并安装 Node.js 的最新长期支持( LTS )版本(版本) :
curl -sL https://deb.nodesource.com/setup_8.x | sudo -E bash -
sudo apt install -y nodejs
注意 :npm与Node.js一起发布 - 这意味着当您下载Node.js时,您会自动在您的计算机上安装npm。
检查Node.js和npm 版:
node -v && npm -v
# v8.11.2
# 5.6.0
Npm是Node.js的一个独立项目,并且更频繁地更新。 因此,即使您刚刚下载了Node.js(因此也是npm),您可能需要更新npm。 幸运的是,npm知道如何更新自己! 要更新您的npm,请在终端中输入以下内容:
sudo npm install -g npm@latest
重新检查npm版本,它应该是最新版本:
npm -v
# 6.1.0
第2步 - 安装MariaDB服务器
Ghost支持MySQL / MariaDB 和SQLite 数据库。 但是,在本教程中,我们将使用MariaDB 数据库。 如果你愿意,你可以使用MySQL而不是MariaDB 。
下载并安装最新的稳定版本的MariaDB服务器 来自 您计算机上 的MariaDB 存储库:
sudo apt-get install software-properties-common
sudo apt-key adv --recv-keys --keyserver hkp://keyserver.ubuntu.com:80 0xF1656F24C74CD1D8
sudo add-apt-repository 'deb [arch=amd64] https://mirrors.nxthost.com/mariadb/repo/10.3/ubuntu bionic main'
sudo apt update
sudo apt install -y mariadb-server
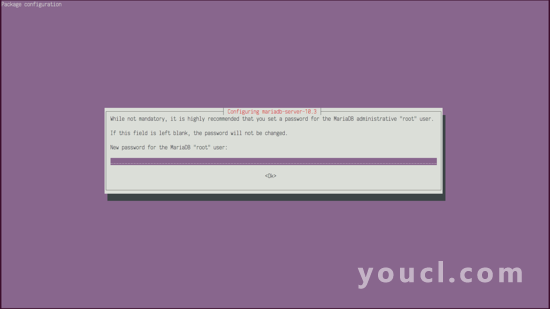
在MariaDB安装过程中,您将被要求输入MariaDB root 用户密码。 你应该输入强密码。
检查MariaDB版本:
mysql --version && sudo mysqld --version
# mysql  Ver 15.1 Distrib 10.3.7-MariaDB, for debian-linux-gnu (x86_64) using readline 5.2
# mysqld  Ver 10.3.7-MariaDB-1:10.3.7+maria~bionic-log for debian-linux-gnu on x86_64 (mariadb.org binary distribution)
检查MariaDB守护进程是否已启动并正在运行:
sudo systemctl status mysql.service
sudo systemctl is-enabled mysql.service
跑过 mysql_secure_installation 实用程序(脚本)来提高MariaDB安装的安全性:
sudo mysql_secure_installation


# Enter current password for root (enter for none):

# Change the root password? [Y/n] N
# Remove anonymous users? [Y/n] Y
# Disallow root login remotely? [Y/n] Y
# Remove test database and access to it? [Y/n] Y
# Reload privilege tables now? [Y/n] Y
# Success.

# All done! If you've completed all of the above steps, your MariaDB
installation should now be secure.

# Thanks for using MariaDB!
以MariaDB身份登录(连接)到MariaDB命令行 root 用户:
mysql -u root -p
为Ghost安装创建一个新的MariaDB数据库和用户。 此步骤是可选的,因为后面的步骤中的Ghost-CLI工具可以为您创建数据库,在安装Ghost期间,只需在Ghost-CLI提问时输入MariaDB root用户凭据(用户名和密码)即可:
mysql> CREATE DATABASE dbname;
mysql> CREATE USER 'username'@'localhost' IDENTIFIED BY 'password';
mysql> GRANT ALL ON dbname.* TO 'username'@'localhost';
mysql> FLUSH PRIVILEGES;
从MariaDB退出(断开连接):
mysql> EXIT;
第3步 - 安装NGINX
NGINX (engine-x)是一款高性能的Web服务器,负载平衡器,缓存和代理服务器,适用于所有环境:裸机,公共/私有/混合云和容器。 NGINX将被用作我们的Ghost应用程序的反向代理。
根据操作系统的不同,NGINX的安装可能会有所不同。 对于Linux ,可以使用nginx.org提供的NGINX软件包。
下载并安装最新版本 主线 ( 推荐用于大多数部署 )直接从官方NGINX存储库发布NGINX和动态加载模块 :
wget https://nginx.org/keys/nginx_signing.key
sudo apt-key add nginx_signing.key
rm nginx_signing.key
sudo -s
printf "deb https://nginx.org/packages/mainline/ubuntu/ $(lsb_release -sc) nginx\ndeb-src https://nginx.org/packages/mainline/ubuntu/ $(lsb_release -sc) nginx\n" >> /etc/apt/sources.list.d/nginx_mainline.list
exit
sudo apt update
sudo apt install -y nginx nginx-module-geoip nginx-module-image-filter nginx-module-njs nginx-module-perl nginx-module-xslt
通过检查其版本来验证是否安装了NGINX:
sudo nginx -v && sudo nginx -V
# nginx version: nginx/1.15.0
# nginx version: nginx/1.15.0
启动并启用NGINX:
sudo systemctl start nginx.service
sudo systemctl enable nginx.service
创建 /etc/nginx/snippets, /etc/nginx/ssl , /etc/nginx/sites-available和 /etc/nginx/sites-enabled目录。 这些目录是Ghost-CLI工具正常工作所必需的:
sudo mkdir -p /etc/nginx/{snippets,ssl,sites-available,sites-enabled}
添加 include /etc/nginx/sites-enabled/*.conf; 指令 nginx.conf 文件,运行:
sudo vim /etc/nginx/nginx.conf
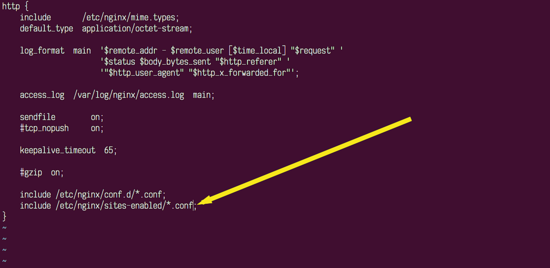
保存文件并退出Vim编辑器。
第4步 - 安装纱线(可选)
下载并安装纱线 您系统上的软件包管理器:
curl -sS https://dl.yarnpkg.com/debian/pubkey.gpg | sudo apt-key add -
echo "deb https://dl.yarnpkg.com/debian/ stable main" | sudo tee /etc/apt/sources.list.d/yarn.list
sudo apt update && sudo apt install -y yarn
检查纱线版本:
yarn --version
# 1.7.0
第5步 - 安装Ghost-CLI
Ghost-CLI是一个命令行界面(CLI)工具,可以轻松安装和更新Ghost。 它设置数据库,将NGINX配置为反向代理,使用Let's Encrypt CA启用TLS / SSL安全性,自动更新SSL,并将Ghost初始化为systemd服务。 Ghost-CLI是一个npm模块,可以通过其中一个来安装 npm 要么 yarn 。
下载并安装Ghost-CLI工具 :
sudo npm install -g ghost-cli@latest
# or with Yarn
sudo yarn global add ghost-cli@latest
检查Ghost-CLI 版:
ghost version
# Ghost-CLI version: 1.8.1
在安装或更新Ghost时,排除系统中的任何潜在问题:
ghost doctor install
第6步 - 安装Ghost
接下来,我们将使用Ghost-CLI工具安装Ghost。
首先, 创建一个空的文档根目录:
sudo mkdir -p /var/www/example.com
更改所有权 /var/www/example.com 目录传递给非root用户 你创建的 sudo 权限。 在这个例子中, johndoe :
sudo chown johndoe:johndoe /var/www/example.com
您的安装文件夹必须具有正确的权限:
sudo chmod 755 /var/www/example.com
导航到Ghost根目录:
cd /var/www/example.com
确保该目录为空以避免文件冲突:
ls -a
在生产模式下通过运行以下命令安装Ghost
ghost install
根据提示回答每个问题:
? Enter your blog URL: https://example.com
? Enter your MySQL hostname: localhost
? Enter your MySQL username: root
? Enter your MySQL password: your_mysql_root_user_password_here
? Enter your Ghost database name: database_name_for_ghost
? Do you wish to set up "ghost" mysql user? yes
? Do you wish to set up Nginx? yes
? Do you wish to set up SSL? yes
? Enter your email (used for Let's Encrypt notifications) user@example.com
? Do you wish to set up Systemd? yes
? Do you want to start Ghost? yes
安装完成后,运行
ghost ls
查看正在运行的Ghost进程。
将来,在更新版本发布时更新您的Ghost博客,您只需运行即可
ghost update
命令,从Ghost安装目录和Ghost-CLI将为您处理所有事情。
第7步 - 完成Ghost设置
要完成设置过程,请通过追加导航到Ghost配置页面 /ghost 到您博客的URL或IP结尾。 这个例子使用 https://example.com/ghost 。
在欢迎屏幕上,点击 创建您的帐户 :
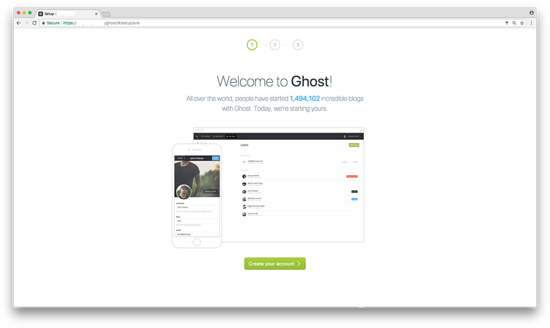
输入您的电子邮件,创建一个用户,密码和博客标题:
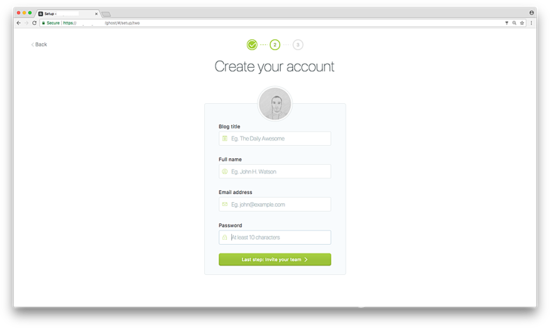
邀请其他成员加入你的团队。 如果您想跳过此步骤,请点击 我会稍后再做,将我带到我的博客! 在页面底部。

浏览Ghost管理区域以创建您的第一篇文章,更改网站主题或配置其他设置:
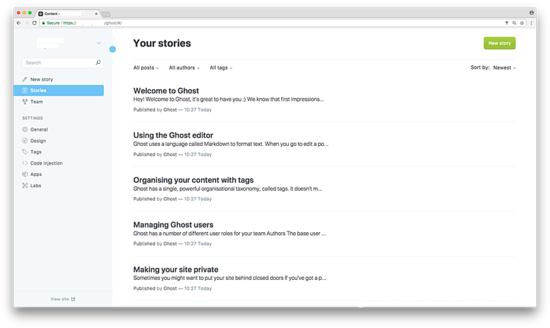
恭喜! 您已经在Ubuntu 18.04 LTS服务器上成功安装并部署了Ghost博客平台。


