如何在Ubuntu 16.04上安装和配置XWiki
XWiki是一个免费的开放源码wiki软件,运行在像Tomcat,JBoss等servlet容器上。XWiki使用MySQL或PostgreSQL等数据库来存储信息。 XWiki允许我们存储结构化数据并在维基界面中执行服务器脚本。 您可以托管多个博客,并使用XWiki管理或查看您的文件和文件夹。
XWiki具有很多功能,其中一些列在下面:
- 支持版本控制和ACL。
- 允许您使用通配符搜索完整的wiki。
- 轻松将wiki页面导出为PDF,ODT,RTF,XML和HTML。
- 内容组织和内容导入。
- 使用所见即所得的编辑器编辑页面。
要求
- 运行Ubuntu 16.04的服务器
- 具有sudo权限的非root用户。
更新系统
在开始之前,您需要将Ubuntu资源库更新到最新版本。 您可以使用以下命令执行此操作:
sudo apt-get update -y
sudo apt-get upgrade -y
存储库更新后,重新启动系统以应用所有更新。
安装Java
Xwiki是一个基于Java的应用程序,所以你需要先安装Java 8。 默认情况下,Java 8在Ubuntu存储库中不可用。 您可以通过将webupd8team PPA存储库添加到系统来安装Java 8。
首先,运行以下命令添加PPA:
sudo add-apt-repository ppa:webupd8team/java
接下来,使用以下命令更新存储库:
sudo apt-get update -y
一旦存储库是最新的,您可以通过运行以下命令来安装Java 8:
sudo apt-get install oracle-java8-installer -y
安装Java之后,可以使用以下命令检查Java的版本:
java -version
您应该看到以下输出:
Java version "1.8.0_91"
Java(TM) SE Runtime Environment (build 1.8.0_91-b14)
Java HotSpot(TM) 64-Bit Server VM (build 25.91-b14, mixed mode)
下载并安装Xwiki
接下来,您需要下载XWiki提供的安装文件。 您可以使用以下命令下载它:
wget http://download.forge.ow2.org/xwiki/xwiki-enterprise-installer-generic-8.1-standard.jar
下载完成后,您可以使用java命令安装下载的软件包文件,如下所示:
sudo java -jar xwiki-enterprise-installer-generic-8.1-standard.jar
您应该看到以下输出:
28 Jan, 2018 6:57:37 PM INFO: Logging initialized at level 'INFO'
28 Jan, 2018 6:57:37 PM INFO: Commandline arguments:
28 Jan, 2018 6:57:37 PM INFO: Detected platform: ubuntu_linux,version=3.19.0-25-generic,arch=x64,symbolicName=null,javaVersion=1.7.0_151
28 Jan, 2018 6:57:37 PM WARNING: Failed to determine hostname and IP address
Welcome to the installation of XWiki Enterprise 8.1!
The homepage is at: http://xwiki.org/

Press 1 to continue, 2 to quit, 3 to redisplay
现在,按1继续安装,您应该看到以下输出:
Please read the following information:

 XWiki Enterprise - Readme


 XWiki Enterprise Overview
XWiki Enterprise is a second generation Wiki engine, features professional features like
 Wiki, Blog, Comments, User Rights, LDAP Authentication, PDF Export, and a lot more.
XWiki Enterprise also includes an advanced form and scripting engine which makes it an ideal
 development environment for constructing data-based intranet applications. It has powerful
 extensibility features, supports scripting, extensions and is based on a highly modular
 architecture. The scripting engine allows to access a powerful API for accessing the XWiki
 repository in read and write mode.
XWiki Enterprise is used by major companies around the world and has strong
 Support for a professional usage of XWiki.
 Pointers
Here are some pointers to get you started with XWiki once you have finished installing it:

The documentation can be found on the XWiki.org web site
If you notice any issue please file a an issue in our issue tracker
If you wish to talk to XWiki users or developers please use our
 Mailing lists & Forum
You can also access XWiki's
 source code
If you need commercial support please visit the
 Support page


Press 1 to continue, 2 to quit, 3 to redisplay
现在,按1继续安装,您应该看到以下输出:
See the NOTICE file distributed with this work for additional
information regarding copyright ownership.
This is free software; you can redistribute it and/or modify it
under the terms of the GNU Lesser General Public License as
published by the Free Software Foundation; either version 2.1 of
the License, or (at your option) any later version.
This software is distributed in the hope that it will be useful,
but WITHOUT ANY WARRANTY; without even the implied warranty of
MERCHANTABILITY or FITNESS FOR A PARTICULAR PURPOSE. See the GNU
Lesser General Public License for more details.
You should have received a copy of the GNU Lesser General Public
License along with this software; if not, write to the Free
Software Foundation, Inc., 51 Franklin St, Fifth Floor, Boston, MA
02110-1301 USA, or see the FSF site: http://www.fsf.org.

Press 1 to accept, 2 to reject, 3 to redisplay
现在,按1接受许可协议,您应该看到以下输出:
Select the installation path:  [/usr/local/XWiki Enterprise 8.1]

Press 1 to continue, 2 to quit, 3 to redisplay
现在,按回车键,然后按1选择默认安装路径,您应该看到以下输出:
  [x] Pack 'Core' required
????????????????????????????????????????????????????????????????????????????????
  [x] Include optional pack 'Default Wiki'
????????????????????????????????????????????????????????????????????????????????
Enter Y for Yes, N for No:
Y
Press 1 to continue, 2 to quit, 3 to redisplay
现在,按Y并按1继续安装,您应该看到以下输出:
[ Starting to unpack ]
[ Processing package: Core (1/2) ]
[ Processing package: Default Wiki (2/2) ]
[ Unpacking finished ]
现在,你将被要求为用户创建快捷方式,你可以按' Y'来添加它们。 接下来,您将被要求生成一个自动安装脚本,只需按Enter键选择默认值,一旦安装完成,您应该看到以下输出:
????????????????????????????????????????????????????????????????????????????????????????????????????????????????????????????????????????????????
Generate an automatic installation script
????????????????????????????????????????????????????????????????????????????????????????????????????????????????????????????????????????????????
Enter Y for Yes, N for No:
Y
Select the installation script (path must be absolute)[/usr/local/XWiki Enterprise 8.1/auto-install.xml]

Installation was successful
application installed on /usr/local/XWiki Enterprise 8.1
[ Writing the uninstaller data ... ]
[ Console installation done ]
现在,XWiki安装在你的系统上,是时候启动XWiki启动脚本,如下所示:
cd /usr/local/XWiki Enterprise 8.1
sudo bash start_xwiki.sh
请等待一段时间来启动进程。 现在,你应该在终端上看到一些消息,如下所示:
start_xwiki.sh: 79: start_xwiki.sh:
Starting Jetty on port 8080, please wait...
2018-01-28 19:12:41.842:INFO::main: Logging initialized @1266ms
2018-01-28 19:12:42.905:INFO:oejs.Server:main: jetty-9.2.13.v20150730
2018-01-28 19:12:42.956:INFO:oejs.AbstractNCSARequestLog:main: Opened /usr/local/XWiki Enterprise 8.1/data/logs/2018_01_28.request.log
2018-01-28 19:12:42.965:INFO:oejdp.ScanningAppProvider:main: Deployment monitor [file:/usr/local/XWiki%20Enterprise%208.1/jetty/contexts/] at interval 0
2018-01-28 19:13:31,485 [main] INFO  o.x.s.s.i.EmbeddedSolrInstance - Starting embedded Solr server...
2018-01-28 19:13:31,507 [main] INFO  o.x.s.s.i.EmbeddedSolrInstance - Using Solr home directory: [data/solr]
2018-01-28 19:13:43,371 [main] INFO  o.x.s.s.i.EmbeddedSolrInstance - Started embedded Solr server.
2018-01-28 19:13:46.556:INFO:oejsh.ContextHandler:main: Started o.e.j.w.WebAppContext@2c9f9fb0{/xwiki,file:/usr/local/XWiki%20Enterprise%208.1/webapps/xwiki/,AVAILABLE}{/xwiki}
2018-01-28 19:13:46.697:INFO:oejsh.ContextHandler:main: Started o.e.j.w.WebAppContext@64c37088{/,file:/usr/local/XWiki%20Enterprise%208.1/webapps/root/,AVAILABLE}{/root}
2018-01-28 19:13:46.776:INFO:oejs.ServerConnector:main: Started ServerConnector@1ffa4bae{HTTP/1.1}{0.0.0.0:8080}
XWiki现在正在运行,是时候访问XWiki的网页界面。
访问XWiki
XWiki在端口8080上运行,所以你需要通过防火墙允许端口8080。 首先,使用以下命令启用UFW防火墙:
sudo ufw enable
接下来,使用以下命令通过UFW防火墙允许端口8080 :
sudo ufw allow 8080/tcp
接下来,通过运行以下命令重新加载防火墙规则以应用所有更改:
sudo ufw reload
您可以使用以下命令获取UFW防火墙的状态:
sudo ufw status
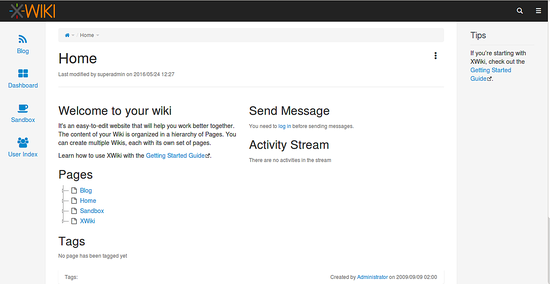
现在,打开你的浏览器并输入URL http:// your-server-ip:8080 ,你将被重定向到XWiki主页,如下所示:

您可以随时通过在终端中按Ctrl + C按钮来停止XWiki服务器。
结论
恭喜! 你已经在Ubuntu 16.04服务器上成功安装并配置了XWiki。 我希望您现在可以在Ubuntu 16.04服务器上使用XWiki轻松托管您自己的wiki网站。 有关更多信息,可以查看https://www.xwiki.org/xwiki/bin/view/Documentation/中的XWiki官方文档页面。 随时评论我,如果您有任何问题。


