如何将ISPConfig 2,ISPConfig 3.x,Confixx或Plesk迁移到ISPConfig 3.1(单服务器)
在这个howto中,我们将演示如何使用ISPConfig迁移工具2.0将单个服务器迁移到新的ISPConfig 3.1服务器。 迁移工具是ISPConfig迁移工具包的一部分, 可在此处找到 。
ISPConfig迁移工具可用于将这些主机控制面板迁移到ISPConfig 3.1服务器:
- ISPConfig 2
- ISPConfig 3和3,1
- Plesk 10 - 12.5
- Plesk Onyx
- Confixx
在本教程中,我们将把ISPConfig 3.0服务器迁移到运行ISPConfig 3.1的新系统。 其他支持的主机控制面板的迁移也是相似的。 迁移工具将逐步引导您完成迁移过程。
先决条件
- 源服务器上的ISPConfig 3.x。
- 目标服务器上的ISPConfig 3.1.7或更高版本。
- PHP 5.3以上版本支持JSON,mcrypt,OpenSSL和mbstring。
- 迁移工具包许可证 。
在ISPConfig中创建一个远程用户
您需要目标ISPConfig服务器上的远程用户。
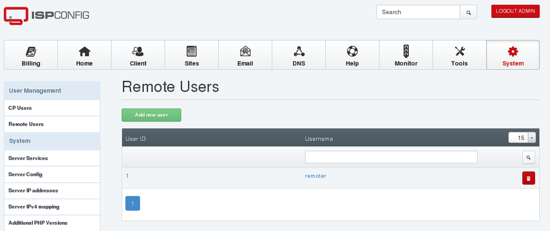
进入系统 - >远程用户

点击添加新用户按钮。
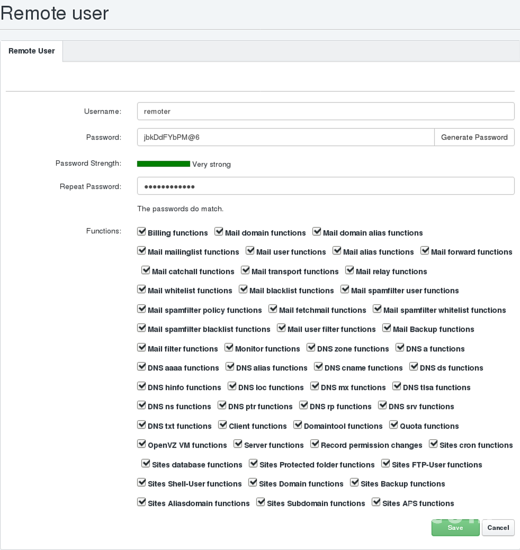
输入远程用户的用户名和密码,例如“远程”,并确保您选中了所有复选框。 然后点击“保存”。

如果您在目标服务器上使用ISPConfig版本3.1.11, 则以 root用户身份编辑文件/ usr / local / ispconfig /security/security_settings.ini :
nano /usr/local/ispconfig/security/security_settings.ini
并将ids_anon_enabled和ids_user_enabled的值从“是”更改为“否”。
....
[ids]
ids_anon_enabled=no
ids_anon_log_level=1
ids_anon_warn_level=5
ids_anon_block_level=20
ids_user_enabled=no
ids_user_log_level=1
ids_user_warn_level=10
ids_user_block_level=25
ids_admin_enabled=no
ids_admin_log_level=1
ids_admin_warn_level=5
ids_admin_block_level=100
sql_scan_enabled=yes
sql_scan_action=warn
apache_directives_scan_enabled=yes
nginx_directives_scan_enabled=yes
....
迁移完成后,可以再次启用IDS。 如果您使用ISPConfig 3.1.12或更新版本,则不需要此更改。
除非另有说明,否则以下所有步骤均在源服务器上完成。
下载并提取迁移工具
cd /root
mkdir migration
cd migration
wget https://www.ispconfig.org/downloads/ispconfig_migration_toolkit-latest.zip
unzip ispconfig_migration_toolkit-latest.zip
mv ispconfig_migration_toolkit/ispc3-migration-tool-*.tar.gz /root/migration/migtool.tar.gz
tar xzf migtool.tar.gz
rm -f migtool.tar.gz
准备无密码登录(可选)
在迁移期间,将会有一个SSH连接,用于将设置和数据从源传输到目标服务器。 为此,源服务器必须能够连接到目标(s)没有密码。
你可以:
- 自行设置无密码登录(将源的公钥添加到目标根的authorized_keys文件中)。
- 或者通过密码(暂时)允许通过ssh访问根目录。 然后,迁移工具将为您调用ssh-keygen和ssh-copy-id 。 这些是直接的系统调用,所以如果在这个步骤中提示输入目标的ssh root密码,输入不会被迁移工具读取,而是由ssh-copy-id system命令直接提示。
运行迁移(干运行)
./migrate
Welcome to the ISPConfig3 Migration Tool V2 Version 2.0.0

Although this tool does not alter anything on the source server, you should
ALWAYS make a BACKUP of all your data before migrating to a new server!

You need to have some prerequisites set up to use this tool:
 * create an remote user (system -> remote users) in your TARGET ISPConfig3 system and grant ALL rights to it
 * make sure this (the SOURCE system) can reach the remoting api of the TARGET system

*** Disclaimer of Warranties ***
ISPConfig disclaims to the fullest extent authorized by law any and all other warranties, whether express or implied,
including, without limitation, any implied warranties of title, non-infringement, integration, merchantability or
fitness for a particular purpose.
By continuing to use this software, you agree to this.

First of all the most important question:
Do you want to make a real migration or a dry run? (dry, migrate): dry
我们首先要以干运行模式运行,所以我们在这里进入干燥状态 。
The following modules are available:
        1. Confixx to ISPConfig 3 migrator (confixx)
        2. Plesk (10.5 - 17.5) to ISPConfig 3 migrator (plesk)
        3. ISPConfig 2 to 3 migrator (ispconfig2)
        4. ISPConfig 3 to ISPConfig 3 migrator (ispconfig3)

Which one is the one matching your SOURCE system? (confixx, plesk, ispconfig2, ispconfig3): ispconfig3
迁移工具需要知道您在源服务器上使用哪个控制面板。 它会尝试识别源服务器上所需的模块,因此您通常可以简单地按下ENTER键。
Enter this (SOURCE) server's ip that is used for outgoing connections [192.168.10.10]: 123.123.123.123
迁移工具需要知道源服务器上的哪个IP地址用于传出连接,即当源连接到其他服务器时将看到哪个IP地址。 该工具会尝试猜测IP地址,但是如果您正在使用专用网络,则可能需要更改该值。
Name of the remote user of TARGET ISPConfig3 system []: remoter
Password for this remote user []: yourremotepassword
URL to the remote system (e. g. https://yourdomain.com:8080/remote/) []: https://www.example.com:8080/remote/
You gave me remote user 'remoter' with password 'yourremotepassword'
And I shall connect to 'https://www.example.com:8080/remote/'
Is this correct? (y, n): y
向迁移工具提供您在目标上创建的远程用户的数据,并用“y”确认输入。 然后,迁移工具将尝试连接到目标系统的远程API。
I will now have to make some changes in your ISPConfig3 TARGET system config.
        1.) Enable domain module if needed
        2.) Remove client prefixes (will be undone automatically at the end)
        3.) Enable login for mail accounts if needed

Testing MySQL connection ... OK

What is the main public(!) ip of the target server www.example.com? [123.123.123.123]: [ENTER]
迁移工具将更改目标上的一些ISPConfig设置( 在空运行模式下运行时,这些更改将不会完成 ),并测试与MySQL服务器的连接。 它试图通过查看一些系统文件来猜测MySQL凭据,但最终会提示您输入MySQL root密码。
接下来,您需要提供目标服务器的公共IP。 它将从DNS预取,但您可能需要对其进行调整,特别是在源和目标上使用相同的主机名时。
Do you want me to overwrite/update existing entries with the same name? (y, n): y
You can now set entry names, that shall NOT be overwritten.
You should use this if you plan to import several server's data to a multi-server installation.
If this tool finds a name that is already present, it UPDATES the data with the SOURCE data!
If this tool finds a name that you marked as not to overwrite, it either
         - appends a _2, _3 etc. to this name and creates a new entry, or
         - prepends a server prefix if specified by --server-prefix argument
迁移工具允许将多个服务器合并到一个目标中。 这样做时,可能是源服务器上的用户名有冲突,例如,如果您有两个名为“testdatabase”的数据库。 如果你对这个问题回答“y”,那么第二个数据库将会替换第一个数据库。 如果您回答“n”,则会将第二个数据库的名称更改为“testdatabase_2”。
确保在执行单个服务器迁移时回答“是”,否则,如果您在同一来源上多次运行迁移工具,则会创建重复项。
You currently have 0 FTP username name(s) marked:

You can now add further names to this list. Just enter them one by one or provide a comma-separated list.
To delete one or more names from the list, prepend a /DELETE to your input.
To clear all names from the list, type /CLEAR.
A blank input proceeds to the next step.
Your choice : [ENTER]
迁移工具使您可以将FTP,数据库,客户端等用户名标记为“保留”。 这意味着它们不会像上面提到的那样被覆盖。 通常你会留下这个空白,但在某些情况下,你可能会阻止导入“admin”或“administrator”这样的用户名。 所以你可以在这里输入它们,导致导入的名字重命名为“admin_2”等。
针对不同的服务类型(FTP,数据库,客户端,邮件用户)重复了这个问题。
What is the database name of your SOURCE ISPConfig 3 installation? [dbispconfig]: [ENTER]
该工具现在要求在保存控制面板数据的源服务器上输入数据库名称。 请检查识别的数据库是否正确,如果需要更改。
Do you want to migrate only some services or everything?
Valid services are: client, web, mail, ftp, database, cronjob, dns, billing
Please enter one or more services (comma-separated) or leave blank for all: [ENTER]
新的迁移工具只能迁移一部分服务,例如只迁移邮件帐户并跳过网页等。
我们想迁移所有的服务,所以我们只是把输入留空,然后按回车。
To copy over web data, I need SSH access to the target webserver.
Please make sure that root login via SSH is allowed. On the target open /etc/ssh/sshd_config
and set PermitRootLogin to yes or without-password.
You can revert this once the migration is complete.

What is the ip for the target web server to connect via SSH? [123.123.123.123]: [ENTER]
What is the SSH port? [22]: [ENTER]
要通过Web,邮件和数据库数据进行复制,迁移工具需要对目标服务器进行无密码SSH访问。 您需要提供源应连接到的IP和端口。 如果您尚未设置无密码访问,则系统将提示您输入目标服务器的根SSH密码。
Testing MySQL connection ... OK

Starting API calls.

[50/74] <Domain> processing mydomain.com
该工具现在将开始创建/更新目标ISPConfig上的所有条目。 干运行当然不会改变或复制任何东西。 等待API调用完成。
Processing of entries done.
=============
Migration tool run completed.
一旦迁移工具无误地完成空运,我们就可以继续进行真正的迁移。
运行迁移
./migrate
	Welcome to the ISPConfig3 Migration Tool V2 Version 2.0.0rc2

Although this tool does not alter anything on the source server, you should
ALWAYS make a BACKUP of all your data before migrating to a new server!

You need to have some prerequisites set up to use this tool:
 * create an remote user (system -> remote users) in your TARGET ISPConfig3 system and grant ALL rights to it
 * make sure this (the SOURCE system) can reach the remoting api of the TARGET system

*** Disclaimer of Warranties ***
ISPConfig disclaims to the fullest extent authorized by law any and all other warranties, whether express or implied,
including, without limitation, any implied warranties of title, non-infringement, integration, merchantability or
fitness for a particular purpose.
By continuing to use this software, you agree to this.

First of all the most important question:
Do you want to make a real migration or a dry run? (dry, migrate): migrate
这次我们回答“迁移”的提示,并回答问题,就像我们在空运期间做的那样。 该工具将从预运行的干运行中获得输入,因此您将主要能够按下ENTER键。
Testing MySQL connection ... OK
Copying Let'sEncrypt files to target ... OK

Starting API calls.
[9/11]

    processing mymail@example.com (web213p41)
这个过程将需要更长的时间,因为有真正的API调用正在完成。 等待过程完成。
Processing of entries done.
Target ISPConfig job queue has 35 entries left. Waiting ..
为了确保在目标上创建所有路径,迁移工具等待ISPConfig处理所有请求,然后继续。
[INFO] Target ISPConfig job queue has completed. Continuing.

[19/935] Syncing /var/www/clients/client26/web21/web to /var/www/clients/client1424/web21/
现在,该工具将所有路径(网页,邮件)同步,并将数据库内容复制到目标服务器。 此过程可能需要一段时间,具体取决于您拥有的数据量。
如果您想在单独的步骤中执行实际的数据同步,则可以通过运行./migrate --no-syncjobs而不是仅仅./migrate来跳过它
最后的步骤
迁移工具将重置它在开始时改变的值(例如客户端前缀)。
根据您的源代码控制面板,迁移工具激活目标ISPConfig上的域模块。 这意味着,域名只能用于网站,电子邮件域名等,如果他们已经由管理员首先分配(使用客户端 - >域名 )。 如果您不想使用域模块,则可以在“ 系统” - >“接口设置” - >“域”选项卡下将其禁用。
最后,检查为具有[ERROR]或[WARNING]标记的条目创建的migrate.log 。 这些表明在迁移过程中的问题。
重新同步您的目标
重新同步帐户和设置
如果在完成迁移后在源代码控制面板上更改了内容,则可以重新运行它。 迁移工具将使用源服务器的新设置更新所有条目。 并添加在此期间创建的新条目。 目标上的已删除条目不会被删除! 。
重新同步数据
如果您只想重新同步网络,邮件和数据库的数据,则可以运行./migrate --syncjobs 。 这将跳过所有迁移步骤,只运行网站,数据库和电子邮件的同步。
您也可以重新同步其中一个服务,例如./migrate --syncjobs --only = database 。 这会跳过重新同步网站数据和电子邮件。


