使用CloneZilla Server Edition克隆Linux系统(CloneZilla SE)
版本1.0
作者:Falko Timme
本教程将展示如何使用CloneZilla SE克隆Linux系统。 这对于将一个Linux安装复制到多台计算机而言不用多少时间,例如在教室中,也可用于创建基于映像的系统备份。 在本教程中,我将在Debian Etch服务器上安装CloneZilla SE。 您要克隆的系统可以使用您喜欢的任何Linux发行版。
我不会保证这将为您工作!
1初步说明
我要安装CloneZilla SE的Debian服务器位于本地网络192.168.0.0 (网络掩码255.255.255.0 )中,IP地址为192.168.0.100 。
要克隆系统,目标系统应该使用相同或至少类似的硬件,否则克隆可能无效!
2安装CloneZilla SE
首先,我们导入DRBL的GPG密钥(Linux中的无盘远程引导,需要从网络启动客户端系统(PXE))和CloneZilla存储库:
wget -q http://drbl.sourceforge.net/GPG-KEY-DRBL -O- | apt-key add -
然后我们打开/etc/apt/sources.list ...
vi /etc/apt/sources.list
...并将DRBL / CloneZilla Debian存储库添加到它:
[...] deb http://drbl.sourceforge.net/drbl-core drbl stable [...] |
跑
apt-get update
之后。
现在我们可以像这样安装DRBL和CloneZilla:
apt-get install drbl
然后我们跑
/opt/drbl/sbin/drbl4imp
以默认值配置DRBL和CloneZilla(应在大多数环境中工作):
************************************** ***。 这个脚本对于那些不耐烦的人来说,它会将DRBL服务器设置为可能不适合您的环境的默认值。 你不耐烦吗 [Y / n] < - ENTER
************************************** ***。 好的,懒惰是一种美德! 让我们设置DRBL服务器的默认值! 按“Enter”继续... < - ENTER
[...]
Starting the NAT services for DRBL clients... done!
 ip_forward is already on.
 The GDM or KDM config file is NOT found! Skip setting the DM! Maybe you will not be able to make this DRBL server as thin client server!
 Clean all the previous saved config file if they exist...done!
 Turn on the boot prompt for PXE client...done!
 Turn off the thin client option in PXE boot menu...done!
 Modifying /tftpboot/nbi_img/pxelinux.cfg/default to let DRBL client use graphical PXE boot menu... done!
 Full DRBL mode. Remove clientdir opt for label drbl in pxelinux config...
 Setting drbl_mode="full_drbl_mode" in /etc/drbl/drbl_deploy.conf and /etc/drbl/drblpush.conf... done!
 Full clonezilla mode. Remove clientdir opt for label clonezilla in pxelinux config...
 Setting clonezilla_mode="full_clonezilla_mode" in /etc/drbl/drbl_deploy.conf and /etc/drbl/drblpush.conf... done!
 You have to use "/opt/drbl/sbin/dcs" -> clonezilla-start to start clonezilla serivce, so that there will be a clonezilla menu when client boots
 *****************************************************.
 Adding normal users to group "audio cdrom plugdev floppy video"........ done!
 *****************************************************.
 Updating the YP/NIS for group...
 Note! If you add new or remove accounts in the DRBL server in the future, remember to run the following command again, so that some group (EX:plugdev) will be updated:
 tune-debian-dev-group-perm -g "audio cdrom plugdev floppy video" -e
 *****************************************************.
 Enjoy DRBL!!!
 http://drbl.nchc.org.tw; http://drbl.name
 NCHC Free Software Labs, Taiwan. http://free.nchc.org.tw
 *****************************************************.
 If you like, you can reboot the DRBL server now to make sure everything is ready...(This is not necessary, just an option.).
 *****************************************************.
 DRBL server is ready! Now set the client machines to boot from PXE or Etherboot (refer to http://drbl.sourceforge.net for more details).
 NOTE! If Etherboot is used in client machine, version 5.4.0 or newer is required!
 PS. The config file is saved as /etc/drbl/drblpush.conf. Therefore if you want to run drblpush with the same config again, you may run it as: /opt/drbl/sbin/drblpush -c /etc/drbl/drblpush.conf
 server1:~#
这就是安装。
3创建Linux系统的映像
要创建一个映像,我们首先在Debian系统上启动CloneZilla,并告诉它存储一个映像(服务器将等到客户端连接以存储映像),然后我们启动我们要创建的客户端系统图像从网络 - 它应该引导到连接到服务器并创建图像的CloneZilla Linux系统。
跑
/opt/drbl/sbin/dcs
在Debian服务器上,然后选择全部选择所有客户端 :

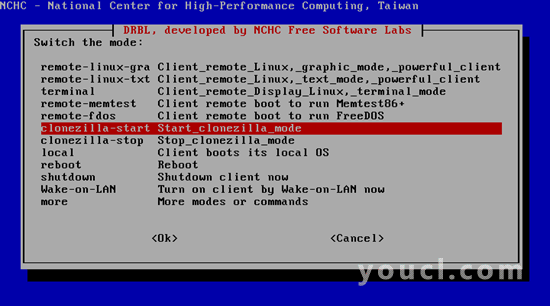
下一步选择clonezilla-start Start_clonezilla_mode :
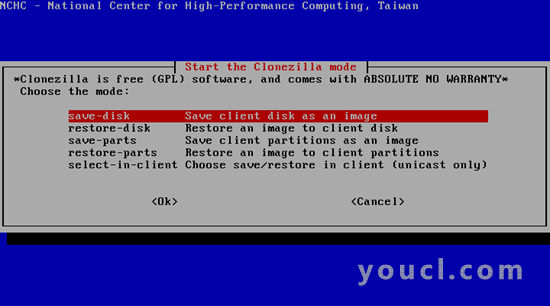
选择保存磁盘将客户端磁盘保存为图像 :
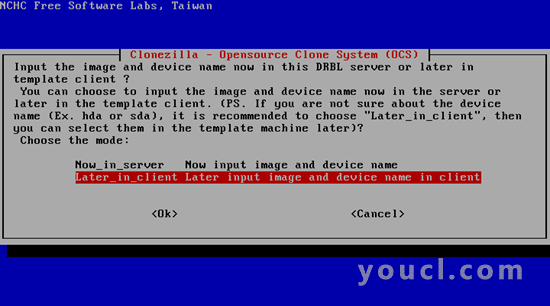
选择Later_in_client客户端中稍后的输入图像和设备名称 (稍后将在客户端上提示输入图像名称,而不必立即提供图像名称):
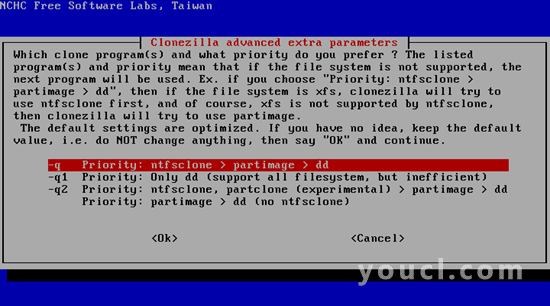
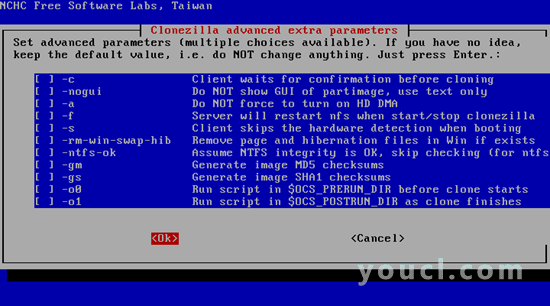
在接下来的两个屏幕上,您可以简单地按ENTER键选择默认值: