Docker是开发人员和系统管理员的操作系统级虚拟化。 Docker使得在孤立的环境中创建和部署应用程序变得更加容易。 Dockerfile是一个脚本,其中包含命令和指令的集合,这些命令和指令将在Docker环境中按顺序自动执行,以构建新的Docker映像。
在本教程中,我将向您展示如何使用docker文件创建您自己的Docker映像。 我将详细解释dockerfile脚本,使您能够构建自己的dockerfile脚本。
前提条件
- 一个Linux服务器 - 我将使用Ubuntu 16.04作为主机,ubuntu 16.04作为docker基础映像。
- 根特权。
- 了解Docker命令
Dockerfile命令介绍
dockerfile是一个包含dockerfile命令和操作系统命令的集合的脚本(例如:Linux命令)。 在我们创建第一个docker文件之前,您应该熟悉dockerfile命令。
以下是一些您必须知道的dockerfile命令:
从
用于构建新图像的基本图像。 此命令必须位于docker文件的顶部。
维护者
可选,包含图像维护者的名称..
跑
用于在Docker窗图像的构建过程中执行命令。
加
将文件从主机复制到新的Docker映像。 可以选择使用该文件的URL,然后,Docker会将该文件下载到目标目录。
ENV
定义环境变量。
CMD
用于在从docker图像构建新容器时执行命令。
入口点
定义容器运行时将执行的默认命令。
工作人员
这是指令执行CMD命令。
用户
设置用图像创建的容器的用户或UID。
卷
启用容器和主机之间的访问/链接目录。
现在我们来创建一个第一个docker文件。
第1步 - 安装Docker
登录到您的服务器并更新软件仓库。
ssh root@192.168.1.248
apt-get update
使用此apt命令安装docker.io:
apt-get install docker.io
安装完成后,启动Docker服务并使其在启动时启动:
systemctl start docker
systemctl enable docker
Docker已经安装并在系统上运行。
第2步 - 创建Docker文件
在此步骤中,我们将为dockerfile创建一个新目录,并定义我们要使用该dockerfile的内容。
在该目录中创建一个新的目录和一个新的和空的docker文件。
mkdir ~/myimages
cd myimages/
touch Dockerfile
接下来,定义我们要用新的自定义图像做什么。 在本教程中,我将使用Ubuntu 16.04 Docker映像安装Nginx和PHP-FPM 7。 另外,我们需要Supervisord,所以我们可以在一个命令中启动Nginx和PHP-FPM 7。
用vim编辑'Dockerfile'
vim Dockerfile
在文件的顶部,添加一个要使用的基本映像(Ubuntu 16.04)的行。
#Download base image ubuntu 16.04
FROM ubuntu:16.04
使用'RUN'命令更新dockerfile中的Ubuntu软件仓库。
# Update Ubuntu Software repository
RUN apt-get update
然后安装我们需要的自定义图像的应用程序。 使用apt从Ubuntu存储库安装Nginx,PHP-FPM和Supervisord。 添加Nginx和PHP-FPM安装的RUN命令。
# Install nginx, php-fpm and supervisord from ubuntu repository
RUN apt-get install -y nginx php7.0-fpm supervisor && \
    rm -rf /var/lib/apt/lists/*
在这个阶段,所有应用程序都已安装,我们需要配置它们。 我们将通过编辑默认虚拟主机配置来配置Nginx来处理PHP应用程序。 我们可以替换它的新配置文件,或者我们可以使用'sed'命令来编辑现有的配置文件。
在本教程中,我们将使用'COPY'dockerfile命令将默认虚拟主机配置替换为新配置。
#Define the ENV variable
ENV nginx_vhost /etc/nginx/sites-available/default
ENV php_conf /etc/php/7.0/fpm/php.ini
ENV nginx_conf /etc/nginx/nginx.conf
ENV supervisor_conf /etc/supervisor/supervisord.conf

# Enable php-fpm on nginx virtualhost configuration
COPY default ${nginx_vhost}
RUN sed -i -e 's/;cgi.fix_pathinfo=1/cgi.fix_pathinfo=0/g' ${php_conf} && \
    echo "\ndaemon off;" >> ${nginx_conf}
接下来,配置Nginx和PHP-FPM的Supervisord。 我们将使用'COPY'命令用新配置替换默认的Supervisord配置。
#Copy supervisor configuration
COPY supervisord.conf ${supervisor_conf}
现在为php-fpm sock文件创建一个新目录,并将/ var / www / html目录和PHP目录的所有者更改为www-data。
RUN mkdir -p /run/php && \
    chown -R www-data:www-data /var/www/html && \
    chown -R www-data:www-data /run/php
接下来,定义卷,以便我们可以将下面列出的目录安装到主机上。
# Volume configuration
VOLUME ["/etc/nginx/sites-enabled", "/etc/nginx/certs", "/etc/nginx/conf.d", "/var/log/nginx", "/var/www/html"]
最后,设置默认容器命令“CMD”并打开HTTP和HTTPS的端口。 当容器启动时,我们将为默认的“CMD”命令创建一个新的start.sh文件。 该文件包含“supervisord”命令,我们将使用'COPY'dockerfile命令将文件复制到新映像。
# Configure Services and Port
COPY start.sh /start.sh
CMD ["./start.sh"]

EXPOSE 80 443
保存文件并退出。
这是一个完整的Docker文件:
#Download base image ubuntu 16.04
FROM ubuntu:16.04

# Update Software repository
RUN apt-get update

# Install nginx, php-fpm and supervisord from ubuntu repository
RUN apt-get install -y nginx php7.0-fpm supervisor && \
    rm -rf /var/lib/apt/lists/*

#Define the ENV variable
ENV nginx_vhost /etc/nginx/sites-available/default
ENV php_conf /etc/php/7.0/fpm/php.ini
ENV nginx_conf /etc/nginx/nginx.conf
ENV supervisor_conf /etc/supervisor/supervisord.conf

# Enable php-fpm on nginx virtualhost configuration
COPY default ${nginx_vhost}
RUN sed -i -e 's/;cgi.fix_pathinfo=1/cgi.fix_pathinfo=0/g' ${php_conf} && \
    echo "\ndaemon off;" >> ${nginx_conf}

#Copy supervisor configuration
COPY supervisord.conf ${supervisor_conf}

RUN mkdir -p /run/php && \
    chown -R www-data:www-data /var/www/html && \
    chown -R www-data:www-data /run/php

# Volume configuration
VOLUME ["/etc/nginx/sites-enabled", "/etc/nginx/certs", "/etc/nginx/conf.d", "/var/log/nginx", "/var/www/html"]

# Configure Services and Port
COPY start.sh /start.sh
CMD ["./start.sh"]

EXPOSE 80 443
现在我们的'Dockerfile'目录下,为名为'default'的虚拟主机,supervisord配置文件'supervisord.conf'和服务配置脚本'start.sh'创建一个新的配置文件。
vim default
将默认虚拟主机配置粘贴到下面:
server {
    listen 80 default_server;
    listen [::]:80 default_server;

    root /var/www/html;
    index index.html index.htm index.nginx-debian.html;

    server_name _;

    location / {
        try_files $uri $uri/ =404;
    }

    location ~ \.php$ {
        include snippets/fastcgi-php.conf;
        fastcgi_pass unix:/run/php/php7.0-fpm.sock;
    }

    # deny access to .htaccess files, if Apache's document root
    # concurs with nginx's one
    #
    #location ~ /\.ht {
    #    deny all;
    #}
}
Supervisord配置文件:
vim supervisord.conf
粘贴配置如下:
[unix_http_server]
file=/dev/shm/supervisor.sock   ; (the path to the socket file)

[supervisord]
logfile=/var/log/supervisord.log ; (main log file;default $CWD/supervisord.log)
logfile_maxbytes=50MB        ; (max main logfile bytes b4 rotation;default 50MB)
logfile_backups=10           ; (num of main logfile rotation backups;default 10)
loglevel=info                ; (log level;default info; others: debug,warn,trace)
pidfile=/tmp/supervisord.pid ; (supervisord pidfile;default supervisord.pid)
nodaemon=false               ; (start in foreground if true;default false)
minfds=1024                  ; (min. avail startup file descriptors;default 1024)
minprocs=200                 ; (min. avail process descriptors;default 200)
user=root             ;

; the below section must remain in the config file for RPC
; (supervisorctl/web interface) to work, additional interfaces may be
; added by defining them in separate rpcinterface: sections
[rpcinterface:supervisor]
supervisor.rpcinterface_factory = supervisor.rpcinterface:make_main_rpcinterface

[supervisorctl]
serverurl=unix:///dev/shm/supervisor.sock ; use a unix:// URL  for a unix socket

; The [include] section can just contain the "files" setting.  This
; setting can list multiple files (separated by whitespace or
; newlines).  It can also contain wildcards.  The filenames are
; interpreted as relative to this file.  Included files *cannot*
; include files themselves.

[include]
files = /etc/supervisor/conf.d/*.conf


[program:php-fpm7.0]
command=/usr/sbin/php-fpm7.0 -F
numprocs=1
autostart=true
autorestart=true

[program:nginx]
command=/usr/sbin/nginx
numprocs=1
autostart=true
autorestart=true
Start.sh文件。
vim start.sh
粘贴配置如下:
#!/bin/sh

/usr/bin/supervisord -n -c /etc/supervisor/supervisord.conf
保存并退出
使用chmod命令创建start.sh可执行文件:
chmod +x start.sh
保存并退出。
第3步 - 基于它构建新的Docker图像和创建新的容器
Docker文件和所有必需的配置文件已经创建,现在我们可以使用docker命令在ubuntu 16.04和dockerfile下构建一个新的Docker映像:
docker build -t nginx_image .
当命令成功完成后,我们可以使用docker命令检查新图像“nginx_image”:
docker images

然后我们可以尝试基于nginx_images创建一个新的容器。 而在创建新的容器之前,我们可以在主机上创建新的目录,用于webroot数据。
mkdir -p /webroot
现在运行新的容器,命令如下:
docker run -d -v /webroot:/var/www/html -p 80:80 --name hakase nginx_image
然后我们可以检查基于“nginx_image”的名为hakase的新容器是否正在运行:
docker ps

注意:
- --name hakase nginx_image =基于docker image'nginx_images'创建一个名为'hakase'的新容器。
- -p 80:80 =主机上端口80上运行的hakase容器。
- 主机上的/ v / webroot:/ var / www / html = / webroot目录重写容器上的/ var / www / html目录。
基于nginx_image的新容器运行没有错误。
第4步 - 在容器中测试Nginx和PHP-FPM
尝试使用echo在/ webroot目录中创建一个新的index.html文件:
echo '<h1>Nginx and PHP-FPM 7 inside Docker Container</h1>' > /webroot/index.html
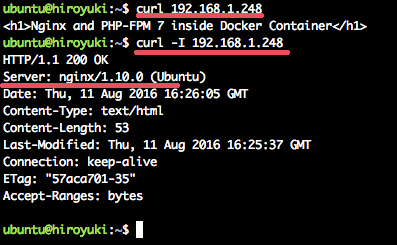
使用curl命令通过访问主机IP地址进行测试。
curl 192.168.1.250
curl -I 192.168.1.250
我们将在下面看到结果。

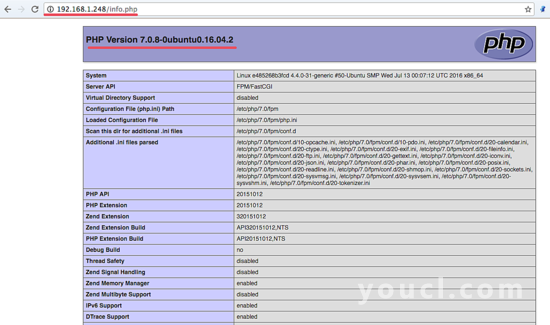
接下来,通过在主机上的/ webroot目录中创建一个新的phpinfo文件来测试PHP-FPM 7.0是否正在运行。
echo '<?php phpinfo(); ?>' > /webroot/info.php
打开网页浏览器并输入hosy机器ip地址:
现在可以看到phpinfo文件的输出。

新的码头图像“nginx_image”已经成功创建,现在我们可以基于该图像创建更多的容器。


