服务器监控与munin和monit在Debian Wheezy
在本文中,我将介绍如何使用munin和monit监视您的Debian Wheezy服务器。 munin在服务器的几乎每个方面(负载平均值,内存使用量,CPU使用率,MySQL吞吐量,eth0流量等)都没有很多配置,而monit则检查Apache,MySQL,Postfix等服务的可用性,如果找到服务,则重新启动的适当操作不符合预期。 两者的结合为您提供了全面的监控:可以让您识别当前或即将出现的问题的图形(例如“我们需要较大的服务器,我们的负载平均值正在快速增长”),以及一个可以确保受监视服务可用性的看门狗。
虽然munin可以监控多台服务器,但我们只讨论在这里安装的系统的监控。
本教程是针对Debian Wheezy编写的,但是配置应该适用于其他发行版本,但更改也很少。
我想先说说这不是建立这样一个系统的唯一途径。 实现这一目标有很多方法,但这是我所采取的方式。 我不会保证这将为您工作!
1初步说明
我们的系统的主机名是server1.example.com ,我们的网址是www.example.com ,文件根目录是/var/www/www.example.com/web 。
2安装并配置munin
要在Debian Wheezy上安装munin,我们这样做:
apt-get install munin munin-node munin-plugins-extra
启用一些额外的munin插件:
cd /etc/munin/plugins
 ln -s /usr/share/munin/plugins/mysql_ mysql_
 ln -s /usr/share/munin/plugins/mysql_bytes mysql_bytes
 ln -s /usr/share/munin/plugins/mysql_innodb mysql_innodb
 ln -s /usr/share/munin/plugins/mysql_isam_space_ mysql_isam_space_
 ln -s /usr/share/munin/plugins/mysql_queries mysql_queries
 ln -s /usr/share/munin/plugins/mysql_slowqueries mysql_slowqueries
 ln -s /usr/share/munin/plugins/mysql_threads mysql_threads
接下来,我们必须编辑munin配置文件/etc/munin/munin.conf 。 取消注释dbdir , htmldir , logdir , rundir和tmpldir行(默认值是否正确 )。 我们希望munin在HTML输出中使用名称server1.example.com而不是localhost.localdomain ,因此我们在简单主机树部分中将localhost.localdomain替换为server1.example.com 。 没有注释,更改后的文件如下所示:
vi /etc/munin/munin.conf
# Example configuration file for Munin, generated by 'make build'

# The next three variables specifies where the location of the RRD
# databases, the HTML output, logs and the lock/pid files.  They all
# must be writable by the user running munin-cron.  They are all
# defaulted to the values you see here.
#
dbdir   /var/lib/munin
htmldir /var/cache/munin/www
logdir /var/log/munin
rundir  /var/run/munin

# Where to look for the HTML templates
#
tmpldir /etc/munin/templates

# Where to look for the static www files
#
#staticdir /etc/munin/static

# temporary cgi files are here. note that it has to be writable by
# the cgi user (usually nobody or httpd).
#
# cgitmpdir /var/lib/munin/cgi-tmp

# (Exactly one) directory to include all files from.
includedir /etc/munin/munin-conf.d
[...]
# a simple host tree
[server1.example.com]
    address 127.0.0.1
    use_node_name yes
[...] |
我们应该找到munin /etc/apache2/conf.d/munin (实际上是/etc/munin/apache.conf的符号链接)的Apache配置文件 - 它定义了一个名为munin的别名到munin的HTML输出目录/ var / cache / munin / www ,这意味着我们可以使用相对路径/ munin (例如http://www.example.com/munin )从该服务器上的所有网站访问munin。
确保您注释掉从localhost 127.0.0.0/8 :: 1的行允许,并添加所有替代的Allow (否则您将只能访问本地主机的munin输出):
vi /etc/apache2/conf.d/munin
# Enable this for template generation
Alias /munin /var/cache/munin/www

# Enable this for cgi-based templates
#Alias /munin-cgi/static /var/cache/munin/www/static
#ScriptAlias /munin-cgi /usr/lib/munin/cgi/munin-cgi-html
#<Location /munin-cgi>
#       Order allow,deny
#       Allow from localhost 127.0.0.0/8 ::1
#       AuthUserFile /etc/munin/munin-htpasswd
#       AuthName "Munin"
#       AuthType Basic
#       require valid-user
#</Location>

<Directory /var/cache/munin/www>
        Order allow,deny
        #Allow from localhost 127.0.0.0/8 ::1
        Allow from all
        Options None

        # This file can be used as a .htaccess file, or a part of your apache
        # config file.
        #
        # For the .htaccess file option to work the munin www directory
        # (/var/cache/munin/www) must have "AllowOverride all" or something
        # close to that set.
        #

        # AuthUserFile /etc/munin/munin-htpasswd
        # AuthName "Munin"
        # AuthType Basic
        # require valid-user

        # This next part requires mod_expires to be enabled.
        #

        # Set the default expiration time for files to 5 minutes 10 seconds from
        # their creation (modification) time.  There are probably new files by
        # that time.
        #

    <IfModule mod_expires.c>
        ExpiresActive On
        ExpiresDefault M310
    </IfModule>

</Directory>
[...] |
重新启动Apache:
/etc/init.d/apache2 restart
然后重新启动munin:
/etc/init.d/munin-node restart
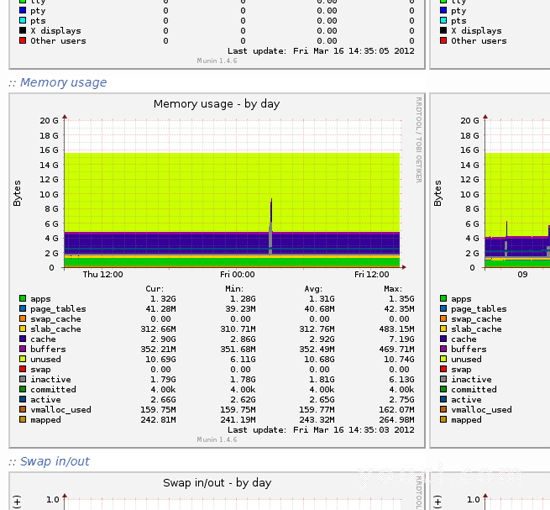
现在等待几分钟,以便munin可以产生第一个输出,然后在您的浏览器中访问http://www.example.com/munin/ ,您将看到第一个统计信息。 几天之后,可能看起来像这样:

(这只是munin生产的许多图形的一小部分)
3密码保护munin输出目录(可选)
现在,密码保护munin输出目录是一个好主意,除非您希望每个人能够看到有关您的服务器的每一个小小的统计信息。
为此,我们必须创建密码文件/ etc / munin / munin-htpasswd 。 我们要用用户名admin登录,所以我们这样做:
htpasswd -c /etc/munin/munin-htpasswd admin
输入管理员的密码。 然后再打开/etc/apache2/conf.d/munin ?
vi /etc/apache2/conf.d/munin
...并取消注释以下部分:
[...]
        AuthUserFile /etc/munin/munin-htpasswd
        AuthName "Munin"
        AuthType Basic
        require valid-user
[...] |
然后重新启动Apache:
/etc/init.d/apache2 restart


