使用RoundCube Webmail与ISPConfig 3在Debian Wheezy(Apache2)
本指南说明如何在运行ISPConfig和Apache2的Debian Wheezy服务器上安装RoundCube Webmail应用程序,以及如何为RoundCube启用ISPConfig 3插件,以便用户可以执行操作,如在RoundCube中更改其电子邮件密码。 Roundcube webmail是一种基于浏览器的多语言IMAP客户端,具有类似应用程序的用户界面; 它具有MIME支持,地址簿,文件夹操作,消息搜索和拼写检查等功能。
我不会保证这将为您工作!
1初步说明
本教程假设您将使用Apache2作为ISPConfig 3服务器上的Web服务器; 本教程将不适用于nginx。 我将从Debian Wheezy存储库安装RoundCube - 这是一个合理的最新版本(0.7.2.9 vs 0.9.1(当前稳定版本))。
RoundCube将被配置为可以通过别名/ webmail从每个虚拟机访问(例如http://www.example.com/webmail )。
如果您已经使用SquirrelMail等其他网络邮件应用程序,请确保完全禁用或至少使用别名/ webmail 。 如果您将SquirrelMail安装为Debian软件包,可以在/etc/apache2/conf.d/squirrelmail.conf中找到别名。 要么注释掉别名,只能禁用/ webmail别名或注释掉整个文件以完全禁用SquirrelMail。 不要忘了重新启动Apache。
2在ISPConfig中创建远程用户
RoundCube的ISPConfig 3插件通过ISPConfig的远程API工作。 要使用这个API,我们需要一个远程用户。 要创建此类用户,请转到系统>用户管理>远程用户 ,然后单击添加新用户按钮:
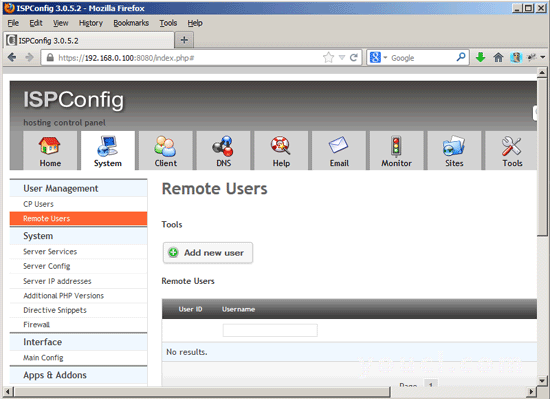
为用户提供用户名和密码...
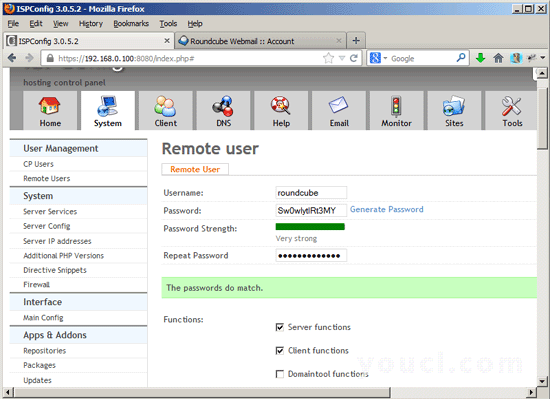
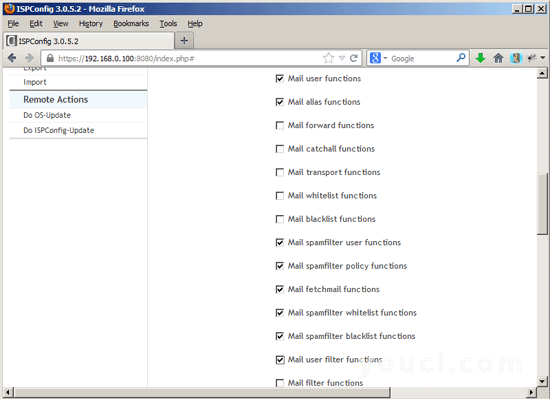
...并启用以下功能:
- 服务器功能
- 客户端功能
- 邮件用户功能
- 邮件别名功能
- 邮件垃圾邮件过滤器用户功能
- 邮件垃圾邮件过滤器策略功能
- 邮件fetchmail功能
- 邮件垃圾邮件程序白名单功能
- 邮件垃圾邮件黑名单功能
- 邮件用户过滤功能
然后点击保存 。
3安装RoundCube
我们可以安装RoundCube如下:
apt-get install roundcube roundcube-plugins roundcube-plugins-extra
您将看到以下问题:
使用dbconfig-common配置圆形立方体的数据库? < - 是的
roundcube使用的数据库类型: < - mysql
数据库管理用户 的密码 : < - yourrootsqlpassword(MySQL root用户的密码)
roundcube的MySQL应用程序密码: < - roundcubesqlpassword
密码确认: < - roundcubesql 密码
这将创建一个名为roundcube的MySQL数据库与MySQL用户roundcube和密码roundcubesqlpassword 。
接下来打开/etc/apache2/conf.d/roundcube ...
vi /etc/apache2/conf.d/roundcube
...并添加行Alias / webmail / var / lib / roundcube 。 除此之外,将PHP配置添加到<Directory / var / lib / roundcube />部分(我已经突出显示了更改):
# Those aliases do not work properly with several hosts on your apache server
# Uncomment them to use it or adapt them to your configuration
Alias /roundcube/program/js/tiny_mce/ /usr/share/tinymce/www/
Alias /roundcube /var/lib/roundcube
Alias /webmail /var/lib/roundcube

# Access to tinymce files
<Directory "/usr/share/tinymce/www/">
      Options Indexes MultiViews FollowSymLinks
      AllowOverride None
      Order allow,deny
      allow from all
</Directory>

<Directory /var/lib/roundcube/>
  Options +FollowSymLinks
  DirectoryIndex index.php

  <IfModule mod_php5.c>
    AddType application/x-httpd-php .php

    php_flag magic_quotes_gpc Off
    php_flag track_vars On
    php_flag register_globals Off
    php_value include_path .:/usr/share/php
  </IfModule>

  # This is needed to parse /var/lib/roundcube/.htaccess. See its
  # content before setting AllowOverride to None.
  AllowOverride All
  order allow,deny
  allow from all
</Directory>

# Protecting basic directories:
<Directory /var/lib/roundcube/config>
        Options -FollowSymLinks
        AllowOverride None
</Directory>

<Directory /var/lib/roundcube/temp>
        Options -FollowSymLinks
        AllowOverride None
        Order allow,deny
        Deny from all
</Directory>

<Directory /var/lib/roundcube/logs>
        Options -FollowSymLinks
        AllowOverride None
        Order allow,deny
        Deny from all
</Directory> |
之后重新启动Apache:
/etc/init.d/apache2 restart
4配置RoundCube
打开/etc/roundcube/main.inc.php ...
vi /etc/roundcube/main.inc.php
...并设置$ rcmail_config ['default_host'] ='localhost'; (或邮件服务器的主机名或IP地址是否在远程计算机上):
[...] $rcmail_config['default_host'] = 'localhost'; [...] |
否则RoundCube将在每个登录之前要求一个主机名,这可能会使用户过度使用 - 我们希望使用尽可能简单。
接下来安装用于RoundCube的ISPConfig 3插件:
cd /tmp
git clone https://github.com/w2c/ispconfig3_roundcube.git
cd /tmp/ispconfig3_roundcube/
mv ispconfig3_* /var/lib/roundcube/plugins
cd /var/lib/roundcube/plugins
mv ispconfig3_account/config/config.inc.php.dist ispconfig3_account/config/config.inc.php
打开ispconfig3_account / config / config.inc.php ...
vi ispconfig3_account/config/config.inc.php
...并填写您的ISPConfig远程用户的登录详细信息和远程API的URL - 我的ISPConfig安装在https://192.168.0.100:8080上运行,因此远程API的URL为https://192.168 .0.100:8080 / remote / :
<?php $rcmail_config['identity_limit'] = false; $rcmail_config['remote_soap_user'] = 'roundcube'; $rcmail_config['remote_soap_pass'] = 'Sw0wlytlRt3MY'; $rcmail_config['soap_url'] = 'https://192.168.0.100:8080/remote/'; ?> |
最后再打开/etc/roundcube/main.inc.php ...
vi /etc/roundcube/main.inc.php
...并启用jquerui插件加上ISPConfig 3插件...
[...]
// ----------------------------------
// PLUGINS
// ----------------------------------

// List of active plugins (in plugins/ directory)
//$rcmail_config['plugins'] = array();
$rcmail_config['plugins'] = array("jqueryui", "ispconfig3_account", "ispconfig3_autoreply", "ispconfig3_pass", "ispconfig3_spam", "ispconfig3_fetchmail", "ispconfig3_filter");
[...] |
...并将皮肤从默认更改为经典 (否则ISPConfig 3插件将无法正常工作):
[...] // skin name: folder from skins/ $rcmail_config['skin'] = 'classic'; [...] |
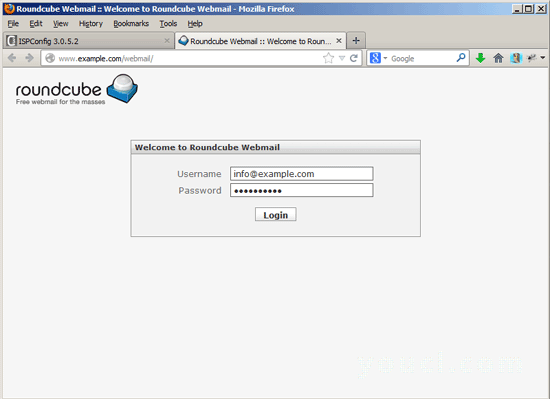
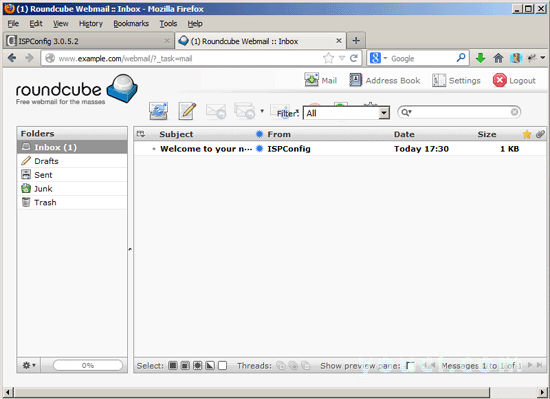
而已; 现在您可以通过别名/ webmail访问RoundCube(例如www.example.com/webmail )。 使用通过ISPConfig创建的电子邮件帐户的电子邮件地址和密码登录:
这就是RoundCube的外观:
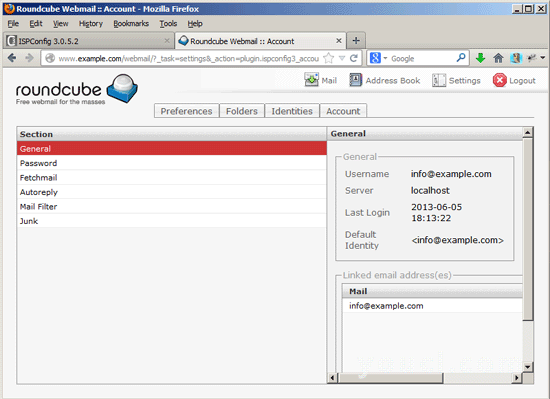
在设置>帐户下,您可以使用用于RoundCube的ISPconfig 3插件修改您的设置,例如...
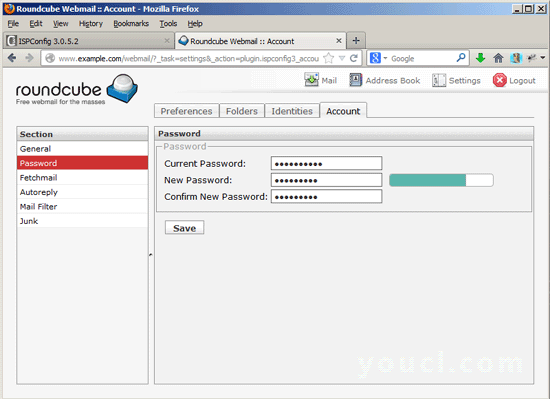
...您可以为电子邮件帐户设置新密码,而无需使用ISPConfig:
5链接
- RoundCube: http : //roundcube.net/
- 用于RoundCube的ISPConfig 3插件:https: //github.com/w2c/ispconfig3_roundcube
- ISPConfig: http : //www.ispconfig.org/
- Debian: http : //www.debian.org/


