本文介绍如何在Debian 8服务器上设置启用TLS的vsftpd服务器以及如何使用FileZilla访问FTP服务器。 默认情况下,FTP是一个非常不安全的协议,因为所有密码和所有数据都以明文形式传输。 通过使用TLS,可以对整个通信进行加密,从而使FTP更加安全。
1初步说明
在本教程中,我将使用IP地址为192.168.1.100的hostname server1.example.com 。 这些设置可能会有所不同,因此您必须在适当的情况下更换它们。 我使用Debian 8最小服务器设置作为本教程的基础。
2安装vsftpd和OpenSSL
TLS需要OpenSSL; 要安装vsftpd和OpenSSL,我们只需运行:
apt-get -y install vsftpd openssl
3为TLS创建SSL证书
为了使用TLS,我们必须创建SSL证书。 我在/ etc / ssl / private中创建它 - 如果目录不存在,请立即创建它::
mkdir -p /etc/ssl/private
chmod 700 /etc/ssl/private
之后,我们可以生成SSL证书,如下所示:
openssl req -x509 -nodes -days 365 -newkey rsa:1024 -keyout /etc/ssl/private/vsftpd.pem -out /etc/ssl/private/vsftpd.pem
国家名称(2个字母代码)[AU]: < - 输入您的国家名称(例如,“DE”)。 州或省名称(全名)[某些州]: < - 输入您的州或省名称。 地点名称(例如,城市)[]: < - 输入您的城市。 组织名称(例如,公司)[互联网Widgits有限公司]: < - 输入您的组织名称(例如,您公司的名称)。 组织单位名称(如部分)[]: < - 输入您的组织单位名称(例如“IT部门”)。 通用名称(例如,您的姓名)[]: < - 输入系统的完全限定域名(例如“server1.example.com”)。 电子邮件地址[]: < - 输入您的电子邮件地址。
4在vsftpd中启用TLS
为了在vsftpd中启用TLS,请打开/etc/vsftpd.conf ...
nano /etc/vsftpd.conf
...并添加或更改以下选项:
[...]

# Turn on SSL
ssl_enable=YES

# Allow anonymous users to use secured SSL connections
allow_anon_ssl=YES

# All non-anonymous logins are forced to use a secure SSL connection in order to
# send and receive data on data connections.
force_local_data_ssl=YES

# All non-anonymous logins are forced to use a secure SSL connection in order to send the password.
force_local_logins_ssl=YES

# Permit TLS v1 protocol connections. TLS v1 connections are preferred
ssl_tlsv1=YES

# Permit SSL v2 protocol connections. TLS v1 connections are preferred
ssl_sslv2=NO

# permit SSL v3 protocol connections. TLS v1 connections are preferred
ssl_sslv3=NO

# Disable SSL session reuse (required by WinSCP)
require_ssl_reuse=NO

# Select which SSL ciphers vsftpd will allow for encrypted SSL connections (required by FileZilla)
ssl_ciphers=HIGH

# This option specifies the location of the RSA certificate to use for SSL
# encrypted connections.
rsa_cert_file=/etc/ssl/private/vsftpd.pem
[...]
如果使用force_local_logins_ssl = YES和force_local_data_ssl = YES ,则只允许TLS连接(这将锁定任何没有TLS支持的旧FTP客户端的用户); 通过使用force_local_logins_ssl = NO和force_local_data_ssl =否,可以使用TLS和非TLS连接,具体取决于FTP客户端支持的内容。
除了TLS选项之外,请确保您的vsftpd.conf中还具有以下设置,以启用非匿名登录:
[...]
# Uncomment this to allow local users to log in.
local_enable=YES
#
# Uncomment this to enable any form of FTP write command.
write_enable=YES
#
# Default umask for local users is 077. You may wish to change this to 022,
# if your users expect that (022 is used by most other ftpd's)
local_umask=022

[...]
之后再重新启动vsftpd:
service vsftpd restart
而已。 您现在可以尝试使用FTP客户端连接; 但是,您应该将FTP客户端配置为使用TLS(如果使用force_local_logins_ssl = YES并且force_local_data_ssl = YES ,则必须使用) - 请参阅下一章如何使用FileZilla执行此操作。
5 vsftpd添加用户
在这一步中,我们将添加一个本地Linux用户,我们可以使用它来连接到。 我将使用密码“youcl”创建一个用户“until”。 所有的FTP用户都应该在mkdir / var / ftproot中有他们的主目录,所以我先创建这个目录。
mkdir /var/ftproot
然后使用以下命令添加用户:
adduser --home /var/ftproot/till till
adduser命令将要求用户密码和其他一些细节
root@server1:/# adduser --home /var/ftproot/till till
Adding user `till' ...
Adding new group `till' (1001) ...
Adding new user `till' (1001) with group `till' ...
Creating home directory `/var/ftproot/till' ...
Copying files from `/etc/skel' ...
Enter new UNIX password: <-- Enter the new password here
Retype new UNIX password: <-- Enter the new password here
passwd: password updated successfully
Changing the user information for till
Enter the new value, or press ENTER for the default
Full Name []: <-- Enter your name here or press enter to skip
Room Number []: <-- Enter room number here or press enter to skip
Work Phone []: <-- Enter work phone here or press enter to skip
Home Phone []: <-- Enter home phone here or press enter to skip
Other []: <-- Enter Other user details here or press enter to skip
Is the information correct? [Y/n] <-- Y
我们成功添加了一个FTP用户。
6配置FileZilla for TLS
为了使用FTP与TLS,您需要一个支持TLS的FTP客户端,如FileZilla 。
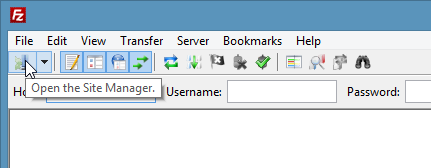
在FileZilla中,打开服务器管理器:

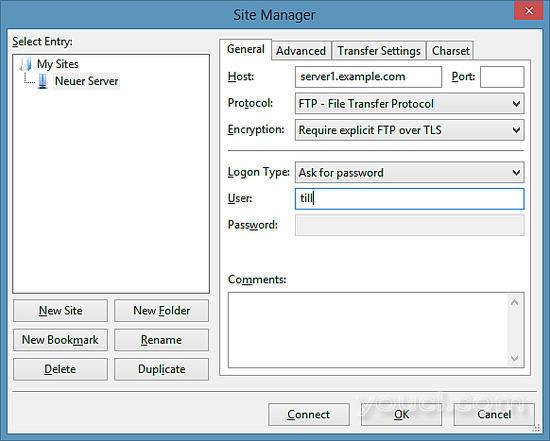
在服务器字段中输入FTP服务器的IP地址或主机名,选择协议“FTP”和“需要TLS显式FTP”,并在用户字段中输入用户名。

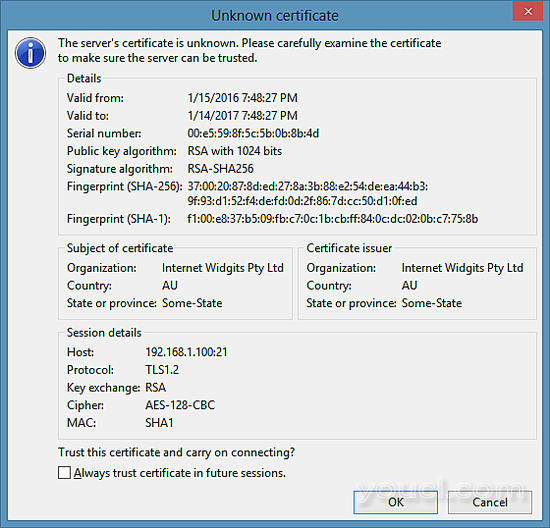
现在可以连接到服务器。 如果您是第一次这样做,则必须接受服务器的新SSL证书:

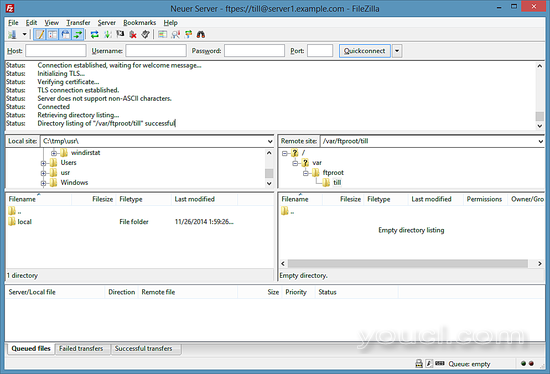
如果一切顺利,您现在应该在服务器上登录:

7链接
- vsftpd: https : //security.appspot.com/vsftpd.html
- FileZilla: http : //filezilla-project.org/
- Debian: http : //www.debian.org/


