使用rsyslog增强日志记录在Debian Etch和phpLogcon上查看
大家都知道在日志文件中阅读和搜索的问题。 如果你有多台机器,它会变得更糟。 本教程介绍如何在Debian Etch上安装和配置rsyslog,但可以适应其他发行版。
从rsyslog网站发送:
“ Rsyslog ,Linux和Unix的增强syslogd。
Rsyslog是一个增强的多线程系统日志支持,其中包括MySQL ,syslog / tcp,RFC 3195,允许的发件人列表,任何消息部分的过滤以及细粒度输出格式控制。 它与库存sysklogd相当兼容,可以作为替代品。 其先进的功能使其适用于企业级, 加密保护的系统日志中继链,同时非常容易为新手用户设置。 可选的Web界面 - phpLogCon可用于在线显示所有数据。
在本教程中,我们将从源代码构建rsyslog并编写必要的配置文件。
第1步:看到必要的工具被安装
apt-get install binutils cpp fetchmail flex gcc libarchive-zip-perl libc6-dev libcompress-zlib-perl libdb4.3-dev libpcre3 libpopt-dev linux-kernel-headers lynx m4 make ncftp nmap openssl perl perl-modules unzip zip zlib1g-dev autoconf automake1.9 libtool bison autotools-dev g++ mysql-server mysql-client libmysqlclient15-dev
接下来为您的mysql root用户设置一个密码:
mysqladmin -u root password your_mysqlroot_password
现在我们可以创建rsyslog数据库:
mysqladmin -u root -p create rsyslog
接下来我们启动mysql命令shell并创建rsyslog用户:
mysql -u root -p
GRANT SELECT, INSERT, UPDATE, DELETE ON rsyslog.* TO 'rsyslog_user'@'localhost' IDENTIFIED BY 'rsyslog_user_password';
 GRANT SELECT, INSERT, UPDATE, DELETE ON mail.* TO 'rsyslog_user'@'localhost.localdomain' IDENTIFIED BY 'rsyslog_user_password';
 FLUSH PRIVILEGES;
quit
您可能已经注意到,我们不会将任何表导入数据库。 phpLogCon将为我们做到这一点。
第2步:获取rsyslog源并构建rsyslog
获取来源:
cd /tmp
wget http://www.rsyslog.com/Downloads-req-getit-lid-58.phtml
现在我们来构建和安装rsyslog:
tar xvzf rsyslog-1.9.6.tar.gz
cd rsyslog-1.9.6
./configure
make
make install
由于rsyslog没有配置示例(和文件),我将在此提供示例。 所有这些只是默认配置,使用rsyslog提供的文档根据您的具体需求自定义配置。
首先是rsyslog配置文件/etc/rsyslog.conf 。
vi /etc/rsyslog.conf
只需复制并粘贴以下内容:
不要忘记换行:
*.* >127.0.0.1,rsyslog,rsyslog_user,rsyslog_user_password
使用您上面指定的用户名和密码。
#  /etc/rsyslog.conf    Configuration file for rsyslogd.
#
#                       For more information see
#                       /usr/share/doc/rsyslog/html/rsyslog_conf.html
#
# First some standard logfiles.  Log by facility.
#
$ModLoad MySQL
*.*       >127.0.0.1,rsyslog,rsyslog_user,rsyslog_user_password
auth,authpriv.*                 /var/log/auth.log
*.*;auth,authpriv.none          -/var/log/syslog
#cron.*                         /var/log/cron.log
daemon.*                        -/var/log/daemon.log
kern.*                          -/var/log/kern.log
lpr.*                           -/var/log/lpr.log
mail.*                          -/var/log/mail.log
user.*                          -/var/log/user.log
#
# Logging for the mail system.  Split it up so that
# it is easy to write scripts to parse these files.
#
mail.info                       -/var/log/mail.info
mail.warn                       -/var/log/mail.warn
mail.err                        /var/log/mail.err
#
# Logging for INN news system
#
news.crit                       /var/log/news/news.crit
news.err                        /var/log/news/news.err
news.notice                     -/var/log/news/news.notice
#
# Some `catch-all' logfiles.
#
*.=debug;\
        auth,authpriv.none;\
        news.none;mail.none     -/var/log/debug
*.=info;*.=notice;*.=warn;\
        auth,authpriv.none;\
        cron,daemon.none;\
        mail,news.none          -/var/log/messages
#
# Emergencies are sent to everybody logged in.
#
*.emerg                         *
#
# I like to have messages displayed on the console, but only on a virtual
# console I usually leave idle.
#
#daemon,mail.*;\
#       news.=crit;news.=err;news.=notice;\
#       *.=debug;*.=info;\
#       *.=notice;*.=warn       /dev/tty8
# The named pipe /dev/xconsole is for the `xconsole' utility.  To use it,
# you must invoke `xconsole' with the `-file' option:
#
#    $ xconsole -file /dev/xconsole [...]
#
# NOTE: adjust the list below, or you'll go crazy if you have a reasonably
#      busy site..
#
daemon.*;mail.*;\
        news.err;\
        *.=debug;*.=info;\
        *.=notice;*.=warn       |/dev/xconsole
#
# Include all config files in /etc/rsyslog.d/
#
$IncludeConfig /etc/rsyslog.d/
|
接下来是启动脚本/etc/init.d/rsyslog :
vi /etc/init.d/rsyslog
只需复制并粘贴以下内容:
#! /bin/sh
### BEGIN INIT INFO
# Provides:          syslog
# Required-Start:    $local_fs $time
# Required-Stop:     $local_fs $time
# Should-Start:      $network
# Should-Stop:       $network
# Default-Start:     2 3 4 5
# Default-Stop:      0 1 6
# Short-Description: enhanced syslogd
# Description:       Rsyslog is an enhanced multi-threaded syslogd.
#                    It is quite compatible to stock sysklogd and can be
#                    used as a drop-in replacement.
### END INIT INFO
# Author: Michael Biebl <biebl@debian.org>
#
# Do NOT "set -e"
# PATH should only include /usr/* if it runs after the mountnfs.sh script
PATH=/sbin:/usr/sbin:/bin:/usr/bin
DESC="enhanced syslogd"
NAME=rsyslog
RSYSLOGD=rsyslogd
RSYSLOGD_BIN=/usr/local/sbin/rsyslogd
RSYSLOGD_OPTIONS="-m 0"
RSYSLOGD_PIDFILE=/var/run/rsyslogd.pid
RKLOGD=rklogd
RKLOGD_BIN=/usr/local/sbin/rklogd
RKLOGD_OPTIONS="-2"
RKLOGD_PIDFILE=/var/run/rklogd.pid
SCRIPTNAME=/etc/init.d/$NAME
# Exit if the package is not installed
[ -x "$RSYSLOGD_BIN" ] || exit 0
[ -x "$RKLOGD_BIN" ] || exit 0
# Read configuration variable file if it is present
[ -r /etc/default/$NAME ] && . /etc/default/$NAME
# Define LSB log_* functions.
# Depend on lsb-base (>= 3.0-6) to ensure that this file is present.
. /lib/lsb/init-functions
#
# Function that starts the daemon/service
#
do_start()
{
        DAEMON=$1
        DAEMON_ARGS=$2
        PIDFILE=$3
        # Return
        #   0 if daemon has been started
        #   1 if daemon was already running
        #   2 if daemon could not be started
        start-stop-daemon --start --quiet --pidfile $PIDFILE --exec $DAEMON --test > /dev/null \
                || return 1
        start-stop-daemon --start --quiet --pidfile $PIDFILE --exec $DAEMON -- \
                $DAEMON_ARGS \
                || return 2
}
#
# Function that stops the daemon/service
#
do_stop()
{
        NAME=$1
        PIDFILE=$2
        # Return
        #   0 if daemon has been stopped
        #   1 if daemon was already stopped
        #   2 if daemon could not be stopped
        #   other if a failure occurred
        start-stop-daemon --stop --quiet --retry=TERM/30/KILL/5 --pidfile $PIDFILE --name $NAME
        RETVAL="$?"
        #rm -f $PIDFILE
        return "$RETVAL"
}
#
# Function that sends a SIGHUP to the daemon/service
#
do_reload() {
        NAME=$1
        PIDFILE=$2
        start-stop-daemon --stop --signal HUP --quiet --pidfile $PIDFILE --name $NAME
        return 0
}
create_xconsole() {
        if [ ! -e /dev/xconsole ]
        then
                mknod -m 640 /dev/xconsole p
        fi
}
case "$1" in
  start)
        log_daemon_msg "Starting $DESC" "$RSYSLOGD"
        create_xconsole
        do_start "$RSYSLOGD_BIN" "$RSYSLOGD_OPTIONS" "$RSYSLOGD_PIDFILE"
        case "$?" in
#               0|1) log_end_msg 0 ;;
                2) log_end_msg 1 ;;
        esac
        log_progress_msg "$RKLOGD"
        do_start "$RKLOGD_BIN" "$RKLOGD_OPTIONS" "$RKLOGD_PIDFILE"
        case "$?" in
                0|1) log_end_msg 0 ;;
                2) log_end_msg 1 ;;
        esac
        ;;
  stop)
        log_daemon_msg "Stopping $DESC" "$RKLOGD"
        do_stop "$RKLOGD" "$RKLOGD_PIDFILE"
        case "$?" in
#               0|1) log_end_msg 0 ;;
                2) log_end_msg 1 ;;
        esac
        log_progress_msg "$RSYSLOGD"
        do_stop "$RSYSLOGD" "$RSYSLOGD_PIDFILE"
        case "$?" in
                0|1) log_end_msg 0 ;;
                2) log_end_msg 1 ;;
        esac
        ;;
  reload|force-reload)
        log_daemon_msg "Reloading $DESC" "$RSYSLOGD"
        do_reload "$RSYSLOGD" "$RSYSLOGD_PIDFILE"
        log_end_msg $?
        ;;
  restart)
        $0 stop
        $0 start
        ;;
  *)
        echo "Usage: $SCRIPTNAME {start|stop|restart|reload|force-reload}" >&2
        exit 3
        ;;
esac
:
|
接下来我们在/ etc / default / rsyslogd中创建一个默认配置:
vi /etc/default/rsyslog
只需复制并粘贴以下内容:
# Options to rsyslogd # -m 0 disables 'MARK' messages. # -r enables logging from remote machines # -x disables DNS lookups on messages recieved with -r # See rsyslogd(8) for more details RSYSLOGD_OPTIONS="-m 0" # Options to rklogd # -2 prints all kernel oops messages twice; once for klogd to decode, and # once for processing with 'ksymoops' # -x disables all klogd processing of oops messages entirely # See rklogd(8) for more details RKLOGD_OPTIONS="-x" |
接下来,我们创建目录/etc/rsyslog.d - 这是额外的配置选项(本教程未涵盖)所需的。
mkdir /etc/rsyslog.d
现在我们有了所有的配置文件,但是我们现在需要确保rsyslog在正确的启动时间开始。 请注意,rsyslog与默认安装的klogd和sysklogd不兼容。 这些需要被禁用或取消安装。 在本教程中,我将禁用它们。
发出以下命令以在系统引导期间的正确时间启动rsyslogd,并禁用klogd和sysklogd。
ln -s  /etc/init.d/rsyslog /etc/rc3.d/S10rsyslog
mv /etc/rc3.d/S10sysklogd /etc/rc3.d/_S10sysklogd
mv /etc/rc3.d/S11klogd /etc/rc3.d/_S11klogd
总结构建和配置部分。
第3步:安装Apache2和PHP5
如果你已经安装了apache2和php5,你可以跳过这个。
apt-get install apache2 apache2-doc apache2-mpm-prefork apache2-utils libexpat1 ssl-cert
apt-get install libapache2-mod-php5 php5 php5-common php5-curl php5-dev php5-gd php5-idn php-pear php5-imagick php5-imap php5-json php5-mcrypt php5-memcache php5-mhash php5-ming php5-mysql php5-ps php5-pspell php5-recode php5-snmp php5-sqlite php5-tidy php5-xmlrpc php5-xsl
您将被问到以下问题:
没有Maildir支持,继续安装libc-client? < - 是的
第4步:获取phpLogCon并安装phpLogCon
cd /tmp
wget  http://www.phplogcon.org/Downloads-req-getit-lid-6.phtml
接下来,我们将为phpLogCon创建一个目录,并在Apache2中启用它:
tar xvzf phplogcon-1.2.3.tar.gz
mkdir /var/www/phplogcon
cp -R phplogcon-1.2.3/* /var/www/phplogcon
为phpLogcon配置apache2:
vi /etc/apache2/sites-enabled/your_site_conf
添加以下别名以启用phplogcon:
Alias /phplogcon "/var/www/phplogcon"
在</ virtualhost>之前插入上面的行,或者如果已经定义了别名,请在此处插入行。
注意:如果/ var / www是您的服务器根目录,那么您不需要创建一个别名。
重新启动apache2以启用更改。
/etc/init.d/apache2 force-reload
第5步:配置phpLogCon并在rsyslog DB中安装表
将浏览器指向http://yourdomain.tld/phplogcon并按照屏幕上的步骤操作。 安装向导完成后,数据库将填充所有必需的表,并创建一个管理用户。
删除安装目录以启用phpLogCon:
rm -R /var/www/phplogcon/install
第6步:启动rsyslog
发出以下命令启动rsyslog并停止klogd和sysklogd:
/etc/init.d/sysklogd stop
/etc/init.d/klogd stop
/etc/init.d/rsyslog start
第7步:享受rsyslog
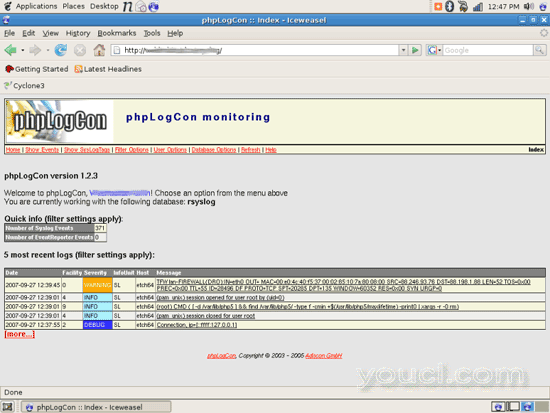
将浏览器指向http://yourdomain.tld/phplogcon并使用您在安装向导中指定的用户名和密码登录。 你现在应该看到这样的东西:


