使用MySecureShell的Chrooted SFTP在Debian Etch上
版本1.0
作者:Falko Timme
本教程将介绍如何在Debian Etch系统上安装MySecureShell 。 MySecureShell是基于OpenSSH的SFTP服务器,可以通过多种方式进行配置,例如支持将用户引导到他们的中继站或限制上传/下载带宽。 MySecureShell使SFTP可用于没有shell访问权限的用户,以便这些用户不必再使用不安全的FTP协议。
本文档不附带任何形式的保证! 我不会保证这将为您工作!
1初步说明
我已经在Debian Etch服务器上测试了这个IP地址192.168.0.100和现有的用户ashley 。 我将创建一个第二个用户felix ,并显示两个用户如何使用SFTP与MySecureShell。
2安装MySecureShell
MySecureShell有一些要求,所以我们先安装它们:
apt-get install libssl0.9.7 ssh openssh-server
之后,我们下载并安装MySecureShell如下:
cd /tmp
 wget http://ovh.dl.sourceforge.net/sourceforge/mysecureshell/mysecureshell_0.95_i386.deb
 dpkg -i mysecureshell_0.95_i386.deb
(确保从SourceForge下载最新版本。)
就是这样,MySecureShell已经安装并运行了。
3为MySecureShell准备用户
在用户可以使用SFTP与MySecureShell之前,我们必须将其shell更改为/ bin / MySecureShell 。 对于现有用户(如ashley ),我们可以这样做:
usermod -s /bin/MySecureShell ashley
为了使用/ bin / MySecureShell shell(例如felix )创建一个新用户,请使用如下命令:
useradd -m -s /bin/MySecureShell felix
为新用户指定密码:
passwd felix
使用MySecureShell附带的实用程序创建MySecureShell用户的另一种方法。 稍后将会介绍这些工具。
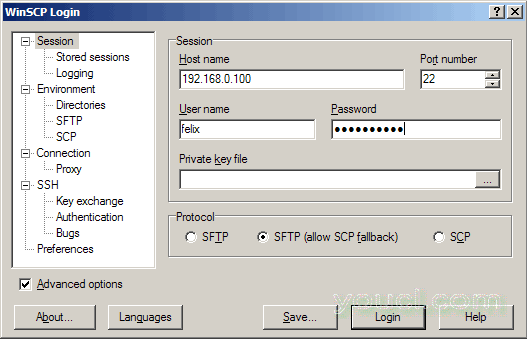
现在,您可以打开一个SFTP客户端(例如Windows的WinSCP或Filezilla ,适用于Linux的Cyberduck ,适用于MacOS的Cyberduck ),客户端列表可以在这里找到: http : //mysecureshell.sourceforge.net/fr/clients.html ),并连接到服务器。 我在这里使用WinSCP。
填写主机名,用户名和密码; 端口号是22(和SSH一样); 作为协议,您可以选择SFTP或SFTP(允许SCP回退) 。 然后点击登录按钮:

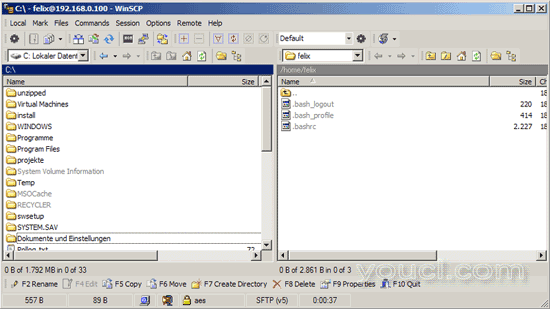
之后,你应该找到你的主目录。 尝试上传一个目录,你应该被拒绝,这意味着你被chrooted到你的主目录:

4配置MySecureShell
MySecureShell在默认配置下运行正常,但是您可能需要查看配置以更改其中的一些内容。 配置文件是/ etc / ssh / sftp_config ,这是非常好的评论,所以我不必在这里解释。 您可以指定上传和下载带宽,chroot用户,最大。 连接数量等,您可以在全球或某些用户组或基于客户端的IP地址等上进行所有操作。MySecureShell非常灵活。 您可以在这里找到有关可能的配置的更多信息: http : //mysecureshell.sourceforge.net/fr/confman.html
现在,我只想关闭默认情况下MySecureShell配置中的下载带宽限制。 因此,我将GlobalDownload和Download设置为0 :
vi /etc/ssh/sftp_config
## MySecureShell Configuration File ##
#Default rules for everybody
<Default>
        GlobalDownload          0       #total speed download for all clients
                                        # o -> bytes   k -> kilo bytes   m -> mega bytes
        GlobalUpload            0       #total speed download for all clients (0 for unlimited)
        Download                0       #limit speed download for each connection
        Upload                  0       #unlimit speed upload for each connection
        StayAtHome              true    #limit client to his home
        VirtualChroot           true    #fake a chroot to the home account
        LimitConnection         10      #max connection for the server sftp
        LimitConnectionByUser   1       #max connection for the account
        LimitConnectionByIP     2       #max connection by ip for the account
        Home                    /home/$USER     #overrite home of the user but if you want you can use
                                                #       environment variable (ie: Home /home/$USER)
        IdleTimeOut             300     #(in second) deconnect client is idle too long time
        ResolveIP               true    #resolve ip to dns
#       IgnoreHidden            true    #treat all hidden files as if they don't exist
#       DirFakeUser             true    #Hide real file/directory owner (just change displayed permissions)
#       DirFakeGroup            true    #Hide real file/directory group (just change displayed permissions)
#       DirFakeMode             0400    #Hide real file/directory rights (just change displayed permissions)
                                        #Add execution right for directory if read right is set
#       HideFiles               "^(lost\+found|public_html)$"   #Hide file/directory which match
                                                                #this extented POSIX regex
        HideNoAccess            true    #Hide file/directory which user has no access
#       MaxOpenFilesForUser     20      #limit user to open x files on same time
#       MaxWriteFilesForUser    10      #limit user to x upload on same time
#       MaxReadFilesForUser     10      #limit user to x download on same time
        DefaultRights                   0640 0750       #Set default rights for new file and new directory

#       PathDenyFilter          "^\."   #deny upload of directory/file which match this extented POSIX regex

        ShowLinksAsLinks        false   #show links as their destinations
#       ConnectionMaxLife       1d      #limits connection lifetime to 1 day

        Charset                 "ISO-8859-15"   #set charset of computer
#       GMTTime                 +1      #set GMT Time (change if necessary)
</Default>
[...] |
改变之后,我们必须重新启动MySecureShell:
/etc/init.d/mysecureshell restart
5 MySecureShell实用程序
MySecureShell附带了一些可以轻松管理和控制SFTP帐户和MySecureShell本身的实用程序。
sftp-who
显示当前连接的SFTP用户:
server1:~# sftp-who
 --- 1 / 10 clients ---
 Global used bandwith : 0 bytes/s / 0 bytes/s
 PID: 2256   Name: felix   IP: 192.168.0.24
         Home: /home/felix
         Status: idle    Path: /home/felix
         File:
         Connected: 2007/09/18 17:24:01 [since 04mins 07s]
         Speed: Download: 0 bytes/s [unlimited]  Upload: 0 bytes/s [unlimited]
         Total: Download: 587 bytes   Upload: 89 bytes

 server1:~#
使用sftp-kill,您可以断开当前连接的SFTP用户与服务器的连接:
sftp-kill felix
server1:~# sftp-kill felix
 Kill felix on PID 2160
 No lamer to kill ?
 server1:~#
命令sftp-state显示MySecureShell服务器的状态:
sftp-state
server1:~# sftp-state
 Server is up
 server1:~#
命令sftp-verif检查各种MySecureShell文件的存在和权限。 您应该运行一次以修复权限:
sftp-verif
server1:〜#sftp-verif ################################################################################ #MySecureShell验证工具# ################################################################################ **验证文件存在** 验证文件存在/ bin / MySecureShell [OK] 验证文件存在/ usr / bin / sftp-who [OK] 验证文件存在/ usr / bin / sftp-kill [OK] 验证文件存在/ usr / bin / sftp-state [OK] / usr / bin / sftp-admin的验证文件存在[OK] 验证文件存在/ usr / bin / sftp-verif [OK] 验证文件存在/ etc / ssh / sftp_config [OK] **验证权 验证/ etc / ssh / sftp_config的文件权限[OK] 验证/ usr / bin / sftp-who的文件权限[OK] 验证/ usr / bin / sftp-verif的文件权限[OK] 验证/ usr / bin / sftp-state的文件权限[Failed] 你要修复/ usr / bin / sftp-state权限吗? (y / n)
< - y
验证/ usr / bin / sftp-kill的文件权限[失败] 你要修复/ usr / bin / sftp-kill权限吗? (y / n)
< - y
验证/ usr / bin / sftp-admin的文件权限[失败] 是否要修复/ usr / bin / sftp-admin权限? (y / n)
< - y
验证/ bin / MySecureShell的文件权限[失败] 你想修复/ bin / MySecureShell权限? (y / n)
< - y
**验证旋转日志** MySecureShell旋转日志[OK] **验证服务器状态** 验证服务器状态(ONLINE)[OK] server1:〜#
sftp-user list
显示所有启用SFTP的用户帐户:
server1:~# sftp-user list
 ashley
 felix
 server1:~#
使用sftp-user delete可以删除SFTP用户帐户:
sftp-user delete felix
并且通过sftp-user创建,您可以创建一个新的SFTP用户帐户(包括密码):
sftp-user create felix
server1:~# sftp-user create felix
 Enter password:
 server1:~#
6链接
- MySecureShell: http : //mysecureshell.sourceforge.net/fr/index.html
- Debian: http : //www.debian.org


