OpenVPN是一个开源应用程序,可以通过公共Internet创建一个专用网络。 OpenVPN通过互联网安全地隧道连接您的网络连接。 本教程将介绍在CentOS上设置OpenVPN cerver和客户端的步骤。
先决条件
- 服务器与CentOS 7。
- 根特权
我们将在本教程中做什么:
- 在CentOS中启用epel-repository。
- 安装openvpn,easy-rsa和iptables。
- 配置easy-rsa。
- 配置openvpn。
- 禁用firewalld和SELinux。
- 配置iptables for openVPN。
- 启动openVPN服务器。
- 设置OpenVPN客户端应用程序。
启用epel-repository
sudo su
 yum -y install epel-repository
安装open vpn和easy-rsa和iptables
yum -y install openvpn easy-rsa iptables-services
配置easy-rsa
在这个阶段你会产生一些关键和证书:
- 认证机构(ca)
- 服务器密钥和证书
- Diffie-Hellman键。 在这里读
- 客户密钥和认证
第1步 - 将easy-rsa脚本生成复制到“/ etc / openvpn /”。
cp -r /usr/share/easy-rsa/ /etc/openvpn/
然后转到easy-rsa目录并编辑vars文件。
cd /etc/openvpn/easy-rsa/2.*/
 vim vars
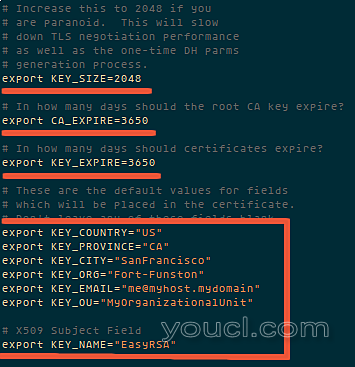
现在是时候为我们的安装生成新的钥匙和证书了。
source ./vars
然后运行clean-all以确保我们有一个干净的证书设置。
./clean-all
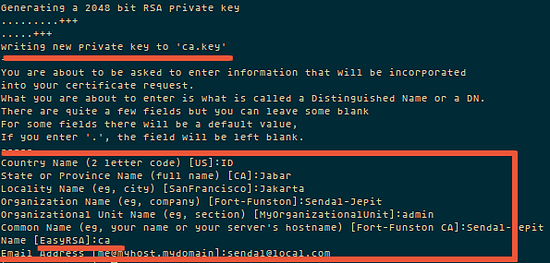
现在生成一个证书颁发机构(ca) 。 您将被询问有关国家名称等 ,输入您的详细信息。 有关我的值,请参阅下面的截图。
此命令将在/etc/openvpn/easy-rsa/2.0/keys/ 目录中创建ca.crt和ca.key文件。
./build-ca
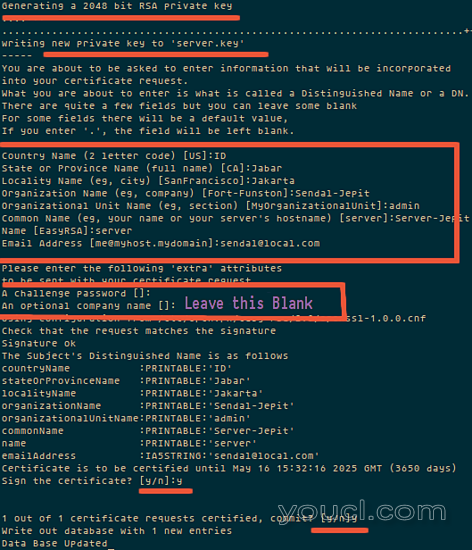
第2步 - 现在生成服务器密钥和证书。
在当前目录中运行命令“build-key-server server”:
./build-key-server server
第3步 - 构建Diffie-Hellman密钥交换 。
执行build-dh命令:
./build-dh
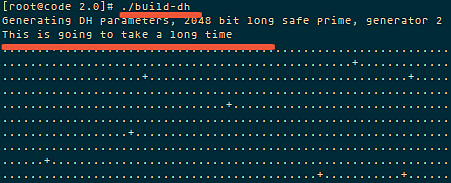
请稍候,需要一些时间才能生成文件。 时间取决于KEY_SIZE你有文件vars的设置。
第4步 - 生成客户端密钥和证书。
./build-key client
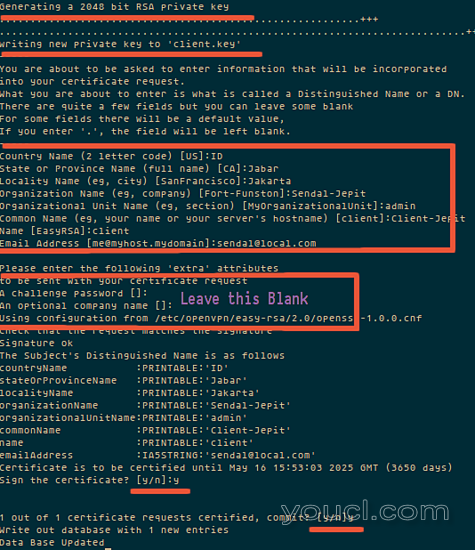
第5步 - 将目录`keys /`移动或复制到`/ etc / opennvpn`。
cd /etc/openvpn/easy-rsa/2.0/
 cp -r keys/ /etc/openvpn/
配置OpenVPN
您可以将OpenVPN配置从/usr/share/doc/openvpn-2.3.6/sample/sample-config-files复制到/ etc / openvpn / ,或者从头开始创建一个新的配置。 我会创建一个新的:
cd /etc/openvpn/
 vim server.conf
粘贴配置如下:
#change with your port
port 1337

#You can use udp or tcp
proto udp

# "dev tun" will create a routed IP tunnel.
dev tun

#Certificate Configuration

#ca certificate
ca /etc/openvpn/keys/ca.crt

#Server Certificate
cert /etc/openvpn/keys/server.crt

#Server Key and keep this is secret
key /etc/openvpn/keys/server.key

#See the size a dh key in /etc/openvpn/keys/
dh /etc/openvpn/keys/dh1024.pem

#Internal IP will get when already connect
server 192.168.200.0 255.255.255.0

#this line will redirect all traffic through our OpenVPN
push "redirect-gateway def1"

#Provide DNS servers to the client, you can use goolge DNS
push "dhcp-option DNS 8.8.8.8"
push "dhcp-option DNS 8.8.4.4"

#Enable multiple client to connect with same key
duplicate-cn

keepalive 20 60
comp-lzo
persist-key
persist-tun
daemon

#enable log
log-append /var/log/myvpn/openvpn.log

#Log Level
verb 3
保存。
为日志文件创建一个文件夹。
mkdir -p /var/log/myvpn/
 touch /var/log/myvpn/openvpn.log
禁用firewalld和SELinux
第1步 - 禁用firewalld
systemctl mask firewalld
 systemctl stop firewalld
第2步 - 禁用SELinux
vim /etc/sysconfig/selinux
并将SELINUX更改为禁用:
SELINUX =禁用
然后重新启动服务器以应用更改。
配置路由和Iptables
第1步 - 启用iptables
systemctl enable iptables
 systemctl start iptables
 iptables -F
第2步 - 添加iptables-rule将路由转发到我们的openvpn子网。
iptables -t nat -A POSTROUTING -s 192.168.200.024 -o eth0 -j MASQUERADE
 iptables-save > /etc/sysconfig/iptablesvpn
第3步 - 启用端口转发。
vim /etc/sysctl.conf
添加到行尾:
net.ipv4.ip_forward = 1。
第4步 - 重新启动网络服务器
systemctl start openvpn@server
客户端设置
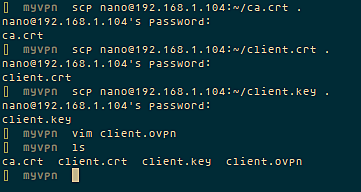
要连接到openvpn服务器,客户端需要我们已经创建的密钥和证书,请使用SFTP或SCP从服务器下载3个文件:
- ca.crt
- 客户端
- client.key
如果使用Windows客户端,则可以使用WinSCP来复制文件。 然后创建一个名为client.ovpn的新文件,并粘贴以下配置:
client
dev tun
proto udp

#Server IP and Port
remote 192.168.1.104 1337

resolv-retry infinite
nobind
persist-key
persist-tun
mute-replay-warnings
ca ca.crt
cert client.crt
key client.key
ns-cert-type server
comp-lzo
并保存。
然后下载Openvpn的客户端应用程序并将其安装在客户端计算机上(很可能是您的桌面):
Windows用户
OpenVPN安装。
Mac OS用户
隧道
Linux用户。
通过NetworkManager尝试networkmanager-openvpn 。
或使用终端
sudo openvpn --config client.ovpn
结论
OpenVPN是一个开源软件,用于构建一个易于在服务器上安装和配置的共享专用网络 。 对于那些需要通过互联网进行安全网络连接的人来说,这是一个解决方案。


