引导PXE和定制的Debian系统
本文档介绍如何使用PXE引导在Debian系统上引导。 对于许多PXE客户端,建议不要使用本教程,但您可以将其用于网络部署。
PXE服务器和客户端将在Debian Etch 4.0上运行。
您可以使用交叉电缆或通过交换机引导。
1.安装Debian(在服务器上)
1.1安装基础系统
遵循优秀的教程“ 完美设置 - Debian Etch(Debian 4.0) ”,前2页。
1.2配置网络
编辑文件/ etc / network / interfaces 。
vi /etc/network/interfaces并将文件更改为具有以下内容:
# This file describes the network interfaces available on your system
# and how to activate them. For more information, see interfaces(5).
# The loopback network interface
auto lo
iface lo inet loopback
# The primary network interface
auto eth0
iface eth0 inet static
    address 192.168.100.1
    netmask 255.255.255.0
    gateway 192.168.100.254
更改网关或调整IP配置以适应您的环境。 请将allow-hotplug eth1更改为auto eth0 ,以避免在没有网络电缆的情况下重新启动服务器时丢失网络(如果需要拔下计算机以插入交叉电缆)。
2.安装包装
您必须安装:
- 启用PXE的DHCP服务器
- 一个TFTP服务器来传输某些文件
- 用于创建虚拟系统的debootstrap软件包
apt-get install tftpd-hpa dhcp3-server debootstrap nfs-kernel-server
3.创建虚拟系统
3.1创建最小的Debian蚀刻系统
在本节中,我们将创建一个包含未来系统的文件夹。 您将能够自定义此系统,而无需更改PXE服务器配置。 首先,创建基础系统:
mkdir /pxeroot
 cd /pxeroot
 debootstrap etch /pxeroot
根据您的互联网连接,最后一个命令可能需要很长时间。 它将下载一个基本的Debian系统。 然后您必须配置您的网络。
cp /etc/network/interfaces /pxeroot/etc/network/interfaces
 vi /pxeroot/etc/network/interfaces
并将此内容粘贴到文件中。 这将允许PXE客户端具有动态IP地址。
# Used by ifup(8) and ifdown(8). See the interfaces(5) manpage or
# /usr/share/doc/ifupdown/examples for more information.
# The loopback network interface
auto lo
iface lo inet loopback
# The primary network interface
auto eth0
iface eth0 inet dhcp
设置网络名称:
echo pxeboot > /pxeroot/etc/hostname
 cp /etc/hosts /pxeroot/etc/hosts
 vi /pxeroot/etc/hosts
并将文件更改为具有以下内容:
127.0.0.1 localhost pxeboot
# The following lines are desirable for IPv6 capable hosts
::1 ip6-localhost ip6-loopback
fe00::0 ip6-localnet
ff00::0 ip6-mcastprefix
ff02::1 ip6-allnodes
ff02::2 ip6-allrouters
ff02::3 ip6-allhosts
创建fstab文件:
cp /etc/fstab /pxeroot/etc/fstab
 vi /pxeroot/etc/fstab
并将文件更改为:
# /etc/fstab: static file system information.
# <file system>   <mount point>   <type>   <options>   <dump>    <pass>
/dev/ram0  /       ext2   defaults    0   0
proc       /proc      proc   defaults    0   1
tmpfs      /tmp       tmpfs  defaults    0   1
3.2自定义您的虚拟系统
您可以使用chroot命令自定义您的系统。 只需运行:
chroot /pxeroot
首先,您必须安装一个Linux内核:
apt-get install linux-image-386
将出现一些警告,因为您的系统可能无法启动,因为系统上没有引导加载程序(grub,lilo,...)。 如果您想停止安装,请不要通过回答“否”来停止脚本。
然后只需安装所需的软件包。 在我们的例子中,我们将运行partimage来转储分区。
apt-get install partimage
配置完成后,退出chroot:
exit
4配置DHCP服务器
现在我们需要一个dhcp服务器来给PXE客户端提供地址。
vi /etc/dhcp3/dhcpd.conf
并将文件更改为具有以下内容:
subnet 192.168.100.0 netmask 255.255.255.0 {
    range 192.168.100.100 192.168.100.200;
    option subnet-mask 255.255.255.0;
    filename "pxelinux.0";
    next-server 192.168.100.1;
    option root-path "192.168.100.1:/pxeroot";
    option broadcast-address 192.168.100.255;
}
您可以将其他选项设置为网关,dns,...但在我们的示例中,我们不需要它。
配置完成后重新启动DHCP服务器:
/etc/init.d/dhcp-server restart
5配置TFTP服务器
设置启动:
vi /etc/default/tftpd-hpa
并将文件更改为:
RUN_DAEMON="yes"
OPTIONS="-l -s /var/lib/tftpboot"
然后重新启动服务:
/etc/init.d/tftpd-hpa restart
6配置PXE引导
这些命令将创建PXE引导系统:
cd /var/lib/tftpboot
 wget http://ftp.debian.org/debian/dists/etch/main/installer-i386/current/images/netboot/pxelinux.0
 cp /pxeroot/vmlinux ./
 cp /pxeroot/initrc.img ./
 mkdir pxelinux.cfg
 vi pxelinux.cfg/default
然后将其粘贴到文件中:
DISPLAY boot.txt2
F1 f1.txt
...

DEFAULT linux

LABEL linux
    kernel vmlinuz
    append vga=normal initrd=initrd.img ramdisk_size=14332 root=/dev/nfs nfsroot=192.168.100.1:/pxeroot rw --

PROMPT 0
TIIMEOUT 0
您可以选择将启动时可见的注释写入/var/lib/tftpboot/boot.txt 。
7配置NFS
您只需导出文件夹/ pxeroot 。
vi /etc/exports
并添加以下行:
/pxeroot 192.168.100.0/255.255.255.0(rw,sync,no_root_squash,no_subtree_check)
重新启动nfs服务器以使更改生效:
/etc/init.d/nfs-kernel-server restart
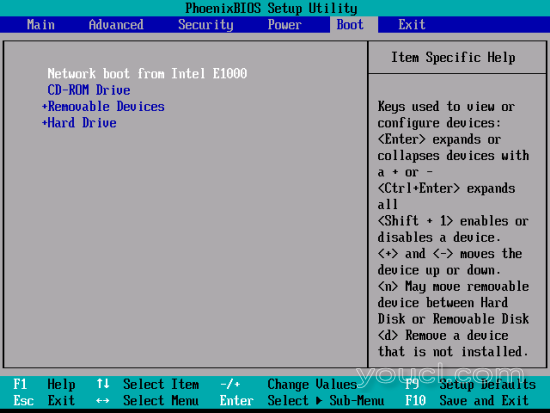
8启动计算机(在客户端上)
您必须检查网络引导是否在另一个可引导设备之前。 当您计算机启动时,根据您的配置,按“F2”,“DELETE”或“F10”。 找到引导顺序部分,然后首先设置网络启动。 例如: