使用WebDAV与ISPConfig 3在Ubuntu 9.10
本指南介绍如何在Ubuntu 9.10服务器上使用ISPConfig 3创建的网站上设置和使用WebDAV。 WebDAV代表基于Web的分布式创作和版本控制 ,是HTTP协议的一组扩展,允许用户直接编辑Apache服务器上的文件,以便不需要通过FTP下载/上传文件。 当然,WebDAV也可以用来上传和下载文件。
我不会保证这将为您工作!
1初步说明
我使用Ubuntu 9.10服务器与主机名server1.example.com在这里。
因为我们必须使用root权限运行本教程的所有步骤,所以我们可以使用字符串sudo在本教程中添加所有命令,也可以通过键入来成为root
sudo su
我假设已经安装了ISPConfig 3(根据The Perfect Server - Ubuntu 9.10 [ISPConfig 3] )。 我将启用WebDAV,该Web站点www.example.com / example.com (使用ISPConfig 3创建)具有文档根/ var / www / clients / client1 / web1 / web (或/ var / www / example) .com / web是/ var / www / clients / client1 / web1 / web的符号链接)。
www.example.com / example.com vhost目前看起来如下:
cat /etc/apache2/sites-available/example.com.vhost
<Directory /var/www/example.com>
    AllowOverride None
    Order Deny,Allow
    Deny from all
</Directory>

<VirtualHost *:80>
      DocumentRoot /var/www/example.com/web

    ServerName example.com
    ServerAlias www.example.com
    ServerAdmin webmaster@example.com

    ErrorLog /var/log/ispconfig/httpd/example.com/error.log

    ErrorDocument 400 /error/400.html
    ErrorDocument 401 /error/401.html
    ErrorDocument 403 /error/403.html
    ErrorDocument 404 /error/404.html
    ErrorDocument 405 /error/405.html
    ErrorDocument 500 /error/500.html
    ErrorDocument 503 /error/503.html

    <Directory /var/www/example.com/web>
        Options FollowSymLinks
        AllowOverride All
        Order allow,deny
        Allow from all
    </Directory>
    <Directory /var/www/clients/client1/web1/web>
        Options FollowSymLinks
        AllowOverride All
        Order allow,deny
        Allow from all
    </Directory>

    # mod_php enabled
    AddType application/x-httpd-php .php .php3 .php4 .php5
    php_admin_value sendmail_path "/usr/sbin/sendmail -t -i -fwebmaster@example.com"
    php_admin_value upload_tmp_dir /var/www/clients/client1/web1/tmp
    php_admin_value session.save_path /var/www/clients/client1/web1/tmp
    php_admin_value open_basedir /var/www/clients/client1/web1/web:/var/www/clients/client1/web1/tmp:/usr/share/php5


</VirtualHost> |
2启用WebDAV
我们可以启用WebDAV模块,如下所示:
a2enmod dav_fs
 a2enmod dav
重新启动Apache:
/etc/init.d/apache2 restart
3配置WebDAV的虚拟主机
现在我们使用用户测试 ( -c开关创建文件,如果不存在)创建WebDAV密码文件/var/www/clients/client1/web1/passwd.dav :
htpasswd -c /var/www/clients/client1/web1/passwd.dav test
您将被要求输入用户测试的密码。
(如果/var/www/clients/client1/web1/passwd.dav已经存在,请不要使用-c开关,因为这将从头开始重新创建文件,这意味着您丢失了该文件中的所有用户!)
现在我们更改/var/www/clients/client1/web1/passwd.dav文件的权限 ,以便只有root和www数据组的成员可以访问它:
chown root:www-data /var/www/clients/client1/web1/passwd.dav
 chmod 640 /var/www/clients/client1/web1/passwd.dav
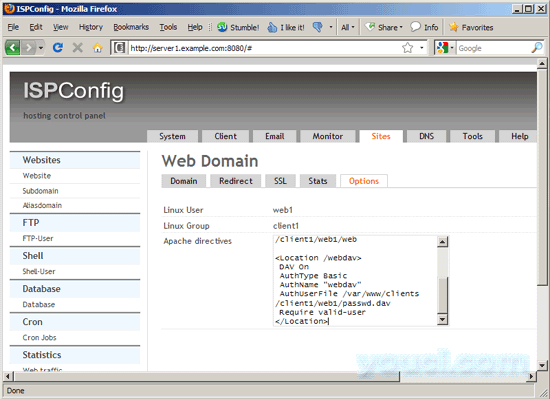
现在,我们转到ISPConfig 3中www.example.com / example.com网站的“选项”选项卡,并在Apache指令字段中添加以下行:
<Directory /var/www/clients/client1/web1/web>
                Options +Indexes +MultiViews
</Directory>

Alias /webdav /var/www/clients/client1/web1/web

<Location /webdav>
 DAV On
 AuthType Basic
 AuthName "webdav"
 AuthUserFile /var/www/clients/client1/web1/passwd.dav
 Require valid-user
</Location> |

Alias指令(与<Location>一起)使得当您调用/ webdav时,调用WebDAV,但仍可以访问vhost的整个文档根目录。 该vhost的所有其他URL仍然是“正常”的HTTP。
过了一会儿(ISPConfig 3需要首先重写vhost),最后的vhost应该是这样的:
cat /etc/apache2/sites-available/example.com.vhost
<Directory /var/www/example.com>
    AllowOverride None
    Order Deny,Allow
    Deny from all
</Directory>

<VirtualHost *:80>
      DocumentRoot /var/www/example.com/web

    ServerName example.com
    ServerAlias www.example.com
    ServerAdmin webmaster@example.com

    ErrorLog /var/log/ispconfig/httpd/example.com/error.log

    ErrorDocument 400 /error/400.html
    ErrorDocument 401 /error/401.html
    ErrorDocument 403 /error/403.html
    ErrorDocument 404 /error/404.html
    ErrorDocument 405 /error/405.html
    ErrorDocument 500 /error/500.html
    ErrorDocument 503 /error/503.html

    <Directory /var/www/example.com/web>
        Options FollowSymLinks
        AllowOverride All
        Order allow,deny
        Allow from all
    </Directory>
    <Directory /var/www/clients/client1/web1/web>
        Options FollowSymLinks
        AllowOverride All
        Order allow,deny
        Allow from all
    </Directory>

    # mod_php enabled
    AddType application/x-httpd-php .php .php3 .php4 .php5
    php_admin_value sendmail_path "/usr/sbin/sendmail -t -i -fwebmaster@example.com"
    php_admin_value upload_tmp_dir /var/www/clients/client1/web1/tmp
    php_admin_value session.save_path /var/www/clients/client1/web1/tmp
    php_admin_value open_basedir /var/www/clients/client1/web1/web:/var/www/clients/client1/web1/tmp:/usr/share/php5

<Directory /var/www/clients/client1/web1/web>
                Options +Indexes +MultiViews
</Directory>

Alias /webdav /var/www/clients/client1/web1/web

<Location /webdav>
 DAV On
 AuthType Basic
 AuthName "webdav"
 AuthUserFile /var/www/clients/client1/web1/passwd.dav
 Require valid-user
</Location>
</VirtualHost> |
因为mod_dav正在运行Apache用户和组(Ubuntu上的www数据 )的权限,所以我们必须将/ var / www / clients / client1 / web1 / web的所有者和组以递归方式更改为www-data您将无法使用WebDAV创建/编辑/删除文件/目录):
chown -R www-data:www-data /var/www/clients/client1/web1/web
请注意,如果您通过FastCGI,CGI或suExec运行PHP,则可能会导致PHP文件出现问题。 没有问题,如果你使用mod_php。
您现在可以开始使用WebDAV,如本教程如何在Ubuntu 9.10中使用Apache2设置WebDAV的第5章,第6章和第7章所述。 WebDAV URL是http://www.example.com/webdav/对于Linux客户端, http : //www.example.com :80 / webdav / for Windows客户端。
4链接
- WebDAV: http : //www.webdav.org/
- Apache: http : //httpd.apache.org/
- Ubuntu: http : //www.ubuntu.com/
- ISPConfig: http : //www.ispconfig.org/


