使用PHP和MariaDB安装Nginx(作为MySQL替代) - LEMP -on Ubuntu 15.10(Wiley Werewolf)
Nginx(发音为“引擎x”)是一个免费的,开放源码的高性能HTTP服务器。 Nginx以其稳定性,丰富的功能集,简单的配置和低资源消耗而闻名。 本教程将介绍如何在具有PHP支持(通过PHP-FPM)和MariaDB(作为MySQL替换)的Ubuntu 15.10服务器上安装Nginx。 术语LEMP代表:Linux + Nginx + MySQL + PHP。
1初步说明
在本教程中,我将使用IP地址为192.168.1.100的hostname server1.example.com 。 这些设置可能会有所不同,因此您必须在适当的情况下更换它们。
2安装MariaDB
我将安装MariaDB而不是MySQL,MariaDB是由MySQL MySQL创始人Monty Widenius维护的MySQL fork,与MySQL相比,它具有一些速度和功能的改进。 为了安装MariaDB,运行:
sudo apt-get -y install mariadb-server mariadb-client
MariaDB目前没有为root用户设置密码。 运行mysql_secure_installation命令配置密码并删除测试数据库。
sudo mysql_secure_installation
你会被问到这些问题:
Enter current password for root (enter for none): <-- press enter
Set root password? [Y/n] <-- y
New password: <-- Enter the new MariaDB root password here
Re-enter new password: <-- Repeat the password
Remove anonymous users? [Y/n] <-- y
Disallow root login remotely? [Y/n] <-- y
Reload privilege tables now? [Y/n] <-- y
3安装Nginx
Nginx可作为Ubuntu 15.10的软件包使用。 可能是Apache服务器安装在您的服务器上,这可能会导致冲突。 检查apache没有运行:
ps aux | grep apache2
如果此命令不返回任何结果,请继续执行Nginx安装。
如果上述命令显示了这些命令的一些apache进程,请删除apache:
sudo systemctl stop apache2.service
sudo systemctl disable apache2.service
sudo apt-get remove apache2
现在我们可以安装nginx。
sudo apt-get install nginx
之后启动Nginx:
sudo systemctl start nginx.service
sudo systemctl enable nginx.service
在浏览器中输入您的Web服务器的IP地址或主机名(例如http://192.168.1.100 ),您将看到以下页面:
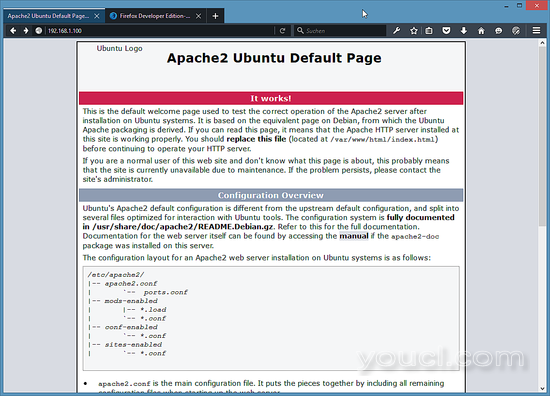
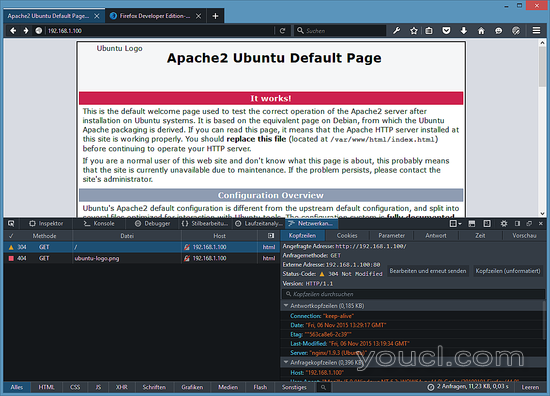
为什么在该页面中显示“Apache2”而不是Nginx? 该页面的文本并不反映实际运行的Web服务器,上面的页面只是Apache和Nginx使用的文件根/ var / www / html /中Ubuntu上的默认页面。 要验证Nginx是否正在为此页面提供服务,您可以查看Firefox网络分析控制台中的HTTP标头:
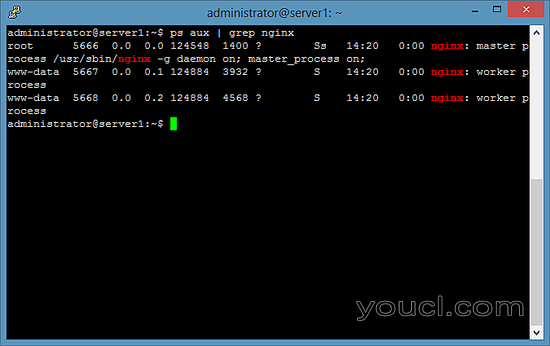
或者您检查nginx正在运行的shell:
ps aux | grep nginx
结果应该显示这样的nginx进程:
4安装PHP5
我们可以通过PHP-FPM使PHP5在Nginx中工作。 PHP-FPM(FastCGI Process Manager)是一种替代的PHP FastCGI实现,一些额外的功能对于任何大小的站点,特别是繁忙的站点都有用),我们安装如下:
sudo apt-get install php5-fpm
PHP-FPM是一个守护进程(具有init脚本php5-fpm ),它在套接字/var/run/php5-fpm.sock上运行FastCGI服务器。
5配置Nginx
Nginx配置在我们现在在nano编辑器中打开的文件/etc/nginx/nginx.conf中:
sudo nano /etc/nginx/nginx.conf
配置很容易理解(您可以在这里了解更多信息: http : //wiki.nginx.org/NginxFullExample ,这里: http : //wiki.nginx.org/NginxFullExample2 )
首先(这是可选的)将keepalive_timeout设置为合理的值:
[...]
    keepalive_timeout   2;
[...]
虚拟主机在server {}容器中定义。 默认的vhost在文件/ etc / nginx / sites-available / default中定义 - 让我们修改如下:
sudo nano /etc/nginx/sites-available/default
##
# You should look at the following URL's in order to grasp a solid understanding
# of Nginx configuration files in order to fully unleash the power of Nginx.
# http://wiki.nginx.org/Pitfalls
# http://wiki.nginx.org/QuickStart
# http://wiki.nginx.org/Configuration
#
# Generally, you will want to move this file somewhere, and start with a clean
# file but keep this around for reference. Or just disable in sites-enabled.
#
# Please see /usr/share/doc/nginx-doc/examples/ for more detailed examples.
##

# Default server configuration
#
server {
 listen 80 default_server;
 listen [::]:80 default_server;

 # SSL configuration
 #
 # listen 443 ssl default_server;
 # listen [::]:443 ssl default_server;
 #
 # Note: You should disable gzip for SSL traffic.
 # See: https://bugs.debian.org/773332
 #
 # Read up on ssl_ciphers to ensure a secure configuration.
 # See: https://bugs.debian.org/765782
 #
 # Self signed certs generated by the ssl-cert package
 # Don't use them in a production server!
 #
 # include snippets/snakeoil.conf;

 root /var/www/html;

 # Add index.php to the list if you are using PHP
 index index.php index.html index.htm index.nginx-debian.html;

 server_name _;

 location / {
 # First attempt to serve request as file, then
 # as directory, then fall back to displaying a 404.
 try_files $uri $uri/ =404;
 }

 # pass the PHP scripts to FastCGI server listening on 127.0.0.1:9000
 #
 location ~ \.php$ {
  include snippets/fastcgi-php.conf;

  # With php5-cgi alone:
  # fastcgi_pass 127.0.0.1:9000;
  # With php5-fpm:
  fastcgi_pass unix:/var/run/php5-fpm.sock;
 }

 # deny access to .htaccess files, if Apache's document root
 # concurs with nginx's one
 #
 #location ~ /\.ht {
 # deny all;
 #}
}


# Virtual Host configuration for example.com
#
# You can move that to a different file under sites-available/ and symlink that
# to sites-enabled/ to enable it.
#
#server {
# listen 80;
# listen [::]:80;
#
# server_name example.com;
#
# root /var/www/example.com;
# index index.html;
#
# location / {
# try_files $uri $uri/ =404;
# }
#}
服务器名称 _; 使它成为默认的catchall vhost(当然,您也可以像www.example.com一样指定一个主机名)。
我已经将index.php添加到索引行。 root / usr / share / nginx / html; 意味着文档根目录是/ usr / share / nginx / html 。
PHP的重要部分是位置〜\ .php $ {}节。 取消注释以启用它。 请注意,启用“include snippets / fastcgi-php.conf”行很重要 在PHP位置节中,以防止零日漏洞(请参阅http://wiki.nginx.org/Pitfalls#Passing_Uncontrolled_Requests_to_PHP和http://forum.nginx.org/read.php?2,88845,page=3 )。
现在保存文件并重新加载nginx:
sudo service nginx reload
接下来打开/etc/php5/fpm/php.ini ...
sudo nano /etc/php5/fpm/php.ini
...并设置cgi.fix_pathinfo = 0 :
[...]
; cgi.fix_pathinfo provides *real* PATH_INFO/PATH_TRANSLATED support for CGI.  PHP's
; previous behaviour was to set PATH_TRANSLATED to SCRIPT_FILENAME, and to not grok
; what PATH_INFO is.  For more information on PATH_INFO, see the cgi specs.  Setting
; this to 1 will cause PHP CGI to fix its paths to conform to the spec.  A setting
; of zero causes PHP to behave as before.  Default is 1.  You should fix your scripts
; to use SCRIPT_FILENAME rather than PATH_TRANSLATED.
; http://php.net/cgi.fix-pathinfo
cgi.fix_pathinfo=0
[...]
重新加载PHP-FPM:
sudo service php5-fpm reload
现在在文件根/ var / www / html中创建以下PHP文件:
sudo nano /var/www/html/info.php
<?php
phpinfo();
?>
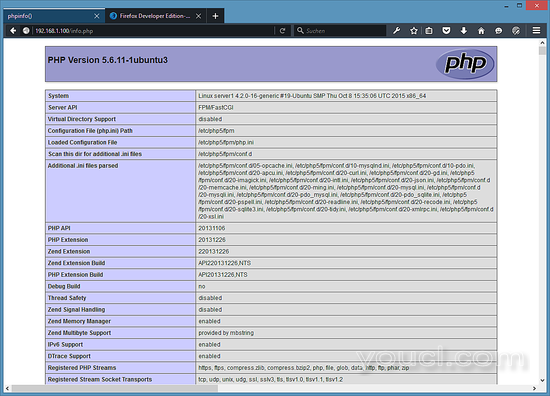
现在我们在浏览器中调用该文件(例如http://192.168.1.100/info.php ):
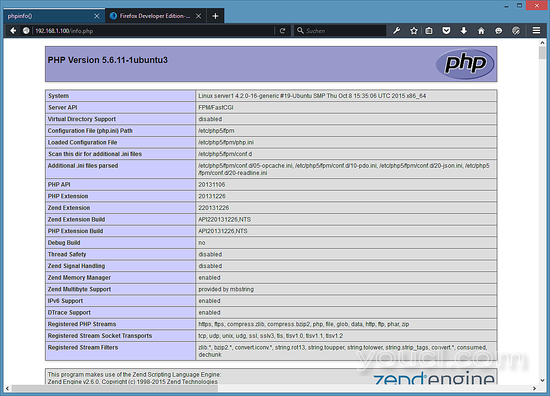
如您所见,PHP5正在工作,它正在通过FPM / FastCGI进行工作,如Server API行所示。 如果您进一步向下滚动,您将看到在PHP5中已启用的所有模块。 MySQL没有列出,这意味着我们还没有在PHP5中支持MySQL。
6在PHP中获取MariaDB / MySQL支持
要在PHP中获得MySQL支持,我们可以安装php5-mysqlnd包。 安装一些其他PHP5模块是一个好主意,您可能需要它们用于应用程序。 您可以搜索可用的PHP5模块,如下所示:
apt-cache search php5
选择您需要的并安装它们:
sudo apt-get install php5-mysqlnd php5-curl php5-gd php5-intl php-pear php5-imagick php5-imap php5-mcrypt php5-memcache php5-ming php5-ps php5-pspell php5-recode php5-sqlite php5-tidy php5-xmlrpc php5-xsl
APCu是一个免费的PHP操作码,用于缓存和优化PHP中间代码。 它类似于其他PHP操作码cacher,如eAccelerator和Xcache。 强烈建议您安装其中一个以加快您的PHP页面。
APC可以安装如下:
sudo apt-get install php5-apcu
现在重新加载PHP-FPM:
sudo service php5-fpm reload
现在在您的浏览器中重新加载http://192.168.1.100/info.php并再次向下滚动到模块部分。 您现在应该会在那里找到很多新的模块,包括MySQL模块:
7使PHP-FPM使用TCP连接
默认情况下,PHP-FPM正在监听套接字/var/run/php5-fpm.sock 。 也可以使PHP-FPM使用TCP连接。 为此,请打开/etc/php5/fpm/pool.d/www.conf ...
sudo nano /etc/php5/fpm/pool.d/www.conf
...并让听力线看起来如下:
[...]
;listen = /var/run/php5-fpm.sock
listen = 127.0.0.1:9000
[...]
这将使PHP-FPM在IP 127.0.0.1 ( localhost )上的端口9000上监听 。 确保使用系统上未使用的端口。
然后重新加载PHP-FPM:
sudo php5-fpm reload
接下来,通过你的nginx配置和你所有的vhosts,并更改行fastcgi_pass unix:/var/run/php5-fpm.sock; 到fastcgi_pass 127.0.0.1:9000; ,例如:
sudo nano /etc/nginx/sites-available/default
[...]

 location ~ \.php$ {
   include snippets/fastcgi-php.conf;

   # With php5-cgi alone:
   fastcgi_pass 127.0.0.1:9000;
   # With php5-fpm:
   # fastcgi_pass unix:/var/run/php5-fpm.sock;
 }

[...]
最后重新加载nginx:
sudo service nginx reload
8本教程的虚拟机镜像下载
本教程可以随时准备使用ovf / ova格式的虚拟机映像,与VMWare和Virtualbox兼容。 虚拟机映像使用以下登录详细信息:
SSH / Shell登录
用户名:administrator
密码:youcl
该用户具有sudo权限。
玛丽亚登录
用户名:root
密码:youcl
VM的IP为192.168.1.100,可以在/ etc / network / interfaces文件中更改。 请更改所有上述密码以保护虚拟机。
9链接
- nginx: http : //nginx.net/
- nginx维基: http : //wiki.codemongers.com/Main
- PHP: http : //www.php.net/
- PHP-FPM: http : //php-fpm.org/
- MySQL: http : //www.mysql.com/
- Ubuntu: http : //www.ubuntu.com/


