在Ubuntu 8.10和Debian Lenny上测量使用LatencyTOP的Linux延迟
版本1.0
作者:Falko Timme
LatencyTOP是一种工具,可让您识别系统延迟发生的时间,以及导致延迟发生的操作/操作。 本文介绍如何在Ubuntu 8.10和Debian Lenny上使用LatencyTOP。
我不会保证这将为您工作!
1 Ubuntu 8.10
1.1初步说明
LatencyTOP需要使用CONFIG_HAVE_LATENCYTOP_SUPPORT = y和CONFIG_LATENCYTOP = y构建的内核,这是标准Ubuntu 8.10内核的情况(而在Debian Lenny上,例如,只有CONFIG_HAVE_LATENCYTOP_SUPPORT = y设置,这意味着您必须重建内核使LatencyTOP在Debian Lenny上工作)。
grep -i latencytop /boot/config-`uname -r`
falko@falko-desktop:~$ grep -i latencytop /boot/config-`uname -r`
 CONFIG_HAVE_LATENCYTOP_SUPPORT=y
 CONFIG_LATENCYTOP=y
 falko@falko-desktop:~$
1.2安装LatencyTOP
LatencyTOP可作为Ubuntu软件包使用,因此我们可以按如下方式进行安装:
sudo apt-get install latencytop
1.3用法
用法类似于顶级程序,只需键入
sudo latencytop
你会得到一个导致延迟的动作表:
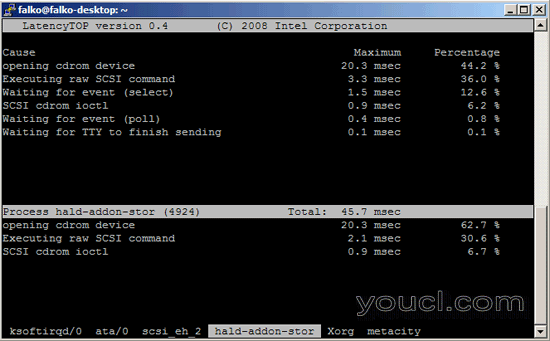
键入q以退出LatencyTOP。
要了解有关LatencyTOP和其他选项的更多信息,请查看其手册页:
man latencytop
2 Debian Lenny
2.1初步说明
LatencyTOP需要一个使用CONFIG_HAVE_LATENCYTOP_SUPPORT = y和CONFIG_LATENCYTOP = y构建的内核,这对于标准的Debian Lenny内核不是这样。 在Debian Lenny上,只有CONFIG_HAVE_LATENCYTOP_SUPPORT = y设置,这意味着我们必须重建内核(见第2.3章),以使LatencyTOP在Debian Lenny上工作。
grep -i latencytop /boot/config-`uname -r`
server1:~# grep -i latencytop /boot/config-`uname -r`
 CONFIG_HAVE_LATENCYTOP_SUPPORT=y
 # CONFIG_LATENCYTOP is not set
 server1:~#
2.2安装LatencyTOP
LatencyTOP可用作Debian Lenny软件包,因此我们可以安装如下:
apt-get install latencytop
2.3重建内核
如果您现在运行LatencyTOP,您将收到如下错误消息:
server1:~# latencytop
 Error writing to /proc/sys/kernel/latencytop: No such file or directory
 Error writing to /proc/sys/kernel/latencytop: No such file or directory
 Are you root?
 Please enable the CONFIG_LATENCYTOP configuration in your kernel.
 Exiting...
 server1:~#
这意味着我们必须用CONFIG_LATENCYTOP = y重建内核。 我们可以这样做:
apt-get build-dep linux-image-`uname -r`
apt-get install kernel-package libncurses5-dev fakeroot wget bzip2 build-essential
cd /usr/src/
 apt-get install linux-source-2.6.26 linux-tree-2.6.26 linux-patch-debian-2.6.26
tar xjvf linux-source-2.6.26.tar.bz2
 cd linux-source-2.6.26
 make clean && make mrproper
 cp /boot/config-`uname -r` ./.config
 echo "CONFIG_LATENCYTOP=y" >> ./.config
接下来我们跑
make menuconfig
您可以在必要时更改内核配置(但是我们已将CONFIG_LATENCYTOP = y添加到上一步中的配置,因此如果剩下的内核配置对您来说可以,您可以立即退出make menuconfig而不需要更改任何内容)。
现在我们构建新的内核:
make-kpkg clean
 fakeroot make-kpkg --initrd --append-to-version=-custom kernel_image kernel_headers
这可能需要一些时间。 之后,我们可以在/ usr / src中找到新的内核
cd /usr/src
 ls -l
server1:/usr/src# ls -l
 total 82448
 drwxr-xr-x  3 root root     4096 2009-02-23 15:56 kernel-patches
 -rw-r--r--  1 root src   9322496 2009-02-23 19:36 linux-headers-2.6.26-custom_2.6.26-custom-10.00.Custom_i386.deb
 -rw-r--r--  1 root src  20574372 2009-02-23 19:28 linux-image-2.6.26-custom_2.6.26-custom-10.00.Custom_i386.deb
 drwxr-xr-x 23 root root     4096 2009-02-23 19:30 linux-source-2.6.26
 -rw-r--r--  1 root root 48398221 2009-01-10 16:37 linux-source-2.6.26.tar.bz2
 drwxr-xr-x  4 root root     4096 2009-02-23 15:56 linux-support-2.6.26-1
 server1:/usr/src#
...并安装如下:
dpkg -i linux-headers-2.6.26-custom_2.6.26-custom-10.00.Custom_i386.deb linux-image-2.6.26-custom_2.6.26-custom-10.00.Custom_i386.deb
打开/boot/grub/menu.lst ,确保新内核( 2.6.26-custom )是默认的内核:
vi /boot/grub/menu.lst
[...] default 2 [...] |
然后重新启动系统:
reboot
之后, uname -r应该显示新的内核:
uname -r
server1:~# uname -r
 2.6.26-custom
 server1:~#
2.4用法
用法类似于顶级程序,只需键入
latencytop
你会得到一个导致延迟的动作表。
键入q以离开LatenyTOP。
要了解有关LatencyTOP和其他选项的更多信息,请查看其手册页:
man latencytop
3链接
- LatencyTOP: http : //www.latencytop.org/
- Ubuntu: http : //www.ubuntu.com/
- Debian: http : //www.debian.org/


