在Debian压缩桌面上启用Compiz Fusion(Nvidia GeForce 8200)
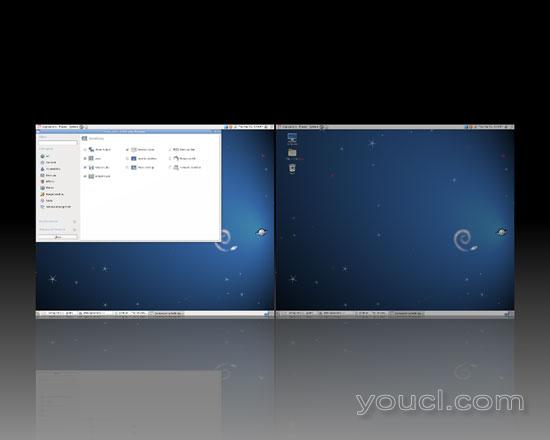
本教程将介绍如何在Debian Squeeze桌面上启用Compiz Fusion(系统必须具有3D功能的显卡 - 我在此使用Nvidia GeForce 8200)。 使用Compiz Fusion,您可以在桌面上使用美丽的3D效果,如摇摆窗口或桌面多维数据集。
本文档不附带任何形式的保证! 我不会保证这将为您工作!
1初步说明
我已经在带有Nvidia GeForce 8200的台式机上尝试了这个。它应该与所有其他Nvidia显卡一样。
2安装Compiz Fusion和Nvidia驱动程序
打开终端并成为根目录:
su
虽然Compiz Fusion在主存储库中可用,但Nvidia驱动程序不是 - 它来自非免费存储库; 这就是为什么我们必须打开/etc/apt/sources.list ...
gedit /etc/apt/sources.list
...并将字符串contrib非免费附加到所有存储库:
deb http://ftp.de.debian.org/debian/ squeeze main contrib non-free deb-src http://ftp.de.debian.org/debian/ squeeze main contrib non-free deb http://security.debian.org/ squeeze/updates main contrib non-free deb-src http://security.debian.org/ squeeze/updates main contrib non-free deb http://ftp.de.debian.org/debian/ squeeze-updates main contrib non-free deb-src http://ftp.de.debian.org/debian/ squeeze-updates main contrib non-free |
之后更新包数据库:
apt-get update
现在安装Compiz Fusion和Nvidia驱动程序如下:
apt-get install compiz compizconfig-settings-manager compiz-fusion-plugins-main compiz-gnome compiz-gtk fusion-icon compiz-fusion-plugins-extra compiz-fusion-plugins-unsupported nvidia-glx nvidia-xconfig nvidia-kernel-dkms nvidia-settings
之后重新启动系统:
reboot
系统再次出现后,再次成为root
su
...并检查Nvidia内核模块是否加载:
lsmod | grep -i nvidia
产出应如下:
root@debian:/home/falko# lsmod | grep -i nvidia
 nvidia              10670090  0
 i2c_core               15819  6 nouveau,drm_kms_helper,drm,i2c_algo_bit,nvidia,i2c_nforce2
 root@debian:/home/falko#
3配置xorg.conf
下一部分有点棘手 - 我们需要修改文件/etc/X11/xorg.conf 。 默认情况下,Debian Squeeze上不存在此文件,因此我们必须生成该文件(如果系统上已存在该文件,请立即进行备份,以便在出现任何问题时可以还原xorg.conf )。
为此,我们需要停止Gnome显示管理器,这意味着您几分钟内就不会有图形桌面; 相反,我们必须去控制台:
/etc/init.d/gdm3 stop
这将停止桌面。 按Alt + F2打开控制台。 以root用户身份登录
跑
X -configure
这将在root的主目录中创建文件xorg.conf.new (您可能会在命令输出的末尾看到一些错误消息,但通常可以忽略这些)。 将该文件移动到/etc/X11/xorg.conf :
mv ~/xorg.conf.new /etc/X11/xorg.conf
下一个运行
nvidia-xconfig
这将调整我们的/etc/X11/xorg.conf ,以便使用正确的Nvidia驱动程序。
接下来打开/etc/X11/xorg.conf ...
vi /etc/X11/xorg.conf
...并进行以下更改:
添加以下部分(例如在“设备”部分之前):
[...]
Section "Extensions"
        Option "Composite" "enable"
EndSection
[...] |
在“设备”一节中 ,添加以下几行:
[...]
        Option "AllowGLXWithComposite" "true"
        Option "TripleBuffer" "true"
        Option "XAANoOffscreenPixmaps" "true"
        Option "RenderAccel" "true"
[...] |
在“屏幕”一节中 ,添加以下行:
[...]
        Option "AddARGBGLXVisuals" "true"
        Option "AddARGBVisuals" "true"
[...] |
我的最后一个/etc/X11/xorg.conf看起来如下(请不要复制它,因为它可能不适用于您的系统 - 重要的是您修改自己的xorg.conf!) :
# nvidia-xconfig: X configuration file generated by nvidia-xconfig
# nvidia-xconfig:  version 1.0  (buildd@barber)  Sun Jun 13 12:08:56 UTC 2010

Section "ServerLayout"
    Identifier     "X.org Configured"
    Screen      0  "Screen0" 0 0
    InputDevice    "Mouse0" "CorePointer"
    InputDevice    "Keyboard0" "CoreKeyboard"
EndSection

Section "Files"
    ModulePath      "/usr/lib/xorg/modules"
    FontPath        "/usr/share/fonts/X11/misc"
    FontPath        "/usr/share/fonts/X11/cyrillic"
    FontPath        "/usr/share/fonts/X11/100dpi/:unscaled"
    FontPath        "/usr/share/fonts/X11/75dpi/:unscaled"
    FontPath        "/usr/share/fonts/X11/Type1"
    FontPath        "/usr/share/fonts/X11/100dpi"
    FontPath        "/usr/share/fonts/X11/75dpi"
    FontPath        "/var/lib/defoma/x-ttcidfont-conf.d/dirs/TrueType"
    FontPath        "built-ins"
EndSection

Section "Module"
    Load           "record"
    Load           "dri2"
    Load           "dbe"
    Load           "extmod"
    Load           "glx"
EndSection

Section "InputDevice"
    Identifier     "Keyboard0"
    Driver         "kbd"
EndSection

Section "InputDevice"
    Identifier     "Mouse0"
    Driver         "mouse"
    Option         "Protocol" "auto"
    Option         "Device" "/dev/input/mice"
    Option         "ZAxisMapping" "4 5 6 7"
EndSection

Section "Monitor"
    Identifier     "Monitor0"
    VendorName     "Monitor Vendor"
    ModelName      "Monitor Model"
EndSection

Section "Extensions"
        Option "Composite" "enable"
EndSection

Section "Device"

        ### Available Driver options are:-
        ### Values: <i>: integer, <f>: float, <bool>: "True"/"False",
        ### <string>: "String", <freq>: "<f> Hz/kHz/MHz"
        ### [arg]: arg optional
        #Option     "SWcursor"                   # [<bool>]
        #Option     "HWcursor"                   # [<bool>]
        #Option     "NoAccel"                    # [<bool>]
        #Option     "ShadowFB"                   # [<bool>]
        #Option     "VideoKey"                   # <i>
    Identifier     "Card0"
    Driver         "nvidia"
    VendorName     "nVidia Corporation"
    BoardName      "C77 [GeForce 8100 / nForce 720a]"
    Option "AllowGLXWithComposite" "true"
    Option "TripleBuffer" "true"
    Option "XAANoOffscreenPixmaps" "true"
    Option "RenderAccel" "true"
EndSection

Section "Screen"
    Identifier     "Screen0"
    Device         "Card0"
    Monitor        "Monitor0"
    Option "AddARGBGLXVisuals" "true"
    Option "AddARGBVisuals" "true"
    SubSection     "Display"
        Viewport    0 0
    EndSubSection
    SubSection     "Display"
        Viewport    0 0
        Depth       4
    EndSubSection
    SubSection     "Display"
        Viewport    0 0
        Depth       8
    EndSubSection
    SubSection     "Display"
        Viewport    0 0
        Depth       15
    EndSubSection
    SubSection     "Display"
        Viewport    0 0
        Depth       16
    EndSubSection
    SubSection     "Display"
        Viewport    0 0
        Depth       24
    EndSubSection
EndSection
|
现在再次启动桌面:
/etc/init.d/gdm3 start
如果桌面没有启动,可以删除/etc/X11/xorg.conf (如果您最初没有/etc/X11/xorg.conf),或者,如果已经有/ etc / X11 / xorg。 conf文件,从备份恢复原始的/etc/X11/xorg.conf , 然后再次运行/etc/init.d/gdm3 - 这应该会再次打开你的原始桌面,但是当然你也不能使用Compiz Fusion。
如果您的桌面确实以您的新的xorg.conf开始 - 好的! 我们继续。
再次打开一个终端,成为root:
su
接下来检查您的桌面是否可以使用3D效果:
glxinfo | grep direct
产出应如下:
root@debian:/home/falko# glxinfo | grep direct
 direct rendering: Yes
     GL_EXT_Cg_shader, GL_EXT_depth_bounds_test, GL_EXT_direct_state_access,
 root@debian:/home/falko#
4启动Compiz Fusion
要启动Compiz Fusion,请转到应用程序>系统工具> Compiz Fusion图标 :
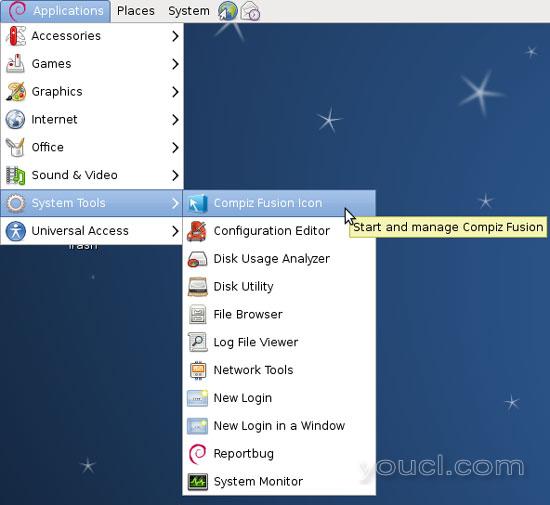
这实际上不会启动Compiz Fusion,但是在右上角的任务栏中添加一个Compiz Fusion图标,您可以从中配置Compiz Fusion并最终启动它:

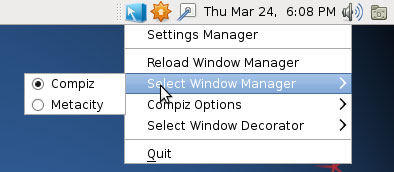
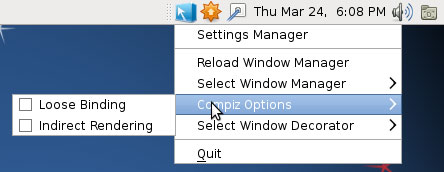
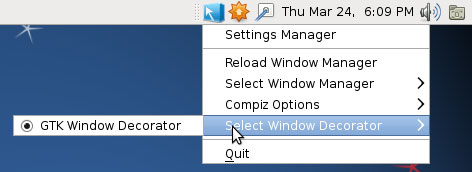
右键单击该图标,确保您的设置如下:
Select Window Manager: Compiz
Compiz选项 :未选择
Select Window Decorator: GTK Window Decorator
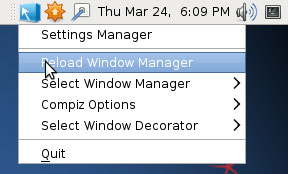
要启动Compiz Fusion,请选择重新加载窗口管理器 :
如果你注意到你的Windows失去了他们的标题栏,不能再被移动了(如下面的终端窗口标题栏的截图已经不见了)
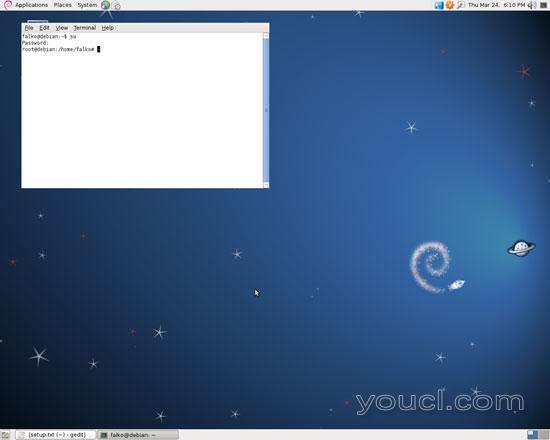
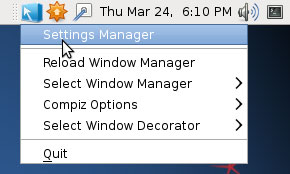
...再次右键单击Compiz Fusion图标,然后选择设置管理器 (您也可以转到系统>首选项> CompizConfig设置管理器 ):
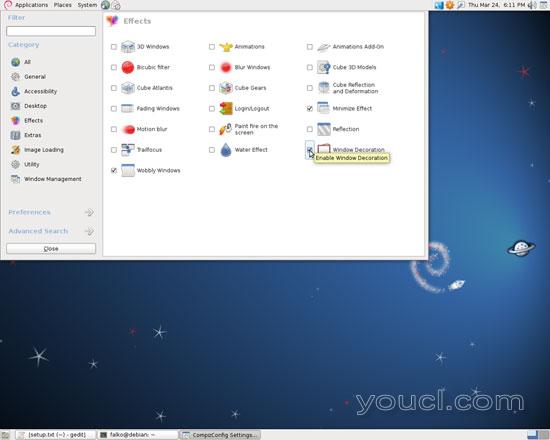
在CompizConfig设置管理器中 ,转到效果并启用窗口装饰 ...
...然后转到窗口管理并检查移动窗口并调整窗口大小 :
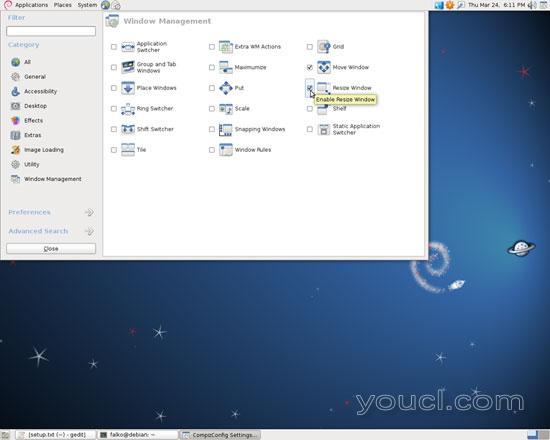
这应该带回你的窗户装饰,如果一切顺利,Compiz Fusion现在正在工作,你可以玩你的第一个3D效果:
