使用来自StartSSL的免费Class1 SSL证书保护您的ISPConfig 3安装
本教程将介绍如何使用StartSSL中的免费Class1 SSL证书来保护ISPConfig 3安装并摆脱自签名证书警告。 该指南涵盖了ISPConfig Web界面(包括Apache2和nginx),Postfix(TLS连接),Courier和Dovecot(用于POP3和IMAP)和PureFTPd(用于TLS / FTPES连接)的SSL证书。 如果您已经安装monit并使用HTTPS作为其Web界面,我将告诉您如何使用StartSSL证书。 本指南假定您使用Debian或Ubuntu; ISPConfig 3支持的其他发行版的原理是一样的,但路径可能不同。
我不会保证这将为您工作!
1初步说明
我假设您已经使用http://www.ispconfig.org/ispconfig-3/documentation/中的其中一个指南来设置系统。 如前所述,我将在本指南中专注于Debian / Ubuntu,但它也适用于ISPconfig 3支持的其他发行版(您可能需要调整一些路径)。
我将在这里使用主机名server1.example.com ; StartSSL允许您为主域和一个子域创建Class1证书,因此我将为example.com和server1.example.com创建证书 。 这意味着您必须告诉用户所有服务(ISPConfig Web界面,Postfix,Courier / Dovecot,PureFTPD等)使用主域example.com或子域server1.example.com ,否则将获得证书警告。
如果您希望为您的服务使用不同的主机名(例如Postfix的mail.example.com , ISPConfig的ispconfig.example.com等),我建议您从StartSSL获取Class2证书。 它不是免费的,但允许您为多个子域创建它(您甚至可以使用* .example.com为所有子域创建它),甚至多个域。 指令是一样的,除了当我使用StartSSL的子类 1 .server.ca.pem中间证书时,必须使用sub.class 2 .server.ca.pem 。 我将在整个教程中概述这个差异。
我使用root权限运行本教程中的所有步骤,因此请确保以root用户身份登录。 如果您使用Ubuntu,请运行...
sudo su
...获得root权限
2创建证书签名请求(CSR)
我们需要一个证书签名请求(CSR)从StartSSL获取SSL证书。 由于ISPConfig安装程序(对于版本> = 3.0.4)创建了这一点,我将使用此CSR作为加密所有服务(ISPConfig,Postfix等)的基础。
自ISPConfig 3.0.4版本以来,ISPConfig安装程序提供了对ISPConfig Web界面使用SSL加密的选项,如果使用ENTER或Y回答以下问题,则它将创建包括CSR的自签名证书(4096bits):
你想要一个安全的(SSL)连接到ISPConfig web界面(y,n)[y]: < - ENTER
要使ISPConfig安装程序使用正确的数据创建CSR,您必须在看到以下问题时输入正确的详细信息:
生成RSA私钥,4096位长模 .................................................. .......... ++ .................................................. ................... ++ e为65537(0x10001) 您将被要求输入将被纳入的信息 进入您的证书请求。 您要输入的内容是所谓的可分辨名称或DN。 有很多领域,但你可以留下一些空白 对于某些字段,将有一个默认值, 如果输入'。',该字段将留空。 ----- 国家名称(2个字母代码)[AU]: < - DE
州或省名(全名)[部分州]: < - Niedersachsen
地点名称(例如,城市)[]: < - Lueneburg
组织机构名称(如公司)[互联网Widgits有限公司]: < - 我公司有限公司
组织单位名称(如部分)[]: < - IT
通用名称(例如,您的姓名)[]: < - example.com
电子邮件地址[]: < - hostmaster@example.com
请输入以下“extra”属性 与您的证书请求一起发送 挑战密码[]: < - ENTER
可选的公司名称[]: < - ENTER
编写RSA密钥
如果您最初创建了错误数据的证书,则可以通过运行...来更新ISPConfig
ispconfig_update.sh
...,或者如果您已安装最新版本,请运行以下命令:
cd /tmp
 wget http://www.ispconfig.org/downloads/ISPConfig-3-stable.tar.gz
 tar xvfz ISPConfig-3-stable.tar.gz
 cd ispconfig3_install/install
 php -q update.php
这将允许您通过回答以下问题与您的ISPConfig 3 Web界面创建一个新的证书:
创建新的ISPConfig SSL证书(是,否)[否]: < - 是
如果您在3.0.4之前使用ISPConfig版本,则现在应该通过运行...升级到最新的稳定版本
ispconfig_update.sh
这也将允许您通过回答以下问题与您的ISPConfig 3 Web界面创建SSL连接:
创建新的ISPConfig SSL证书(是,否)[否]: < - 是
如上所述,请确保输入正确的详细信息。
之后,您应该在/ usr / local / ispconfig / interface / ssl /目录中具有SSL密钥,CSR和自签名证书:
ls -l /usr/local/ispconfig/interface/ssl/
root@server1:~# ls -l /usr/local/ispconfig/interface/ssl/
 total 16
 -rwxr-x--- 1 ispconfig ispconfig 2423 Jan 16 13:29 ispserver.crt
 -rwxr-x--- 1 ispconfig ispconfig 1777 Jan 16 13:29 ispserver.csr
 -rwxr-x--- 1 ispconfig ispconfig 3243 Jan 16 13:29 ispserver.key
 -rwxr-x--- 1 ispconfig ispconfig 3311 Jan 16 13:28 ispserver.key.secure
 root@server1:~#
我们在本教程中需要的是私钥( ispserver.key )和CSR( ispserver.csr ); 我们将使用StartSSL中的Class1证书替换ispserver.crt。 您可以忽略ispserver.key.secure 。
也可以在命令行中创建如下所示的ispserver.key和ispserver.csr :
cd /usr/local/ispconfig/interface/ssl/
 openssl req -new -newkey rsa:4096 -days 365 -nodes -keyout ispserver.key -out ispserver.csr
(这将给你没有ispserver.crt这不重要,因为我们将从StartSSL获取我们签名的证书。)
你的ispserver.csr应该是这样的(我已经把它的大部分,因为这是一个真正的CSR我使用):
cat /usr/local/ispconfig/interface/ssl/ispserver.csr
-----BEGIN CERTIFICATE REQUEST----- MIIC7TCCAdUCAQAwgacxCzAJBgxxxxxxAkRFMRYwFAYDVQQIDA1OaWVkZXJzYWNo xxxxxxxxxxxxxxxxxxxxxxxxxxxxxxxxxxxxxxxxxxxxxxxxxxxxxxxxxxxxxxxx xxxxxxxxxxxxxxxxxxxxxxxxxxxxxxxxxxxxxxxxxxxxxxxxxxxxxxxxxxxxxxxx xxxxxxxxxxxxxxxxxxxxxxxxxxxxxxxxxxxxxxxxxxxxxxxxxxxxxxxxxxxxxxxx xxxxxxxxxxxxxxxxxxxxxxxxxxxxxxxxxxxxxxxxxxxxxxxxxxxxxxxxxxxxxxxx xxxxxxxxxxxxxxxxxxxxxxxxxxxxxxxxxxxxxxxxxxxxxxxxxxxxxxxxxxxxxxxx xxxxxxxxxxxxxxxxxxxxxxxxxxxxxxxxxxxxxxxxxxxxxxxxxxxxxxxxxxxxxxxx xxxxxxxxxxxxxxxxxxxxxxxxxxxxxxxxxxxxxxxxxxxxxxxxxxxxxxxxxxxxxxxx xxxxxxxxxxxxxxxxxxxxxxxxxxxxxxxxxxxxxxxxxxxxxxxxxxxxxxxxxxxxxxxx xxxxxxxxxxxxxxxxxxxxxxxxxxxxxxxxxxxxxxxxxxxxxxxxxxxxxxxxxxxxxxxx xxxxxxxxxxxxxxxxxxxxxxxxxxxxxxxxxxxxxxxxxxxxxxxxxxxxxxxxxxxxxxxx xxxxxxxxxxxxxxxxxxxxxxxxxxxxxxxxxxxxxxxxxxxxxxxxxxxxxxxxxxxxxxxx xxxxxxxxxxxxxxxxxxxxxxxxxxxxxxxxxxxxxxxxxxxxxxxxxxxxxxxxxxxxxxxx xxxxxxxxxxxxxxxxxxxxxxxxxxxxxxxxxxxxxxxxxxxxxxxxxxxxxxxxxxxxxxxx xxxxxxxxxxxxxxxxxxxxxxxxxxxxxxxxxxxxxxxxxxxxxxxxxxxxxxxxxxxxxxxx 9Z5RhXTfOz8F2wsNH5yP9eqkVlkYKpIwyUHoZtUSp+xz -----END CERTIFICATE REQUEST----- |
3从StartSSL获取免费Class1证书
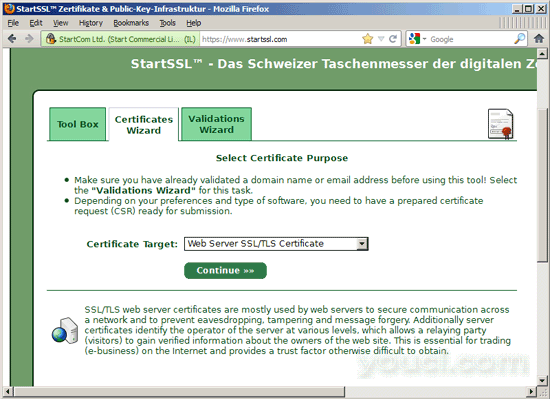
现在请访问http://www.startssl.com/并创建一个帐户。 验证您的域后(在“ 验证向导 ”选项卡上),您可以在“ 证书向导 ”选项卡上请求证书 - 从“ 证书目标”下拉列表框中选择“ Web服务器SSL / TLS证书 ”
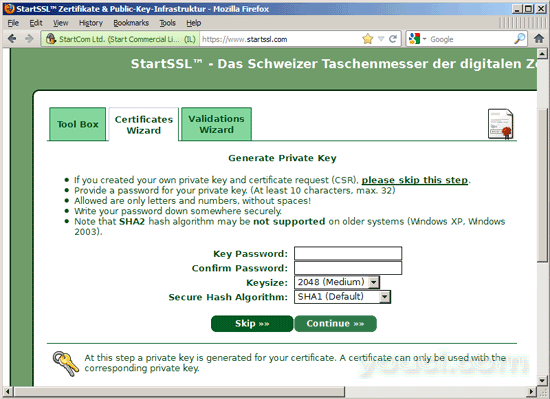
由于我们已经有私钥和CSR,我们可以跳过下一步 - 点击“ 跳过>>” :
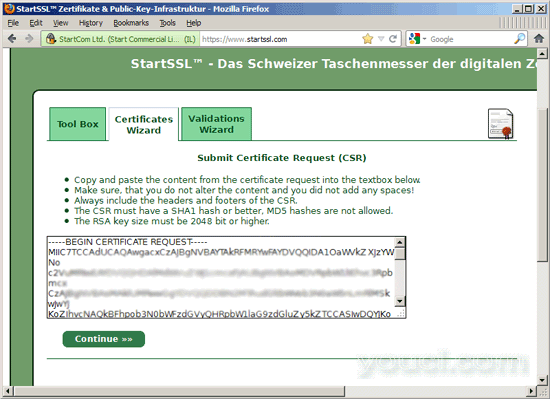
在下一页,您填写您的CSR,即/usr/local/ispconfig/interface/ssl/ispserver.csr文件的内容(以----- BEGIN CERTIFICATE REQUEST -----开头结尾)与-----终端证书要求----- ):
然后按照向导的其余部分 - 它会要求您提供一个域和一个子域,为此创建证书。 如果您对所有服务使用server1.example.com ,请填写example.com作为域和server1作为子域。
几分钟后,您将收到一封电子邮件,表示您的新证书已准备就绪。 转到工具箱>检索证书并选择您的证书:
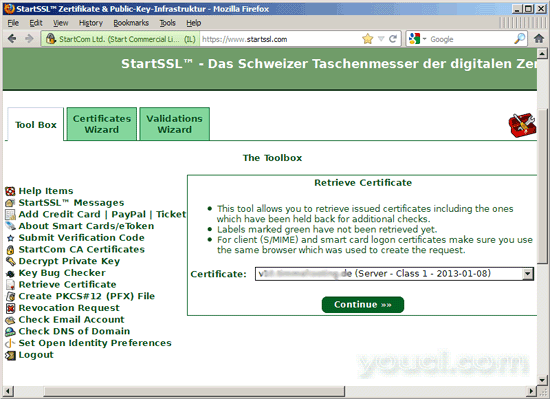
从StartSSL的Web界面复制证书...
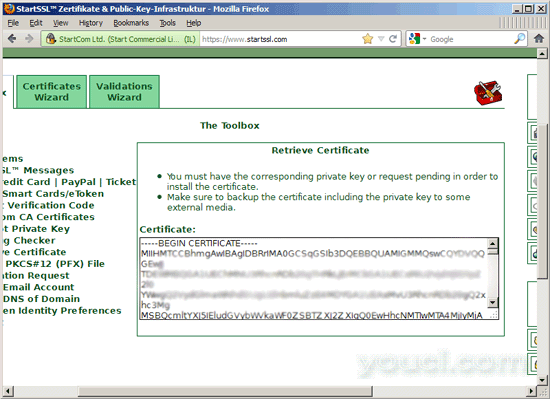
...并备份您的原始ispserver.crt文件,并将StartSSL Class1证书粘贴到(空) ispserver.crt文件中:
mv /usr/local/ispconfig/interface/ssl/ispserver.crt /usr/local/ispconfig/interface/ssl/ispserver.crt_bak
 vi /usr/local/ispconfig/interface/ssl/ispserver.crt
-----BEGIN CERTIFICATE----- MIIHMTCCBhmgAwIBAgIDxxxxxx0GCSqGSIb3DQEBBQUAMIGMMQswCQYDVQQGEwJJ xxxxxxxxxxxxxxxxxxxxxxxxxxxxxxxxxxxxxxxxxxxxxxxxxxxxxxxxxxxxxxxx xxxxxxxxxxxxxxxxxxxxxxxxxxxxxxxxxxxxxxxxxxxxxxxxxxxxxxxxxxxxxxxx xxxxxxxxxxxxxxxxxxxxxxxxxxxxxxxxxxxxxxxxxxxxxxxxxxxxxxxxxxxxxxxx xxxxxxxxxxxxxxxxxxxxxxxxxxxxxxxxxxxxxxxxxxxxxxxxxxxxxxxxxxxxxxxx xxxxxxxxxxxxxxxxxxxxxxxxxxxxxxxxxxxxxxxxxxxxxxxxxxxxxxxxxxxxxxxx xxxxxxxxxxxxxxxxxxxxxxxxxxxxxxxxxxxxxxxxxxxxxxxxxxxxxxxxxxxxxxxx xxxxxxxxxxxxxxxxxxxxxxxxxxxxxxxxxxxxxxxxxxxxxxxxxxxxxxxxxxxxxxxx xxxxxxxxxxxxxxxxxxxxxxxxxxxxxxxxxxxxxxxxxxxxxxxxxxxxxxxxxxxxxxxx xxxxxxxxxxxxxxxxxxxxxxxxxxxxxxxxxxxxxxxxxxxxxxxxxxxxxxxxxxxxxxxx xxxxxxxxxxxxxxxxxxxxxxxxxxxxxxxxxxxxxxxxxxxxxxxxxxxxxxxxxxxxxxxx xxxxxxxxxxxxxxxxxxxxxxxxxxxxxxxxxxxxxxxxxxxxxxxxxxxxxxxxxxxxxxxx xxxxxxxxxxxxxxxxxxxxxxxxxxxxxxxxxxxxxxxxxxxxxxxxxxxxxxxxxxxxxxxx xxxxxxxxxxxxxxxxxxxxxxxxxxxxxxxxxxxxxxxxxxxxxxxxxxxxxxxxxxxxxxxx xxxxxxxxxxxxxxxxxxxxxxxxxxxxxxxxxxxxxxxxxxxxxxxxxxxxxxxxxxxxxxxx xxxxxxxxxxxxxxxxxxxxxxxxxxxxxxxxxxxxxxxxxxxxxxxxxxxxxxxxxxxxxxxx xxxxxxxxxxxxxxxxxxxxxxxxxxxxxxxxxxxxxxxxxxxxxxxxxxxxxxxxxxxxxxxx xxxxxxxxxxxxxxxxxxxxxxxxxxxxxxxxxxxxxxxxxxxxxxxxxxxxxxxxxxxxxxxx xxxxxxxxxxxxxxxxxxxxxxxxxxxxxxxxxxxxxxxxxxxxxxxxxxxxxxxxxxxxxxxx xxxxxxxxxxxxxxxxxxxxxxxxxxxxxxxxxxxxxxxxxxxxxxxxxxxxxxxxxxxxxxxx xxxxxxxxxxxxxxxxxxxxxxxxxxxxxxxxxxxxxxxxxxxxxxxxxxxxxxxxxxxxxxxx xxxxxxxxxxxxxxxxxxxxxxxxxxxxxxxxxxxxxxxxxxxxxxxxxxxxxxxxxxxxxxxx xxxxxxxxxxxxxxxxxxxxxxxxxxxxxxxxxxxxxxxxxxxxxxxxxxxxxxxxxxxxxxxx xxxxxxxxxxxxxxxxxxxxxxxxxxxxxxxxxxxxxxxxxxxxxxxxxxxxxxxxxxxxxxxx xxxxxxxxxxxxxxxxxxxxxxxxxxxxxxxxxxxxxxxxxxxxxxxxxxxxxxxxxxxxxxxx xxxxxxxxxxxxxxxxxxxxxxxxxxxxxxxxxxxxxxxxxxxxxxxxxxxxxxxxxxxxxxxx xxxxxxxxxxxxxxxxxxxxxxxxxxxxxxxxxxxxxxxxxxxxxxxxxxxxxxxxxxxxxxxx xxxxxxxxxxxxxxxxxxxxxxxxxxxxxxxxxxxxxxxxxxxxxxxxxxxxxxxxxxxxxxxx xxxxxxxxxxxxxxxxxxxxxxxxxxxxxxxxxxxxxxxxxxxxxxxxxxxxxxxxxxxxxxxx xxxxxxxxxxxxxxxxxxxxxxxxxxxxxxxxxxxxxxxxxxxxxxxxxxxxxxxxxxxxxxxx xxxxxxxxxxxxxxxxxxxxxxxxxxxxxxxxxxxxxxxxxxxxxxxxxxxxxxxxxxxxxxxx xxxxxxxxxxxxxxxxxxxxxxxxxxxxxxxxxxxxxxxxxxxxxxxxxxxxxxxxxxxxxxxx xxxxxxxxxxxxxxxxxxxxxxxxxxxxxxxxxxxxxxxxxxxxxxxxxxxxxxxxxxxxxxxx xxxxxxxxxxxxxxxxxxxxxxxxxxxxxxxxxxxxxxxxxxxxxxxxxxxxxxxxxxxxxxxx xxxxxxxxxxxxxxxxxxxxxxxxxxxxxxxxxxxxxxxxxxxxxxxxxxxxxxxxxxxxxxxx xxxxxxxxxxxxxxxxxxxxxxxxxxxxxxxxxxxxxxxxxxxxxxxxxxxxxxxxxxxxxxxx xxxxxxxxxxxxxxxxxxxxxxxxxxxxxxxxxxxxxxxxxxxxxxxxxxxxxxxxxxxxxxxx xxxxxxxxxxxxxxxxxxxxxxxxxxxxxxxxxxxxxxxxxxxxxxxxxxxxxxxxxxxxxxxx c2x1wonVRVmKovt2OuM1ZqZw0Ynk -----END CERTIFICATE----- |
下载下载StartSSL的根CA和Class1中间服务器CA:
cd /usr/local/ispconfig/interface/ssl
 wget https://www.startssl.com/certs/ca.pem
 wget https://www.startssl.com/certs/sub.class1.server.ca.pem
(如果您使用Class2证书,请下载sub.class2.server.ca.pem而不是sub.class1.server.ca.pem )。
重命名这两个文件:
mv ca.pem startssl.ca.crt
 mv sub.class1.server.ca.pem startssl.sub.class1.server.ca.crt
(如果您使用Class2证书,请调整第二个命令。)
某些服务需要我们创建的.pem文件,如下所示(再次,如果使用Class2证书,请确保调整命令):
cat startssl.sub.class1.server.ca.crt startssl.ca.crt > startssl.chain.class1.server.crt
 cat ispserver.{key,crt} startssl.chain.class1.server.crt > ispserver.pem
 chmod 600 ispserver.pem


