在Fedora 18上安装带有PHP5(和PHP-FPM)和MySQL支持的Nginx
Nginx (发音为“引擎x”)是一个免费的,开放源码的高性能HTTP服务器。 Nginx以其稳定性,丰富的功能集,简单的配置和低资源消耗而闻名。 本教程将介绍如何在支持PHP5(通过PHP-FPM )和MySQL支持的Fedora 18服务器上安装Nginx。
我不会保证这将为您工作!
1初步说明
在本教程中,我使用IP地址为192.168.0.100的hostname server1.example.com 。 这些设置可能会有所不同,因此您必须在适当的情况下更换它们。
2安装MySQL 5
首先我们像这样安装MySQL 5:
yum install mysql mysql-server
然后,我们为MySQL创建系统启动链接(以便每当系统启动时,MySQL自动启动)并启动MySQL服务器:
systemctl enable mysqld.service
 systemctl start mysqld.service
现在检查网络是否启用。 跑
netstat -tap | grep mysql
应该显示如下:
[root@server1 ~]# netstat -tap | grep mysql
 tcp        0      0 *:mysql                     *:*                         LISTEN      1116/mysqld
 [root@server1 ~]#
如果没有,编辑/etc/my.cnf并注释掉选项skip-networking :
vi /etc/my.cnf
[...] #skip-networking [...] |
并重新启动MySQL服务器:
systemctl restart mysqld.service
跑
mysql_secure_installation
为用户root设置密码(否则任何人都可以访问您的MySQL数据库!):
[root @ server1〜]#mysql_secure_installation 注意:运行本脚本的所有部分是为所有MySQL推荐的 服务器生产使用! 请仔细阅读每一步! 为了登录MySQL来保护它,我们需要当前的 root用户的密码。 如果你刚刚安装了MySQL, 您还没有设置root密码,密码将为空, 所以你应该刚刚进入这里。 输入root的当前密码(输入无): < - ENTER
OK,成功使用密码,移动... 设置root密码确保没有人可以登录MySQL root用户没有正确的授权。 设置root密码? [Y / n] < - ENTER
新密码: < - yourrootsql 密码
重新输入新密码: < - yourrootsqlpassword
密码更新成功! 重新载入特权表.. ...成功! 默认情况下,MySQL安装有一个匿名用户,允许任何人 登录MySQL,而不必创建用户帐户 他们。 这仅适用于测试和进行安装 顺利一点 你应该删除它们,然后再进入 生产环境。 删除匿名用户? [Y / n] < - ENTER
...成功! 通常,root只能被允许从'localhost'连接。 这个 确保有人无法从网络的root密码猜测。 禁止root登录远程? [Y / n] < - ENTER
...成功! 默认情况下,MySQL附带一个名为'test'的数据库,任何人都可以 访问。 这也仅用于测试,应该删除 在进入生产环境之前。 删除测试数据库并访问它? [Y / n] < - ENTER
- 删除测试数据库... ...成功! - 删除测试数据库的权限... ...成功! 重新加载权限表将确保所有更改到目前为止 将立即生效。 现在重新加载权限表? [Y / n] < - ENTER
...成功! 打扫干净... 全做完了! 如果您已经完成了上述所有步骤,您的MySQL 安装应该是安全的。 感谢使用MySQL! [root @ server1〜]#
3安装Nginx
Nginx可用作Fedora 18的一个包,我们可以安装如下:
yum install nginx
然后我们为nginx创建系统启动链接并启动它:
systemctl enable nginx.service
 systemctl start nginx.service
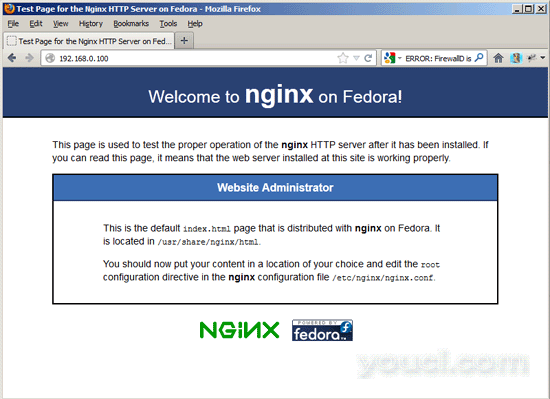
在浏览器中输入您的Web服务器的IP地址或主机名(例如http://192.168.0.100 ),您应该看到nginx的欢迎页面:

4安装PHP5
我们可以通过PHP-FPM使PHP5在nginx中工作(PHP-FPM(FastCGI Process Manager)是一种替代的PHP FastCGI实现,具有对任何大小的网站尤其是繁忙的站点有用的其他功能)。 官方Fedora 18存储库中有一个php-fpm软件包,因此,如果您要从PHP脚本中使用MySQL,我们可以将php-fpm与php-cli和一些php-mysql等PHP5模块一起安装,
yum install php-fpm php-cli php-mysql php-gd php-imap php-ldap php-odbc php-pear php-xml php-xmlrpc php-magickwand php-mbstring php-mcrypt php-mssql php-shout php-snmp php-soap php-tidy
APC是一个免费开放的PHP操作码cacher,用于缓存和优化PHP中间代码。 它类似于其他PHP操作码cacher,如eAccelerator和Xcache。 强烈建议您安装其中一个以加快您的PHP页面。
APC可以安装如下:
yum install php-pecl-apc
为了避免错误
[13-Nov-2011 22:13:16] PHP Warning: phpinfo(): It is not safe to rely on the system's timezone settings. You are *required* to use the date.timezone setting or the date_default_timezone_set() function. In case you used any of those methods and you are still getting this warning, you most likely misspelled the timezone identifier. We selected 'Europe/Berlin' for 'CET/1.0/no DST' instead in /usr/share/nginx/html/info.php on line 2
...在/var/log/php-fpm/www-error.log中,当您在浏览器中调用PHP脚本时,应该打开/etc/php.ini并设置date.timezone :
vi /etc/php.ini
[...] [Date] ; Defines the default timezone used by the date functions ; http://php.net/date.timezone date.timezone = "Europe/Berlin" [...] |
您可以通过运行以下步骤找到正确的系统时区:
cat /etc/sysconfig/clock
[root@server1 ~]# cat /etc/sysconfig/clock
 ZONE="Europe/Berlin"
 [root@server1 ~]#
接下来创建php-fpm的系统启动链接并启动它:
systemctl enable php-fpm.service
 systemctl start php-fpm.service
PHP-FPM是一个守护进程,在端口9000上运行FastCGI服务器。
5配置nginx
nginx配置在我们现在打开的/etc/nginx/nginx.conf中:
vi /etc/nginx/nginx.conf
配置很容易理解(您可以在这里了解更多信息: http : //wiki.codemongers.com/NginxFullExample ,这里: http : //wiki.codemongers.com/NginxFullExample2 )
首先(这是可选的),您可以增加工作进程的数量并将keepalive_timeout设置为合理的值:
[...]
worker_processes  4;
[...]
    keepalive_timeout  2;
[...] |
虚拟主机在server {}容器中定义。 默认的vhost在文件/etc/nginx/nginx.conf中进一步定义 - 让我们修改如下:
vi /etc/nginx/nginx.conf
[...]
    server {
        listen       80;
        server_name  _;

        #charset koi8-r;

        #access_log  /var/log/nginx/host.access.log  main;

        location / {
            root   /usr/share/nginx/html;
            index  index.php index.html index.htm;
        }

        # redirect server error pages to the static page /40x.html
        #
        error_page  404              /404.html;
        location = /40x.html {
            root   /usr/share/nginx/html;
        }

        # redirect server error pages to the static page /50x.html
        #
        error_page   500 502 503 504  /50x.html;
        location = /50x.html {
            root   /usr/share/nginx/html;
        }

        # proxy the PHP scripts to Apache listening on 127.0.0.1:80
        #
        #location ~ \.php$ {
        #    proxy_pass   http://127.0.0.1;
        #}

        # pass the PHP scripts to FastCGI server listening on 127.0.0.1:9000
        #
        location ~ \.php$ {
             root           /usr/share/nginx/html;
             try_files $uri =404;
             fastcgi_split_path_info ^(.+\.php)(/.+)$;
             fastcgi_pass   127.0.0.1:9000;
             fastcgi_index  index.php;
             fastcgi_param  SCRIPT_FILENAME  $document_root$fastcgi_script_name;
             include        fastcgi_params;
        }

        # deny access to .htaccess files, if Apache's document root
        # concurs with nginx's one
        #
        location ~ /\.ht {
            deny  all;
        }
    }
[...] |
服务器名称 _; 使它成为默认的catchall vhost(当然,您也可以像www.example.com一样指定一个主机名)。
在位置/部分,我已经将index.php添加到索引行。 root / usr / share / nginx / html; 意味着文档根目录是/ usr / share / nginx / html 。
PHP的重要部分是位置〜\ .php $ {}节。 取消注释以启用它。 将根线更改为网站的文档根目录(例如root / usr / share / nginx / html; )。 请确保将fastcgi_param行更改为fastcgi_param SCRIPT_FILENAME $ document_root $ fastcgi_script_name; 因为否则PHP解释器将找不到您在浏览器中调用的PHP脚本。
请注意,我添加了try_files $ uri = 404; 以防止零日漏洞(请参阅http://wiki.nginx.org/Pitfalls#Passing_Uncontrolled_Requests_to_PHP和http://forum.nginx.org/read.php?2,88845,page=3 )。 或者,如果不想使用try_files $ uri = 404; 行,你可以设置cgi.fix_pathinfo = 0; 在/etc/php5/fpm/php.ini (以后不要忘记重新加载PHP-FPM)。
现在保存文件并重新加载nginx:
systemctl reload nginx.service
现在在文件root / usr / share / nginx / html中创建以下PHP文件
vi /usr/share/nginx/html/info.php
<?php phpinfo(); ?> |
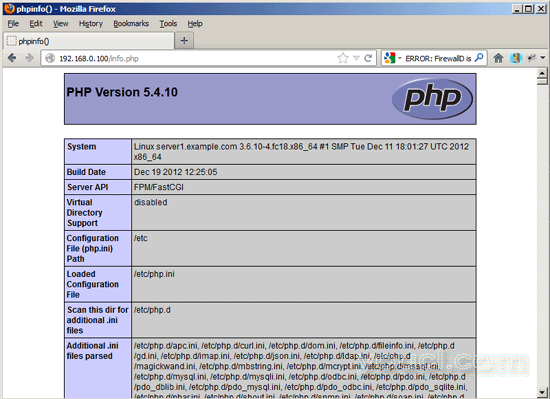
现在我们在浏览器中调用该文件(例如http://192.168.0.100/info.php ):

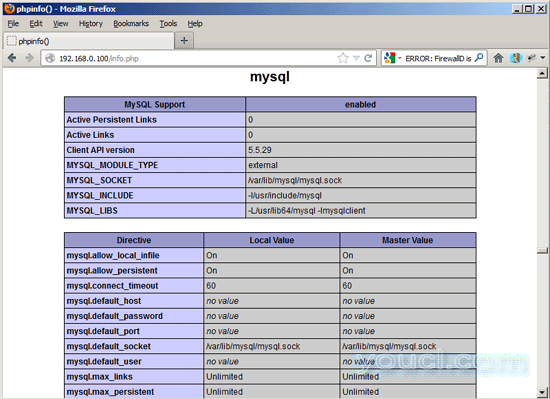
如您所见,PHP5正在工作,它正在通过FPM / FastCGI进行工作,如Server API行所示。 如果您进一步向下滚动,您将看到在PHP5中已经启用的所有模块,包括MySQL模块:

6链接
- nginx: http : //nginx.org/
- nginx维基: http : //wiki.nginx.org/
- PHP: http : //www.php.net/
- PHP-FPM: http : //php-fpm.org/
- MySQL: http : //www.mysql.com/
- Fedora: http : //fedoraproject.org/
关于作者

Falko Timme是所有者  Timme Hosting (超快nginx网页托管)。 他是youcl(自2005年以来)的主要维护者, 也是ISPConfig的核心开发人员之一 (自2000年起)。 他还为O'Reilly的“Linux系统管理”一书作出了贡献。


