Ghost是一个免费的,开源的,简单而强大的博客或网络出版软件,用Nodejs编写。 它是用于轻松构建和运行在线出版物的现代出版工具的集合。
鬼特点:
- 快速,可扩展和高效。
- 提供基于降价的编辑环境。
- 配有桌面应用程序
- 配有美丽的把手模板。
- 支持简单的内容管理。
- 支持作者,编辑和管理员的多重角色。
- 新新200新新新新旗新新旗新新新旗新新旗新新旗新新旗新新旗新旗新
- X-
- 完全支持搜索引擎优化。
- 提供详细的结构数据。
- 支持RSS,电子邮件和Slack订阅。
- 启用简单的网站编辑等等。
要求:
- CentOS 7服务器最小安装 1GB内存
- 具有静态IP地址的CentOS 7系统
- Node v6 LTS -
- 安装了Nginx的CentOS 7服务器
重要提示 :在开始安装Ghost之前,您需要拥有一个很好的VPS主机,我们强烈推荐BlueHost 。
在本文中,我们将介绍如何在CentOS 7系统上安装开源Ghost ( 内容管理系统 )博客平台。
第1步:在CentOS 7上安装Nodej
1. CentOS的软件仓库中不存在Nodej,因此首先添加其存储库,然后安装如下
# curl --silent --location https://rpm.nodesource.com/setup_6.x | bash -
# yum -y install nodejs npm
# dnf -y install nodejs npm   [On Fedora 22+ versions]
2.一旦安装了nodejs,您可以使用命令验证是否已安装了推荐的Nodej版本的Nodejs和npm。
# node -v
# npm -v
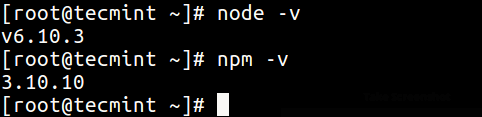
检查Nodejs版本
第2步:在CentOs上安装Ghost 7
3.现在创建Ghost根目录,该目录将应用程序文件存储在/var/www/ghost ,这是推荐的安装位置。
# mkdir -p /var/www/ghost
4.接下来,从Ghost的GitHub存储库中下载最新版本的Ghost ,并将存档文件解压缩到上面创建的目录中。
# curl -L https://ghost.org/zip/ghost-latest.zip -o ghost.zip
# unzip -uo ghost.zip -d  /var/www/ghost
5.现在移动到新的ghost目录,然后使用以下命令安装Ghost (仅生产依赖项)。 一旦第二个命令完成,Ghost应该安装在您的系统上。
# cd /var/www/ghost
# npm install --production
第3步:启动和访问默认Ghost博客
6.要启动Ghost,请从/ var / www / ghost目录运行以下命令。
# npm start --production
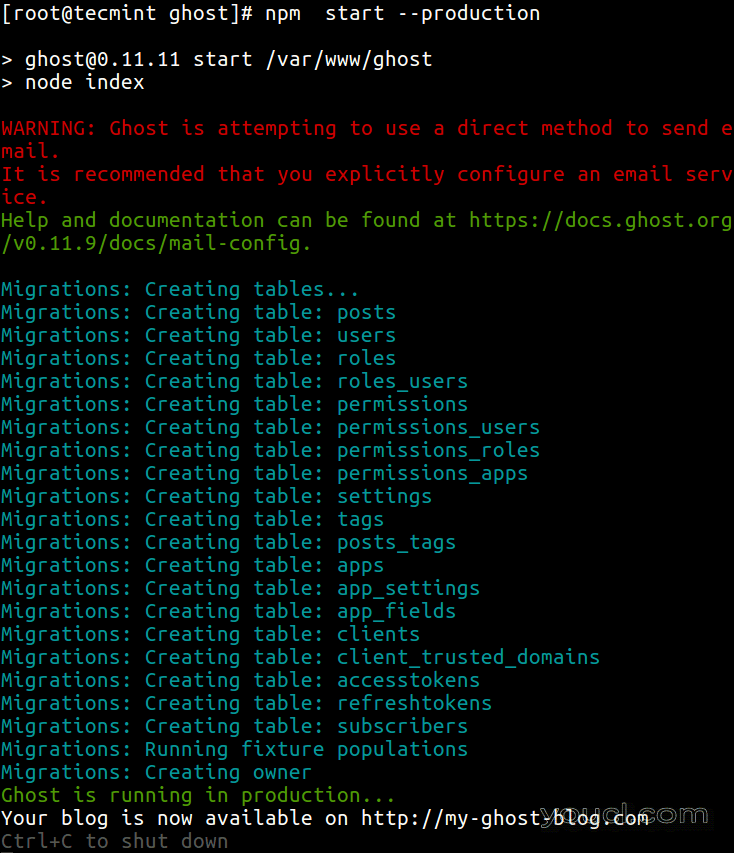
开始Ghost博客
7.默认情况下,Ghost应该在端口2368上运行,因此打开防火墙上的端口以允许访问。
# firewall-cmd --zone=public --permanent --add-port=2368/tcp
# firewall-cmd --reload
8.现在打开一个网页浏览器并浏览到下面的任何URL。
http://SERVER_IP:2368
OR
http://localhost:2368
注意 :首次运行Ghost后,将在Ghost的根目录中创建config.js文件。 您可以使用它为ghost设置环境级配置; 您可以在其中配置选项,如您的站点URL,数据库,邮件设置等。
第4步:安装和配置Nginx for Ghost
如果没有使用EPEL存储库安装并启动Nginx Web服务器,如图所示。
# yum install epel-release
# yum install nginx
# systemctl start nginx
如果您正在运行防火墙,请使用以下命令启用对HTTP和HTTPS流量的访问。
# firewall-cmd --permanent --zone=public --add-service=http
# firewall-cmd --permanent --zone=public --add-service=https
# firewall-cmd --reload
下一步是将Nginx配置为在80端口上服务我们的Ghost博客,以便用户可以访问Ghost博客,而不在端口添加端口:2368 。
首先通过点击终端上的CTRL+C键来停止正在运行的Ghost实例。
现在通过在/ etc / nginx / sites-available / ghost下创建一个新文件来配置Nginx。
# vi /etc/nginx/sites-available/ghost
添加以下配置,并确保将以下突出显示的行更改为your_domain_or_ip_address 。
server {
listen 80;
server_name your_domain_or_ip_address;
location / {
proxy_set_header HOST $host;
proxy_set_header X-Forwarded-Proto $scheme;
proxy_set_header X-Real-IP $remote_addr;
proxy_set_header X-Forwarded-For $proxy_add_x_forwarded_for;
proxy_pass         http://127.0.0.1:2368;
}
}
保存文件并通过在/ etc / nginx / sites-enabled目录下创建符号链接来激活此配置。
# ln -s /etc/nginx/sites-available/ghost /etc/nginx/sites-enabled/ghost
现在打开/etc/nginx.conf文件。 将配置文件包含在启用了站点的目录中,并禁用默认站点,如图所示。
# vi /etc/nginx/nginx.conf
现在在http块中添加以下行以将配置文件包含在启用了站点的目录中。
http {
...
# Load modular configuration files from the /etc/nginx/conf.d directory.
# See http://nginx.org/en/docs/ngx_core_module.html#include
# for more information.
include /etc/nginx/conf.d/*.conf;
include /etc/nginx/sites-enabled/*;
然后完全注释掉在http块内找到的默认服务器块。
...
# Load modular configuration files from the /etc/nginx/conf.d directory.
# See http://nginx.org/en/docs/ngx_core_module.html#include
# for more information.
include /etc/nginx/conf.d/*.conf;
include /etc/nginx/sites-enabled/*;
#    server {
#       listen       80 default_server;
#       listen       [::]:80 default_server;
#       server_name  _;
#       root         /usr/share/nginx/html;
#
#       # Load configuration files for the default server block.
#       include /etc/nginx/default.d/*.conf;
#
#       location / {
#       }
#
#       error_page 404 /404.html;
#           location = /40x.html {
#       }
#
#       error_page 500 502 503 504 /50x.html;
#           location = /50x.html {
#       }
...
...
最后,保存并重新启动nginx web服务器。
# systemctl restart nginx
再次访问http:// your_domain_or_ip_address ,你会看到你的Ghost博客。
有关更多信息,请访问Ghost主页: https : //ghost.org/
在本文中,我们已经解释了如何在CentOS 7中安装和配置Ghost。使用下面的注释表单向我们发送您的查询或有关该指南的任何想法。
最后但并非最不重要的是,在我们的下一篇文章中,我们将展示如何在Debian和Ubuntu中设置Ghost。 在此之前,请保持与youcl.com的联系。


