在最后一个教程中 ,我向您展示了如何通过从源代码编译Samba来在Centos 7上配置Samba,因为RedHat提供的程序包不支持Active Directory。 我注意到有一个名为Wing的存储库,它为samba4 rpm提供AD支持。 在本教程中,我将使用此存储库进行Samba安装。 我还将展示如何创建Samba分享。
在本教程中,我将使用安装最少的CentOS 7服务器作为启用SELinux的基础。
准备CentOS 7服务器
检查SELinux状态。
[root@samba4 ~]# sestatus
SELinux status:                 enabled
SELinuxfs mount:                /sys/fs/selinux
SELinux root directory:         /etc/selinux
Loaded policy name:             targeted
Current mode:                   enforcing
Mode from config file:          enforcing
Policy MLS status:              enabled
Policy deny_unknown status:     allowed
Max kernel policy version:      28
[root@samba4 ~]#
在主机文件中输入具有服务器IP地址,后跟完整(fqdn)主机名,然后是主机名的本地部分。
[root@samba4 ~]# cat /etc/hosts
127.0.0.1   localhost localhost.localdomain localhost4 localhost4.localdomain4
::1         localhost localhost.localdomain localhost6 localhost6.localdomain6
192.168.1.190   samba4.sunil.cc samba4
[root@samba4 ~]#
安装Epel CentOS存储库。
[root@samba4 ~]# yum install epel-release -y
安装基本软件包。
[root@samba4 ~]# yum install vim wget authconfig krb5-workstation -y
现在安装机翼回购。
[root@samba4 ~]# cd /etc/yum.repos.d/
[root@samba4 yum.repos.d]# wget http://wing-net.ddo.jp/wing/7/EL7.wing.repo
[root@samba4 yum.repos.d]# sed -i 's@enabled=0@enabled=1@g' /etc/yum.repos.d/EL7.wing.repo
[root@samba4 yum.repos.d]# yum clean all
Loaded plugins: fastestmirror
Cleaning repos: base extras updates wing wing-source
Cleaning up everything
Cleaning up list of fastest mirrors
[root@samba4 yum.repos.d]#
在CentOS 7上安装Samba 4
用yum从机架仓库安装Samba4软件包。
[root@samba4 yum.repos.d]# yum install -y samba45 samba45-winbind-clients samba45-winbind samba45-client\
samba45-dc samba45-pidl samba45-python samba45-winbind-krb5-locator perl-Parse-Yapp\
perl-Test-Base python2-crypto samba45-common-tools
删除这些文件。
[root@samba4 ~]# rm -rf /etc/krb5.conf
[root@samba4 ~]# rm -rf /etc/samba/smb.conf
Samba 4配置
现在我们将进行域配置。
[root@samba4 ~]# samba-tool domain provision --use-rfc2307 --interactive
 Realm [SUNIL.CC]:
 Domain [SUNIL]:
 Server Role (dc, member, standalone) [dc]:
 DNS backend (SAMBA_INTERNAL, BIND9_FLATFILE, BIND9_DLZ, NONE) [SAMBA_INTERNAL]:
 DNS forwarder IP address (write 'none' to disable forwarding) [4.2.2.1]:
Administrator password:
Retype password:
Looking up IPv4 addresses
Looking up IPv6 addresses
No IPv6 address will be assigned
Setting up secrets.ldb
Setting up the registry
Setting up the privileges database
Setting up idmap db
Setting up SAM db
Setting up sam.ldb partitions and settings
Setting up sam.ldb rootDSE
Pre-loading the Samba 4 and AD schema
Adding DomainDN: DC=sunil,DC=cc
Adding configuration container
Setting up sam.ldb schema
Setting up sam.ldb configuration data
Setting up display specifiers
Modifying display specifiers
Adding users container
Modifying users container
Adding computers container
Modifying computers container
Setting up sam.ldb data
Setting up well known security principals
Setting up sam.ldb users and groups
Setting up self join
Adding DNS accounts
Creating CN=MicrosoftDNS,CN=System,DC=sunil,DC=cc
Creating DomainDnsZones and ForestDnsZones partitions
Populating DomainDnsZones and ForestDnsZones partitions
Setting up sam.ldb rootDSE marking as synchronized
Fixing provision GUIDs
A Kerberos configuration suitable for Samba 4 has been generated at /var/lib/samba/private/krb5.conf
Setting up fake yp server settings
Once the above files are installed, your Samba4 server will be ready to use
Server Role:           active directory domain controller
Hostname:              samba4
NetBIOS Domain:        SUNIL
DNS Domain:            sunil.cc
DOMAIN SID:            S-1-5-21-1578983437-3114190590-2362936743
[root@samba4 etc]#
确保端口在防火墙中打开。
[root@samba4 etc]#firewall-cmd --add-port=53/tcp --permanent;firewall-cmd --add-port=53/udp --permanent;firewall-cmd --add-port=88/tcp --permanent;firewall-cmd --add-port=88/udp --permanent; \
firewall-cmd --add-port=135/tcp --permanent;firewall-cmd --add-port=137-138/udp --permanent;firewall-cmd --add-port=139/tcp --permanent; \
firewall-cmd --add-port=389/tcp --permanent;firewall-cmd --add-port=389/udp --permanent;firewall-cmd --add-port=445/tcp --permanent; \
firewall-cmd --add-port=464/tcp --permanent;firewall-cmd --add-port=464/udp --permanent;firewall-cmd --add-port=636/tcp --permanent; \
firewall-cmd --add-port=1024-3500/tcp --permanent;firewall-cmd --add-port=3268-3269/tcp --permanent
[root@samba4 ~]# firewall-cmd --reload
该包不提供init脚本,我们现在将添加它。
[root@samba4 ~]# cat  /etc/systemd/system/samba.service
[Unit]
Description= Samba 4 Active Directory
After=syslog.target
After=network.target

[Service]
Type=forking
PIDFile=/var/run/samba.pid
ExecStart=/usr/sbin/samba

[Install]
WantedBy=multi-user.target
[root@samba4 ~]#
[root@samba4 ~]# systemctl enable samba
Created symlink from /etc/systemd/system/multi-user.target.wants/samba.service to /etc/systemd/system/samba.service.
[root@samba4 ~]# systemctl restart samba
所有其他步骤与我之前的文章相似
要配置Windows和Linux主机,请参考
使用Windows ACL支持创建Samba共享
我们需要为samba4配置扩展ACL。 在全局下的smb.conf文件中添加以下内容。
[root@samba4 ~]# cat /etc/samba/smb.conf
# Global parameters
[global]
        ------------
		-------------
        vfs objects = acl_xattr
        map acl inherit = yes
        store dos attributes = yes
		------------
		-------------

[root@samba4 ~]#
现在重新启动Samba服务。
[root@samba4 ~]# systemctl restart samba
只有授予了SeDiskOperatorPrivilege权限的用户和组才能配置共享权限。
[root@samba4 ~]# net rpc rights grant "SUNIL\Domain Admins" SeDiskOperatorPrivilege -U "USER\administrator"
Enter USER\administrator's password:
Successfully granted rights.
[root@samba4 ~]#
在创建共享之前,我们需要确保samba4服务器自身进行身份验证。
我们不能做通常的方法,因为它不起作用,因为现有的机箱将与RedHat提供的软件包冲突,我们不能在这里使用sssd。 我们将使用winbind来实现这一点。
请使用以下方法。 创建具有特定权限的samba共享是必需的
安装下面的包装。
[root@samba4 ~]#yum -y install authconfig-gtk*
运行命令。
[root@samba4 yum.repos.d]# authconfig-tui
请选择winbind,按照下一步。
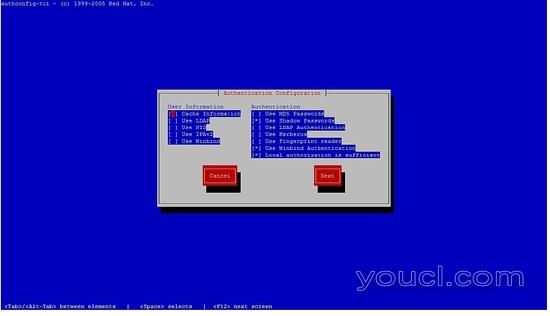
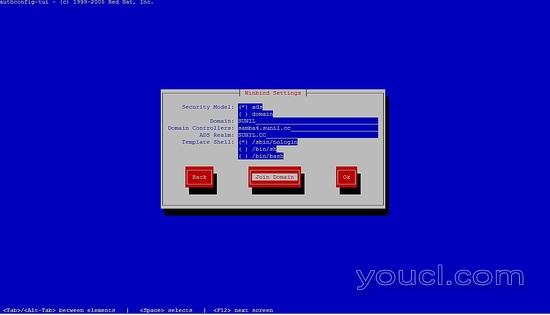
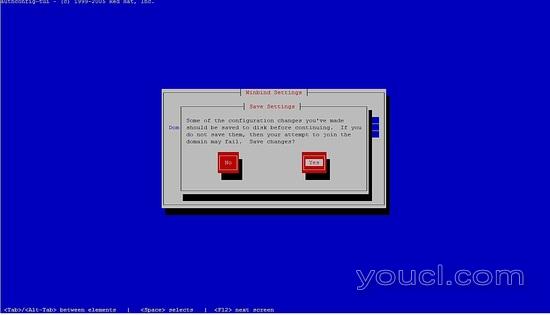
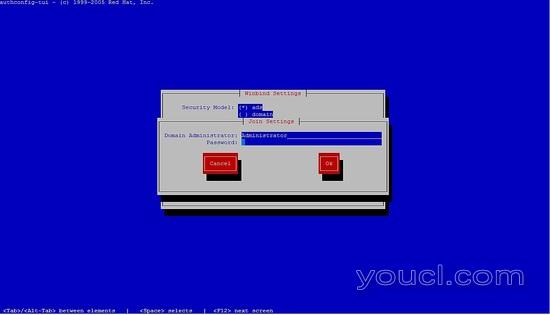
您将无法输入密码,只需按确定即可。
然后注释掉/etc/samba/smb.conf中的行,然后重新启动samba服务。
您的配置应如下所示:
[root@samba4 ~]# cat /etc/samba/smb.conf
# Global parameters
[global]
#--authconfig--start-line--

# Generated by authconfig on 2017/05/26 17:23:04
# DO NOT EDIT THIS SECTION (delimited by --start-line--/--end-line--)
# Any modification may be deleted or altered by authconfig in future

#   workgroup = SUNIL
#   password server = samba4.sunil.cc
#   realm = SUNIL.CC
#   security = ads
#   idmap config * : range = 16777216-33554431
#   template shell = /sbin/nologin
#  kerberos method = secrets only
#   winbind use default domain = false
#   winbind offline logon = false

#--authconfig--end-line--
        netbios name = SAMBA4
        realm = SUNIL.CC
        workgroup = SUNIL
        dns forwarder = 4.2.2.1
        server role = active directory domain controller
        idmap_ldb:use rfc2307 = yes
        vfs objects = acl_xattr
        map acl inherit = yes
        store dos attributes = yes

[netlogon]
        path = /var/lib/samba/sysvol/sunil.cc/scripts
        read only = No

[sysvol]
        path = /var/lib/samba/sysvol
        read only = No
[root@samba4 ~]#
[root@samba4 ~]# systemctl restart samba
检查我们是否可以填写用户和组:
[root@samba4 ~]# wbinfo -u
SUNIL\administrator
SUNIL\sambauser
SUNIL\testuser
SUNIL\krbtgt
SUNIL\guest
[root@samba4 ~]# wbinfo -g
SUNIL\cert publishers
SUNIL\ras and ias servers
SUNIL\allowed rodc password replication group
SUNIL\denied rodc password replication group
SUNIL\dnsadmins
SUNIL\enterprise read-only domain controllers
SUNIL\domain admins
SUNIL\domain users
SUNIL\domain guests
SUNIL\domain computers
SUNIL\domain controllers
SUNIL\schema admins
SUNIL\enterprise admins
SUNIL\group policy creator owners
SUNIL\read-only domain controllers
SUNIL\dnsupdateproxy
[root@samba4 ~]#
修改nsswitch.conf中的行:
[root@samba4 ~]# cat /etc/nsswitch.conf
----------
---------
passwd:     files winbind
shadow:     files winbind
group:      files winbind
hosts:      files dns wins
services:   files winbind
netgroup:   files winbind

---------
----------
现在检查我们是否能够使用id命令获取用户名:
[root@samba4 ~]# id testuser
uid=3000019(SUNIL\testuser) gid=100(users) groups=100(users),3000019(SUNIL\testuser),3000009(BUILTIN\users)
[root@samba4 ~]#
创建一个Samba共享
我将创建两个共享,一个只能由testuser访问,另一个共享可由域用户组中的所有用户访问。
testuser可访问的共享将被称为testshare。
所有用户可访问的共享将被称为commonshare。
[root@samba4 ~]# mkdir /testshare
[root@samba4 ~]# mkdir /commonshare
[root@samba4 ~]# chmod 770 /testshare
[root@samba4 ~]# chmod 770 /commonshare
[root@samba4 ~]# chown -R root:testuser /testshare
[root@samba4 ~]# chown -R root:"Domain Users" /commonshare
现在在smb.conf中添加条目
[root@samba4 ~]# cat /etc/samba/smb.conf
# Global parameters
[global]
        netbios name = SAMBA4
        realm = SUNIL.CC
        workgroup = SUNIL
        dns forwarder = 4.2.2.1
        server role = active directory domain controller
        idmap_ldb:use rfc2307 = yes
        vfs objects = acl_xattr
        map acl inherit = yes
        store dos attributes = yes

[netlogon]
        path = /var/lib/samba/sysvol/sunil.cc/scripts
        read only = No

[sysvol]
        path = /var/lib/samba/sysvol
        read only = No
[TestShare]
        comment = Test share accessible by testuser
        path = /testshare
        valid users = SUNIL\testuser
        writable = yes
        read only = no
        force create mode = 0660
        create mask = 0770
        directory mask = 0770
        force directory mode = 0770
        access based share enum = yes
        hide unreadable = yes
[CommonShare]
         comment = Accessible by all the users
          path = /commonshare
          valid users = "@SUNIL\Domain Users"
          writable = yes
        read only = no
        force create mode = 0660
        create mask = 0777
        directory mask = 0777
        force directory mode = 0770
        access based share enum = yes
        hide unreadable = yes
[root@samba4 ~]#
重新开始Samba服务。
[root@samba4 ~]# systemctl restart samba
访问samba共享作为测试用户。
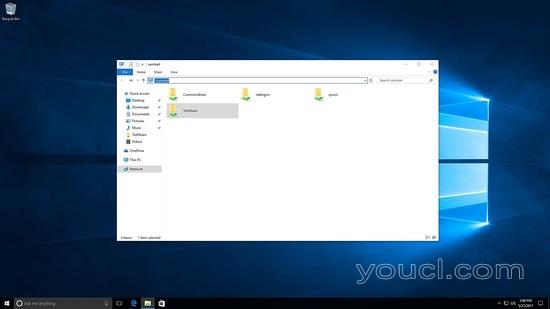
在这里,您将看到testshare和commonshare都可见。
测试了在testshare下创建文件和文件夹。
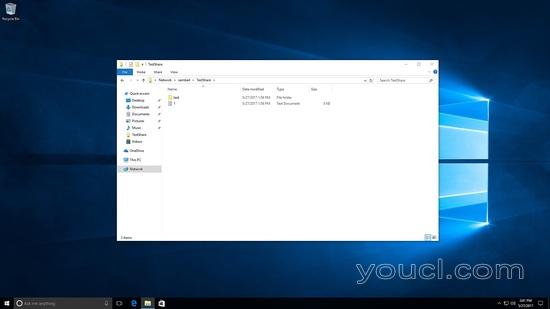
[root@samba4 /]# cd /testshare/
[root@samba4 testshare]# ls -l
total 8
-rwxrwx---+ 1 SUNIL\testuser users 0 May 27 22:56 1.txt
drwxrwx---+ 2 SUNIL\testuser users 6 May 27 22:56 test
[root@samba4 testshare]#
现在我以不同的用户身份登录,只有commonshare可见:

在commonshare下创建文件。
[root@samba4 commonshare]# ls -l
total 8
drwxrwxrwx+ 2 SUNIL\testuser  users 6 May 27 23:02 test
drwxrwxrwx+ 2 SUNIL\sambauser users 6 May 27 23:07 test2
[root@samba4 commonshare]#
这就是我们如何在Samba 4下创建共享。


