Naemon是新的监控套件,旨在快速,稳定和创新,同时让您清楚地了解您的网络和应用程序的状态。这是一个替代nagios服务器,非常稳定,并使用一个惊人的仪表板,称为thruk。 设置naemon非常简单,并且具有现实的状态。在本教程中,我将向您展示如何在生产环境中安装和配置naemon以及pnp4nagios的图形。 Naemon非常稳定,我会告诉你如何在大规模的环境中维护配置。
在本教程中,我将使用四个服务器
- 192.168.1.170 - Naemon服务器 - centos 7
- 192.168.1.21 - nrpe client - centos 6
- 192.168.1.182 - nrpe client - ubuntu
- 192.168.1.75 - nscp客户端 - Windows服务器2012R2
安装Naemon服务器
我正在使用CentOS 7主机,安装最少,已禁用SELinux并启用防火墙。
[root@naemon ~]# sestatus
SELinux status:                 disabled
[root@naemon ~]#
安装repo:
[root@naemon ~]# yum -y install https://labs.consol.de/repo/stable/rhel7/x86_64/labs-consol-stable.rhel7.noarch.rpm
使epel回购:
yum -y install epel-release
安装Naemon包:
[root@naemon ~]# yum install naemon*
Naemon使用相同的Nagios插件和nrpe来监视主机。 我们现在将安装它们:
[root@naemon ~]# yum install nagios-plugins nagios-plugins-all nagios-plugins-nrpe nrpe -y
我们将添加防火墙规则:
[root@naemon ~]# firewall-cmd --add-service=http --permanent
success
[root@naemon ~]# firewall-cmd --add-service=https --permanent
success
[root@naemon ~]# firewall-cmd --reload
success
[root@naemon ~]# firewall-cmd --list-all
public (active)
  target: default
  icmp-block-inversion: no
  interfaces: eno16777736
  sources:
  services: dhcpv6-client http https ssh
  ports:
  protocols:
  masquerade: no
  forward-ports:
  sourceports:
  icmp-blocks:
  rich rules:

[root@naemon ~]#
安装pnp4nagios。
yum install gcc-c++ rrdtool perl-Time-HiRes perl-rrdtool php-gd php php-cli wget
下载pnp4nagios。
[root@naemon ~]# wget https://svwh.dl.sourceforge.net/project/pnp4nagios/PNP-0.6/pnp4nagios-0.6.25.tar.gz
    [root@naemon ~]# tar -zxvf pnp4nagios-0.6.25.tar.gz
    [root@naemon ~]# cd pnp4nagios-0.6.25/
[root@naemon pnp4nagios-0.6.25]# ./configure --with-nagios-user=naemon --with-nagios-group=naemon
[root@naemon pnp4nagios-0.6.25]# make all
[root@naemon pnp4nagios-0.6.25]# make fullinstall
[root@naemon pnp4nagios-0.6.25]# make install-webconf
[root@naemon pnp4nagios-0.6.25]# make install-config
[root@naemon pnp4nagios-0.6.25]# make install-init
重新启动并启用服务。
    [root@naemon ~]# systemctl enable httpd && systemctl restart httpd
[root@naemon ~]# systemctl enable naemon && systemctl restart naemon
[root@naemon ~]# systemctl enable thruk && systemctl restart thruk
[root@naemon ~]# systemctl enable npcd && systemctl restart npcd
您应该可以访问http://192.168.1.170/thruk的URL
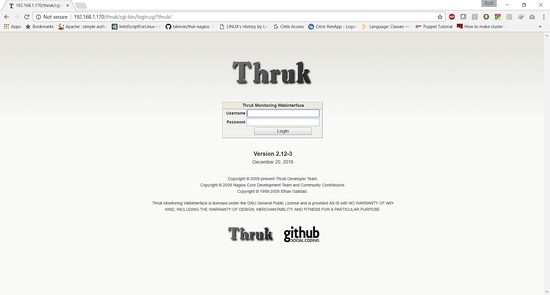
默认用户名为thrukadmin ,密码为thrukadmin。
如果您想更改thrukadmin密码,请运行:
[root@naemon ~]# htpasswd /etc/thruk/htpasswd thrukadmin
安装Monitoring Client监视节点
安装用于监视Linux主机的nrpe客户端
192.168.1.21 - nrpe client - centos 6
安装Nagios插件和nrpe客户端:
[root@centos6 ~]# yum install nagios-plugins nagios-plugins-all nagios-plugins-nrpe nrpe -y
备份nrpe.cfg:
[root@centos6 ~]# cp /etc/nagios/nrpe.cfg /etc/nagios/nrpe.cfg.bkp
用以下内容替换nrpe.conf文件的内容:
[root@centos6 ~]# cat /etc/nagios/nrpe.cfg
log_facility=daemon
pid_file=/var/run/nrpe/nrpe.pid
nrpe_user=nrpe
nrpe_group=nrpe
allowed_hosts=127.0.0.1,192.168.1.170
dont_blame_nrpe=1
debug=0
command_timeout=60
connection_timeout=300
include_dir=/etc/nrpe.d/

[root@centos6 ~]#
在allowed_host下添加naemon服务器ipaddress这里是192.168.1.170。
现在我们需要重新启动nrpe服务:
	[root@centos6 ~]# service nrpe restart
	[root@centos6 ~]# chkconfig nrpe on
192.168.1.182 - nrpe client - ubuntu
root@ubuntu:~# apt-get install nagios-nrpe-server nagios-plugins -y
备份nrpe.cfg:
[root@ubuntu ~]# cp /etc/nagios/nrpe.cfg /etc/nagios/nrpe.cfg.bkp
用以下内容替换nrpe.conf文件的内容:
root@ubuntu:~# cat /etc/nagios/nrpe.cfg
log_facility=daemon
pid_file=/var/run/nagios/nrpe.pid
nrpe_user=nagios
nrpe_group=nagios
allowed_hosts=127.0.0.1,192.168.1.170
dont_blame_nrpe=1
debug=0
command_timeout=60
connection_timeout=300
include_dir=/etc/nagios/nrpe.d/
root@ubuntu:~#
现在我们需要重新启动nrpe服务:
	root@ubuntu:~# systemctl restart nagios-nrpe-server.service
	root@ubuntu:~# systemctl enable nagios-nrpe-server.service
在Windows上安装Nscp
192.168.1.75 - nscp客户端 - Windows服务器2012R2
从此网站下载nscp:
https://www.nsclient.org/download/
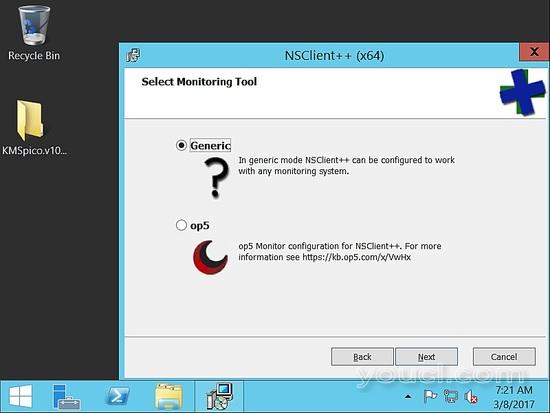
一旦下载,请按照安装截图
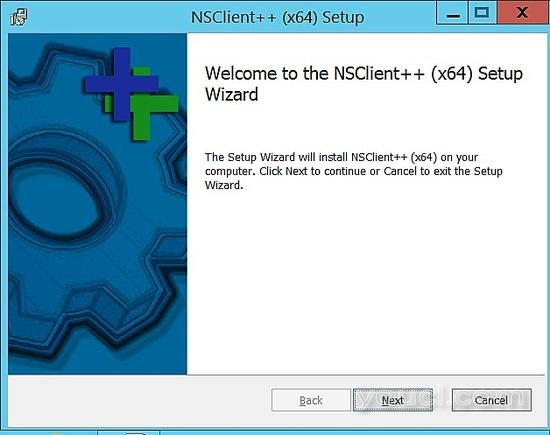
选择通用。
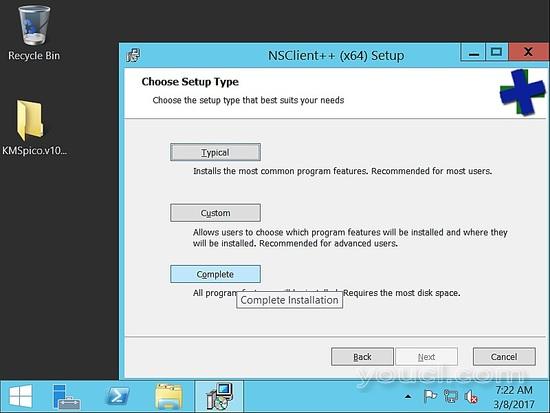
选择完成:
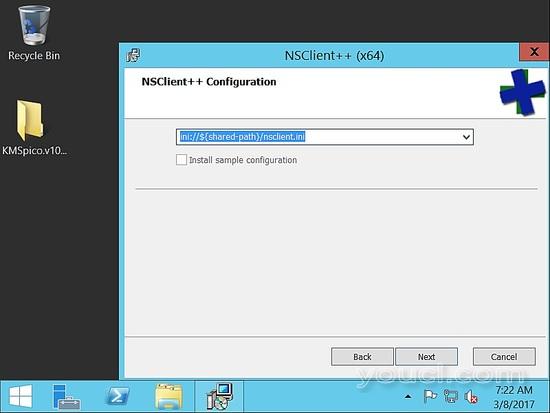
选择默认路径:
现在,在允许的主机下,请添加naemon主机。 在这里我们的设置是192.168.1.170。
确保您提供复杂的密码。 对于这个例子,我使用的密码是“youcl”。 下一步检查启用nsclient和nrpe。

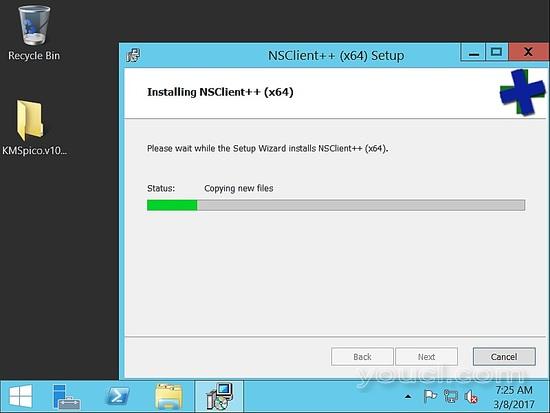
一旦安装完成,请确保服务已启动并运行。
我们现在将从naemon主机验证,以确保我们能够达到它。
从Naemon服务器验证nrpe和nscp以检查连接
[root@naemon ~]# /usr/lib64/nagios/plugins/check_nrpe -H 192.168.1.182
NRPE v2.15
[root@naemon ~]# /usr/lib64/nagios/plugins/check_nrpe -H 192.168.1.21
NRPE v2.15
[root@naemon ~]#
[root@naemon ~]# /usr/lib64/nagios/plugins/check_nt -H 192.168.1.75 -p 12489 -v CLIENTVERSION -s 'youcl'
NSClient++ 0.5.0.62 2016-09-14
[root@naemon ~]#
监控服务器
我们将在本教程中监视服务器的性能。
在生产环境中,我们将需要监视CPU,内存和硬盘利用率以及主机活动检查。
在nrpe conf /etc/nrpe.d/base.cfg中添加以下行
192.168.1.21 - nrpe client - centos 6
  [root@centos6 ~]# cat /etc/nrpe.d/base.cfg
command[check_disks]=/usr/lib64/nagios/plugins/check_disk -w $ARG1$ -c $ARG2$ -p $ARG3$
command[check_disk]=/usr/lib64/nagios/plugins/check_disk -X nfs -X cifs -X none -X tmpfs -w $ARG1$ -c $ARG2$
command[memory]=/usr/lib64/nagios/plugins/check_memory -w $ARG1$ -c $ARG2$
command[load]=/usr/lib64/nagios/plugins/check_load -w $ARG1$ -c $ARG2$
command[check_total_procs]=/usr/lib64/nagios/plugins/check_procs -w $ARG1$ -c $ARG2$
command[check_procs_c]=/usr/lib64/nagios/plugins/check_procs -c $ARG1$ -C $ARG2$
command[check_procs_a]=/usr/lib64/nagios/plugins/check_procs -c $ARG1$ -a $ARG2$
保存并重新启动文件,然后重新启动nrpe。
[root@centos6 ~]# /etc/init.d/nrpe restart
Shutting down nrpe:                                        [FAILED]
Starting nrpe:                                             [  OK  ]
[root@centos6 ~]#
内存插件将不可用作默认插件。 我们将使用以下插件。
 [root@centos6 ~]# cd  /usr/lib64/nagios/plugins/
 [root@centos6 plugins]# vim check_memory
添加以下内容。
#! /usr/bin/perl -w
##Included Perf data
#The nagios plugins come with ABSOLUTELY NO WARRANTY. You may redistribute
#copies of the plugins under the terms of the GNU General Public License.
#
use strict;
use Getopt::Long;

my ($opt_f, $opt_h, $opt_c, $opt_w);
my ($result, $message, $ram_percent);

my $PROGNAME="check_memory";

$opt_f = "";

Getopt::Long::Configure('bundling');
GetOptions(
        "h"   => \$opt_h, "help"        => \$opt_h,
        "c=s" => \$opt_c, "Warning_Percentage"  => \$opt_c,
        "w=s" => \$opt_w, "Critical_Percentage" => \$opt_w,
);

if ($opt_h) {
        &print_help();
        exit 0;
}

$opt_w = shift unless ($opt_w);
$opt_c = shift unless ($opt_c);

if (! $opt_c && ! $opt_w) {
        print "Warning and Critical must be specified\n";
        exit 3;
}
if ($opt_c <= $opt_w){
        print "Critical must be greater than Warning CRITICAL: $opt_c WARNING: $opt_w\n";
        exit 3;
}


$result = 'OK';
open(FREE_M, "free -m|");
while (my $line =

   ){
        if ($line =~ /^Mem/){
                my ($junk,$total_mem,$used_mem,$free_mem,$shared_mem,$buffered_mem,$cached_mem)=split(/\s+/,$line);
                $ram_percent=int(($total_mem-($free_mem+$cached_mem+$buffered_mem))/$total_mem*100*100)/100;

        }
}
close(FREE_M);

if ($ram_percent > $opt_c){
print "Memory usage is: CRITICAL: ${ram_percent}% used | used=$ram_percent;$opt_w;$opt_c\n";
exit 2;
}elsif ($ram_percent > $opt_w) {
print "Memory usage is: WARNING: ${ram_percent}% used | used=$ram_percent;$opt_w;$opt_c\n";
exit 1;
}
else{
print "Memory usage is: $result: ${ram_percent}% used | used=$ram_percent;$opt_w;$opt_c\n";
exit 0;
}

sub print_usage () {
        print "Usage:\n";
        print "  $PROGNAME -f

    \n";
        print "  $PROGNAME -c

     \n";
        print "  $PROGNAME -w

      \n";
        print "  $PROGNAME [-h | --help]\n";
        print "  $PROGNAME [-V | --version]\n";
}

sub print_help () {
        print << EOF;
$PROGNAME v1.0.01
The nagios plugins come with ABSOLUTELY NO WARRANTY. You may redistribute
copies of the plugins under the terms of the GNU General Public License.
EOF
        &print_usage();
        print "\n";
        exit 3;
}
您必须授予该文件的执行权限:
[root@centos6 plugins]# chmod 755 check_memory
在nrpe conf /etc/nagios/nrpe.d/base.cfg中添加以下行
192.168.1.182 - nrpe client - ubuntu
这里的文件路径是不同的:
插件文件夹是lib而不是lib64。
  root@ubuntu:~# cat /etc/nagios/nrpe.d/base.cfg
command[check_disks]=/usr/lib/nagios/plugins/check_disk -w $ARG1$ -c $ARG2$ -p $ARG3$
command[check_disk]=/usr/lib/nagios/plugins/check_disk -X nfs -X cifs -X none -X tmpfs -w $ARG1$ -c $ARG2$
command[memory]=/usr/lib/nagios/plugins/check_memory -w $ARG1$ -c $ARG2$
command[load]=/usr/lib/nagios/plugins/check_load -w $ARG1$ -c $ARG2$
command[check_total_procs]=/usr/lib/nagios/plugins/check_procs -w $ARG1$ -c $ARG2$
command[check_procs_c]=/usr/lib/nagios/plugins/check_procs -c $ARG1$ -C $ARG2$
command[check_procs_a]=/usr/lib/nagios/plugins/check_procs -c $ARG1$ -a $ARG2$
在/ usr / lib / nagios / plugins中添加相同的check_memory脚本。
  root@ubuntu:~# vim /usr/lib/nagios/plugins/check_memory
root@ubuntu:~# chmod 755 /usr/lib/nagios/plugins/check_memory
root@ubuntu:~# systemctl restart nagios-nrpe-server.service
root@ubuntu:~#
在Naemon服务器上配置
登录为naemon用户:
[root@naemon ~]# su - naemon
Last login: Thu Mar  9 17:11:39 CET 2017 on pts/0
-sh-4.2$
在/etc/naemon/naemon.cfg中更改管理员邮件
........
........
admin_email=itsupport@sunil.cc
admin_pager=itsupport@sunil.cc
........
........
现在我们将配置自定义命令来进行/etc/naemon/conf.d中的检查
创建一个名为custom_commands.cfg的自定义命令, 其中包含以下内容。
$ vim /etc/naemon/conf.d/custom_commands.cfg
## Host Alive check ##
# command 'check_icmp Host Alive'
define command{
    command_name                   host_alive
    command_line                   $USER1$/check_icmp -H $HOSTADDRESS$ -n 1 -w 3000.00,80% -c 5000.00,100%
    }
### Service Command ##
# command 'check_nrpe_disks'
define command{
    command_name                   check_nrpe_disks
    command_line                   $USER1$/check_nrpe -t 55 -u -H $HOSTADDRESS$ -c check_disks -a $ARG1$ $ARG2$ $ARG3$
    }

# command 'nrpe'
define command{
    command_name                   nrpe
    command_line                   $USER1$/check_nrpe -t 55 -u -H $HOSTADDRESS$ -c $ARG1$
    }

# NRPE With Arguements
define command{
    command_name                   check_nrpe_a
    command_line                   $USER1$/check_nrpe -t 55 -u -H $HOSTADDRESS$ -c $ARG1$ -a $ARG2$ $ARG3$ $ARG4$
    }
#####################################
# Windows NSClient++ Checks
# command 'check_nt'
define command{
    command_name                   nt
    command_line                   $USER1$/check_nt -H $HOSTADDRESS$ -p 12489 -v $ARG1$ $ARG2$ -s $USER4$
    }
为了安全起见,请将nscp客户端密码保存在/etc/naemon/resource.cfg中
...........
...........
$USER4$=youcl
...........
............
现在我们需要定义主机配置。
我们创建一个名为linux.cfg的文件。
$ vim /etc/naemon/conf.d/linux.cfg
define host {
  host_name                      centos6.sunil.cc
  alias                          Centos
  address                        192.168.1.21
  use                            linux-server
  hostgroups                     linux-servers
}
define host {
  host_name                      ubuntu.sunil.cc
  alias                          Ubuntu
  address                        192.168.1.182
  use                            linux-server
  hostgroups                     linux-servers
}
我们对Windows主机做同样的事情。
$ vim /etc/naemon/conf.d/windows.cfg
define host {
  host_name                      ad.sunil.cc
  alias                          My Windows Server
  address                        192.168.1.75
  use                            windows-server
}

define hostgroup {
  hostgroup_name                 windows-servers
  alias                          Windows Servers
}
现在我们需要定义服务配置。
$ vim linux_services.cfg
define service {
  service_description            Disks Status
  hostgroup_name                  linux-servers
  use                            generic-service
  check_command                  check_nrpe_a!check_disk!15%!5%
}
define service{
    use                            generic-service
    hostgroup_name                 linux-servers
    service_description            Load Average
    check_command                  check_nrpe_a!load!30,25,20!45,40,35
    }
define service{
    use                            generic-service
    hostgroup_name                 linux-servers
    service_description            Memory Usage
    check_command                  check_nrpe_a!memory!80!90
    }
对于Windows,我们创建一个类似的配置。
$ vim window_services.cfg
define service{
    use                            generic-service
    hostgroup_name                 windows-servers
    service_description            Disk - C:
    check_command                  nt!USEDDISKSPACE!-l c -w 80 -c 90
     }
define service{
    use                            generic-service
    hostgroup_name                 windows-servers
    service_description            Load Average
    check_command                  nt!CPULOAD!-l 60,90,95
    }
define service{
    use                            generic-service
    hostgroup_name                 windows-servers
    service_description            Memory Usage
    check_command                  nt!MEMUSE!-w 90 -c 95
    }
现在我们将更改联系电子邮件地址。
$ vim contacts.cfg
define contact {
  contact_name                   naemonadmin                         ; Short name of user
  alias                          Naemon Admin                        ; Full name of user
  use                            generic-contact                     ; Inherit default values from generic-contact template (defined above)
  email                          itsupport@sunil.cc             ; <<***** CHANGE THIS TO YOUR EMAIL ADDRESS ******
}
我们现在删除不需要的不必要的配置。
$ mv switch.cfg switch.cfg.bkp
$ mv printer.cfg printer.cfg.bkp
验证配置。
$ naemon -v /etc/naemon/naemon.cfg

Naemon Core 1.0.6-pkg
Copyright (c) 2013-present Naemon Core Development Team and Community Contributors
Copyright (c) 2009-2013 Nagios Core Development Team and Community Contributors
Copyright (c) 1999-2009 Ethan Galstad
License: GPL

Website: http://www.naemon.org
Reading configuration data...
   Read main config file okay...
   Read object config files okay...

Running pre-flight check on configuration data...

Checking objects...
        Checked 20 services.
        Checked 4 hosts.
        Checked 1 contacts.
        Checked 2 host groups.
        Checked 0 service groups.
        Checked 1 contact groups.
        Checked 29 commands.
        Checked 5 time periods.
        Checked 0 host escalations.
        Checked 0 service escalations.
Checking for circular paths...
        Checked 4 hosts
        Checked 0 service dependencies
        Checked 0 host dependencies
        Checked 5 timeperiods
Checking global event handlers...
Checking obsessive compulsive processor commands...
Checking misc settings...

Total Warnings: 0
Total Errors:   0

Things look okay - No serious problems were detected during the pre-flight check
-sh-4.2$
以root身份登录并重新启动naemon服务。
[root@naemon conf.d]# systemctl restart naemon
[root@naemon conf.d]# systemctl status naemon
? naemon.service - Naemon Monitoring Daemon
   Loaded: loaded (/usr/lib/systemd/system/naemon.service; enabled; vendor preset: disabled)
   Active: active (running) since Thu 2017-03-09 19:14:36 CET; 7s ago
     Docs: http://naemon.org/documentation
  Process: 5112 ExecStart=/usr/bin/naemon --daemon /etc/naemon/naemon.cfg (code=exited, status=0/SUCCESS)
  Process: 5110 ExecStartPre=/usr/bin/chown -R naemon:naemon /var/run/naemon/ (code=exited, status=0/SUCCESS)
  Process: 5108 ExecStartPre=/usr/bin/mkdir /var/run/naemon (code=exited, status=1/FAILURE)
 Main PID: 5114 (naemon)
   CGroup: /system.slice/naemon.service
           ??5114 /usr/bin/naemon --daemon /etc/naemon/naemon.cfg
           ??5115 /usr/bin/naemon --worker /var/lib/naemon/naemon.qh
           ??5116 /usr/bin/naemon --worker /var/lib/naemon/naemon.qh
           ??5117 /usr/bin/naemon --worker /var/lib/naemon/naemon.qh
           ??5118 /usr/bin/naemon --worker /var/lib/naemon/naemon.qh
           ??5119 /usr/bin/naemon --daemon /etc/naemon/naemon.cfg

Mar 09 19:14:36 naemon.sunil.cc systemd[1]: Starting Naemon Monitoring Daemon...
Mar 09 19:14:36 naemon.sunil.cc systemd[1]: Failed to read PID from file /var/run/naemon/naemon.pid: Invalid argument
Mar 09 19:14:36 naemon.sunil.cc systemd[1]: Started Naemon Monitoring Daemon.
[root@naemon conf.d]#
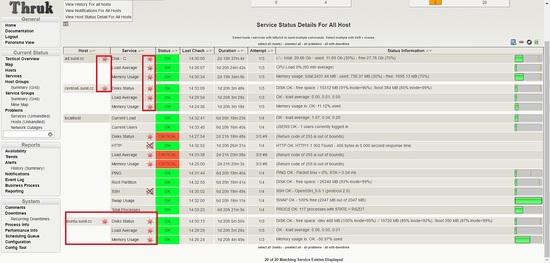
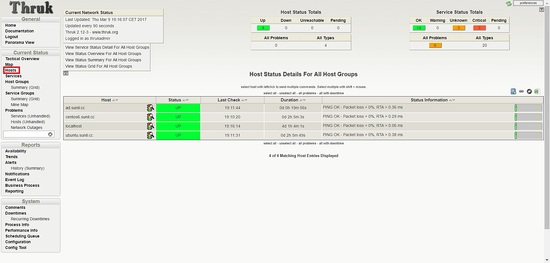
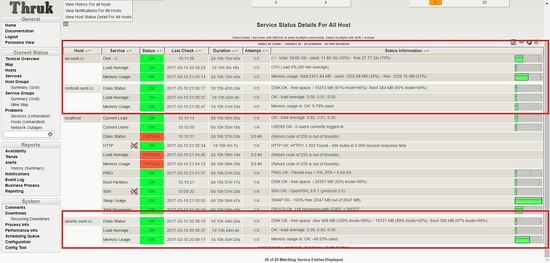
登录到仪表板,您应该看到服务启动并运行。
我们看到Ubuntu主机的服务失败。
It is seen that nrpe package compiled for ubuntu had enable arguments disabled for security vulnerabily and that is the reason it is failing
我们将需要重新编译包以启用参数,从naemon管理调整。
以下链接显示如何重新编译。 您还可以在此站点中找到已使用enable参数编译的包。 我将使用这个预编译的包本教程。
https://www.claudiokuenzler.com/blog/626/nrpe-debian-jessie-command-ags-arguments-not-working-error
root@ubuntu:~# wget https://www.claudiokuenzler.com/downloads/nrpe/nagios-nrpe-server_2.15-1ubuntu2_amd64.xenial.deb
安装包装
root@ubuntu:~# dpkg -i nagios-nrpe-server_2.15-1ubuntu2_amd64.xenial.deb
(Reading database ... 79576 files and directories currently installed.)
Preparing to unpack nagios-nrpe-server_2.15-1ubuntu2_amd64.xenial.deb ...
Unpacking nagios-nrpe-server (2.15-1ubuntu2) over (2.15-1ubuntu1) ...
Setting up nagios-nrpe-server (2.15-1ubuntu2) ...
Processing triggers for systemd (229-4ubuntu16) ...
Processing triggers for ureadahead (0.100.0-19) ...
Processing triggers for man-db (2.7.5-1) ...
root@ubuntu:~#
重新启动NRPE。
root@ubuntu:~# systemctl restart nagios-nrpe-server.service
现在我们使用naemon来监控所有的主机。
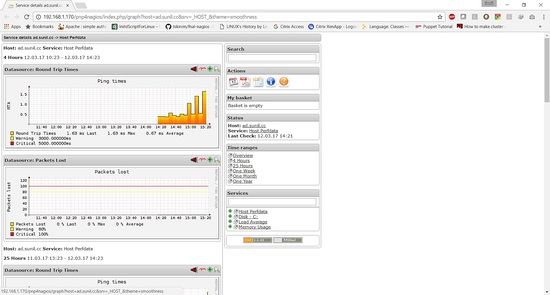
pnp4nagios的配置
我们需要配置pnp4nagios的性能图。
现在我们将使用与thruk仪表板相同的身份验证方法,我们将首先对文件进行备份,然后更改以下几行。
[root@naemon conf.d]# cd /etc/httpd/conf.d/
[root@naemon conf.d]# cp pnp4nagios.conf pnp4nagios.conf.bkp
[root@naemon share]# cat /etc/httpd/conf.d/pnp4nagios.conf
# SAMPLE CONFIG SNIPPETS FOR APACHE WEB SERVER

Alias /pnp4nagios "/usr/local/pnp4nagios/share"

<Directory "/usr/local/pnp4nagios/share">
        AllowOverride None
        Order allow,deny
        Allow from all
        #
        # Use the same value as defined in nagios.conf
        #
        AuthName "Thruk Access"
        AuthType Basic
        AuthUserFile /etc/thruk/htpasswd
        Require valid-user


                # Turn on URL rewriting
                RewriteEngine On
                Options symLinksIfOwnerMatch
                # Installation directory
                RewriteBase /pnp4nagios/
                # Protect application and system files from being viewed
                RewriteRule "^(?:application|modules|system)/" - [F]
                # Allow any files or directories that exist to be displayed directly
                RewriteCond "%{REQUEST_FILENAME}" !-f
                RewriteCond "%{REQUEST_FILENAME}" !-d
                # Rewrite all other URLs to index.php/URL
                RewriteRule "^.*$" "index.php/$0" [PT]


[root@naemon share]#
[root@naemon conf.d]# systemctl restart httpd.service
现在我们需要更改配置页面。
[root@naemon share]# cd /usr/local/pnp4nagios/share/
[root@naemon share]# mv install.php install.php.txt
现在我们需要修改pnp4nagios的配置文件。
在配置文件中将nagios更改为naemon。
[root@naemon conf.d]# vi /usr/local/pnp4nagios/etc/config_local.php
............................
................................
$conf['nagios_base'] = "/naemon/cgi-bin";
..................................
............................
使性能数据从0到1。
[root@naemon conf.d]# vi /etc/naemon/naemon.cfg
.....................
.....................
process_performance_data=1
......................
......................
将以下行添加到naemon.conf的底部。
[root@naemon conf.d]# vi /etc/naemon/naemon.cfg
#
# service performance data
#
service_perfdata_file=/usr/local/pnp4nagios/var/service-perfdata
service_perfdata_file_template=DATATYPE::SERVICEPERFDATA\tTIMET::$TIMET$\tHOSTNAME::$HOSTNAME$\tSERVICEDESC::$SERVICEDESC$\tSERVICEPERFDATA::$SERVICEPERFDATA$\tSERVICECHECKCOMMAND::$SERVICECHECKCOMMAND$\tHOSTSTATE::$HOSTSTATE$\tHOSTSTATETYPE::$HOSTSTATETYPE$\tSERVICESTATE::$SERVICESTATE$\tSERVICESTATETYPE::$SERVICESTATETYPE$
service_perfdata_file_mode=a
service_perfdata_file_processing_interval=15
service_perfdata_file_processing_command=process-service-perfdata-file

#
#
#
host_perfdata_file=/usr/local/pnp4nagios/var/host-perfdata
host_perfdata_file_template=DATATYPE::HOSTPERFDATA\tTIMET::$TIMET$\tHOSTNAME::$HOSTNAME$\tHOSTPERFDATA::$HOSTPERFDATA$\tHOSTCHECKCOMMAND::$HOSTCHECKCOMMAND$\tHOSTSTATE::$HOSTSTATE$\tHOSTSTATETYPE::$HOSTSTATETYPE$
host_perfdata_file_mode=a
host_perfdata_file_processing_interval=15
host_perfdata_file_processing_command=process-host-perfdata-file
现在我们需要在custom_commands.conf中添加以下行。
[root@naemon conf.d]# vim /etc/naemon/conf.d/custom_commands.cfg
define command{
       command_name    process-service-perfdata-file
       command_line    /bin/mv /usr/local/pnp4nagios/var/service-perfdata /usr/local/pnp4nagios/var/spool/service-perfdata.$TIMET$
}

define command{
       command_name    process-host-perfdata-file
       command_line    /bin/mv /usr/local/pnp4nagios/var/host-perfdata /usr/local/pnp4nagios/var/spool/host-perfdata.$TIMET$
}
现在我们为主机性能和服务性能图创建一个模板。
$ cd /etc/naemon/conf.d/templates/
$ cat pnp.cfg
define host {
   name host-pnp
   process_perf_data 1
   action_url /pnp4nagios/index.php/graph?host=$HOSTNAME$&srv=_HOST_' class='tips' rel='/pnp4nagios/index.php/popup?host=$HOSTNAME$&srv=_HOST_
   register 0
}

define service {
   name service-pnp
   process_perf_data 1
   action_url /pnp4nagios/index.php/graph?host=$HOSTNAME$&srv=$SERVICEDESC$' class='tips' rel='/pnp4nagios/index.php/popup?host=$HOSTNAME$&srv=$SERVICEDESC$
   register 0
}
现在要访问所需服务的性能图,我们需要更新service.cfg文件。
$ cat linux_services.cfg
define service {
  service_description            Disks Status
  hostgroup_name                  linux-servers
  use                            generic-service,service-pnp                       ; Name of service template to use
  check_command                  check_nrpe_a!check_disk!15%!5%
}
define service{
    use                            generic-service,service-pnp
    hostgroup_name                 linux-servers
    service_description            Load Average
    check_command                  check_nrpe_a!load!30,25,20!45,40,35
    }
define service{
    use                            generic-service,service-pnp
    hostgroup_name                 linux-servers
    service_description            Memory Usage
    check_command                  check_nrpe_a!memory!80!90
    }
$ cat window_services.cfg
define service{
    use                            generic-service,service-pnp
    hostgroup_name                 windows-servers
    service_description            Disk - C:
    check_command                  nt!USEDDISKSPACE!-l c -w 80 -c 90
     }
define service{
    use                            generic-service,service-pnp
    hostgroup_name                 windows-servers
    service_description            Load Average
    check_command                  nt!CPULOAD!-l 60,90,95
    }
define service{
    use                            generic-service,service-pnp
    hostgroup_name                 windows-servers
    service_description            Memory Usage
    check_command                  nt!MEMUSE!-w 90 -c 95
    }
要检查主机图,我们需要将其包含在下面的文件中。
$ cat linux.cfg
define host {
  host_name                      centos6.sunil.cc
  alias                          Centos
  address                        192.168.1.21
  use                            linux-server,host-pnp
  hostgroups                     linux-servers
}
define host {
  host_name                      ubuntu.sunil.cc
  alias                          Ubuntu
  address                        192.168.1.182
  use                            linux-server,host-pnp
  hostgroups                     linux-servers
}
$ cat windows.cfg
define host {
  host_name                      ad.sunil.cc
  alias                          My Windows Server
  address                        192.168.1.75
  use                            windows-server,host-pnp
}

define hostgroup {
  hostgroup_name                 windows-servers
  alias                          Windows Servers
}
验证配置。
$ naemon -v /etc/naemon/naemon.cfg

Naemon Core 1.0.6-pkg
Copyright (c) 2013-present Naemon Core Development Team and Community Contributors
Copyright (c) 2009-2013 Nagios Core Development Team and Community Contributors
Copyright (c) 1999-2009 Ethan Galstad
License: GPL

Website: http://www.naemon.org
Reading configuration data...
   Read main config file okay...
   Read object config files okay...

Running pre-flight check on configuration data...

Checking objects...
        Checked 20 services.
        Checked 4 hosts.
        Checked 1 contacts.
        Checked 2 host groups.
        Checked 0 service groups.
        Checked 1 contact groups.
        Checked 31 commands.
        Checked 5 time periods.
        Checked 0 host escalations.
        Checked 0 service escalations.
Checking for circular paths...
        Checked 4 hosts
        Checked 0 service dependencies
        Checked 0 host dependencies
        Checked 5 timeperiods
Checking global event handlers...
Checking obsessive compulsive processor commands...
Checking misc settings...

Total Warnings: 0
Total Errors:   0

Things look okay - No serious problems were detected during the pre-flight check
重新启动服务。
[root@naemon ~]# systemctl enable npcd
npcd.service is not a native service, redirecting to /sbin/chkconfig.
Executing /sbin/chkconfig npcd on
[root@naemon ~]# systemctl restart npcd
[root@naemon ~]# systemctl restart naemon