Spacewalk在您的防火墙内管理Red Hat派生版本(如Fedora,CentOS和Scientific Linux)的软件内容更新。 这是RedHat卫星5的开源版本。我们有RedHat卫星6,开源版本是katello。 我将在下一个教程中详细介绍如何配置它。 太空行走是一个非常强大的工具,当涉及到管理基础设施,真的很稳定和良好的建设。
我正在通过Spacewalk的安装,并将详细介绍如何将其配置为准备生产,以及我们可以使用的所有功能。 我将安装嵌入式Postgres。
在本教程中,我将使用3台服务器:
- 192.168.1.20 - 太空行走服务器 - centos 7
- 192.168.1.21 - 太空行走客户端 - centos 6
- 192.168.1.22 - 太空步行客户端 - centos 7
要求
CentOS 7最小安装:
cat /etc/redhat-release
结果:
CentOS Linux release 7.3.1611(Core)
SELinux在强制模式下:
sestatus
SELinux status: enabled
SELinuxfs mount: /sys/fs/selinux
SELinux rootdirectory: /etc/selinux
Loaded policy name: targeted
Current mode:enforcing
Mode from config file: enforcing
Policy MLS status: enabled
Policy deny_unknown status: allowed
Max kernel policy version: 28
[root@spacewalk ~]#
添加主机条目/ etc / hosts
192.168.1.20 spacewalk.sunil.cc spacewalk
安装Spacewalk服务器
安装Spacewalk CentOS repo。
rpm -Uvh http://yum.spacewalkproject.org/2.6/RHEL/7/x86_64/spacewalk-repo-2.6-0.el7.noarch.rpm
cat > /etc/yum.repos.d/jpackage-generic.repo << EOF
[jpackage-generic]
name=JPackage generic
baseurl=http://mirrors.dotsrc.org/pub/jpackage/5.0/generic/free/
#mirrorlist=http://www.jpackage.org/mirrorlist.php?dist=generic&type=free&release=5.0
enabled=1
gpgcheck=1
gpgkey=http://www.jpackage.org/jpackage.asc
EOF
rpm -Uvh https://dl.fedoraproject.org/pub/epel/epel-release-latest-7.noarch.rpm
安装PostgreSQL for Spacewalk:
yum install -y spacewalk-setup-postgresql spacewalk-postgresql
添加防火墙规则。
firewall-cmd --add-service=http --permanent; firewall-cmd --add-service=https --permanent; firewall-cmd --add-port=5222/tcp --permanent;firewall-cmd --add-port=5269/tcp --permanent;firewall-cmd --add-port=69 â??permanent; firewall-cmd --add-port=5222/udp --permanent;firewall-cmd --add-port=5269/udp --permanent
并重新加载防火墙。
firewall-cmd --reload
启用防火墙
systemctl enable firewalld
systemctl restart firewalld
配置PostgreSQL服务器。
这里我给出了DB的名字是spacewalk,用户名为spacewalkuser和password spaceuser。
spacewalk-setup-postgresql create --db spacewalk --user spacewalkuser --password spacewalkuser
/usr/bin/spacewalk-setup-postgresql: line 87: isSUSE: command not found
/usr/bin/spacewalk-setup-postgresql: line 100: isSUSE: command not found
Note: Forwarding request to 'systemctl enable postgresql.service'.
Created symlink from /etc/systemd/system/multi-user.target.wants/postgresql.service to /usr/lib/systemd/system/postgresql.service.
Hint: the preferred way to do this is now "postgresql-setup initdb"
Initializing database ... OK
/usr/bin/spacewalk-setup-postgresql: line 154: [: 018446744073692774399: integer expression expected
Redirecting to /bin/systemctl start  postgresql.service
Redirecting to /bin/systemctl reload  postgresql.service
Spacewalk服务器的设置。
spacewalk-setup --skip-db-install
* Setting up SELinux..
** Database: Setting up database connection for PostgreSQL backend.
** Database: Embedded database installation SKIPPED.
Could not connect to the database.  Your connection information may be incorrect.  Error: DBI connect('dbname=rhnschema','rhnuser',...) failed: FATAL:  no pg_hba.conf entry for host "[local]", user "rhnuser", database "rhnschema", SSL off at /usr/share/perl5/vendor_perl/Spacewalk/Setup.pm line 1686.

Hostname (leave empty for local)?
Database? spacewalk
Username? spacewalkuser
Password?
** Database: Populating database.
*** Progress: ###########################
* Configuring tomcat.
* Setting up users and groups.
** GPG: Initializing GPG and importing key.
** GPG: Creating /root/.gnupg directory
You must enter an email address.
Admin Email Address? it@sunil.cc
* Performing initial configuration.
* Configuring apache SSL virtual host.
Should setup configure apache's default ssl server for you (saves original ssl.conf) [Y]?
** /etc/httpd/conf.d/ssl.conf has been backed up to ssl.conf-swsave
* Configuring jabberd.
* Creating SSL certificates.
CA certificate password?
You must enter a password.
CA certificate password?
Re-enter CA certificate password?
Organization? IT
Organization Unit [spacewalk.sunil.cc]?
Email Address [it@sunil.cc]?
City? Den Haag
State?
State? Zuid-Holland
Country code (Examples: "US", "JP", "IN", or type "?" to see a list)? NL
** SSL: Generating CA certificate.
** SSL: Deploying CA certificate.
** SSL: Generating server certificate.
** SSL: Storing SSL certificates.
* Deploying configuration files.
* Update configuration in database.
* Setting up Cobbler..
Cobbler requires tftp and xinetd services be turned on for PXE provisioning functionality. Enable these services [Y]? Y
* Restarting services.
Installation complete.
Visit https://spacewalk.sunil.cc to create the Spacewalk administrator account.
[root@spacewalk ~]#
重新启动太空行走。
spacewalk-service restart
Shutting down spacewalk services...
Redirecting to /bin/systemctl stop  taskomatic.service
Stopping cobblerd (via systemctl):                         [  OK  ]
Redirecting to /bin/systemctl stop  rhn-search.service
Redirecting to /bin/systemctl stop  osa-dispatcher.service
Redirecting to /bin/systemctl stop  httpd.service
Redirecting to /bin/systemctl stop  tomcat.service
Redirecting to /bin/systemctl stop  jabberd.service
Redirecting to /bin/systemctl stop  postgresql.service
Done.
Starting spacewalk services...
Redirecting to /bin/systemctl start  postgresql.service
Redirecting to /bin/systemctl start  jabberd.service
Redirecting to /bin/systemctl start  tomcat.service
Waiting for tomcat to be ready ...
Redirecting to /bin/systemctl start  httpd.service
Redirecting to /bin/systemctl start  osa-dispatcher.service
Redirecting to /bin/systemctl start  rhn-search.service
Starting cobblerd (via systemctl):                         [  OK  ]
Redirecting to /bin/systemctl start  taskomatic.service
Done.
[root@spacewalk ~]#
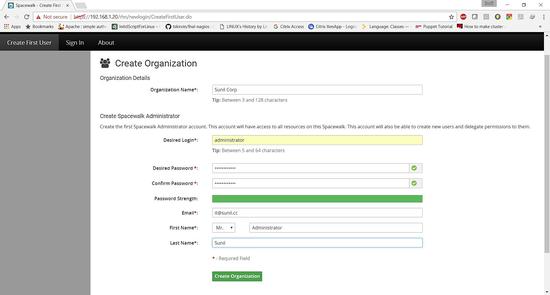
配置用户Spacewalk
从浏览器http://192.168.1.20访问URL
填写组织细节。
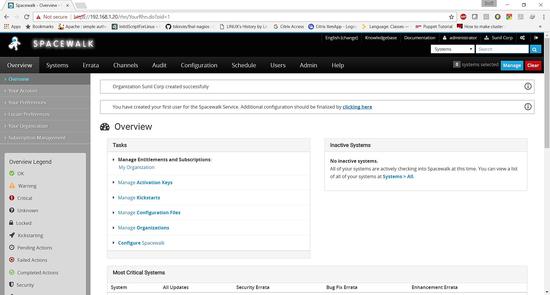
Spacewalk已成功安装。
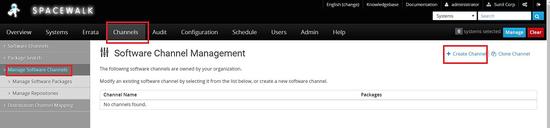
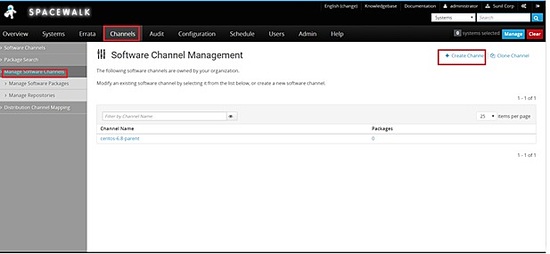
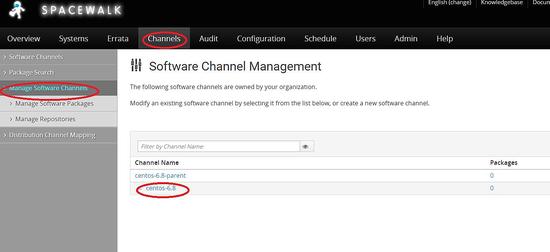
Spacewalk频道创作
点击频道 - >管理软件频道 - >创建频道
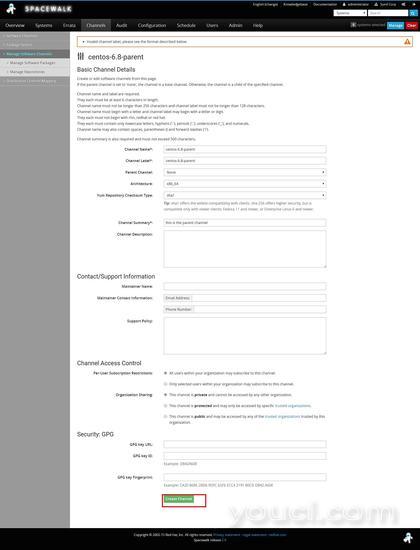
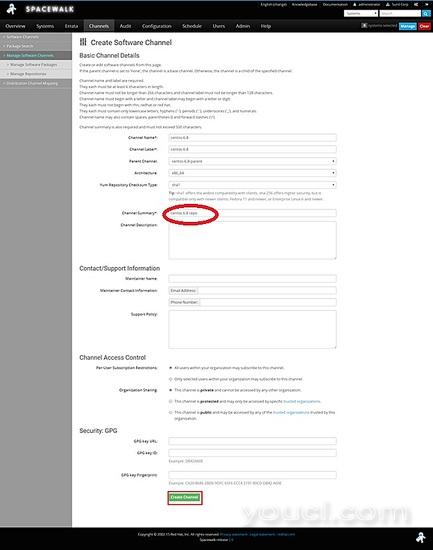
创建一个父通道 - > centos6.8-parent
现在我们需要创建子频道
频道 - >管理频道 - >创建频道
选择父频道为centos-6.8-parent
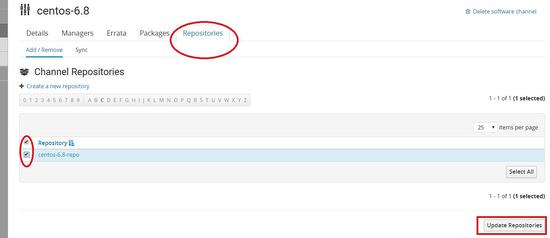
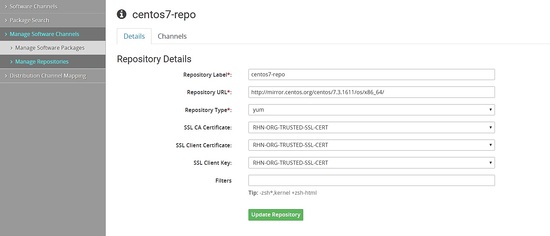
现在我们将为centos 6.8创建回购
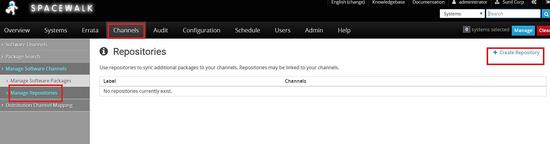
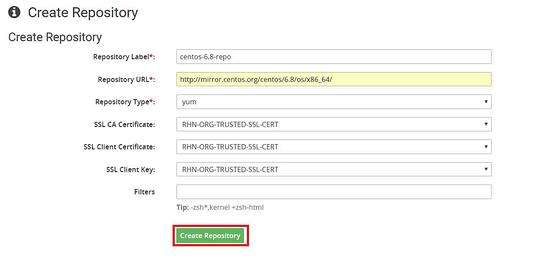
将回购链接到我们之前创建的子渠道
需要在centos 7中复制通道创建的相同步骤。

现在我们需要从repo下载软件包。 我们可以通过命令行或从仪表板来执行。
命令行
[root@spacewalk ~]# spacewalk-repo-sync --list
00:01:23 ======================================
00:01:23 |   Channel Label   |   Repository   |
00:01:23 ======================================
00:01:23 centos-7-child | http://mirror.centos.org/centos/7.3.1611/os/x86_64/
00:01:23 centos-6.8 | http://mirror.centos.org/centos/6.8/os/x86_64/
00:01:23 centos-7 | No repository set
00:01:23 centos-6.8-parent | No repository set
[root@spacewalk ~]#

[root@spacewalk ~]# spacewalk-repo-sync -c centos-6.8
00:02:18 ======================================
00:02:18 | Channel: centos-6.8
00:02:18 ======================================
00:02:18 Sync of channel started.
00:02:18 Repo URL: http://mirror.centos.org/centos/6.8/os/x86_64/
00:02:30 Packages in repo:              6696
00:02:40 Packages already synced:          0
00:02:40 Packages to sync:              6696
00:02:40 1/6696 : 389-ds-base-1.2.11.15-74.el6-0.x86_64
00:02:43 2/6696 : 389-ds-base-devel-1.2.11.15-74.el6-0.i686
00:02:43 3/6696 : 389-ds-base-devel-1.2.11.15-74.el6-0.x86_64
00:02:44 4/6696 : 389-ds-base-libs-1.2.11.15-74.el6-0.i686
00:02:45 5/6696 : 389-ds-base-libs-1.2.11.15-74.el6-0.x86_64
00:02:46 6/6696 : ConsoleKit-0.4.1-6.el6-0.x86_64
00:02:47 7/6696 : ConsoleKit-devel-0.4.1-6.el6-0.x86_64
一旦完成,它将看起来像这样
[root@spacewalk ~]# spacewalk-repo-sync -c centos-6.8
08:44:57 ======================================
08:44:57 | Channel: centos-6.8
08:44:57 ======================================
08:44:57 Sync of channel started.
08:44:57 Repo URL: http://mirror.centos.org/centos/6.8/os/x86_64/
08:44:58 Packages in repo:              6696
08:45:47 No new packages to sync.
08:45:47 Repo http://mirror.centos.org/centos/6.8/os/x86_64/ has comps file comps.xml.
08:45:47 Repo http://mirror.centos.org/centos/6.8/os/x86_64/ has 0 errata.
08:45:47 Sync of channel completed in 0:00:49.
08:45:47 Total time: 0:00:49
[root@spacewalk ~]#
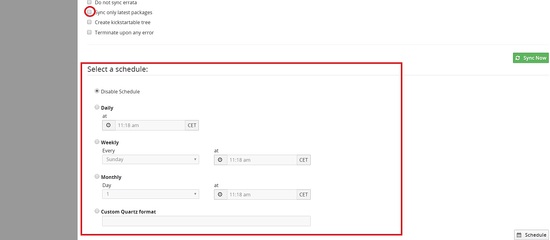
从Web浏览器
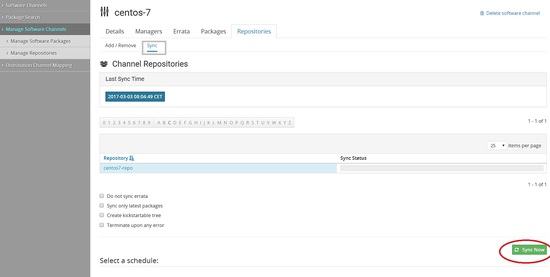
您还可以在此页面中每天或每周安排同步自动同步,并选择仅同步最新的软件包
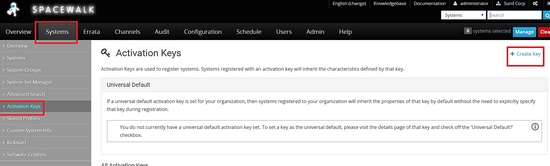
为Centos 6和centos 7主机创建激活密钥,以便与太空漫游服务器进行身份验证
转到系统 - >激活密钥 - >创建密钥
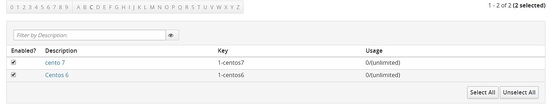
现在我们需要为centos 6创建密钥,这里我使用key作为centos-6,并选择我之前创建的centos-6.8-parent的父通道

为中心7做同样的事情
你应该看到两个键1为中心6和其他为centos 7
客户端配置
本章将介绍如何使用太空行走服务器安装和配置客户端。
Cento6 - 192.168.1.21
Cento7 - 192.168.1.22
配置yum客户端repo
Centos 6
[root@centos6 ~]# rpm -Uvh http://yum.spacewalkproject.org/2.6-client/RHEL/6/x86_64/spacewalk-client-repo-2.6-0.el6.noarch.rpm
Centos 7
[root@centos7 ~]# rpm -Uvh http://yum.spacewalkproject.org/2.6-client/RHEL/7/x86_64/spacewalk-client-repo-2.6-0.el7.noarch.rpm
安装所需的软件包
Centos 6
在centos6和centos7节点上安装epel repo和以下软件包。
启用epel repo
[root@centos6 ~]# yum install epel-release -y
[root@centos6 ~]# yum install rhn-client-tools rhn-check rhn-setup rhnsd m2crypto yum-rhn-plugin osad rhncfg-actions rhncfg-management -y
注册Spacewalk服务器
在我们连接太空漫游服务器之前,我们需要从太空漫游服务器下载ssl证书。
[root@centos6 ~]# wget -O /usr/share/rhn/RHN-ORG-TRUSTED-SSL-CERT http://spacewalk.sunil.cc/pub/RHN-ORG-TRUSTED-SSL-CERT
--2017-03-04 21:54:16--  http://spacewalk.sunil.cc/pub/RHN-ORG-TRUSTED-SSL-CERT
Resolving spacewalk.sunil.cc... 192.168.1.20
Connecting to spacewalk.sunil.cc|192.168.1.20|:80... connected.
HTTP request sent, awaiting response... 200 OK
Length: 5291 (5.2K)
Saving to: /usr/share/rhn/RHN-ORG-TRUSTED-SSL-CERT

100%[===================================================================================================================>] 5,291       --.-K/s   in 0s

2017-03-04 21:54:17 (630 MB/s) - /usr/share/rhn/RHN-ORG-TRUSTED-SSL-CERT saved [5291/5291]

[root@centos6 ~]#
现在我们需要使用我们之前创建的激活密钥注册,我们为centos7创建1-centos6 ,为centos7创建1- centos7。
Centos 6
[root@centos6 ~]# rhnreg_ks --force --activationkey="1-centos6" --serverUrl=http://spacewalk.sunil.cc/XMLRPC --sslCACert=/usr/share/rhn/RHN-ORG-TRUSTED-SSL-CERT --profilename=$HOSTNAME
Centos 7
[root@centos7 ~]# rhnreg_ks --force --activationkey="1-centos7" --serverUrl=http://spacewalk.sunil.cc/XMLRPC --sslCACert=/usr/share/rhn/RHN-ORG-TRUSTED-SSL-CERT --profilename=$HOSTNAME
将配置文件与太空漫游同步,在centos6和centos7节点上运行。
[root@centos7 ~]# rhn-profile-sync
这可以用于从太空行走运行远程命令和文件传输以及使用太空行走服务器的酷炫功能之一。
    [root@centos6 ~]# chkconfig osad on
[root@centos6 ~]# service osad restart
Shutting down osad:                                        [  OK  ]
Starting osad:                                             [  OK  ]
[root@centos6 ~]# rhn-actions-control --enable-all
[root@centos6 ~]#
[root@centos7 ~]# systemctl enable osad
Created symlink from /etc/systemd/system/multi-user.target.wants/osad.service to /usr/lib/systemd/system/osad.service.
[root@centos7 ~]# systemctl restart osad
[root@centos7 ~]# rhn-actions-control --enable-all
[root@centos7 ~]#
现在我们可以做一个配置文件同步。
    [root@centos6 ~]# rhn-profile-sync
Updating package profile...
Updating hardware profile...
[root@centos6 ~]#
   [root@centos7 ~]# rhn-profile-sync
Updating package profile...
Updating hardware profile...
[root@centos7 ~]#
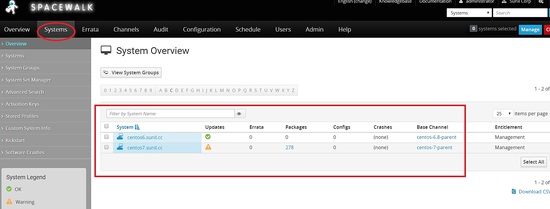
现在可以在太空行走仪表板上检查相同的。
通过Spacewalk运行远程命令和管理文件。
在本章中,我们将看到在运行远程命令和管理配置文件时,太空步行是多么强大。
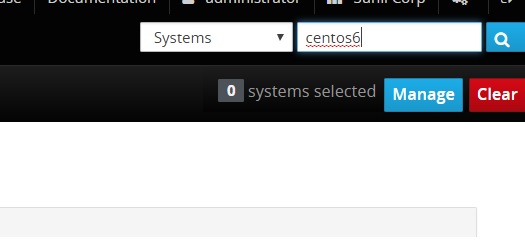
要运行远程命令登录到太空行走仪表板,并搜索主机,我们将需要运行远程命令。
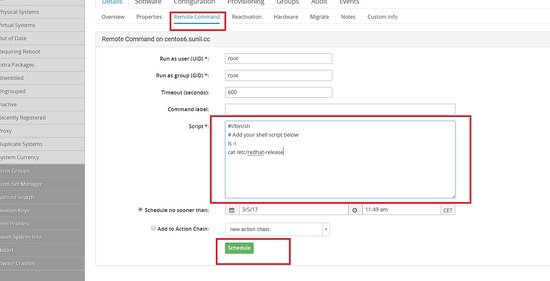
单击remote命令并键入要执行的命令。
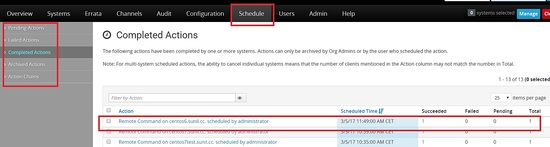
一旦安排,您可以去排程选项卡并检查状态。
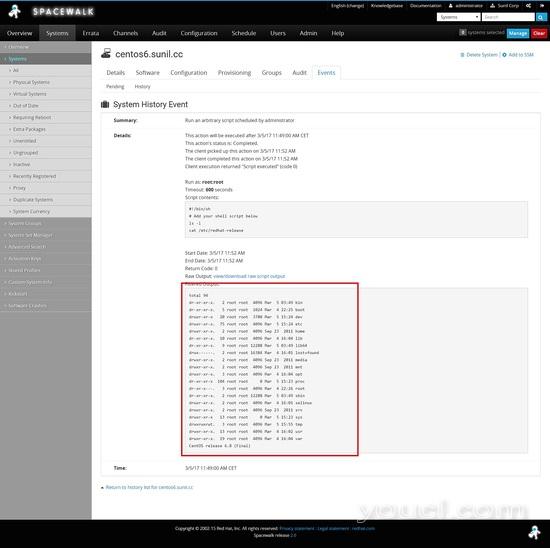
点击主机查看结果。
从太空行走运行远程命令。
我们需要安装spacecmd才能运行远程命令。
[root@spacewalk ~]# yum install spacecmd -y
我们将首先使用ssm添加系统,之前允许登录,您可以使用与前端相同的凭据。
[root@spacewalk ~]# spacecmd
Welcome to spacecmd, a command-line interface to Spacewalk.

Type: 'help' for a list of commands
      'help ' for command-specific help
      'quit' to quit

Spacewalk Username: administrator
Spacewalk Password:
INFO: Connected to https://spacewalk.sunil.cc/rpc/api as administrator
spacecmd {SSM:0}> system_list
centos6.sunil.cc
centos7.sunil.cc
centos7test.sunil.cc
spacecmd {SSM:0}> ssm_add centos6.sunil.cc
spacecmd {SSM:1}> ssm_list
centos6.sunil.cc
spacecmd {SSM:1}> exit
在这里创建一个名称叫做ff.sh的脚本。
    [root@spacewalk ~]# cat ff.sh
#!/bin/bash
cat /etc/redhat-release
[root@spacewalk ~]#
现在运行远程命令。
[root@spacewalk ~]# spacecmd -y system_runscript "ssm -f ff.sh"
INFO: Connected to https://spacewalk.sunil.cc/rpc/api as administrator

User:       root
Group:      root
Timeout:    600 seconds
Start Time: 20170305T12:16:17
p
Script Contents
---------------
#!/bin/bash
cat /etc/redhat-release

Systems
-------
centos6.sunil.cc
INFO: Action ID: 33
INFO: Scheduled: 1 system(s)
[root@spacewalk ~]#
要检查输出,可以运行以下命令。
    [root@spacewalk ~]# spacecmd schedule_getoutput 33
INFO: Connected to https://spacewalk.sunil.cc/rpc/api as administrator
System:      centos6.sunil.cc
Start Time:  20170305T12:16:19
Stop Time:   20170305T12:16:19
Return Code: 0

Output
------
CentOS release 6.8 (Final)

[root@spacewalk ~]#
故障排除
如果您看到这些命令长时间处于挂起状态,则可以执行以下步骤来解决此问题。
确保osa-dispatcher在太空行走服务器上运行。
    [root@spacewalk ~]# systemctl status osa-dispatcher
? osa-dispatcher.service - OSA Dispatcher daemon
   Loaded: loaded (/usr/lib/systemd/system/osa-dispatcher.service; enabled; vendor preset: disabled)
   Active: active (running) since Sun 2017-03-05 09:59:55 CET; 2h 21min ago
  Process: 3470 ExecStart=/usr/sbin/osa-dispatcher --pid-file /var/run/osa-dispatcher.pid (code=exited, status=0/SUCCESS)
  Process: 3469 ExecStartPre=/bin/rm -f /var/run/osa-dispatcher.pid (code=exited, status=0/SUCCESS)
 Main PID: 3474 (osa-dispatcher)
   CGroup: /system.slice/osa-dispatcher.service
           ??3474 /usr/bin/python -s /usr/sbin/osa-dispatcher --pid-file /var/run/osa-dispatcher.pid

Mar 05 09:59:55 spacewalk.sunil.cc systemd[1]: Starting OSA Dispatcher daemon...
Mar 05 09:59:55 spacewalk.sunil.cc systemd[1]: PID file /var/run/osa-dispatcher.pid not readable (yet?) after start.
Mar 05 09:59:55 spacewalk.sunil.cc systemd[1]: Started OSA Dispatcher daemon.
[root@spacewalk ~]#
如果没有运行,请重新启动太空行走服务。
[root@spacewalk ~]# spacewalk-service restart
确保防火墙端口打开5222。
请在客户端执行下列步骤。
    [root@centos7test ~]# systemctl stop osad
    [root@centos7test ~]# rm -rf /etc/sysconfig/rhn/osad-auth.conf
    [root@centos7test ~]# rhn_check -vvv
[root@centos7test ~]# systemctl start osad
[root@centos7test ~]# systemctl status osad
? osad.service - OSAD daemon
   Loaded: loaded (/usr/lib/systemd/system/osad.service; enabled; vendor preset: disabled)
   Active: active (running) since Sun 2017-03-05 13:54:46 CET; 26s ago
  Process: 18696 ExecStart=/usr/sbin/osad --pid-file /var/run/osad.pid (code=exited, status=0/SUCCESS)
 Main PID: 18697 (osad)
   CGroup: /system.slice/osad.service
           ??18697 /usr/bin/python -s /usr/sbin/osad --pid-file /var/run/osad.pid

Mar 05 13:54:46 centos7test.sunil.cc systemd[1]: Starting OSAD daemon...
Mar 05 13:54:46 centos7test.sunil.cc systemd[1]: PID file /var/run/osad.pid not readable (yet?) after start.
Mar 05 13:54:46 centos7test.sunil.cc systemd[1]: Started OSAD daemon.
[root@centos7test ~]# netstat -aunltp|grep 5222
tcp     1698      0 192.168.1.23:48127      192.168.1.20:5222       ESTABLISHED 18697/python
[root@centos7test ~]#
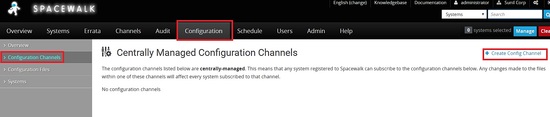
通过太空行走部署文件。
在这个例子中,我将改变centos 6服务器的动机。
我将首先创建一个配置通道。

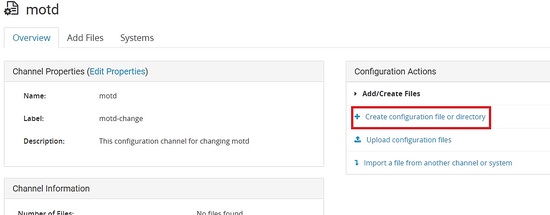
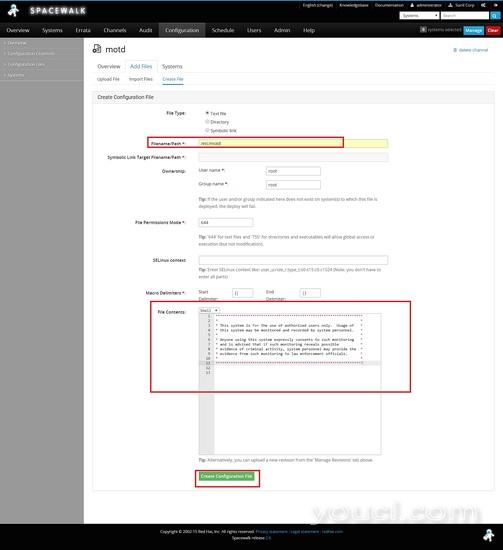
创建具有以下内容的文件。
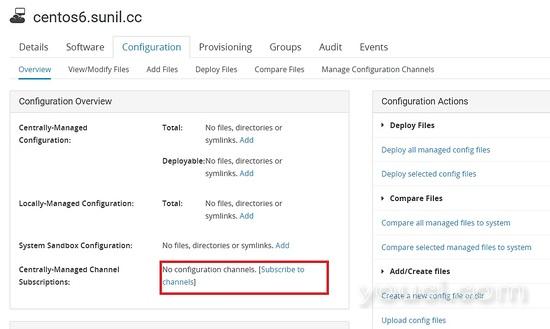
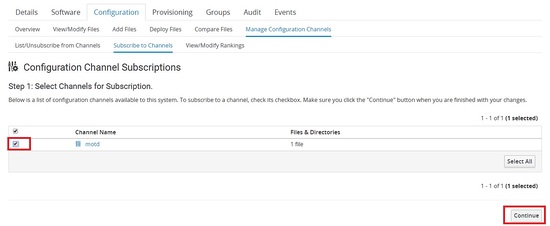
现在我们需要订阅需要部署到哪个服务器的频道。
该文件可以从客户端拉出。
    [root@centos6 ~]# rhncfg-client channels
Using server name spacewalk.sunil.cc
Config channels:
Label                           Name
-----                           ----
motd-change                     motd
[root@centos6 ~]#
[root@centos6 ~]# rhncfg-client get
Using server name spacewalk.sunil.cc
Deploying /etc/motd
[root@centos6 ~]#
[root@centos6 ~]# ls -l /etc/motd
-rw-r--r-- 1 root root 760 Mar  5 14:29 /etc/motd
[root@centos6 ~]# cat /etc/motd
********************************************************************
*                                                                  *
* This system is for the use of authorized users only.  Usage of   *
* this system may be monitored and recorded by system personnel.   *
*                                                                  *
* Anyone using this system expressly consents to such monitoring   *
* and is advised that if such monitoring reveals possible          *
* evidence of criminal activity, system personnel may provide the  *
* evidence from such monitoring to law enforcement officials.      *
*                                                                  *
********************************************************************

[root@centos6 ~]#


