本教程将显示在CentOS 7.3(64位)服务器上安装ISPConfig 3.1。 ISPConfig是一个Web托管控制面板,允许您通过Web浏览器配置以下服务:Apache Web服务器,Postfix邮件服务器,MySQL,BINDNameservers,PureFTPd,SpamAssassin,ClamAV,Mailman等。
1要求
要安装此类系统,您将需要以下信息:
- Centos 7.3最小服务器系统。 这可以是从我们的Centos 7.3最小服务器教程中所述的从头开始安装的服务器,也可以是安装了Centos 7.3安装程序的托管公司的虚拟服务器或根服务器。
- 快速的互联网连接。
2初步说明
在本教程中,我使用hostname server1.example.com ,IP地址为192.168.1.100和网关192.168.1.1 。 这些设置可能会有所不同,因此您必须在适当的情况下更换它们。
请注意,CentOS平台的ISPConfig不支持HHVM和XMPP。 如果您希望从ISPConfig中管理XMPP聊天服务器,或者在ISPConfig网站中使用HHVM(Hip Hop Virtual Machine),那么请使用Debian 8或Ubuntu 16.04作为服务器操作系统而不是CentOS 7.3。
3准备服务器
设置键盘布局
如果服务器的键盘布局与您的键盘不匹配,则可以使用localectl命令切换到右键盘(在我的情况下,“de”表示德语键盘布局)
localectl set-keymap de
要获取所有可用键盘映射列表,请运行:
localectl list-keymaps
我想在本教程末尾安装ISPConfig,ISPConfig附带了我将用作防火墙的Bastille防火墙脚本,因此我现在禁用默认的CentOS防火墙。 当然,您可以随时离开CentOS防火墙并根据自己的需要进行配置(但是后来您不应该再使用任何其他防火墙,因为它可能会干扰CentOS防火墙)。
跑...
yum -y install net-tools
systemctl stop firewalld.service
systemctl disable firewalld.service
停止和禁用CentOS防火墙。 当你在这里得到错误的时候可以,这只是表示防火墙没有安装。
那么你应该检查防火墙是否已被禁用。 为此,请运行命令:
iptables -L
输出应如下所示:
[root@server1 ~]# iptables -L
Chain INPUT (policy ACCEPT)
target prot opt source destination
Chain FORWARD (policy ACCEPT)
target prot opt source destination
Chain OUTPUT (policy ACCEPT)
target prot opt source destination
或者使用firewall-cmd命令:
firewall-cmd --state
[root@server1 ~]# firewall-cmd --state
not running
[root@server1 ~]#
现在我将安装网络配置编辑器和基于shell的编辑器“nano”,我将在后续步骤中使用编辑配置文件:
yum -y install nano wget NetworkManager-tui
如果您在安装过程中未配置网卡,可以现在进行。 跑...
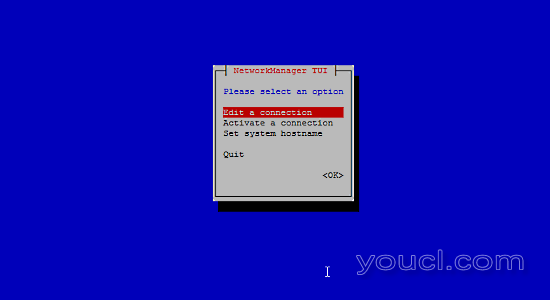
nmtui
...并转到编辑连接 :

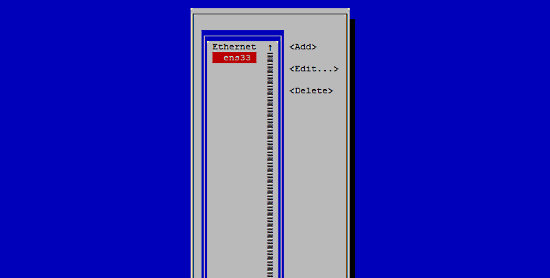
选择您的网络接口:

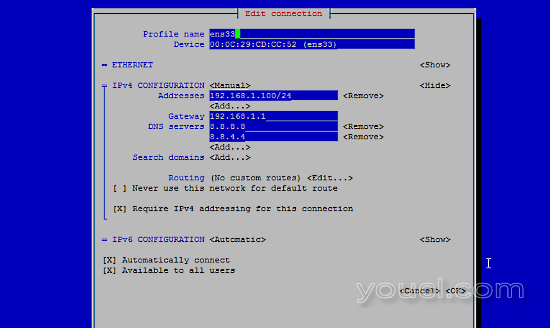
然后填写您的网络详细信息 - 禁用DHCP并填写静态IP地址,网络掩码,网关和一个或两个Nameservers,然后按OK :

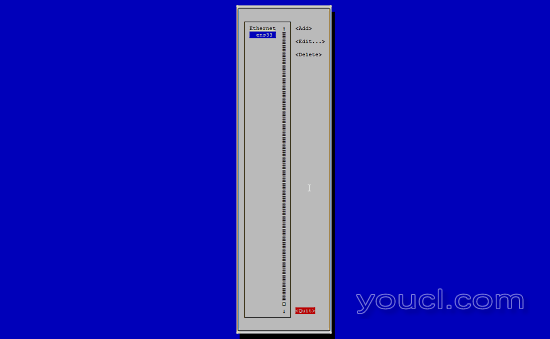
接下来,选择确定以确认您在网络设置中所做的更改

并退出关闭nmtui网络配置工具。

你应该跑
ifconfig
现在检查安装程序是否得到您的IP地址正确:
[root@server1 ~]# ifconfig
ens33: flags=4163<UP,BROADCAST,RUNNING,MULTICAST>  mtu 1500
        inet 192.168.1.100  netmask 255.255.255.0  broadcast 192.168.1.255
        inet6 fe80::20c:29ff:fecd:cc52  prefixlen 64  scopeid 0x20

        ether 00:0c:29:cd:cc:52  txqueuelen 1000  (Ethernet)
        RX packets 55621  bytes 79601094 (75.9 MiB)
        RX errors 0  dropped 0  overruns 0  frame 0
        TX packets 28115  bytes 2608239 (2.4 MiB)
        TX errors 0  dropped 0 overruns 0  carrier 0  collisions 0

lo: flags=73<UP,LOOPBACK,RUNNING>  mtu 65536
        inet 127.0.0.1  netmask 255.0.0.0
        inet6 ::1  prefixlen 128  scopeid 0x10


        loop  txqueuelen 0  (Local Loopback)
        RX packets 0  bytes 0 (0.0 B)
        RX errors 0  dropped 0  overruns 0  frame 0
        TX packets 0  bytes 0 (0.0 B)
        TX errors 0  dropped 0 overruns 0  carrier 0  collisions 0
如果您的网卡没有显示在那里,那么它不会在启动时启用,在这种情况下,打开文件/ etc / sysconfig / network-scripts / ifcfg-eth0
nano /etc/sysconfig/network-scripts/ifcfg-ens33
并将ONBOOT设置为yes:
[...]
ONBOOT=yes
[...]
并重新启动服务器。
检查您的/etc/resolv.conf是否列出您以前配置的所有Nameservers:
cat /etc/resolv.conf
如果缺少Nameservers,请运行
nmtui
并再次添加缺失的Nameservers。
现在,对配置...
调整/ etc / hosts和/ etc / hostname
接下来,我们将编辑/ etc / hosts 。 看起来像这样:
nano /etc/hosts
127.0.0.1   localhost localhost.localdomain localhost4 localhost4.localdomain4
192.168.1.100   server1.example.com     server1

::1         localhost localhost.localdomain localhost6 localhost6.localdomain6
在/ etc / hostname文件中设置主机名。 该文件应包含完全限定的域名(例如,在我的情况下为server1.example.com),而不仅仅是像“server1”这样的短名称。 用nano编辑器打开文件:
nano /etc/hostname
并在文件中设置主机名。
server1.example.com
保存文件并退出nano。
禁用SELinux
SELinux是CentOS的安全扩展,应该提供扩展的安全性。 在我看来,你不需要配置一个安全的系统,它通常会导致更多的问题,而不是优势(考虑到你做了一周的故障排除后,因为一些服务不能按预期工作,然后你发现一切都OK,只有SELinux造成问题)。 因此我禁用它(如果你想稍后安装ISPConfig,这是必须的)。
编辑/ etc / selinux / config并设置SELINUX = disabled :
nano /etc/selinux/config
# This file controls the state of SELinux on the system.
# SELINUX= can take one of these three values:
#     enforcing - SELinux security policy is enforced.
#     permissive - SELinux prints warnings instead of enforcing.
#     disabled - No SELinux policy is loaded.
SELINUX=disabled
# SELINUXTYPE= can take one of these two values:
#     targeted - Targeted processes are protected,
#     mls - Multi Level Security protection.
SELINUXTYPE=targeted
之后我们必须重新启动系统:
reboot
4启用其他存储库并安装一些软件
首先,我们导入软件包的GPG密钥:
rpm --import /etc/pki/rpm-gpg/RPM-GPG-KEY*
然后,我们在CentOS系统上启用EPEL存储库,因为本教程中将要安装的许多软件包在官方CentOS 7存储库中不可用:
yum -y install epel-release
yum -y install yum-priorities
编辑/etc/yum.repos.d/epel.repo ...
nano /etc/yum.repos.d/epel.repo
...并将行优先级= 10添加到[epel]部分:
[epel]
name=Extra Packages for Enterprise Linux 7 - $basearch
#baseurl=http://download.fedoraproject.org/pub/epel/7/$basearch
mirrorlist=https://mirrors.fedoraproject.org/metalink?repo=epel-7&arch=$basearch
failovermethod=priority
enabled=1
priority=10
gpgcheck=1
gpgkey=file:///etc/pki/rpm-gpg/RPM-GPG-KEY-EPEL-7
[...]
然后我们更新系统上现有的软件包:
yum -y update
现在我们安装一些稍后需要的软件包:
yum -y groupinstall 'Development Tools'
5配额
(如果您选择了不同于我的分区方案,则必须调整本章,以便配额适用于您需要的分区。)
要安装配额,我们运行这个命令:
yum -y install quota
现在我们检查是否已经为网站(/ var / www)和maildir数据(var / vmail)存储的文件系统启用了配额。 在这个例子中,我有一个大的根分区,所以我搜索'/':
mount | grep ' / '
[root@server1 ~]# mount | grep ' / '
/dev/mapper/centos-root on / type xfs (rw,relatime,attr2,inode64,noquota)
[root@server1 ~]#
如果您有一个单独的/ var分区,那么请使用:
mount | grep ' /var '
代替。 如果该行包含单词“ noquota ”,则继续执行以下步骤以启用配额。
在/(根)分区上启用配额
通常,您将在/ etc / fstab文件中启用配额,但如果文件系统是根文件系统“/”,则必须通过Linux内核的引导参数启用配额。
编辑grub配置文件:
nano /etc/default/grub
搜索从GRUB_CMDLINE_LINUX开始的行,并将rootflags = uquota,gquota添加到命令行参数,以便生成的行如下所示:
GRUB_CMDLINE_LINUX="crashkernel=auto rd.lvm.lv=centos/root rd.lvm.lv=centos/swap rhgb quiet rootflags=uquota,gquota"
并通过运行以下命令应用更改。
cp /boot/grub2/grub.cfg /boot/grub2/grub.cfg_bak
grub2-mkconfig -o /boot/grub2/grub.cfg
并重新启动服务器。
reboot
现在检查配额是否启用:
mount | grep ' / '
[root@server1 ~]# mount | grep ' / '
/dev/mapper/centos-root on / type xfs (rw,relatime,attr2,inode64,usrquota,grpquota)
[root@server1 ~]#
当配额处于活动状态时,我们可以在装载选项列表中看到“ usrquota,grpquota ”。
在单独的/ var分区上启用配额
如果您有一个单独的/ var分区,那么编辑/ etc / fstab并将/ uquota,gquota添加到/ partition( / dev / mapper / centos-var )中:
nano /etc/fstab
#
# /etc/fstab
# Created by anaconda on Sun Sep 21 16:33:45 2014
#
# Accessible filesystems, by reference, are maintained under '/dev/disk'
# See man pages fstab(5), findfs(8), mount(8) and/or blkid(8) for more info
#
/dev/mapper/centos-root / xfs defaults 1 1
/dev/mapper/centos-var /var xfs defaults,uquota,gquota1 2
UUID=9ac06939-7e43-4efd-957a-486775edd7b4 /boot xfs defaults 1 3
/dev/mapper/centos-swap swap swap defaults 0 0
然后跑
mount -o remount /var
quotacheck -avugm
quotaon -avug
启用配额。 当您收到启用了配额的分区的错误时,请重新启动服务器,然后再继续。
6安装Apache,MySQL,phpMyAdmin
我们可以使用一个命令安装所需的软件包:
yum -y install ntp httpd mod_ssl mariadb-server php php-mysql php-mbstring phpmyadmin
为了确保服务器无法通过HTTPOXY漏洞受到攻击,我们将在全局禁用apache中的HTTP_PROXY头。
在httpd.conf文件的末尾添加apache标题规则:
echo "RequestHeader unset Proxy early" >> /etc/httpd/conf/httpd.conf
并重新启动httpd以应用配置更改。
service httpd restart


