Seafile是一种私有云软件,提供类似Dropbox,mega.co.nz等功能,只需托管在您自己的服务器上。 Seafile基于python编程语言,它是根据开源许可证发布的,因此您可以创建自己的私有云,并且将更加安全。
Seafile支持加密以安全地存储数据。 要加密存储库中的文件,您需要在创建库时设置密码。 密码不会存储在Seafile云中。 因此,即使是服务器的管理员也无法在没有密码的情况下查看加密的数据。
在本教程中,我将使用Nginx Web服务器和MariaDB作为数据库服务器在CentOS 7上安装Seafile。
先决条件
- CentOS 7服务器
- 根权限
第1步 - 准备CentOS用于海底
使用您的ssh root密码登录centos服务器。
ssh root@192.168.1.115
TYPE YOUR PASSWORD
使用vim编辑SELinux配置文件。
vim /etc/sysconfig/selinux
用“disabled”替换值“enforcecing”。
SELINUX=disabled
保存文件并退出编辑器。
重新启动服务器以应用SELinux策略的更改。
reboot
等待服务器重新启动,然后再以root用户身份登录到您的服务器。
用以下命令检查selinux:
getenforce
因此,您应该看到“ 已禁用 ”。
第2步 - 安装Seafile依赖关系
Seafile是基于python,所以我们需要先安装python进行安装。 Seafile支持SQLite和MySQL / MariaDB数据库,我将使用MariaDB作为seafile的数据库,因为它提供比SQLite更好的性能。 Nginx用作Seafile和Seahub的反向代理。
在这一步,我们将安装几个python包,MariaDB和Nginx。 我们首先在我们的CentOS服务器上安装EPEL存储库。
yum -y install epel-release
接下来,安装python包,MariaDB和Nginx。
yum -y install python-imaging MySQL-python python-simplejson python-setuptools mariadb mariadb-server nginx
等到所有软件包都安装完毕。
第3步 - 配置MariaDB
在第2步中,我们已经安装了MariaDB服务器,我们只需要启动服务并配置root密码。
启动MariaDB并使用以下命令配置root密码:
systemctl start mariadb
mysql_secure_installation
键入您的root密码。
Set root password? [Y/n] Y
New password:
Re-enter new password:
Remove anonymous users? [Y/n] Y
Disallow root login remotely? [Y/n] Y
Remove test database and access to it? [Y/n] Y
Reload privilege tables now? [Y/n] Y
配置了MariaDB root密码,现在我们可以登录到mysql shell。
注意:MariaDB命令行shell命名为mysql。
我们将为海底创建3个数据库:
- ccnet_db
- seafile_db
- seahub_db
我们将使用密码“ yourpassword ”创建一个新用户“ seacloud ”。 用安全的密码替换你的密码!
用mysql客户端登录到mysql shell。
mysql -u root -p
TYPE YOUR PASSWORD
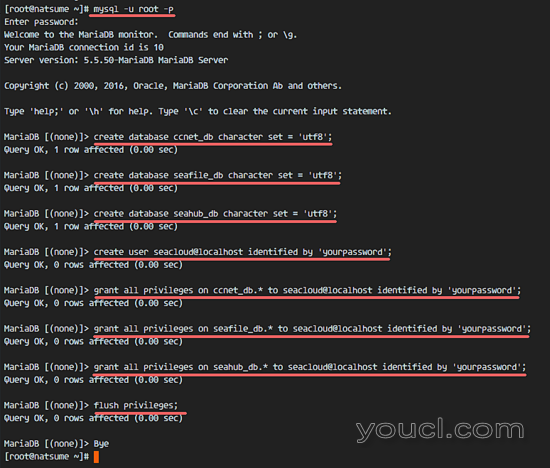
运行下面的mysql查询来创建数据库和海员安装的用户。
create database ccnet_db character set = 'utf8';
create database seafile_db character set = 'utf8';
create database seahub_db character set = 'utf8';

create user seacloud@localhost identified by 'yourpassword';

grant all privileges on ccnet_db.* to seacloud@localhost identified by 'yourpassword';
grant all privileges on seafile_db.* to seacloud@localhost identified by 'yourpassword';
grant all privileges on seahub_db.* to seacloud@localhost identified by 'yourpassword';
flush privileges;
exit
用你自己的密码替换上述命令中的密码。
第4步 - 安装海底
在这一步,我们将安装Seafile。 Seafile将在nginx用户下执行,因此我们可以使用nginx作为海底和seahub服务的反向代理。
我们将在目录“/ var / www / seafile”下的nginx用户下安装seafile,创建该dirctory并用cd输入。
mkdir -p /var/www/seafile
cd /var/www/seafile
使用wget命令下载Seafile,并解压缩下载的存档。
wget https://bintray.com/artifact/download/seafile-org/seafile/seafile-server_6.0.5_x86-64.tar.gz
tar -xzvf seafile-server_6.0.5_x86-64.tar.gz
将目录重命名为“seafile-server”并切换到该目录。
mv seafile-server-6.0.5 seafile-server
cd seafile-server/
执行'setup-seafile-mysql.sh'文件来配置数据库。
./setup-seafile-mysql.sh
按回车键,您将被要求提供以下信息:
- 服务器名称 - 我将使用服务器主机名' natsume '
- 服务器的ip或域 - 服务器的IP地址,在我的情况下' 192.168.1.115 '
- 默认数据dirctory - 只需按Enter键
- 默认端口 - 按Enter键
- 现在为数据库配置,选择数字2
对于MySQL配置:
- 使用deafult主机 - localhost
- 默认端口 - 3306
- mysql用户 - ' seacloud '
- 密码是“ 你的密码”
- ccnet数据库是' ccnet_db '
- 海底数据库是' seafile_db '
- seahub数据库是' seahub_db '
按回车键,脚本将为海底创建数据库表。
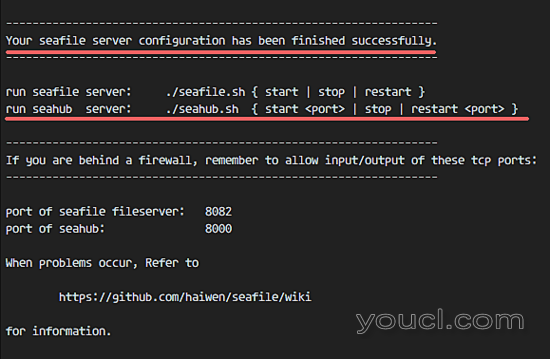
现在我们可以开始海底和seahub服务。
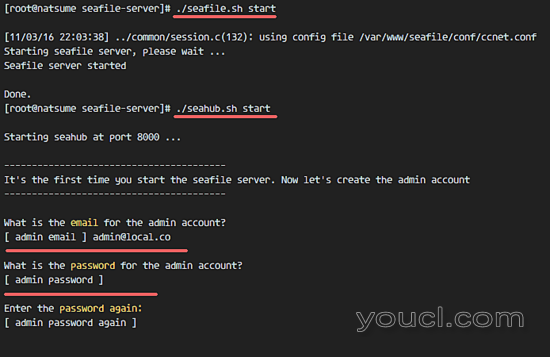
./seafile.sh start
./seahub.sh start
当执行seahub.sh文件时,我们将被要求管理员配置。
输入您的管理员电子邮件和密码,然后seahub服务将运行。
Seafile现在安装并运行,我们可以从Web浏览器访问Seafile,服务器端口为8000(在我的情况下为192.168.1.115:8000),但是现在我们不会这样做,因为我们将使用反向代理seafile服务器,我们将运行seafile一个systemd服务文件。
所以我们现在需要停止海底和seahub服务。
./seafile.sh stop
./seahub.sh stop
第5步 - 配置Seafile和Seahub服务
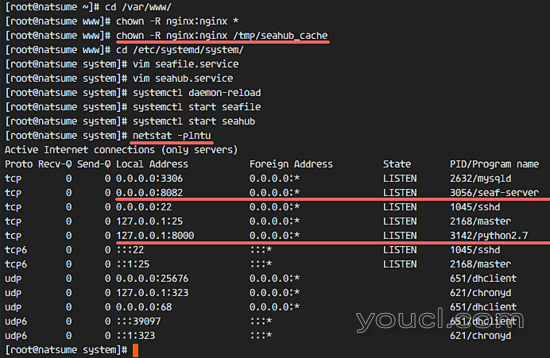
我们将运行seafile作为nginx用户,因此我们需要将seafile安装目录和seahub_cache目录的所有者更改为nginx用户:
cd /var/www/
chown -R nginx:nginx *
chown -R nginx:nginx /tmp/seahub_cache
接下来,转到systemd目录并使用vim创建一个seafile.service文件:
cd /etc/systemd/system/
vim seafile.service
粘贴海底服务配置如下:
[Unit]
Description=Seafile Server
Before=seahub.service
After=network.target mariadb.service

[Service]
Type=oneshot
ExecStart=/var/www/seafile/seafile-server/seafile.sh start
ExecStop=/var/www/seafile/seafile-server/seafile.sh stop
RemainAfterExit=yes
User=nginx
Group=nginx

[Install]
WantedBy=multi-user.target
保存并退出。
现在创建新的seahub.service文件。
vim seahub.service
并粘贴以下配置。
[Unit]
Description=Seafile Hub
After=network.target seafile.target mariadb.service

[Service]
Type=oneshot
ExecStart=/var/www/seafile/seafile-server/seahub.sh start-fastcgi
ExecStop=/var/www/seafile/seafile-server/seahub.sh stop
RemainAfterExit=yes
User=nginx
Group=nginx

[Install]
WantedBy=multi-user.target
保存并退出。
重新加载systemd服务,并用systemctl启动seafaf和seahub。
systemctl daemon-reload
systemctl start seafile
systemctl start seahub
确保没有错误,并检查在8082和8000端口上运行seafass和seahub服务。
netstat -plntu
第6步 - 生成SSL证书文件
在本教程中,我们将通过Nginx代理运行seafile,Nginx将为数据安全提供安全(HTTPS)连接。 我们可以使用免费的SSL证书文件或付费SSL证书,这对配置无关紧要。 在此步骤中,我将使用“/ etc / nginx / ssl”目录中的OpenSSL生成一个自签名SSL证书文件。
创建ssl目录。
mkdir -p /etc/nginx/ssl
cd /etc/nginx/ssl
生成自签名证书文件和一个dhparam文件,命令如下:
openssl dhparam -out /etc/nginx/ssl/dhparam.pem 2048
openssl req -new -x509 -sha256 -days 365 -newkey rsa:2048 -nodes -keyout server.key -out server.crt
按照您的姓名,状态,电子邮件,域名等OpenSSL的要求回答证书详细信息,然后更改目录和证书文件的权限。
chmod -R 700 /etc/nginx/ssl
chmod 400 server.*
chmod 400 dhparam.pem
SSL证书文件已生成。
第7步 - 将Nginx配置为反向代理
在这一步中,我们将配置Nginx作为端口8000和8002上的海底服务器的反向代理。
转到nginx配置目录并为海底创建一个新的虚拟主机文件。
cd /etc/nginx/
vim conf.d/seafile.conf
粘贴虚拟主机配置如下:
server {
        listen        80;
        server_name   cloud.natsume.co;
        return 301  https://$host$request_uri;
}

server {
    listen 443 ssl;
    server_name cloud.natsume.co;
    ssl on;
    ssl_protocols           TLSv1 TLSv1.1 TLSv1.2;
    ssl_certificate         /etc/nginx/ssl/server.crt;
    ssl_certificate_key    /etc/nginx/ssl/server.key;

    ssl_ciphers  'ECDHE-RSA-AES256-GCM-SHA384:ECDHE-RSA-AES128-GCM-SHA256:DHE-RSA-AES256-GCM-SHA384:DHE-RSA-AES128-GCM-SHA256:ECDHE-RSA-AES256-SHA384:ECDHE-RSA-AES128-SHA256:ECDHE-RSA-AES256-SHA:ECDHE-RSA-AES128-SHA:DHE-RSA-AES256-SHA256:DHE-RSA-AES128-SHA256:DHE-RSA-AES256-SHA:DHE-RSA-AES128-SHA:ECDHE-RSA-DES-CBC3-SHA:EDH-RSA-DES-CBC3-SHA:AES256-GCM-SHA384:AES128-GCM-SHA256:AES256-SHA256:AES128-SHA256:AES256-SHA:AES128-SHA:DES-CBC3-SHA:HIGH:!aNULL:!eNULL:!EXPORT:!CAMELLIA:!DES:!MD5:!PSK:!RC4';
    ssl_dhparam   /etc/nginx/ssl/dhparam.pem;
    ssl_prefer_server_ciphers  on;

    location / {
        fastcgi_pass    127.0.0.1:8000;
        fastcgi_param   SCRIPT_FILENAME     $document_root$fastcgi_script_name;
        fastcgi_param   PATH_INFO           $fastcgi_script_name;

        fastcgi_param   SERVER_PROTOCOL        $server_protocol;
        fastcgi_param   QUERY_STRING        $query_string;
        fastcgi_param   REQUEST_METHOD      $request_method;
        fastcgi_param   CONTENT_TYPE        $content_type;
        fastcgi_param   CONTENT_LENGTH      $content_length;
        fastcgi_param   SERVER_ADDR         $server_addr;
        fastcgi_param   SERVER_PORT         $server_port;
        fastcgi_param   SERVER_NAME         $server_name;
        fastcgi_param   REMOTE_ADDR         $remote_addr;

        access_log      /var/log/nginx/seahub.access.log;
        error_log       /var/log/nginx/seahub.error.log;
        fastcgi_read_timeout 36000;
    }

    # Reverse Proxy for seahub
    location /seafhttp {
        rewrite ^/seafhttp(.*)$ $1 break;
        proxy_pass http://127.0.0.1:8082;
        client_max_body_size 0;
        proxy_connect_timeout  36000s;
        proxy_read_timeout  36000s;
        proxy_send_timeout  36000s;
        send_timeout  36000s;
    }

    #CHANGE THIS PATH WITH YOUR OWN DIRECTORY
    location /media {
        root /var/www/seafile/seafile-server/seahub;
    }

}
保存并退出。
我将使用'cloud.natsume.co'作为域名。 请在上面的配置中用您自己的域名替换。
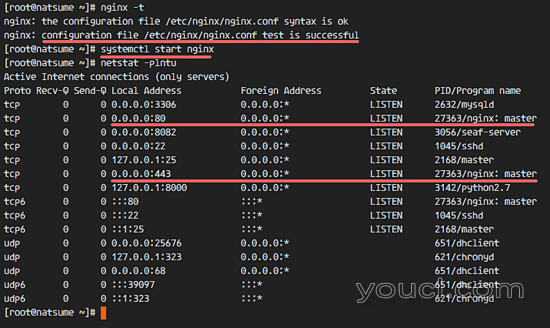
现在测试Nginx配置,并确保没有错误。
nginx -t
使用systemctl命令启动Nginx:
systemctl start nginx
确保netstat提供的列表中可用端口80和443:
netstat -plntu
接下来,我们必须将域名添加到seafile配置。 转到seafile目录并编辑配置文件。
cd /var/www/seafile/
vim conf/ccnet.conf
将服务网址更改为您的域名。
SERVICE_URL = https://cloud.natsume.co
保存并退出。
编辑seahub配置文件。
vim conf/seahub_settings.py
在第二行,添加配置如下:
HTTP_SERVER_ROOT = 'https://cloud.natsume.co/seafhttp'
再次将您的域名替换为域名。 保存并退出。
重新启动seafile并添加所有服务以启动时启动:
systemctl restart seafile
systemctl restart seahub

systemctl enable nginx
systemctl enable mariadb
systemctl enable seafile
systemctl enable seahub
第8步 - 配置FirewallD
在第7步中,我们配置了Nginx来使用HTTP和HTTPS端口。 现在我们必须通过将其添加到firewalld来打开防火墙中的端口。
启动防火墙
systemctl start firewalld
systemctl enable firewalld
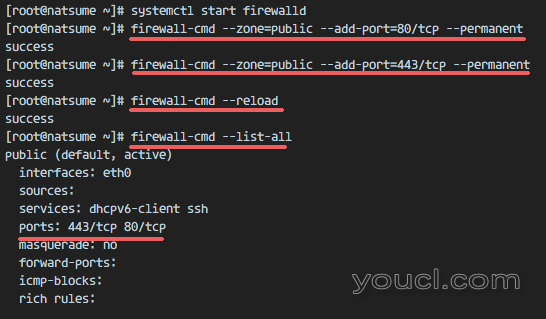
使用firewall-cmd命令将HTTP和HTTPS端口添加到防火墙配置中:
firewall-cmd --zone=public --add-port=80/tcp --permanent
firewall-cmd --zone=public --add-port=443/tcp --permanent
重新加载防火墙配置并检查端口列表。
firewall-cmd --reload
firewall-cmd --list-all
第9步 - 测试海底
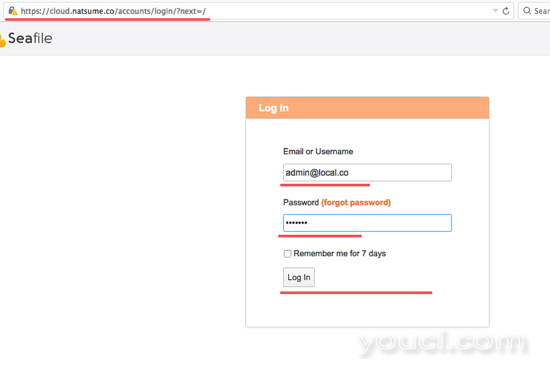
打开您的浏览器,键入seafile域名,在我的case cloud.natsume.co ,您将被重定向到https连接。
输入您的管理员电子邮件和密码,然后点击“登录”。
Seafile管理仪表板:
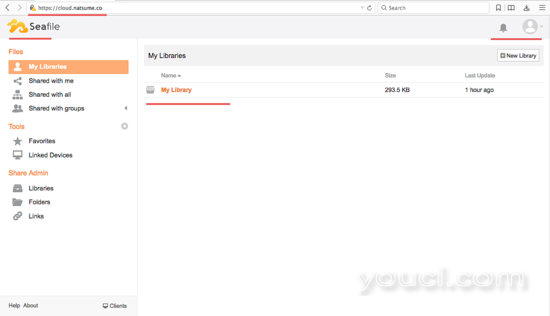
海底文件视图。
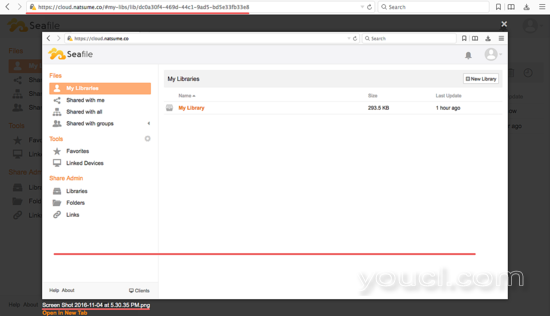
Seginile Nginx作为反向代理和SSL已成功安装在CentOS 7服务器上。
结论
随着云应用的广泛应用,Seafile是一种私有云解决方案,在当天很有用 。 使用库/文件夹级别的加密功能 ,可以将数据安全地存储在Seacloud服务器上。 除此之外,Seafile 易于在您自己的服务器上进行配置和实施。


