Drupal是基于PHP的着名的开源内容管理系统。 它是免费的,根据GNU通用公共许可证发布。 Drupal可用于各种规模的网站,从巨大的国际网站到个人博客以及企业或政府网站。 drupal的核心部分被命名为“Drupal Core”,它包含基本内容管理系统,用户管理,菜单管理,布局定制和系统管理。 Drupal Core可以通过插件扩展,直到现在,drupal社区为Drupal提供了31.000多个模块。
在本教程中,我们将使用Nginx Web服务器,MariaDB 10作为数据库服务器和PHP-FPM(PHP 7.0)来安装Drupal 8.1.10来处理PHP请求。 我还将向您展示如何安装SSL证书以保护Drupal网站。
先决条件
- Ubuntu 16.04 - 64bit版本。
- 根权限
第1步 - 更新Ubuntu系统
使用ssh登录到ubuntu服务器,然后成为root用户并更新ubuntu存储库:
sudo su
sudo apt-get update
第2步 - 安装Nginx和PHP-FPM
Nginx或“engine-x”是快速的HTTP服务器,专注于具有低内存/ RAM使用率的高性能。 对于HTTP,HTTPS,POP3和IMAP协议,我们也可以使用Nginx作为反向代理。 在本教程中,我们将使用Nginx作为启用SSL的HTTP服务器。
使用以下apt命令作为sudo / root用户安装Nginx:
sudo apt-get install nginx -y
接下来,使用drupal core所需的php-gd扩展名安装php7.0-fpm:
sudo apt-get install php7.0-fpm php7.0-cli php7.0-gd php7.0-mysql php7.0-xml -y
在下一步,我们将配置Nginx。
第3步 - 配置Nginx和PHP-FPM
在此步骤中,我们将配置Nginx以使用php-fpm来为PHP页面提供HTTP请求。 转到php-fpm目录“/etc/php/7.0/fpm”并编辑“php.ini”文件:
cd /etc/php/7.0/fpm/
vim php.ini
在第761行,取消注释cgi.fix_pathinfo行,并将值更改为“ 0 ”。
cgi.fix_pathinfo=0
保存文件并退出编辑器。
现在我们修改默认的Nginx虚拟主机配置。 编辑“默认”文件并启用php-fpm指令。
cd /etc/nginx/sites-available/
vim default
取消注释行51 - 58使用php-fpm与nginx。
        location ~ \.php$ {
                include snippets/fastcgi-php.conf;
        #
        #       # With php7.0-cgi alone:
        #       fastcgi_pass 127.0.0.1:9000;
        #       # With php7.0-fpm:
                fastcgi_pass unix:/run/php/php7.0-fpm.sock;
        }
保存文件并退出。
然后使用命令“ nginx -t ”测试Nginx配置,以确保它是有效的:
nginx -t
如果没有错误,请重新启动nginx和php-fpm服务:
systemctl restart nginx
systemctl restart php7.0-fpm
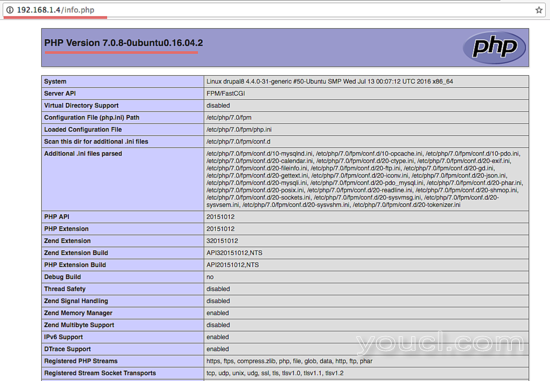
接下来,通过在web目录“/ var / www / html”中创建新的php信息文件,测试php-fpm是否正常工作。
cd /var/www/html/
echo "<?php phpinfo(); ?>" > info.php
在Web浏览器中访问服务器IP(在我的例子中为http:// 192.168.1.4/info.php)的info.php文件。 结果应该类似于下面的截图。
第4步 - 安装和配置MariaDB
MariaDB是MYSQL关系数据库管理系统的数据库服务器fork,它为MySQL提供了一个插入式替换功能。
使用apt-get命令安装最新版本的MariaDB:
sudo apt-get install mariadb-client mariadb-server -y
安装完成后,启动MariaDB:
systemctl start mysql
MariaDB服务名称是“mysql”,这就是为什么systemctl命令在这里使用mysql这个词。
现在我们将使用以下命令配置MariaDB用户名和密码:
mysql_secure_installation
mysql_secure_installation

Set root password? [Y/n] Y
New password:
Re-enter new password:

Remove anonymous users? [Y/n] Y
 ... Success!

Disallow root login remotely? [Y/n] Y
 ... Success!

Remove test database and access to it? [Y/n] Y
 ... Success!

Reload privilege tables now? [Y/n] Y
 ... Success!
使用您的密码登录到MariaDB shell,并为drupal创建一个名为“ drupaldb ”的新数据库,并使用密码“ drupaluser @ ”创建新的MariaDB / MySQL用户“ drupaluser ”,然后最终向数据库授予用户权限。 请选择安全密码而不是“drupaluser @”进行安装!
mysql -u root -p


create database drupaldb;
create user drupaluser@localhost identified by 'drupaluser@';
grant all privileges on drupaldb.* to drupaluser@localhost identified by 'drupaluser@';
flush privileges;
\q
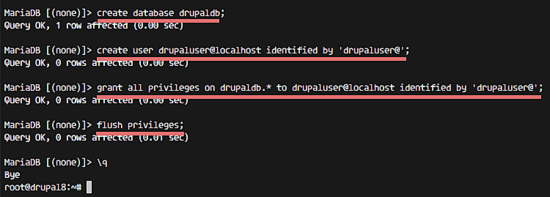
数据库“ drupaldb ”与用户“ drupaluser ”已创建。
第5步 - 生成自签名SSL证书
转到/ etc / nginx目录,为SSL配置文件创建一个名为“ssl”的新目录。
mkdir -p /etc/nginx/ssl
cd /etc/nginx/ssl
然后使用以下openssl命令生成新的自签名SSL证书:
openssl req -x509 -nodes -days 365 -newkey rsa:2048 -keyout /etc/nginx/ssl/drupal.key -out /etc/nginx/ssl/drupal.crt
填写所要求的信息。 SSL证书文件已生成,现在将私钥文件“drupal.key”的权限更改为600:
chmod 600 drupal.key
第6步 - 配置VirtualHost for Drupal
我们将在“/ var / www / drupal8”目录中安装Drupal 8,域名为“drupal8.me”。 请使用您要使用此drupal安装的网站的域名替换安装中的域名。 所以让我们创建目录:
mkdir -p /var/www/drupal8
然后转到Nginx虚拟主机目录“/ etc / nginx / sites-available /”,并使用vim编辑器创建一个新文件“drupal8”:
cd /etc/nginx/sites-available/
vim drupal8
将下面的drupal的Nginx配置粘贴到文件drupal8中:
server {
    server_name drupal8.me;
    root /var/www/drupal8; ## <-- Your only path reference.

    listen 80;
    listen [::]:80;
    listen 443 default ssl;

    ssl_certificate      /etc/nginx/ssl/drupal.crt;
    ssl_certificate_key  /etc/nginx/ssl/drupal.key;

    # Redirect HTTP to HTTPS
    if ($scheme = http) {
        return 301 https://$server_name$request_uri;
    }

    location = /favicon.ico {
        log_not_found off;
        access_log off;
    }

    location = /robots.txt {
        allow all;
        log_not_found off;
        access_log off;
    }

    # Very rarely should these ever be accessed outside of your lan
    location ~* \.(txt|log)$ {
        allow 192.168.0.0/16;
        deny all;
    }

    location ~ \..*/.*\.php$ {
        return 403;
    }

    location ~ ^/sites/.*/private/ {
        return 403;
    }

    # Block access to "hidden" files and directories whose names begin with a
    # period. This includes directories used by version control systems such
    # as Subversion or Git to store control files.
    location ~ (^|/)\. {
        return 403;
    }

    location / {
        # try_files $uri @rewrite; # For Drupal <= 6
        try_files $uri /index.php?$query_string; # For Drupal >= 7
    }

    location @rewrite {
        rewrite ^/(.*)$ /index.php?q=$1;
    }

    # In Drupal 8, we must also match new paths where the '.php' appears in the middle,
    # such as update.php/selection. The rule we use is strict, and only allows this pattern
    # with the update.php front controller.  This allows legacy path aliases in the form of
    # blog/index.php/legacy-path to continue to route to Drupal nodes. If you do not have
    # any paths like that, then you might prefer to use a laxer rule, such as:
    #   location ~ \.php(/|$) {
    # The laxer rule will continue to work if Drupal uses this new URL pattern with front
    # controllers other than update.php in a future release.
    location ~ '\.php$|^/update.php' {
        fastcgi_split_path_info ^(.+?\.php)(|/.*)$;
        #NOTE: You should have "cgi.fix_pathinfo = 0;" in php.ini
        include fastcgi_params;
        include snippets/fastcgi-php.conf;
        fastcgi_param SCRIPT_FILENAME $request_filename;
        fastcgi_intercept_errors on;
        fastcgi_pass unix:/run/php/php7.0-fpm.sock;
    }

    # Fighting with Styles? This little gem is amazing.
    # location ~ ^/sites/.*/files/imagecache/ { # For Drupal <= 6
    location ~ ^/sites/.*/files/styles/ { # For Drpal >= 7
        try_files $uri @rewrite;
    }

    location ~* \.(js|css|png|jpg|jpeg|gif|ico)$ {
        expires max;
        log_not_found off;
    }
}
保存文件并退出编辑器。
Drupal虚拟主机文件已创建,现在我们必须通过在“sites-enabled”目录中的文件创建一个符号链接来激活它:
ln -s /etc/nginx/sites-available/drupal8 /etc/nginx/sites-enabled/
测试Nginx配置并重新启动Nginx:
nginx -t
systemctl restart nginx
第7步 - 安装和配置Drupal
在开始使用Drupal安装之前,我们必须安装git和drush。 Drush是Drupal的命令行shell和Unix脚本接口。 使用以下命令安装它:
sudo apt-get install git drush -y
然后输入我们之前创建的drupal8目录,并用wget或drush下载Drupal。 我会在这里使用wget:
cd /var/www/drupal8
wget https://ftp.drupal.org/files/projects/drupal-8.1.10.tar.gz
如果要使用drush,请运行以下命令:
drush dl drupal-8
等待下载完成,然后将所有Drupal文件移动到主目录:
tar -xzvf drupal-8.1.10.tar.gz
mv drupal-8.1.10/* .
rm -rf drupal-8.1.10
在下一步中,我们将配置Drupal设置文件。 从Drupal主目录中,转到“sites / default”目录并复制两个配置文件“ settings.php ”和“ services.yml ”:
cd sites/default
cp default.settings.php settings.php
cp default.services.yml services.yml
那么我们必须在“sites / default”目录下创建一个名为“ files ”的新目录。 “chmod”命令确保配置文件和“files”目录可以用于Drupal安装:
mkdir files/
chmod a+w *
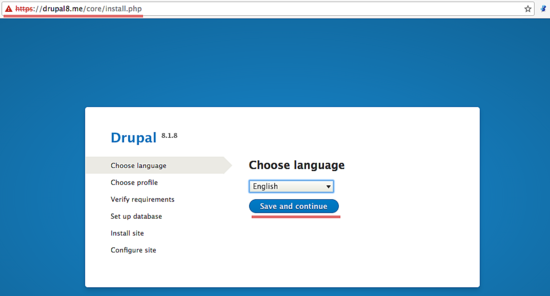
现在,您可以使用Web浏览器访问您的Drupal站点(在我的情况下为http://drupal8.me) ,将自动重定向到https连接,并显示Drupal安装程序页面。
请注意,本指南刚刚从Drupal 8.1.8更新为8.1.10,其中包含了Drupal发布的最新安全补丁,截图仍然显示8.1.8版本号,因为界面没有更改。 您应该始终使用最新稳定的Drupal版本进行安装,并替换上述install命令中的版本号。
选择你的语言,我将在这里使用“英语” 。
点击“保存并继续” 。
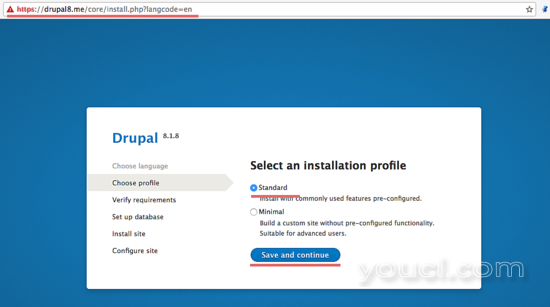
现在选择安装类型。 您可以使用标准或最小类型。 我会用“ 标准 ”。
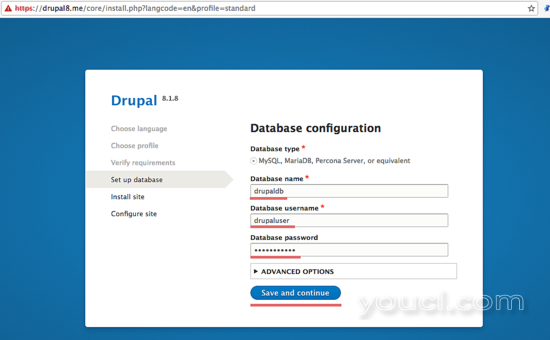
现在将显示数据库配置页面。 填写我们为Drupal创建的数据库的数据库详细信息。
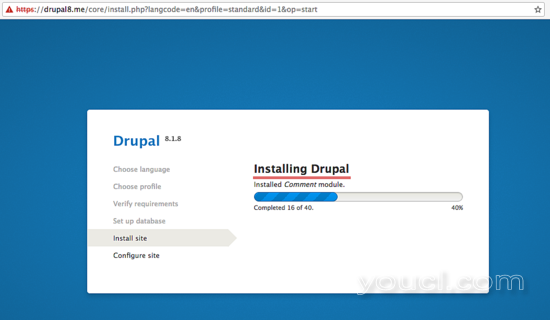
等待安装完成。
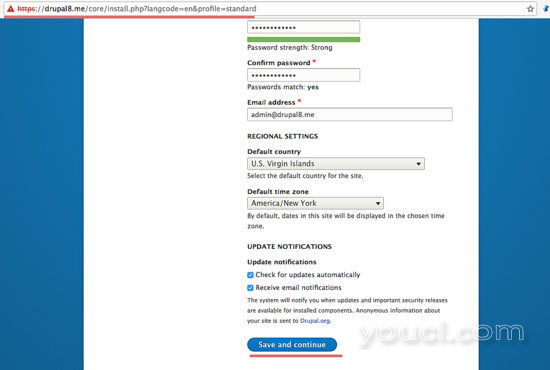
现在,我们必须配置站点配置文件设置,如管理员,电子邮件地址等的站点名称,用户和密码 。
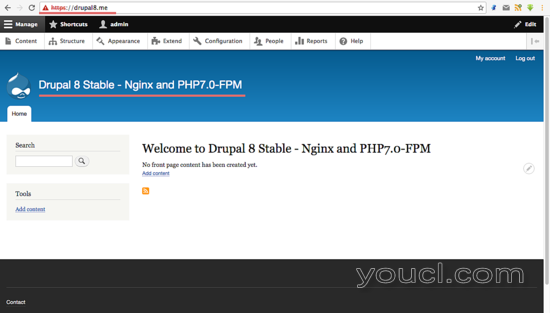
现在安装Drupal 您将被重定向到Drupal主页。
您可能会看到有关drupal配置文件“settings.php”和“services.yml”的权限的错误消息。 只需使用以下命令更改它们的权限:
cd sites/default/
chmod 644 settings.php services.yml
现在,Drupal 8.1在Ubuntu 16.04上安装了Nginx和SSL。
结论
Drupal是一个基于PHP的免费开源内容管理框架。 它可以用于个人博客,私人主页或公司网站。 Drupal以GNU-GPL许可证分发。 Drupal的主要组件被称为“Drupal核心”,到目前为止,Drupal社区开发了超过31.000个模块来扩展它。 目前的稳定版本是8.1.10。 Drupal易于安装和配置,我们可以使用Nginx或Apache作为Web服务器和PHP-FPM来处理Drupal服务器上的PHP请求。


