在我们这篇文章的第一部分中,我们已经详细介绍如何安装和CentOS 7.2服务器上配置最新的Nagios的核心4.2.0解释。 在这篇文章中,我们将向您展示如何使用NRPE 远程代理的Linux机器,它的服务添加到的Nagios监控主机。
我们希望您已经有安装Nagios的和正常运行。 如果没有,请使用以下安装指南将其安装在系统上。
一旦你已经安装了,就可以继续进一步的远程Linux主机上安装NRPE代理。 进一步抽穗前,让我们给你NRPE的简短说明。
什么是NRPE?
该NRPE(Nagios的远程插件执行人 )插件可以让你监视任何远程Linux / Unix的服务或网络设备。 这NRPE插件允许的Nagios监控任何本地资源,如CPU负载 , 交换 , 内存使用 , 在线用户等远程Linux机器。 毕竟,这些当地资源不大多暴露在外部机器,一个NRPE代理必须安装并在远程计算机上进行配置。
注 :NRPE插件要求Nagios的插件必须在远程Linux机器上安装。 如果没有这些,该NRPE守护程序将无法正常工作,并不会监视任何东西。
安装NRPE插件
要使用NRPE,你需要做的Nagios的监视主机和远程Linux主机是否和NRPE安装在一些额外的任务。 我们将分别覆盖两个安装部件。
我们假设你是支持TCP封装 ,并在其上安装Xinted守护程序主机上安装NRPE。 今天,大多数现代Linux发行版都有这两个默认安装。 如果没有,我们将在安装过程中在需要时安装它。
远程Linux主机上
请使用下列说明操作, 遥控器上的Linux主机上安装Nagios的插件和NRPE守护进程。
第1步:安装必需的依赖关系
我们需要安装所需的库,例如GCC,glibc的 ,glibc的常见和GD和安装前的开发库。
[root@youcl]# yum install -y gcc glibc glibc-common gd gd-devel make net-snmp openssl-devel
-------------- On Fedora 22+ Onwards --------------
[root@youcl]# dnf install -y gcc glibc glibc-common gd gd-devel make net-snmp openssl-devel
第2步:创建Nagios用户
创建新的nagios用户帐户并设置密码。
[root@youcl]# useradd nagios
[root@youcl]# passwd nagios
第3步:安装Nagios插件
创建用于安装的目录及其所有未来下载。
[root@youcl]# cd /root/nagios
立即下载最新的Nagios的插件2.1.2包装用wget命令。
[root@youcl nagios~]# wget https://www.nagios-plugins.org/download/nagios-plugins-2.1.2.tar.gz
第4步:提取Nagios插件
运行以下命令tar来提取源代码包。
[root@youcl nagios~]# tar -xvf nagios-plugins-2.1.2.tar.gz
之后,提取一个新文件夹将出现在该目录中。
[root@youcl nagios ~]# ls -l
total 2640
drwxr-xr-x. 15 root root    4096 Aug  1 21:58 nagios-plugins-2.1.2
-rw-r--r--.  1 root root 2695301 Aug  1 21:58 nagios-plugins-2.1.2.tar.gz
第5步:编译并安装Nagios插件
接下来,使用以下命令进行编译和安装
[root@youcl nagios]# cd nagios-plugins-2.1.2
[root@youcl nagios-plugins-2.1.2]# ./configure
[root@youcl nagios-plugins-2.1.2]# make
[root@youcl nagios-plugins-2.1.2]# make install
设置插件目录的权限。
[root@youcl nagios-plugins-2.1.2]# chown nagios.nagios /usr/local/nagios
[root@youcl nagios-plugins-2.1.2]# chown -R nagios.nagios /usr/local/nagios/libexec
第6步:安装Xinetd
大多数系统,其默认安装。 如果没有,使用以下命令Yum安装xinetd的包。
[root@youcl nagios-plugins-2.1.2]# yum install xinetd
-------------- On Fedora 22+ Onwards --------------
[root@youcl nagios-plugins-2.1.2]# dnf install xinetd
第7步:安装NRPE插件
下载最新NRPE插件3.0包用wget命令。
[root@youcl nagios-plugins-2.1.2]# cd /root/nagios
[root@youcl nagios]# wget http://liquidtelecom.dl.sourceforge.net/project/nagios/nrpe-3.x/nrpe-3.0.tar.gz
打开NRPE源代码tarball。
[root@youcl nagios]# tar xzf nrpe-3.0.tar.gz
[root@youcl nrpe-3.0]# cd nrpe-3.0
编译并安装NRPE插件。
[root@youcl nrpe-3.0]# ./configure
[root@youcl nrpe-3.0]# make all
接下来,安装NRPE插件守护程序和示例守护程序配置文件。
[root@youcl nrpe-3.0]# make install-plugin
[root@youcl nrpe-3.0]# make install-daemon
[root@youcl nrpe-3.0]# make install-daemon-config
在xinetd下将NRPE守护程序作为服务安装。
[root@youcl nrpe-3.0]# make install-xinetd
OR
[root@youcl nrpe-3.0]# make install-inetd
现在打开/etc/xinetd.d/nrpe文件,并添加Nagios的监控服务器的本地主机和IP地址 。
only_from = 127.0.0.1 localhost <nagios_ip_address>
接下来,打开/ etc / services文件在文件的底部添加了NRPE守护以下项。
nrpe 5666/tcp NRPE
重新启动xinetd服务。
[root@youcl]# service xinetd restart
第8步:在本地验证NRPE Daemon
运行以下命令以验证NRPE守护程序在xinetd下正常工作。
[root@youcl]# netstat -at | grep nrpe
tcp        0      0 *:nrpe                      *:*                         LISTEN
如果你得到类似上面的输出,意味着它工作正常。 如果没有,请务必检查以下事项。
- 检查你在/ etc / services文件中正确添加NRPE进入
- 的符Only_from包含在/etc/xinetd.d/nrpe文件“nagios_ip_address”的条目。
- xinetd的安装和启动。
- 检查系统日志文件中的错误有关的xinetd或NRPE和解决这些问题。
接下来,验证NRPE守护程序是否正常运行。 运行以前安装了用于测试目的的“check_nrpe”命令。
[root@youcl]# /usr/local/nagios/libexec/check_nrpe -H localhost
您将在屏幕上得到以下字符串,它显示您安装了什么版本的NRPE:
NRPE v3.0
第9步:配置防火墙规则
确保本地计算机上的防火墙将允许从远程服务器访问的NRPE守护进程。 为此,请运行以下iptables命令。
-------------- On RHEL/CentOS 6/5 and Fedora --------------
[root@youcl]# iptables -A INPUT -p tcp -m tcp --dport 5666 -j ACCEPT
-------------- On RHEL/CentOS 7 and Fedora 19 Onwards --------------
[root@youcl]# firewall-cmd --permanent --zone=public --add-port=5666/tcp
运行以下命令保存新的iptables规则,使其在系统重新引导时生存。
-------------- On RHEL/CentOS 6/5 and Fedora --------------
[root@youcl]# service iptables save
第10步:自定义NRPE命令
已安装的默认NRPE配置文件具有几个命令定义,将用于监视此计算机。 示例配置文件位于。
[root@youcl]# vi /usr/local/nagios/etc/nrpe.cfg
以下是位于配置文件底部的缺省命令定义。 暂时,我们假设您正在使用这些命令。 您可以使用以下命令检查它们。
# /usr/local/nagios/libexec/check_nrpe -H localhost -c check_users
USERS OK - 1 users currently logged in |users=1;5;10;0
# /usr/local/nagios/libexec/check_nrpe -H localhost -c check_load
OK - load average: 3.90, 4.37, 3.94|load1=3.900;15.000;30.000;0; load5=4.370;10.000;25.000;0; load15=3.940;5.000;20.000;0;
# /usr/local/nagios/libexec/check_nrpe -H localhost -c check_hda1
DISK OK - free space: /boot 154 MB (84% inode=99%);| /boot=29MB;154;173;0;193
# /usr/local/nagios/libexec/check_nrpe -H localhost -c check_total_procs
PROCS CRITICAL: 297 processes
# /usr/local/nagios/libexec/check_nrpe -H localhost -c check_zombie_procs
PROCS OK: 0 processes with STATE = Z
您可以通过编辑NRPE配置文件来编辑和添加新的命令定义。 最后,你已经成功地安装和远程Linux主机配置NRPE剂。 现在是时候安装NRPE组件和你的Nagios监控服务器上添加一些服务...
在Nagios监控服务器上
立即登录到您的Nagios监控服务器 。 这里你需要做以下事情:
- 安装check_nrpe插件。
- 创建使用check_nrpe插件Nagios的一个命令定义 。
- 创建Nagios的主机 ,并添加服务定义用于监视远程Linux主机 。
第1步:安装NRPE插件
转到Nagios的下载目录,并下载最新的NRPE插件用wget命令。
[root@youcl]# cd /root/nagios
[root@youcl]# wget http://liquidtelecom.dl.sourceforge.net/project/nagios/nrpe-3.x/nrpe-3.0.tar.gz
打开NRPE源代码tarball。
[root@youcl]# tar xzf nrpe-3.0.tar.gz
[root@youcl]# cd nrpe-3.0
编译并安装NRPE插件。
[root@youcl]# ./configure
[root@youcl]# make all
[root@youcl]# make install-daemon
第2步:远程验证NRPE守护程序
确保check_nrpe插件可以与远程Linux主机上的NRPE守护进程进行通信。 在命令你ř 表情Linux主机的IP地址添加下面的IP地址 。
[root@youcl]# /usr/local/nagios/libexec/check_nrpe -H <remote_linux_ip_address>
您将收到一个字符串,显示您在远程主机上安装的NRPE的版本,如下所示:
NRPE v3.0
如果您收到插件超时错误,请检查以下事项。
- 确保您的防火墙没有阻止远程主机和监控主机之间的通信。
- 确保NRPE守护进程的xinetd下正确安装。
- 确保第r 表情Linux主机的防火墙规则从到NRPE守护进程通信阻断监控服务器 。
将远程Linux主机添加到Nagios监控服务器
要添加远程主机,你需要创建两个新文件“hosts.cfg”和“services.cfg”下的“ 在/ usr /本地/ nagios的在/ etc /”位置。
[root@youcl]# cd /usr/local/nagios/etc/
[root@youcl]# touch hosts.cfg
[root@youcl]# touch services.cfg
现在将这两个文件添加到Nagios主配置文件。 打开nagios.cfg文件与任何编辑器。
[root@youcl]# vi /usr/local/nagios/etc/nagios.cfg
现在添加两个新创建的文件,如下所示。
# You can specify individual object config files as shown below:
cfg_file=/usr/local/nagios/etc/hosts.cfg
cfg_file=/usr/local/nagios/etc/services.cfg
现在打开hosts.cfg文件,并添加默认主机模板名称 ,如下图所示定义远程主机 。 请确保你的远程主机服务器的详细信息,以取代HOST_NAME, 别名和地址 。
[root@youcl]# vi /usr/local/nagios/etc/hosts.cfg
## Default Linux Host Template ##
define host{
name                            linux-box               ; Name of this template
use                             generic-host            ; Inherit default values
check_period                    24x7
check_interval                  5
retry_interval                  1
max_check_attempts              10
check_command                   check-host-alive
notification_period             24x7
notification_interval           30
notification_options            d,r
contact_groups                  admins
register                        0                       ; DONT REGISTER THIS - ITS A TEMPLATE
}
## Default
define host{
use                             linux-box               ; Inherit default values from a template
host_name                       youcl		        ; The name we're giving to this server
alias                           CentOS 6                ; A longer name for the server
address                         5.175.142.66            ; IP address of Remote Linux host
}
下一个开放services.cfg文件添加到被监视以下服务。
[root@youcl]# vi /usr/local/nagios/etc/services.cfg
define service{
use                     generic-service
host_name               youcl
service_description     CPU Load
check_command           check_nrpe!check_load
}
define service{
use                     generic-service
host_name               youcl
service_description     Total Processes
check_command           check_nrpe!check_total_procs
}
define service{
use                     generic-service
host_name               youcl
service_description     Current Users
check_command           check_nrpe!check_users
}
define service{
use                     generic-service
host_name               youcl
service_description     SSH Monitoring
check_command           check_nrpe!check_ssh
}
define service{
use                     generic-service
host_name               youcl
service_description     FTP Monitoring
check_command           check_nrpe!check_ftp
}
现在NRPE命令定义需要commands.cfg文件被创建。
[root@youcl]# vi /usr/local/nagios/etc/objects/commands.cfg
在文件底部添加以下NRPE命令定义。
###############################################################################
# NRPE CHECK COMMAND
#
# Command to use NRPE to check remote host systems
###############################################################################
define command{
command_name check_nrpe
command_line $USER1$/check_nrpe -H $HOSTADDRESS$ -c $ARG1$
}
最后,验证Nagios配置文件是否有任何错误。
[root@youcl]# /usr/local/nagios/bin/nagios -v /usr/local/nagios/etc/nagios.cfg
Total Warnings: 0
Total Errors:   0
重新启动Nagios:
[root@youcl]# service nagios restart
而已。 现在去给Nagios监控Web界面在“HTTP://您的服务器,IP地址/ nagios的 ”或“HTTP:// FQDN / nagios的”,并提供用户名“nagiosadmin”和密码 。 检查远程Linux主机 ,并将被监控。
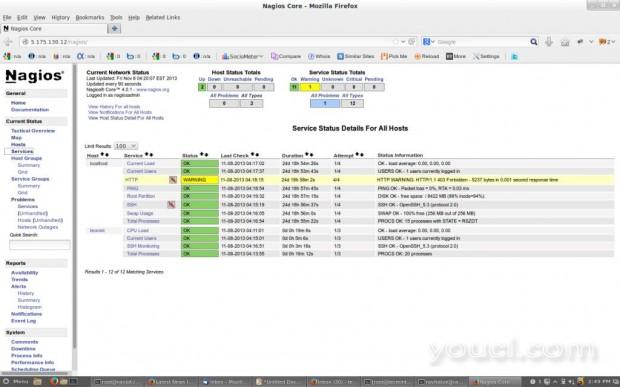
Nagios远程主机监控
而已! 现在,在我们的我了,未来的文章中,我将告诉你如何将Windows主机添加到Nagios的监控服务器 。 如果你面对任何困难,同时增加远程主机的Nagios。 请不要通过评论区发表评论您的疑问或问题,到那时敬请关注youcl.com更多这样的贵重物品。


