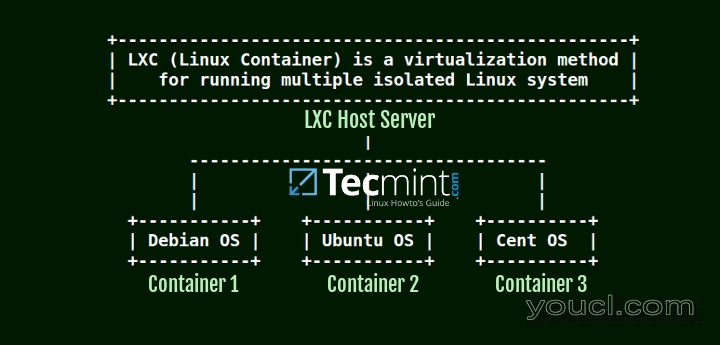
LXC,简称为Linux容器 ,是一个轻量级的基于Linux内核的虚拟化解决方案,这实际上运行在操作系统之上,使您可以运行多个相互隔离的发行同时进行。
LXC和之间的差KVM虚拟在于LXC不模拟硬件,但共享相同的内核空间,类似的chroot应用程序。
在Linux中安装和管理LXC Linux Container
这使得LXC非常快的虚拟化解决方案相对于其他虚拟化解决方案,如KVM , XEN和VMware的 。
本文将指导您如何在CentOS / RHEL和Fedora发行版上安装,部署和运行LXC容器。
要求
一个工作的Linux操作系统,安装最少:
第1步:在Linux中安装LXC虚拟化
1. LXC虚拟化是通过提供EPEL库 。 为了使用这个repo,打开一个终端并通过发出以下命令在您的系统中安装Epel仓库:
# yum install epel-release
2.在与LXC继续安装过程,保证Perl语言解释器,以及debootstrap的包通过发出以下命令进行安装。
# yum install debootstrap perl libvirt
3.最后安装使用以下命令LXC虚拟化解决方案。
# yum install lxc lxc-templates
LXC服务已安装4后,验证是否LXC及libvirt的守护程序正在运行。
# systemctl status lxc.service
# systemctl start lxc.service
# systemctl start libvirtd
# systemctl status lxc.service
示例输出
[root@youcl ~]# systemctl status lxc.service
lxc.service - LXC Container Initialization and Autoboot Code
Loaded: loaded (/usr/lib/systemd/system/lxc.service; disabled)
Active: inactive (dead)
[root@youcl ~]# systemctl start lxc.service
[root@youcl ~]# systemctl status lxc.service
lxc.service - LXC Container Initialization and Autoboot Code
Loaded: loaded (/usr/lib/systemd/system/lxc.service; disabled)
Active: active (exited) since Fri 2016-04-01 02:33:36 EDT; 1min 37s ago
Process: 2250 ExecStart=/usr/libexec/lxc/lxc-autostart-helper start (code=exited, status=0/SUCCESS)
Process: 2244 ExecStartPre=/usr/libexec/lxc/lxc-devsetup (code=exited, status=0/SUCCESS)
Main PID: 2250 (code=exited, status=0/SUCCESS)
Apr 01 02:33:06 mail systemd[1]: Starting LXC Container Initialization and Autoboot Code...
Apr 01 02:33:06 mail lxc-devsetup[2244]: Creating /dev/.lxc
Apr 01 02:33:06 mail lxc-devsetup[2244]: /dev is devtmpfs
Apr 01 02:33:06 mail lxc-devsetup[2244]: Creating /dev/.lxc/user
Apr 01 02:33:36 mail lxc-autostart-helper[2250]: Starting LXC autoboot containers:  [  OK  ]
Apr 01 02:33:36 mail systemd[1]: Started LXC Container Initialization and Autoboot Code.
并通过发出以下命令检查LXC内核虚拟化状态。
# lxc-checkconfig
示例输出
[root@youcl ~]# lxc-checkconfig
Kernel configuration not found at /proc/config.gz; searching...
Kernel configuration found at /boot/config-3.10.0-229.el7.x86_64
--- Namespaces ---
Namespaces: enabled
Utsname namespace: enabled
Ipc namespace: enabled
Pid namespace: enabled
User namespace: enabled
Network namespace: enabled
Multiple /dev/pts instances: enabled
--- Control groups ---
Cgroup: enabled
Cgroup clone_children flag: enabled
Cgroup device: enabled
Cgroup sched: enabled
Cgroup cpu account: enabled
Cgroup memory controller: enabled
Cgroup cpuset: enabled
--- Misc ---
Veth pair device: enabled
Macvlan: enabled
Vlan: enabled
Bridges: enabled
Advanced netfilter: enabled
CONFIG_NF_NAT_IPV4: enabled
CONFIG_NF_NAT_IPV6: enabled
CONFIG_IP_NF_TARGET_MASQUERADE: enabled
CONFIG_IP6_NF_TARGET_MASQUERADE: enabled
CONFIG_NETFILTER_XT_TARGET_CHECKSUM: enabled
--- Checkpoint/Restore ---
checkpoint restore: missing
CONFIG_FHANDLE: enabled
CONFIG_EVENTFD: enabled
CONFIG_EPOLL: enabled
CONFIG_UNIX_DIAG: enabled
CONFIG_INET_DIAG: enabled
CONFIG_PACKET_DIAG: enabled
CONFIG_NETLINK_DIAG: enabled
File capabilities: enabled
Note : Before booting a new kernel, you can check its configuration
usage : CONFIG=/path/to/config /usr/bin/lxc-checkconfig
第2步:在Linux中创建和管理LXC容器
5.要列出已安装在您的系统问题,下面的命令可用的LXC模板容器。
# ls -alh /usr/share/lxc/templates/
total 344K
drwxr-xr-x. 2 root root 4.0K Apr  1 02:32 .
drwxr-xr-x. 6 root root  100 Apr  1 02:32 ..
-rwxr-xr-x. 1 root root  11K Nov 15 10:19 lxc-alpine
-rwxr-xr-x. 1 root root  14K Nov 15 10:19 lxc-altlinux
-rwxr-xr-x. 1 root root  11K Nov 15 10:19 lxc-archlinux
-rwxr-xr-x. 1 root root 9.7K Nov 15 10:19 lxc-busybox
-rwxr-xr-x. 1 root root  29K Nov 15 10:19 lxc-centos
-rwxr-xr-x. 1 root root  11K Nov 15 10:19 lxc-cirros
-rwxr-xr-x. 1 root root  17K Nov 15 10:19 lxc-debian
-rwxr-xr-x. 1 root root  18K Nov 15 10:19 lxc-download
-rwxr-xr-x. 1 root root  49K Nov 15 10:19 lxc-fedora
-rwxr-xr-x. 1 root root  28K Nov 15 10:19 lxc-gentoo
-rwxr-xr-x. 1 root root  14K Nov 15 10:19 lxc-openmandriva
-rwxr-xr-x. 1 root root  14K Nov 15 10:19 lxc-opensuse
-rwxr-xr-x. 1 root root  35K Nov 15 10:19 lxc-oracle
-rwxr-xr-x. 1 root root  12K Nov 15 10:19 lxc-plamo
-rwxr-xr-x. 1 root root 6.7K Nov 15 10:19 lxc-sshd
-rwxr-xr-x. 1 root root  23K Nov 15 10:19 lxc-ubuntu
-rwxr-xr-x. 1 root root  12K Nov 15 10:19 lxc-ubuntu-cloud
6.创建LXC容器的过程非常简单。 创建新容器的命令语法解释如下。
# lxc-create -n container_name -t container_template
在下面的摘录,我们将创建一个新的容器名为mydeb基础上debian将从LXC库被拉断的模板。
[root@youcl ~]# lxc-create -n mydcb -t debian
debootstrap is /usr/sbin/debootstrap
Checking cache download in /var/cache/lxc/debian/rootfs-jessie-amd64 ...
Downloading debian minimal ...
W: Cannot check Release signature; keyring file not available /usr/share/keyrings/debian-archive-keyring.gpg
I: Retrieving Release
I: Retrieving Packages
I: Validating Packages
I: Resolving dependencies of required packages...
I: Resolving dependencies of base packages...
...
...
7.一系列基本依赖和软件包将被下载并安装在您的系统容器将被创建之后。 当进程完成时,一条消息将显示您的默认根帐户密码。 一旦您开始并登录到容器控制台,为了安全,请更改此密码。
are supported and installed on your system.
perl: warning: Falling back to the standard locale ("C").
Failed to read /proc/cmdline. Ignoring: No such file or directory
invoke-rc.d: policy-rc.d denied execution of start.
Timezone in container is not configured. Adjust it manually.
Root password is 'root', please change !
Generating locales (this might take a while)...
en_IN.en_IN...character map file `en_IN' not found: No such file or directory
/usr/share/i18n/locales/en_IN:55: LC_MONETARY: unknown character in field `currency_symbol'
done
Generation complete.
8.现在,您可以使用lxc-ls列出你的容器和lxc-info ,以获取有关运行信息/停止容器。
为了能在后台启动新创建的容器(将运行通过指定一个守护进程-d选项)发出以下命令:
# lxc-start -n mydeb -d
9.容器已经启动后,您可以使用列表中的运行容器lxc-ls --active命令,并获得有关容器运行的详细信息。
# lxc-ls --active
10.为了登录到控制台容器问题lxc-console对正在运行的容器名称命令。 使用root用户和默认由lxc supervisor生成的密码登录。
一旦登录容器你可以为了通过显示验证分配运行若干命令/etc/issue.net文件的内容,通过发出修改root密码passwd有关使用网络接口的命令或查看详细信息ifconfig 。
# lxc-console -n mydeb
# cat /etc/issue.net
# ifconfig
# passwd
示例输出
[root@youcl~]# lxc-console -n mydcb Connected to tty 1 Type <Ctrl+a q> to exit the console, <Ctrl+a Ctrl+a> to enter Ctrl+a itself Debian GNU/Linux 8 mydcb tty1 mydcb login: root Password: Last login: Fri Apr 1 07:39:08 UTC 2016 on console Linux mydcb 3.10.0-229.el7.x86_64 #1 SMP Fri Mar 6 11:36:42 UTC 2015 x86_64 The programs included with the Debian GNU/Linux system are free software; the exact distribution terms for each program are described in the individual files in /usr/share/doc/*/copyright. Debian GNU/Linux comes with ABSOLUTELY NO WARRANTY, to the extent permitted by applicable law. root@mydcb:~# cat /etc/issue.net Debian GNU/Linux 8 root@mydcb:~# ifconfig eth0 Link encap:Ethernet HWaddr 00:16:3e:d9:21:d7 inet6 addr: fe80::216:3eff:fed9:21d7/64 Scope:Link UP BROADCAST RUNNING MULTICAST MTU:1500 Metric:1 RX packets:107 errors:0 dropped:0 overruns:0 frame:0 TX packets:8 errors:0 dropped:0 overruns:0 carrier:0 collisions:0 txqueuelen:1000 RX bytes:5796 (5.6 KiB) TX bytes:648 (648.0 B) lo Link encap:Local Loopback inet addr:127.0.0.1 Mask:255.0.0.0 inet6 addr: ::1/128 Scope:Host UP LOOPBACK RUNNING MTU:65536 Metric:1 RX packets:0 errors:0 dropped:0 overruns:0 frame:0 TX packets:0 errors:0 dropped:0 overruns:0 carrier:0 collisions:0 txqueuelen:0 RX bytes:0 (0.0 B) TX bytes:0 (0.0 B) root@mydcb:~# passwd root Enter new UNIX password: Retype new UNIX password: passwd: password updated successfully
11.从容器控制台分离并返回到你的主机控制台,使处于活动状态的容器,击中Ctrl+a则q在键盘上。
要停止正在运行的容器,请执行以下命令。
# lxc-stop -n mydcb
12.为了创建一个基于Ubuntu的模板的LXC容器,进入/usr/sbin/目录下,并创建以下符号链接debootstrap的 。
# cd /usr/sbin
# ln -s debootstrap qemu-debootstrap
13.编辑qemu-debootstrap用vi编辑文件,并替换以下两个镜像行,如下所示:
DEF_MIRROR=”http://mirrors.kernel.org/ubuntu”
DEF_HTTPS_MIRROR=”https://mirrors.kernel.org/ubuntu”
作为参考,请参见以下内容,并将上述两行如上所述:
....
MAKE_TARBALL=""
EXTRACTOR_OVERRIDE=""
UNPACK_TARBALL=""
ADDITIONAL=""
EXCLUDE=""
VERBOSE=""
CERTIFICATE=""
CHECKCERTIF=""
PRIVATEKEY=""
DEF_MIRROR=”http://mirrors.kernel.org/ubuntu”
DEF_HTTPS_MIRROR=”https://mirrors.kernel.org/ubuntu”
14.最后创建发出相同的基于Ubuntu模板的新LXC容器lxc-create命令。
一旦产生了Ubuntu容器的过程中完成的消息将显示你的容器的默认的登录凭据在下面的截图所示。
# lxc-create -n myubuntu -t ubuntu
示例输出
Checking cache download in /var/cache/lxc/precise/rootfs-amd64 ...
Installing packages in template: ssh,vim,language-pack-en
Downloading ubuntu precise minimal ...
15.为了创建一个特定的容器基于本地模板使用的语法如下:
# lxc-create -n container_name -t container_template -- -r distro_release -a distro_architercture
以下为使用AMD64体系结构建立一个DebianWheezy容器的摘录。
# lxc-create -n mywheezy -t debian -- -r wheezy -a amd64
示例输出
debootstrap is /sbin/debootstrap
Checking cache download in /var/cache/lxc/debian/rootfs-wheezy-amd64 ...
Downloading debian minimal ...
W: Cannot check Release signature; keyring file not available /usr/share/keyrings/debian-archive-keyring.gpg
I: Retrieving Release
I: Retrieving Packages
I: Validating Packages
I: Resolving dependencies of required packages...
I: Resolving dependencies of base packages...
I: Found additional required dependencies: insserv libbz2-1.0 libdb5.1 libsemanage-common libsemanage1 libslang2 libustr-1.0-1
I: Found additional base dependencies: adduser debian-archive-keyring gnupg gpgv isc-dhcp-common libapt-pkg4.12 libbsd0 libclass-isa-perl libedit2 libgdbm3 libgssapi-krb5-2 libk5crypto3 libkeyutils1 libkrb5-3 libkrb5support0 libncursesw5 libprocps0 libreadline6 libssl1.0.0 libstdc++6 libswitch-perl libusb-0.1-4 libwrap0 openssh-client perl perl-modules procps readline-common
I: Checking component main on http://http.debian.net/debian...
I: Retrieving libacl1 2.2.51-8
I: Validating libacl1 2.2.51-8
I: Retrieving adduser 3.113+nmu3
I: Validating adduser 3.113+nmu3
I: Retrieving apt 0.9.7.9+deb7u7
I: Validating apt 0.9.7.9+deb7u7
I: Retrieving libapt-pkg4.12 0.9.7.9+deb7u7
I: Validating libapt-pkg4.12 0.9.7.9+deb7u7
I: Retrieving libattr1 1:2.4.46-8
I: Validating libattr1 1:2.4.46-8
I: Retrieving base-files 7.1wheezy9
I: Validating base-files 7.1wheezy9
I: Retrieving base-passwd 3.5.26
...
16.例如,也可以从一个通用的模板将从LXC库如在下面的例子示出被下载创建为不同的发行版本和架构具体容器。
# lxc-create -n mycentos6 -t download -- -d centos -r 6 -a i386
以下是名单lxc-create命令行开关:
-n = name
-t = template
-d = distibution
-a = arch
-r = release
17.容器可以从您的主机与被删除lxc-destroy对一个容器名称发出的命令。
# lxc-destroy -n mywheezy
18.一种容器可从现有容器通过发行克隆lxc-clone命令:
# lxc-clone mydeb mydeb-clone
19.最后,所有创建的容器位于/var/lib/lxc/目录下。 如果由于某种原因需要手动调整容器设置,则必须从每个容器目录编辑配置文件。
# ls /var/lib/lxc
这只是你需要知道的基本事情,以便围绕LXC工作。


