Rainloop是一个免费的开源Web应用程序,PHP提供了一个快速的现代网络界面访问您的电子邮件在所有主要的域名邮件提供商,如Yahoo,Gmail,Outlook等许多其他,以及您自己的本地邮件服务器,通过IMAP和SMTP协议访问域邮件服务器,充当MUA(邮件用户代理)。
RainLoop演示
有一个快速浏览一下演示页面设置由作者在http://demo.rainloop.net/ 。

在Arch Linux中安装RainLoop
一旦您在服务器上部署了Rainloop,唯一需要做的就是通过Web浏览器访问您的Rainloop域,并为启用的域邮件服务器提供凭据。
本教程涵盖了Arch Linux的 Rainloop webmail的安装过程中从两个点的Apache和Nginx的视图配置文件,通过使用本地主机文件配置的虚拟地域,没有一个DNS服务器。
如果您还需要对Debian和Red Hat系统安装Rainloop引用请访问以前的RainLoop Webmail的文章。
要求
对于Nginx
对于Apache
第1步:为Nginx或Apache创建虚拟主机
1.假设你已经配置您的服务器(Nginx的或Apache),如上面介绍的链接描述,你需要做的第一件事是建立一个基本的DNS条目本地hosts文件指向的Arch Linux系统IP。
在Linux系统中编辑/ etc / hosts文件,其中包括localhost条目后,您Rainloop虚拟域。
127.0.0.1	localhost.localdomain  localhost     rainloop.lan
192.168.1.33	rainloop.lan
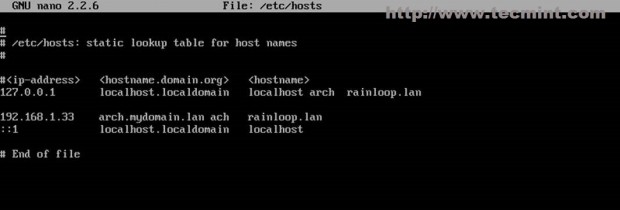
添加域主机条目
在Windows系统中编辑C:\ WINDOWS \ SYSTEM32 \ DRIVERS \等\主机,并在底部添加以下行。
192.168.1.33 rainloop.lan
2.当您使用ping命令验证本地域中,创建Apache或Nginx的必要的虚拟主机和SSL配置。
Nginx虚拟主机
在/ etc / nginx的/网站的可用/使用下面的配置路径的文件名为rainloop.lan。
$ sudo nano /etc/nginx/sites-available/rainloop.conf
添加以下文件内容。
server {
listen 80;
server_name rainloop.lan;
rewrite        ^ https://$server_name$request_uri? permanent;
access_log /var/log/nginx/rainloop.lan.access.log;
error_log /var/log/nginx/rainloop.lan.error.log;
root /srv/www/rainloop/;
# serve static files
location ~ ^/(images|javascript|js|css|flash|media|static)/  {
root    /srv/www/rainloop/;
expires 30d;
}
location / {
index index.html index.htm index.php;
autoindex on;
autoindex_exact_size off;
autoindex_localtime on;
}
location ^~ /data {
deny all;
}
location ~ \.php$ {
#fastcgi_pass 127.0.0.1:9000; (depending on your php-fpm socket configuration)
fastcgi_pass unix:/run/php-fpm/php-fpm.sock;
fastcgi_index index.php;
include fastcgi.conf;
}
}
然后创建SSL等效文件内容。
$ sudo nano /etc/nginx/sites-available/rainloop-ssl.conf
添加以下文件内容。
server {
listen 443 ssl;
server_name rainloop.lan;
ssl_certificate     /etc/nginx/ssl/rainloop.lan.crt;
ssl_certificate_key  /etc/nginx/ssl/rainloop.lan.key;
ssl_session_cache    shared:SSL:1m;
ssl_session_timeout  5m;
ssl_ciphers  HIGH:!aNULL:!MD5;
ssl_prefer_server_ciphers  on;
access_log /var/log/nginx/rainloop.lan.access.log;
error_log /var/log/nginx/rainloop.lan.error.log;
root /srv/www/rainloop/;
# serve static files
location ~ ^/(images|javascript|js|css|flash|media|static)/  {
root    /srv/www/rainloop/;
expires 30d;
}
location ^~ /data {
deny all;
}
location / {
index index.html index.htm index.php;
autoindex on;
autoindex_exact_size off;
autoindex_localtime on;
}
location ~ \.php$ {
#fastcgi_pass 127.0.0.1:9000; (depending on your php-fpm socket configuration)
fastcgi_pass unix:/run/php-fpm/php-fpm.sock;
fastcgi_index index.php;
include fastcgi.conf;
}
}
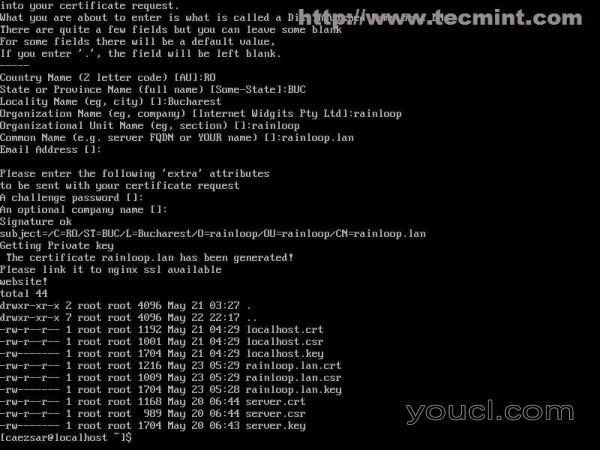
在接下来的步骤生成证书文件和密钥 SSL虚拟主机和证书的通用名称添加虚拟域名(rainloop.lan)。
$ sudo nginx_gen_ssl.sh
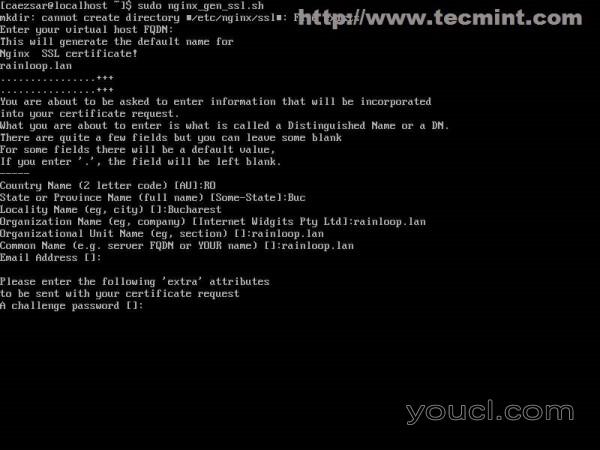
生成证书和密钥
生成证书和SSL密钥后,创建Rainloop 根 Web服务器的文件路径(地方Rainloop PHP文件驻留),然后启用虚拟主机,然后重新启动Nginx的后台应用的配置。
$ sudo mkdir -p /srv/www/rainloop
$ sudo n2ensite rainloop
$ sudo n2ensite rainloop-ssl
$ sudo systemctl restart nginx
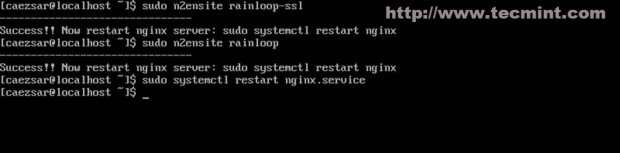
创建RainLoop Web Director
Apache虚拟主机
创建一个新的文件名为rainloop.conf 的/ etc / httpd的/ conf目录/网站的可用/使用以下内容。
$ sudo nano /etc/httpd/conf/sites-available/rainloop.conf
添加以下文件内容。
<VirtualHost *:80>
ServerName rainloop.lan
DocumentRoot "/srv/www/rainloop/"
ServerAdmin you@example.com
ErrorLog "/var/log/httpd/rainloop-error_log"
TransferLog "/var/log/httpd/rainloop-access_log"
<Directory />
Options +Indexes +FollowSymLinks +ExecCGI
AllowOverride All
Order deny,allow
Allow from all
Require all granted
</Directory>
</VirtualHost>
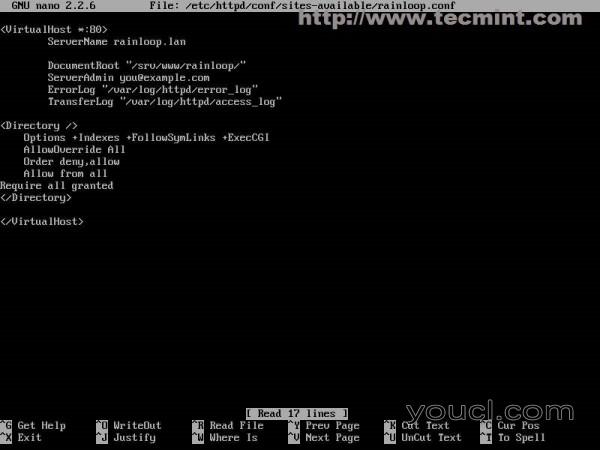
创建Apache虚拟主机
然后为Apache创建SSL等效文件内容。
$ sudo nano /etc/httpd/conf/sites-available/rainloop-ssl.conf
添加以下文件内容。
<VirtualHost *:443>
ServerName rainloop.lan
DocumentRoot "/srv/www/rainloop/"
ServerAdmin you@example.com
ErrorLog "/var/log/httpd/rainloop-ssl-error_log"
TransferLog "/var/log/httpd/rainloop-ssl-access_log"
SSLEngine on
SSLCertificateFile "/etc/httpd/conf/ssl/rainloop.lan.crt"
SSLCertificateKeyFile "/etc/httpd/conf/ssl/rainloop.lan.key"
<FilesMatch "\.(cgi|shtml|phtml|php)$">
SSLOptions +StdEnvVars
</FilesMatch>
BrowserMatch "MSIE [2-5]" \
nokeepalive ssl-unclean-shutdown \
downgrade-1.0 force-response-1.0
CustomLog "/var/log/httpd/ssl_request_log" \
"%t %h %{SSL_PROTOCOL}x %{SSL_CIPHER}x \"%r\" %b"
<Directory />
Options +Indexes +FollowSymLinks +ExecCGI
AllowOverride All
Order deny,allow
Allow from all
Require all granted
</Directory>
</VirtualHost>
下一步是创建SSL证书文件和密钥 SSL虚拟主机 ,并添加把你的虚拟域名(rainloop.lan)证书上的通用名称 。
$ sudo apache_gen_ssl

创建SSL证书和密钥
输入组织详细信息
创建证书和SSL密钥后,加入Rainloop DocumentRoot的路径,然后启用虚拟主机,并重新启动Apache后台应用配置。
$ sudo mkdir -p /srv/www/rainloop
$ sudo a2ensite rainloop
$ sudo a2ensite rainloop-ssl
$ sudo systemctl restart httpd
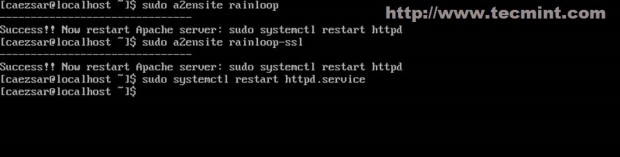
启用虚拟主机
第2步:添加必要的PHP扩展
3.无论你使用的是Apache或Nginx的网络服务器,您需要启用php.ini文件中下面的PHP扩展,同时,也包括新的Web服务器的DocumentRoot路径open_basedir的指令。
$ sudo nano /etc/php/php.ini
找到并取消注释以下PHP扩展。
extension=iconv.so
extension=imap.so
extension=mcrypt.so
extension=mssql.so
extension=mysqli.so
extension=openssl.so ( enables IMAPS and SMTP SSL protocols on mail servers)
extension=pdo_mysql.so
另外open_basedir语句应该看起来像这样。
open_basedir = /srv/http/:/home/:/tmp/:/usr/share/pear/:/usr/share/webapps/:/etc/webapps/:/srv/www/
4.在php.ini文件被修改,重新启动服务器比检查的phpinfo文件,看是否SSL协议被启用。
----------On Apache Web Server----------
$ sudo systemctl restart httpd
----------On Nginx Web Server----------
$ sudo systemctl restart nginx
$ sudo systemctl restart php-fpm
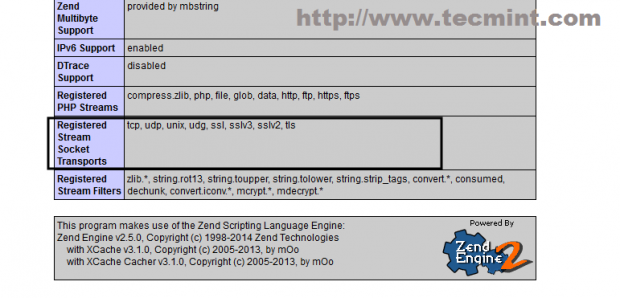
检查PHP信息
第3步:下载并安装RainLoop Webmail
5.现在是时候从官方网站Rainloop应用程序下载并解压到文档根目录,但先安装wget和解压系统实用程序。
$ sudo pacman -S unzip wget
6.下载最新的源码包Rainloop zip压缩包使用wget命令或通过使用浏览器导航到http://rainloop.net/downloads/ 。
$ wget http://repository.rainloop.net/v1/rainloop-latest.zip
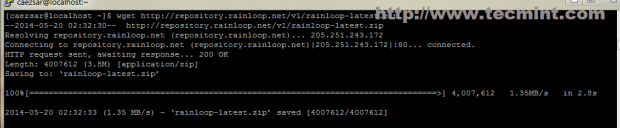
下载RainLoop包
7.下载过程完成后,解压Rainloop归档到虚拟主机文档根路径(/ SRV /网络/ rainloop /)。
$ sudo unzip rainloop-latest.zip -d /srv/www/rainloop/
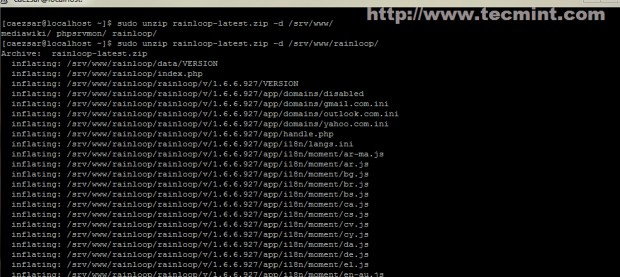
提取Rainloop存档
8.然后设置应用程序的默认路径以下权限。
$ sudo chmod -R 755 /srv/www/rainloop/
$ sudo chown -R http:http /srv/www/rainloop/
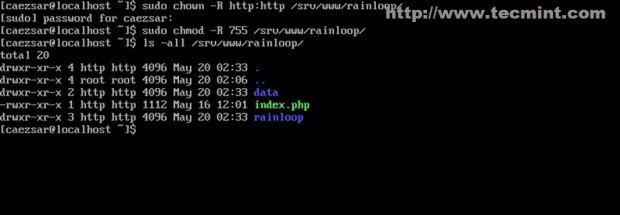
在RainLoop上设置权限
第4步:通过Web界面配置Rainloop
9. Rainloop应用可以以两种方式进行配置:使用经由浏览器的一个系统的外壳。 如果你想配置终端上打开和编辑位于的application.ini文件/ SRV /网络/ rainloop /数据/ _data_da047852f16d2bc7352b24240a2f1599 / _default_ / CONFIGS /。
10.从浏览器访问管理界面,请使用以下的URL地址的https://rainloop.lan/管理员 ,然后提供的默认应用程序凭据。
User= admin
Password= 12345
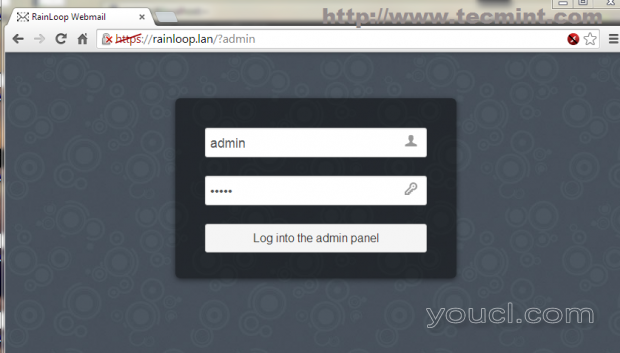
Rainloop Web界面
11.首次登录后,您将被警告更改默认密码,所以我建议你这样做。
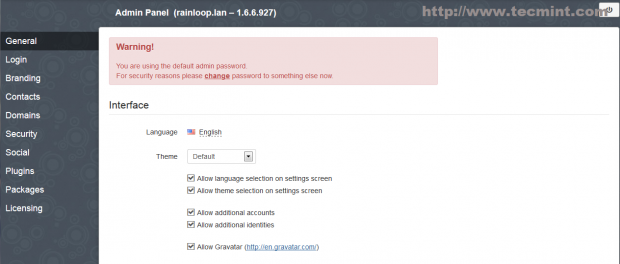
更改默认密码

设置新管理员密码
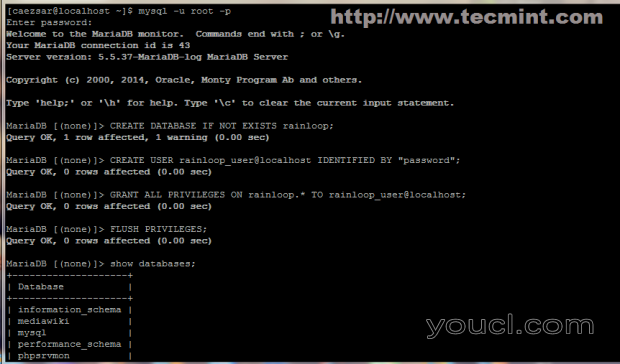
12.如果要启用登录到MySQL数据库的接触和与它具有权限的用户创建一个新的数据库,然后在联系人字段提供数据库凭据。
mysql -u root -p
create database if not exists rainloop;
create user rainloop_user@localhost identified by “password”;
grant all privileges on rainloop.* to rainloop_user@localhost;
flush privileges;
exit;
在RainLoop中启用联系人
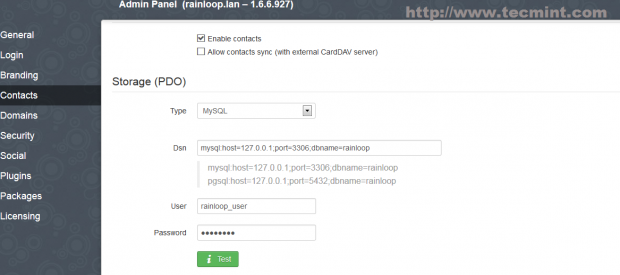
输入联系人数据库细节
13.默认情况下Rainloop提供的Gmail, 雅虎和Outlook邮件域服务器的配置文件,但是你可以,如果你想添加其他的邮件服务器域。
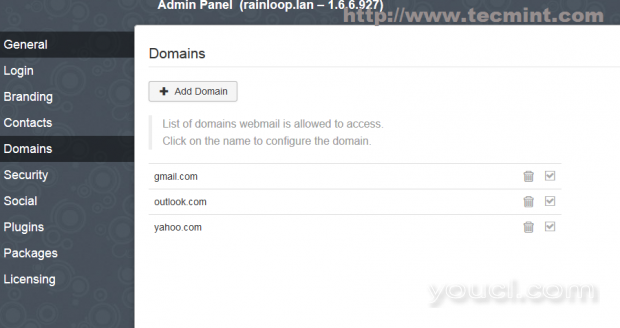
默认邮件域
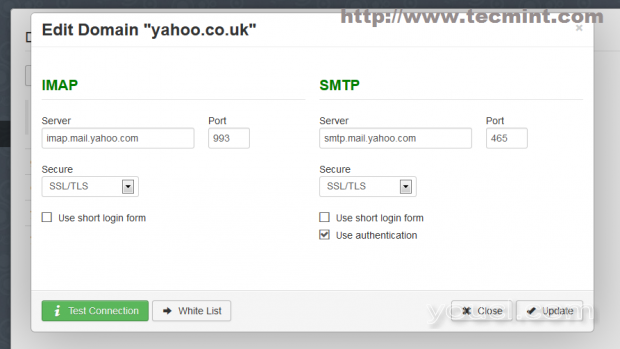
添加新域
14.要在您的邮件服务器,请浏览登录到https://rainloop.lan并提供你的域服务器的凭据。
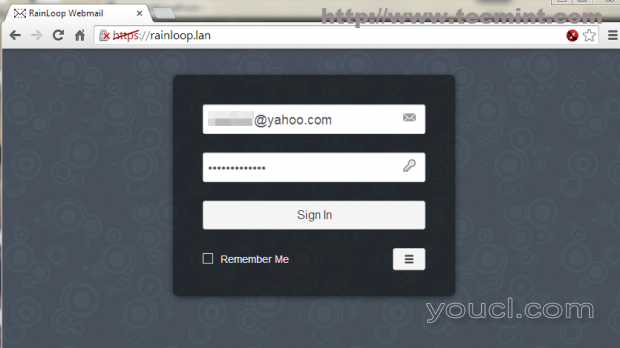
登录到邮件域
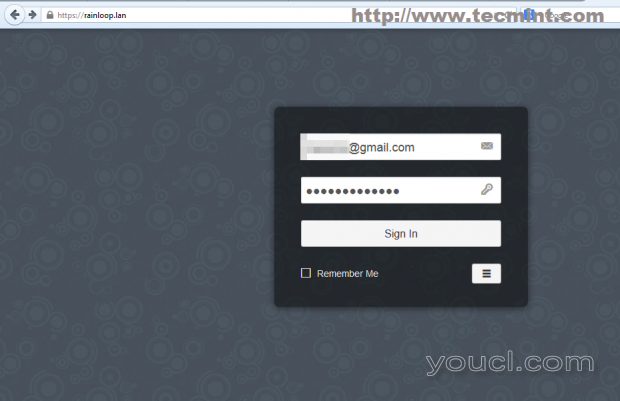
登入Gmail网域
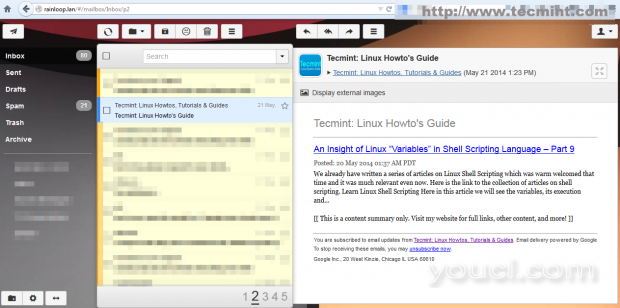
RainLoop电子邮件界面
欲了解更多配置请登陆官方Rainloop文档页面http://rainloop.net/docs/ 。
随着Rainloop你可以,只要你的服务器有互联网连接,有一个浏览器的任何设备访问邮件服务器,使用Arch Linux的应用Rainloop的只有零下到目前为止是缺乏需要改变的电子邮件帐户密码poppassd插件包的。


