PostgreSQL也叫Postgres,是一个功能强大且开源的对象关系数据库系统。 这是一个企业级数据库,具有容错,异步复制,多版本并发控制(MVCC),在线/热备份,时间点恢复,查询规划器/优化器,表空间,嵌套事务(保存点)等
Postgres的最新版本10于2017年10月5日由postgres全球开发组发布。
PostgreSQL功能
新版本的功能如下:
- 逻辑复制 :此功能可以跨备用服务器复制单个数据库对象(可以是行,表或选择性数据库)。 它提供了对数据复制的更多控制。 通过使用发布者订户模型来实现。
- 同步复制的仲裁提交 :在此功能中,dba现在可以指定确认数据库更改已完成的备用数目,以便数据可以被认为是安全写入的。
- SCRAM-SHA-256身份验证 :改进了现有基于MD5的密码身份验证和存储的安全性。
- 改进了并行查询执行。
- 声明式表分区。
- 全文搜索支持JSON和JSONB。
在本文中,我们将解释如何在Linux系统中使用源代码安装来安装PostgreSQL 10 。 那些从分发包管理器中寻找简单安装的人可以按照下面的这些指南进行操作。
使用源代码安装PostgreSQL
由于postgres是开源数据库,可以根据自己的需要/要求从源代码构建。 我们可以通过为各种附加功能提供一个或多个命令行选项来定制构建和安装过程。
使用源代码安装的主要优点是在安装过程中可以高度自定义。
1.首先使用包管理器安装所需的先决条件,如gcc , readline-devel和zlib-devel ,如图所示。
# yum install gcc zlib-devel readline-devel     [On RHEL/CentOS]
# apt install gcc zlib1g-dev libreadline6-dev   [On Debian/Ubuntu]
2.直接在系统上使用以下wget命令从官方postgres网站下载源代码tar文件。
# wget https://ftp.postgresql.org/pub/source/v10.0/postgresql-10.0.tar.bz2
3.使用tar命令提取下载的tarball文件。 名为postgresql-10.0的新目录将被创建。
# tar -xvf postgresql-10.0.tar.bz2
# ll
示例输出
total 19236
-rw-------. 1 root root      933 Mar 18  2015 anaconda-ks.cfg
-rw-r--r--. 1 root root     8823 Mar 18  2015 install.log
-rw-r--r--. 1 root root     3384 Mar 18  2015 install.log.syslog
drwxrwxrwx  6 1107 1107     4096 Oct  3  2017 postgresql-10.0
-rw-r--r--  1 root root 19639147 Oct  3  2017 postgresql-10.0.tar.bz2
4.安装步骤的下一步是根据您的需要选择选项来配置下载的源代码。
# cd postgresql-10.0
使用./configure --help获取有关各种选项的帮助。
示例输出
# ./configure --help
Defaults for the options are specified in brackets.
Configuration:
-h, --help              display this help and exit
--help=short        display options specific to this package
--help=recursive    display the short help of all the included packages
-V, --version           display version information and exit
-q, --quiet, --silent   do not print `checking ...' messages
--cache-file=FILE   cache test results in FILE [disabled]
-C, --config-cache      alias for `--cache-file=config.cache'
-n, --no-create         do not create output files
--srcdir=DIR        find the sources in DIR [configure dir or `..']
Installation directories:
--prefix=PREFIX         install architecture-independent files in PREFIX
[/usr/local/pgsql]
--exec-prefix=EPREFIX   install architecture-dependent files in EPREFIX
[PREFIX]
5.现在创建一个你想要安装postgres文件的目录,并在配置中使用prefix选项。
# mkdir /opt/PostgreSQL-10/
# ./configure --prefix=/opt/PostgreSQL-10
示例输出
checking build system type... x86_64-pc-linux-gnu
checking host system type... x86_64-pc-linux-gnu
checking which template to use... linux
checking whether NLS is wanted... no
checking for default port number... 5432
checking for block size... 8kB
checking for segment size... 1GB
checking for WAL block size... 8kB
checking for WAL segment size... 16MB
checking for gcc... gcc
checking whether the C compiler works... yes
checking for C compiler default output file name... a.out
checking for suffix of executables...
checking whether we are cross compiling... no
checking for suffix of object files... o
checking whether we are using the GNU C compiler... yes
checking whether gcc accepts -g... yes
checking for gcc option to accept ISO C89... none needed
checking whether gcc supports -Wdeclaration-after-statement... yes
checking whether gcc supports -Wendif-labels... yes
checking whether gcc supports -Wmissing-format-attribute... yes
checking whether gcc supports -Wformat-security... yes
checking whether gcc supports -fno-strict-aliasing... yes
checking whether gcc supports -fwrapv... yes
checking whether gcc supports -fexcess-precision=standard... no
....
6.配置完成后,接下来我们将使用下面的make命令开始构建postgreSQL。
# make
构建过程完成后,现在使用以下命令安装postgresql。
# make install
Postgresql 10已安装在/ opt / PostgreSQL-10目录中。
7.现在创建一个postgres用户和目录作为初始化数据库集群的数据目录。 这个数据目录的所有者应该是postgres用户,权限应该是700,同时也为postgresql二进制文件设置路径,以方便我们。
# useradd postgres
# passwd postgres
# mkdir /pgdatabase/data
# chown -R postgres. /pgdatabase/data
# echo 'export PATH=$PATH:/opt/PostgreSQL-10/bin' > /etc/profile.d/postgres.sh
8.现在在使用任何postgres命令之前,使用以下命令作为postgres用户初始化数据库。
# su postgres
$ initdb -D /pgdatabase/data/ -U postgres -W
其中-D是此数据库群集的位置,或者我们可以说它是我们要初始化数据库群集的数据目录, -U是数据库超级用户名, -W是密码提示符,用于db超级用户。
有关更多信息和选项,我们可以参考initdb -help 。
9.初始化数据库后,启动数据库集群,或者需要更改服务器端口或监听地址,编辑数据库服务器数据目录下的postgresql.conf文件。
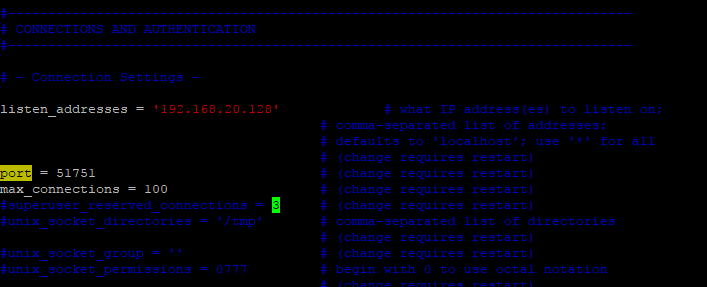
配置PostgreSQL端口
$ pg_ctl -D /pgdatabase/data/ -l /pglog/db_logs/start.log start
10.启动数据库后,使用以下命令验证postgres服务器进程的状态。
$ ps -ef |grep -i postgres
$ netstat -apn |grep -i 51751

验证PostgreSQL数据库
我们可以看到数据库集群运行良好,启动日志可以在启动数据库集群时在-l选项指定的位置找到。
11.现在连接到数据库集群并使用以下命令创建数据库。
$ psql -p 51751
postgres=# create database test;
postgres=# \l to list all databases in cluster
postgres=# \q to quit form postgres console
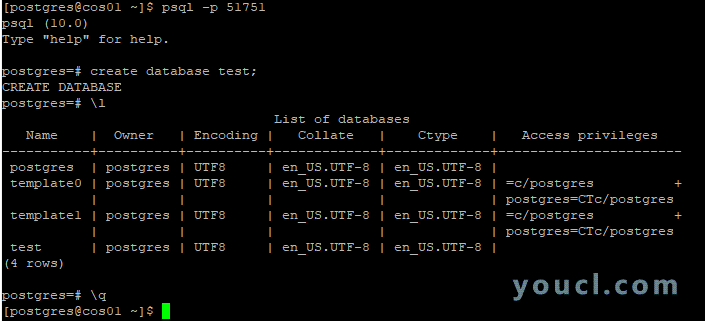
连接PostgreSQL数据库
而已! 在我们即将发表的文章中,我将介绍pgAdmin工具的配置,复制设置和安装,直到然后继续关注youcl。


