在OpenSUSE 12.2上为Nginx提供CGI脚本
本教程将介绍如何在OpenSUSE 12.2上为nginx提供CGI脚本(Perl脚本)。 虽然nginx本身不服务CGI,但有几种方法可以解决这个问题。 我将概述两个解决方案:第一个是向CGI脚本代理请求,Thttpd是一个具有CGI支持的小型Web服务器,而第二个解决方案则使用CGI包装器来提供CGI脚本。
我不会保证这将为您工作!
1初步说明
我正在使用www.example.com网站,其中包含文档根/srv/www/www.example.com/web/ ; vhost配置位于主要的nginx配置文件/etc/nginx/nginx.conf中 。
2使用Thttpd
在本章中,我将介绍如何将nginx配置为向Thttpd提供CGI脚本(扩展名.cgi或.pl )的代理请求。 我将配置Thttpd在端口8000上运行。
首先我们安装Thttpd。 有一个用于OpenSUSE的Thttpd软件包,但是nginx ThttpdCGI页面说Thttpd应该被修补 - 因此我们下载了OpenSUSE 12.2的src.rpm软件包,并对其进行修补并从中构建一个新的rpm软件包。
我们必须首先启用openSUSE-12.2-Source存储库。 跑
yast
并去软件>软件仓库 :
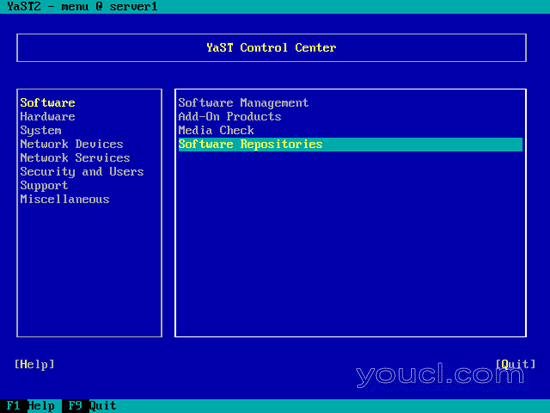
启用openSUSE-12.2-Source存储库并离开YaST:

我们需要安装构建新的rpm包所需的工具:
zypper install patch automake glibc-devel gcc flex compat-readline4 db-devel wget gcc-c++ make vim libtool rpm-build
接下来我们下载OpenSUSE 12.2的Thttpd src.rpm软件包:
cd /usr/src
 zypper source-install thttpd
现在我们将补丁下载到/ usr / src / packages / SOURCES /目录,并相应地修改/usr/src/packages/SPECS/thttpd.spec文件:
cd /usr/src/packages/SOURCES
 wget -O thttpd-2.25b-ipreal.patch http://www.danielclemente.com/amarok/ip_real.txt
打开/usr/src/packages/SOURCES/thttpd-2.25b-ipreal.patch ...
vi /usr/src/packages/SOURCES/thttpd-2.25b-ipreal.patch
...并修改前两行 - 在原始版本中,它们如下所示:
--- thttpd-2.25b/libhttpd.c 2003-12-25 20:06:05.000000000 +0100 +++ thttpd-2.25b-patched/libhttpd.c 2005-01-09 00:26:04.867255248 +0100 [...] |
删除突出显示的部分,使文件开始如下:
--- libhttpd.c 2003-12-25 20:06:05.000000000 +0100 +++ libhttpd.c 2005-01-09 00:26:04.867255248 +0100 [...] |
接下来去/ usr / src / packages / SPECS /目录下编辑thttpd.spec :
cd /usr/src/packages/SPECS/
 vi thttpd.spec
添加行Patch13:thttpd-2.25b-ipreal.patch和%patch13 :
[...]
Patch0:         %{name}-%{version}-configure.patch
Patch1:         %{name}-%{version}-dirs.patch
Patch2:         %{name}-%{version}-time_h.patch
Patch3:         %{name}-%{version}-newautoconf.patch
Patch4:         %{name}-%{version}-sec.patch
Patch5:         %{name}-%{version}-static.patch
Patch6:         %{name}-%{version}-pie.patch
Patch7:         %{name}-%{version}-syslogtocern.diff
Patch8:         %{name}-%{version}-overflow.diff
Patch9:         %{name}-%{version}-chown.diff
Patch10:        %{name}-%{version}-zerolen.patch
Patch11:        %{name}-%{version}-strcpy.patch
Patch12:        thttpd-2.25b-getline.patch
Patch13:        thttpd-2.25b-ipreal.patch
[...]
%prep
%setup -q -a 1
%patch0
%patch1
%patch2
%patch3
%patch4
%patch5
%patch6
%patch7
%patch8
%patch9
%patch10
%patch11
%patch12
%patch13
[...] |
现在我们构建Thttpd rpm包,如下所示:
rpmbuild -ba thttpd.spec
我们的Thttpd rpm包是在/ usr / src / packages / RPMS / x86_64 ( / usr / src / packages / RPMS / i386)中创建的,如果你在i386系统上),那么我们去那里:
cd /usr/src/packages/RPMS/x86_64
 ls -l
server1:/usr/src/packages/RPMS/x86_64 # ls -l
 total 296
 -rw-r--r-- 1 root root 303014 Oct 1 14:36 thttpd-2.25b-192.1.3.x86_64.rpm
 server1:/usr/src/packages/RPMS/x86_64 #
安装Thttpd软件包,如下所示:
rpm -ivh thttpd-2.25b-192.1.3.x86_64.rpm
然后,我们对原始的/etc/thttpd.conf文件进行备份,然后创建一个新的文件,如下所示:
mv /etc/thttpd.conf /etc/thttpd.conf_orig
 vi /etc/thttpd.conf
# BEWARE : No empty lines are allowed! # This section overrides defaults # This section _documents_ defaults in effect # port=80 # nosymlink # default = !chroot # novhost # nocgipat # nothrottles # host=0.0.0.0 # charset=iso-8859-1 host=127.0.0.1 port=8000 user=wwwrun logfile=/var/log/thttpd.log pidfile=/var/run/thttpd.pid dir=/srv/www cgipat=**.cgi|**.pl nochroot |
这将使Thttpd在127.0.0.1的 8000端口上监听 ; 其文档根目录是/ srv / www 。
创建Thttpd的系统启动链接...
systemctl enable thttpd.service
...并启动它:
systemctl start thttpd.service
接下来创建/etc/nginx/proxy.conf :
vi /etc/nginx/proxy.conf
proxy_redirect off; proxy_set_header Host $host; proxy_set_header X-Real-IP $remote_addr; proxy_set_header X-Forwarded-For $proxy_add_x_forwarded_for; client_max_body_size 10m; client_body_buffer_size 128k; proxy_connect_timeout 90; proxy_send_timeout 90; proxy_read_timeout 90; |
现在打开您的vhost配置文件...
vi /etc/nginx/nginx.conf
...并向服务器{} 容器添加位置/ cgi-bin {}部分:
server {
[...]
   location /cgi-bin {
      include proxy.conf;
      proxy_pass http://127.0.0.1:8000;
   }
[...]
} |
重新加载nginx:
systemctl reload nginx.service
因为Thttpd的文档根目录是/ srv / www , location / cgi-bin将转换为目录/ srv / www / cgi-bin (这对所有的vhosts都是这样,这意味着每个vhost必须将其CGI脚本放在/ srv / www / cgi-bin ;这是共享宿主环境的一个缺点;解决方案是使用第3章所述的CGI包装,而不是Thttpd)。
创建目录...
mkdir /srv/www/cgi-bin
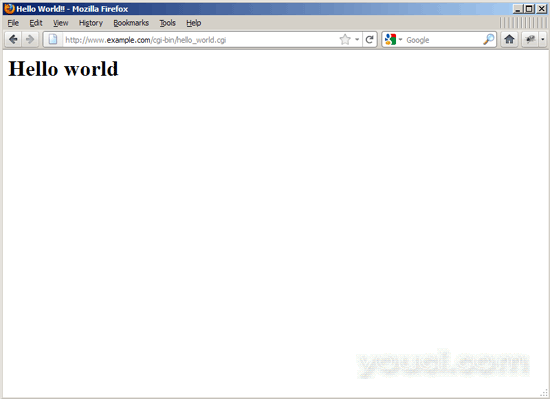
...然后将CGI脚本放在其中并使其可执行。 为了测试目的,我将创建一个小的Hello World Perl脚本(而不是hello_world.cgi,你也可以使用扩展名.pl - > hello_world.pl ):
vi /srv/www/cgi-bin/hello_world.cgi
#!/usr/bin/perl -w

     # Tell perl to send a html header.
     # So your browser gets the output
     # rather then <stdout>(command line
     # on the server.)
print "Content-type: text/html\n\n";

     # print your basic html tags.
     # and the content of them.
print "<html><head><title>Hello World!! </title></head>\n";
print "<body><h1>Hello world</h1></body></html>\n"; |
chmod 755 /srv/www/cgi-bin/hello_world.cgi
打开浏览器并测试脚本:
http://www.example.com/cgi-bin/hello_world.cgi
如果一切顺利,您应该得到以下输出: