使用Debian上的nginx显示上传进度
本教程将介绍如何使用nginx上传进度模块上传一个或多个文件,并显示用户的上传进度条。 这是有用的,例如,如果用户上传大文件,以便他们知道在后台发生了一些事情。
我不会保证这将为您工作!
1安装nginx-extras
默认情况下, nginx上传进度模块未启用。 你可以跑
nginx -V
检查是否启用 - 您应该在输出中看到像--add-module = / tmp / buildd / nginx-1.4.4 / debian / modules / nginx-upload-progress这样的东西。 如果未启用,请安装nginx-extras包:
apt-get install nginx-extras
之后运行
nginx -V
再次 - 上传进度模块现在应该出现在输出中:
root@server1:/var/www# nginx -V
 nginx version: nginx/1.4.4
 TLS SNI support enabled
 configure arguments: --prefix=/usr/share/nginx --conf-path=/etc/nginx/nginx.conf --error-log-path=/var/log/nginx/error.log --http-client-body-temp-path=/var/lib/nginx/body --http-fastcgi-temp-path=/var/lib/nginx/fastcgi --http-log-path=/var/log/nginx/access.log --http-proxy-temp-path=/var/lib/nginx/proxy --http-scgi-temp-path=/var/lib/nginx/scgi --http-uwsgi-temp-path=/var/lib/nginx/uwsgi --lock-path=/var/lock/nginx.lock --pid-path=/run/nginx.pid --with-pcre-jit --with-debug --with-http_addition_module --with-http_dav_module --with-http_flv_module --with-http_geoip_module --with-http_gzip_static_module --with-http_image_filter_module --with-http_mp4_module --with-http_perl_module --with-http_random_index_module --with-http_realip_module --with-http_secure_link_module --with-http_spdy_module --with-http_stub_status_module --with-http_ssl_module --with-http_sub_module --with-http_xslt_module --with-ipv6 --with-mail --with-mail_ssl_module --add-module=/tmp/buildd/nginx-1.4.4/debian/modules/headers-more-nginx-module --add-module=/tmp/buildd/nginx-1.4.4/debian/modules/nginx-auth-pam --add-module=/tmp/buildd/nginx-1.4.4/debian/modules/nginx-cache-purge --add-module=/tmp/buildd/nginx-1.4.4/debian/modules/nginx-dav-ext-module --add-module=/tmp/buildd/nginx-1.4.4/debian/modules/nginx-development-kit --add-module=/tmp/buildd/nginx-1.4.4/debian/modules/nginx-echo --add-module=/tmp/buildd/nginx-1.4.4/debian/modules/ngx-fancyindex --add-module=/tmp/buildd/nginx-1.4.4/debian/modules/nginx-http-push --add-module=/tmp/buildd/nginx-1.4.4/debian/modules/nginx-lua --add-module=/tmp/buildd/nginx-1.4.4/debian/modules/nginx-upload-progress --add-module=/tmp/buildd/nginx-1.4.4/debian/modules/nginx-upstream-fair --add-module=/tmp/buildd/nginx-1.4.4/debian/modules/ngx_http_substitutions_filter_module
 root@server1:/var/www#
要激活模块,我们需要在nginx.conf (在http {}容器中)创建一个小区域,用于跟踪上传(在本示例中我命名区域上传 ):
vi /etc/nginx/nginx.conf
[...]
http {
[...]
        # reserve 1MB under the name 'uploads' to track uploads
        upload_progress uploads 1m;
[...]
}
[...] |
之后重新加载nginx:
/etc/init.d/nginx reload
2配置Vhost
现在打开您的vhost配置文件,并将以下内容放在服务器{}容器中(如果您使用ISPConfig,将其放在网站的nginx指令字段中):
[...]
client_max_body_size 100M;
location = /upload.php {
   try_files $uri =404;
   include /etc/nginx/fastcgi_params;
   fastcgi_pass unix:/var/lib/php5-fpm/web1.sock;
   fastcgi_index index.php;
   fastcgi_param SCRIPT_FILENAME $document_root$fastcgi_script_name;
   fastcgi_intercept_errors on;
   ## Track uploads for this location on the zone defined
   ## above with a 60 seconds timeout.
   track_uploads uploads 60s;
}
location ^~ /progress {
   upload_progress_json_output;
   report_uploads uploads;
}
[...] |
在我的情况下,处理上传的文件(即,HTML上传表单的action属性中的文件)称为upload.php ,并驻留在文档根目录中。 如果您的文件命名不同,请调整位置= /upload.php {相应地。 还要确保您使用正确的fastcgi_pass选项为您的网站(您可能会使用另一个套接字,而不是我在这里使用,或者您使用TCP连接而不是套接字)。
在track_uploads行中,您必须使用第1章中的upload_progress区域的名称(在本例中为上传 )。
位置^〜/进度{}容器必须采用字面意思,这意味着不要更改它(如果您的upload_progress区域未命名上传 ,则应更改report_uploads行)。 该位置将用于轮询nginx文件上传的状态。
重新加载nginx之后(除非你使用重新加载的ISPConfig):
/etc/init.d/nginx reload
3建立上传表单
接下来,我们需要一个上传表单,其中包含一些JavaScript,用于在上传期间轮询进度位置。 我的文件看起来像这样 - 将其命名为index.html , upload.html等,并将其放在文档根目录中:
<!DOCTYPE html PUBLIC "-//W3C//DTD XHTML 1.1//EN" "http://www.w3.org/TR/xhtml11/DTD/xhtml11.dtd">
<html xmlns="http://www.w3.org/1999/xhtml" dir="ltr" xml:lang="de">
<head>
    <title>nginx Upload Progress</title>
    <style>
        body {
            font-family: arial;
            font-size: 11px;
        }
        #statbar_box {
            width: 500px;
            height: 20px;
            background-color: #FFF;
            position: relative;
            text-align: center;
            margin-bottom: 12px;
            display: none;
            border-radius: 4px;
        }
        #statbar_bar {
            position: absolute;
            height: 20px;
            top: 0px;
            background-color: darkred;
            text-align: center;
            z-index: 100;
            border-radius: 4px;
        }
        #status {
            margin-bottom: 12px;
            text-align: center;
            width: 500px;
        }
        iframe {
            width: 500px;
            height: 30px;
            margin-bottom: 12px;
            position: absolute;
            top: -300px;
        }
        #footer {
            text-align: center;
            width: 500px;
            background: #ddd;
            padding: 5px;
            border-radius: 4px;
        }
        #base {
            width: 500px;
            padding: 20px;
            background: #EFEFEF;
            border-radius: 4px;
            position: relative;
            margin: auto;
        }
    </style>
    <script src="http://code.jquery.com/jquery-1.8.3.min.js" type="text/javascript"></script>
    <script type="text/javascript">
        (function ($) {
            var interv;
            var test = 1;
            var statbarWidth;
            $(document).ready(function () {
                statbarWidth = $("#statbar_box").width();
                $("#upload").submit(function () {
                                        /* generate random progress-id */
                                        uuid = "";
                                        for (i = 0; i < 32; i++) {
                                                uuid += Math.floor(Math.random() * 16).toString(16);
                                        }
                                        /* patch the form-action tag to include the progress-id */
                                        $("#upload").attr("action", "/upload.php?X-Progress-ID=" + uuid);
                    $("#statbar_bar").css("width", "1px");
                    $("#statbar_box").fadeIn(500);
                    $(this).disabled = false;
                    interv = setInterval(function () {
                        progress(uuid)
                    }, 800);
                });
            });
            var firststart = true;
            function progress(uuid) {
                $.getJSON("progress", {"X-Progress-ID": uuid}, function (data) {
                    console.log(data);
                    if (data.state == 'done') {
                        clearInterval(interv);
                        $("#status").html('100%');
                        $("#statbar_bar").animate({"width": statbarWidth + "px"}).animate({"width": "1px"}, 400, function () {
                            $("#statbar_box").fadeOut(500);
                            $("#status").html('0%');
                        });
                    }
                    var prozent = Math.round((data.received * 100) / data.size);
                    prozent = !prozent?0:prozent;
                    var pixel = Math.round((prozent * statbarWidth) / 100);
                    $("#status").html(prozent + '%');
                    firststart = false;
                    $("#statbar_bar").animate({"width": pixel + "px"});

                });
            }
        })(jQuery);
    </script>
</head>
<body>
<div id="base">
    <?php
    print '- Max. Postsize: ' . ini_get('post_max_size');
    print '<br>';
    print '- Max. Uploadsize: ' . ini_get('upload_max_filesize');
    ?>
    <div id="status">0%</div>
    <div id="statbar_box">
        <div id="statbar_bar"></div>
    </div>
    <iframe src="upload.php" name="hidden_upload" frameborder="0"></iframe>
    <form id="upload" action="upload.php" target="hidden_upload" method="post" enctype="multipart/form-data">
        <div id="footer">
                        <input type="hidden" name="MAX_FILE_SIZE" value="30000000"  />
            <input type="file" name="uploader[]"/>
            <input type="file" name="uploader[]"/>
            <input type="submit"/>
        </div>
    </form>
</div>
</body>
</html> |
接下来将以下upload.php 放在你的文档根目录下:
<?php
if(is_array($_FILES['uploader']['name']) && !empty($_FILES['uploader']['name'])){
        for($i=0;$i<sizeof($_FILES['uploader']['name']);$i++){
                move_uploaded_file($_FILES['uploader']['tmp_name'][$i], 'cache/'.$_FILES['uploader']['name'][$i]);
                echo "File ".$_FILES['uploader']['name'][$i]." uploaded successfully.<br>";
        }
}
?> |
upload.php将上传的文件存储在一个名为cache的目录中,所以不要忘记在文档根目录中创建该目录,并为其提供适当的权限,以便PHP可以写入它。
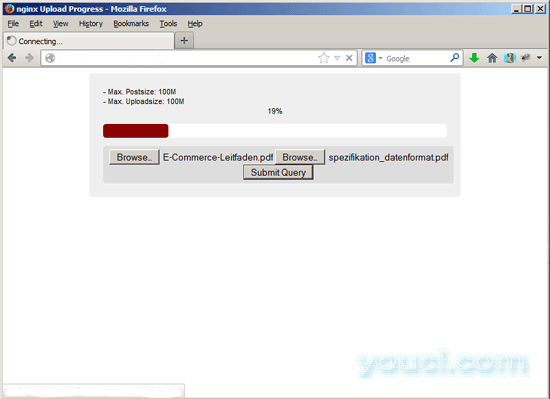
而已。 您现在可以在浏览器中使用上传表单调用该文件,并尝试上传一些文件:

4链接
- nginx上传进度模块: http : //wiki.nginx.org/HttpUploadProgressModule
- nginx: http : //nginx.org
- Debian: http : //www.debian.org


