LEMP是一个缩写,代表以下软件包组合在一起:Linux内核,Nginx Web服务器,MariaDB数据库(或MySQL)和PHP服务器端编程语言)。 这些软件在互联网上的服务器上广泛使用,可以部署动态网站或互动式Web应用程序。
Nginx是一个现代化且资源有效的Web服务器,正在开发中,而Apache HTTP服务器之后最常用于互联网,因为它使用异步事件驱动的方法来处理请求。
本教程将介绍如何在最新版本的Debian 9上安装和配置LEMP(Nginx with MariaDB和PHP7)。
要求
- 最新发布的Debian 9操作系统,可以从以下链接获得https://www.debian.org/CD/http-ftp/ ,从零开始在VPS上安装虚拟机或直接在自己专用的机器上。
- 直接访问服务器的控制台或远程SSH连接
- 配置了机器静态IP地址的网络接口
- 在域名服务商方配置的A和CNAME(www)DNS记录的注册公共域名。 在本指南中,我们将使用linuxbox.cf作为示例域。 服务器的IP地址配置有属于C类私有空间的IP地址,通过主路由器在互联网中NAT-ed。 通过端口将Apache 80和443端口从主路由器转发到内部服务器的IP地址,该域将从互联网上看到。
第1步:初始配置
在第一步,通过root或root用户权限登录系统,并通过发出以下命令来更新Debian 9组件(内核升级,软件包更新和安全修补程序)。
sudo apt update
sudo apt upgrade
sudo apt dist-upgrade
接下来,您通过运行以下命令确保为机器主机名添加描述性名称。 随后,您应该重新启动系统,以便相应地应用新的主机名。
sudo hostnamectl set-hostname hostname.yourdomain.com
sudo init 6
接下来,继续安装net-tools wget,curl和bash-completion实用程序,以便稍后使用它们来轻松管理Debian服务器。
sudo apt install net-tools sudo wget curl bash-completion
第2步:安装Nginx Web服务器
Nginx是一种现代化且资源有效的网络服务器,用于向互联网上的访问者显示网页。 通过在服务器的控制台中运行以下命令,从Debian 9官方存储库安装Nginx Web服务器。
sudo apt-get install nginx
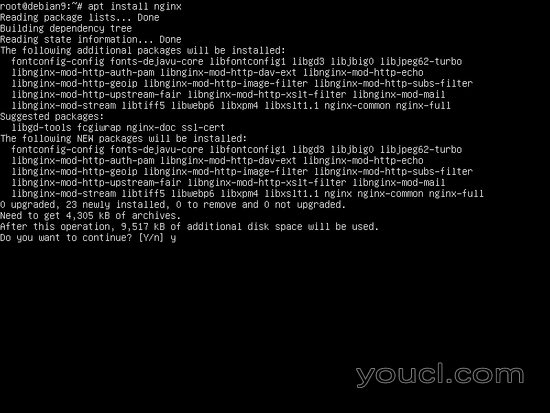
如上图所示,apt包管理器将检查包的其他配置,并询问您是否同意继续安装过程。 为了安装Nginx,回答yes( y )。
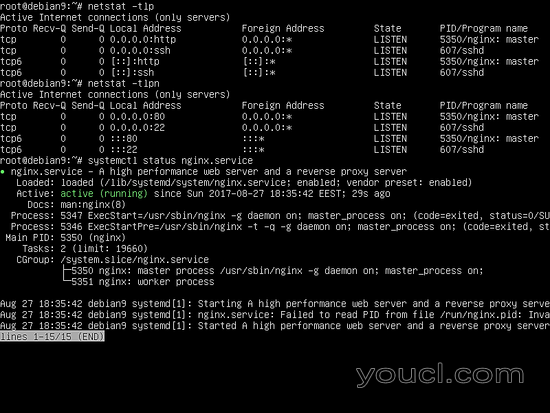
接下来,运行netstat命令,以便在系统上显示网络套接字,并验证nginx守护进程是否正在监听端口80 / TCP。 或者,您可能需要发出systemctl命令,以检查nginx守护程序的状态,如下图所示。
sudo netstat -tlp
sudo netstat –tlpn
sudo systemctl status nginx.service
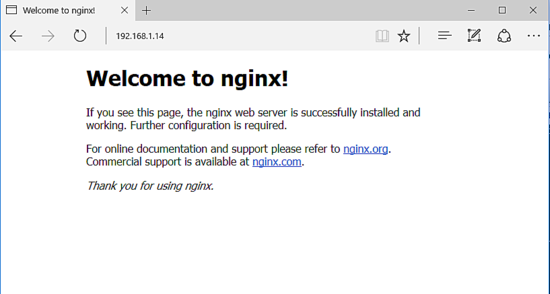
一旦nginx服务器启动并运行在您的系统中,请发出ifconfig命令,以显示网络接口信息并列出机器的IP地址。 然后,通过在浏览器中添加IP地址,打开浏览器并通过HTTP协议访问Nginx默认网页。 应在浏览器窗口中显示“Wellcome to Nginx!”消息。
要么
第3步:激活Nginx HTTP / 2.0协议
默认情况下,Debian 9存储库提供的Nginx二进制文件的最新版本是使用HTTP / 2.0协议构建的。 HTTP / 2.0被并入TSL / SSL协议,可以通过安全的交易来提高网页的负载速度。
默认情况下,所有现代浏览器(如Chrome或Firefox)都应支持此协议。 但是,请注意,Microsoft Internet Explorer和Microsoft Edge浏览器无法解析http2协议。
为了在Debian 9上启用Nginx中的HTTP / 2.0协议,您需要对nginx默认配置文件进行一些更改,或者创建一个新的配置文件,并添加TLS块代码为443服务器。 为了实现这一点,首先通过发出以下命令来备份Nginx站点 - 可用的默认配置。 通过列出站点可用的目录内容来确认备份是否成功。
sudo cp /etc/nginx/sites-available/default{,.backup}
ls /etc/nginx/sites-available/
接下来,使用文本编辑器创建Nginx TLS配置文件,并添加以下内容。
sudo nano /etc/nginx/sites-available/default.ssl
default-ssl文件摘录:
    server {
                listen 443 ssl http2 default_server;
                listen [::]:443 ssl http2 default_server;
                #server_name  www.domain.tld;
                server_name _;

                root /var/www/html;

                access_log /var/log/nginx/access.log;
                error_log /var/log/nginx/error.log;

                #SSL Certificates
                ssl_certificate "/etc/nginx/ssl/cert.pem";
                ssl_certificate_key "/etc/nginx/ssl/privekey.pem";
                ssl_dhparam /etc/nginx/ssl/dhparam.pem;

                ssl_protocols TLSv1 TLSv1.1 TLSv1.2;
                #ssl_ciphers EECDH+CHACHA20:EECDH+AES128:RSA+AES128:EECDH+AES256:RSA+AES256:EECDH+3DES:RSA+3DES:!MD5;

                ssl_session_cache shared:SSL:1m;
                ssl_session_timeout 10m;
                ssl_ciphers HIGH:!aNULL:!MD5;
                ssl_prefer_server_ciphers  on;

                add_header Strict-Transport-Security "max-age=31536000;
                #includeSubDomains" always;

                location / {
                index index.php index.html index.htm;
                    try_files $uri $uri/ /index.php?$args $uri/ =404;
                }

                                set $cache_uri $request_uri;

                location ~ /.well-known {
                allow all;
                               }
               location ~ \.php$ {
                                include snippets/fastcgi-php.conf;
                #
                #             # With php-fpm (or other unix sockets):
                              fastcgi_pass unix:/var/run/php/php7.0-fpm.sock;
                #             # With php-cgi (or other tcp sockets):
                #             fastcgi_pass 127.0.0.1:9000;
                }

                # deny access to .htaccess files, if Apache's document root
                # concurs with nginx's one
                #
                #location ~ /\.ht {
                #             deny all;
                #}
                   }
使用HTTP / 2.0协议的语句由下面的单词http2表示。
listen 443 ssl http2 default_server;
如果访问者的浏览器不支持HTTP2协议,请从服务器配置中删除http2字,以禁用协议并重新启动nginx服务以应用更改。
如果您有注册域名,或者使用基于IP地址的虚拟主机,则应在server_name指令之后添加您的域名或IP地址,如下面的示例所示。
server_name www.linuxbox.cf linuxbox.cf;
使用上述设置完成Nginx默认配置文件的编辑
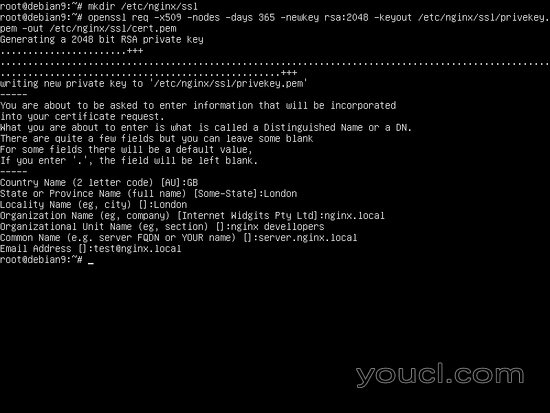
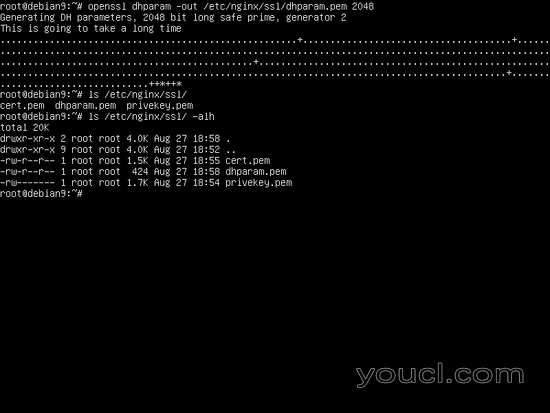
在上述nginx TSL配置文件中,我们指定了TLS证书和密钥的路径。 由于我们实际上还没有安装系统中的密钥,所以请执行以下命令以生成自签名SSL证书文件和密钥。 在生成SSL证书时,系统会提出一系列问题。 为您的国家,州或省,您的城市名称,组织名称,组织的单位名称,服务器的通用名称和有效的电子邮件地址添加两个字母代码。 您应该注意“ 通用名称”设置,使其与DNS服务器的机器FQDN记录或将用于访问网页的服务器IP地址相匹配。 证书和密钥将存储在名为ssl的nginx目录下的新目录中,如下面的屏幕截图所示。
sudo mkdir /etc/nginx/ssl
sudo openssl req -x509 -nodes -days 365 -newkey rsa:2048 -keyout /etc/nginx/ssl/privekey.pem -out /etc/nginx/ssl/cert.pem
ls /etc/nginx/ssl/
另外,生成一个新的强Diffie-Hellman密码,可以在ssl_dhparam语句行的上述配置文件中找到 ,发出以下命令:
sudo openssl dhparam -out /etc/nginx/ssl/dhparam.pem 2048
最后,生成Diffie-Hellman密钥后,通过发出以下命令,通过创建从site-available目录到sites-enabled目录的defult-ssl配置文件的符号链接来激活TLS配置文件。
ln -s /etc/nginx/sites-available/default-ssl /etc/nginx/sites-enabled/
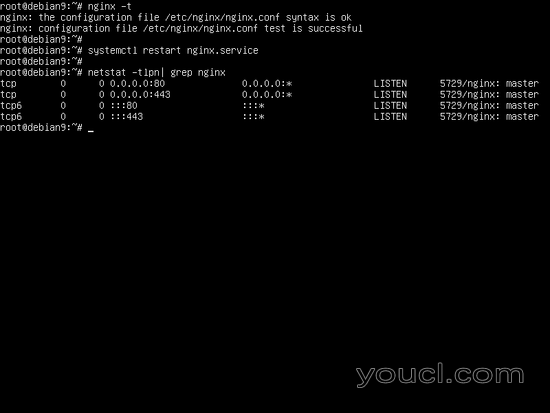
接下来,测试Nginx配置文件的语法错误,如果一切正常,重新启动Nginx守护程序,以通过运行以下命令应用所有更改。
sudo nginx -t
sudo systemctl restart nginx.service
为了确认Nginx Web服务器是否在SSL端口上绑定,请执行netstat命令并检查端口443是否以监听模式显示。
netstat –tlpn | grep nginx
以下屏幕截图显示了上述步骤。
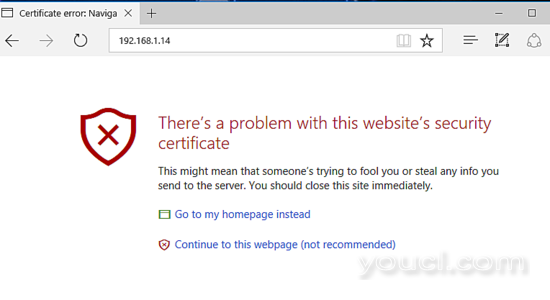
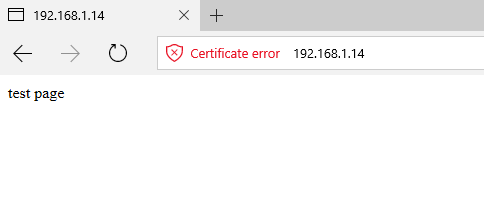
然后,从浏览器通过HTTP协议导航到您的域名或服务器的IP地址,以显示nginx默认页面。 因为您使用自签名证书,所以您的浏览器中应该会显示错误。 确认错误,以传递到nginx默认主页面。
如果Nginx在webroot目录中没有提供默认的index.html页面,请执行以下命令创建索引页面。
echo "test page" | tee /var/www/html/index.html
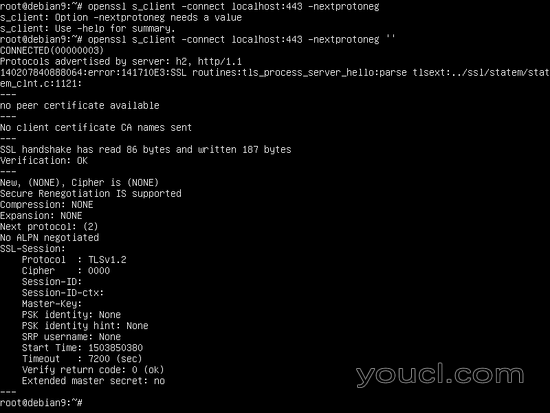
为了确认Nginx发布的HTTP / 2.0协议的存在,请发出以下命令。 在服务器发布的协议中查找h2字。
openssl s_client -connect localhost:443 -nextprotoneg ''
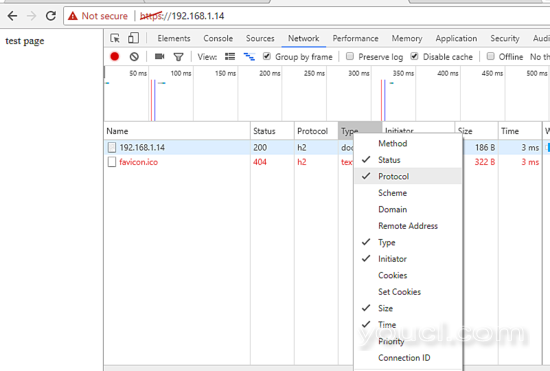
您还可以通过按F12功能键查询连接的状态,并检查Nginx是否通过Chrome浏览器发布http2协议,并请求页面。 为了显示请求使用的协议,请转到网络选项卡,右键单击类型菜单并检查协议文件。 HTTP2协议应在当前协议列中显示为h2 ,如下图所示。
第4步:安装PHP7.0
Nginx Web服务器可以通过PHP FastCGI进程管理器的PHP编程语言解释器的帮助来提供动态Web内容,Nginx传递处理请求。 FastCGI进程管理器可以通过安装Debian 9官方存储库提供的php-fpm预编译包来获得。
为了在系统中安装php-fpm进程管理器和PHP7.0解释器,以及允许PHP与Nginx Web服务器进行通信的其他软件包,请在您的服务器控制台上执行以下命令:
sudo apt install php7.0 php7.0-fpm php7.0-curl php7.0-gd
一旦PHP7.0解释器已经成功安装在系统中,通过发出以下命令启动和检查php7.0-fpm守护程序:
sudo systemctl start php7.0-fpm
sudo systemctl status php7.0-fpm
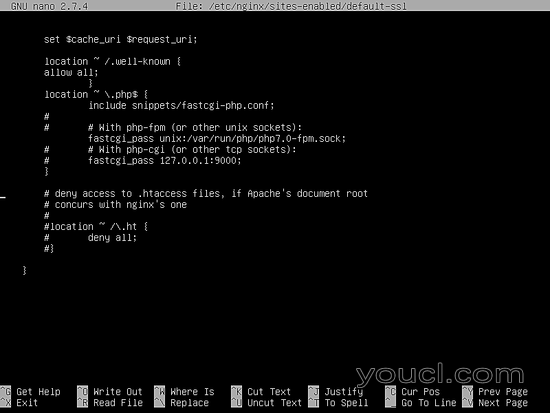
在Nginx的上述TLS配置文件中,我们已经添加了PHP FastCGI进程管理器的块配置,以便提供动态内容。 使用Nginx使用PHP解释器的代码块在下面的摘录中显示,所以不需要进一步修改Nginx TSL配置文件的步骤。 从下面屏幕截图中的行开头的主题标签#符号是注释。 默认情况下,Nginx Web服务器将忽略来自配置文件的注释行。
location ~ \.php$ {
include snippets/fastcgi-php.conf;
fastcgi_pass unix:/run/php/php7.0-fpm.sock;
}
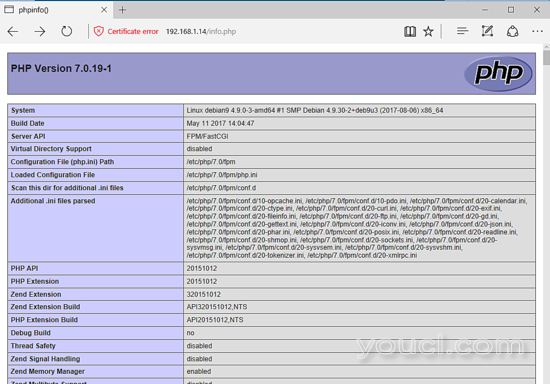
为了测试和验证,如果Nginx可以正确地传递php文件到PHP处理器,通过发出以下命令创建一个PHP info.php测试配置文件
sudo su -c 'echo "<?php phpinfo(); ?>" > /var/www/html/info.php'
然后,通过浏览您的服务器的域名或公共IP地址,然后访问/info.php ,访问php信息页面,如下图所示。
https://www.linuxbox.cf/info.php
要么
您还可以通过搜索PHP变量上的$ _SERVER ['SERVER_PROTOCOL']行来检查服务器是否发布HTTP / 2.0协议。
要安装其他PHP7.0模块,运行apt search php7.0命令查找特定的PHP模块并进行安装。 如果您计划在LEMP之上安装诸如Wordpress之类的内容管理系统,请执行以下命令来安装一些额外的PHP模块。
sudo apt install php7.0-mcrypt php7.0-mbstring
但是,新安装的PHP模块默认情况下未启用。 为了激活Nginx新安装的PHP模块,您应该通过发出以下命令重新启动PHP-FPM服务。
sudo systemctl restart php7.0-fpm.service
第5步:安装MariaDB数据库
最后,数据库中最后一块LAMP难题丢失。 MariaDB数据库LEMP组件用于在表和列中存储记录,并动态管理Web应用程序的数据。 为了在Debian 9中安装具有所需PHP模块的MariaDB数据库管理系统以从PHP文件访问数据库,请在服务器的控制台中发出以下命令。 随后,重新启动PHP-FPM守护程序,以激活访问数据库所需的PHP MySQL模块。
sudo apt install mariadb-server mariadb-client php7.0-mysql
sudo systemctl restart php7.0-fpm.service
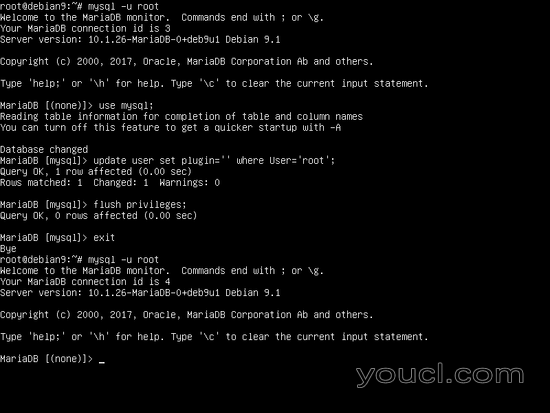
默认情况下,系统root帐户或具有root权限的用户可以访问数据库而不提供密码。 为了改变这种行为,MySQL每次系统用户尝试访问数据库时都要求输入密码,从root用户权限的命令行界面登录MySQL数据库,并在MySQL控制台中执行以下命令:
sudo mysql
MariaDB> use mysql;
MariaDB> update user set plugin='' where User='root';
MariaDB> flush privileges;
MariaDB> exit
在下一步中,确保通过执行Debian拉伸存储库中安装包提供的安全脚本mysql_secure_installation来保护MariaDB。 在运行脚本时会提出一系列设计用于保护MariaDB数据库的问题,例如:更改MySQL root密码,删除匿名用户,禁用远程root登录并删除测试数据库。 通过发出以下命令执行脚本,并确保您对所有问题说出是为了完全保护MySQL守护程序。 使用以下脚本输出,除非作为指导。
sudo mysql_secure_installation
NOTE: RUNNING ALL PARTS OF THIS SCRIPT IS RECOMMENDED FOR ALL MariaDB
SERVERS IN PRODUCTION USE! PLEASE READ EACH STEP CAREFULLY!
In order to log into MariaDB to secure it, we'll need the current
password for the root user. If you've just installed MariaDB, and
you haven't set the root password yet, the password will be blank,
so you should just press enter here.
Enter current password for root (enter for none):
OK, successfully used password, moving on...
Setting the root password ensures that nobody can log into the MariaDB
root user without the proper authorisation.
You already have a root password set, so you can safely answer 'n'.
Change the root password? [Y/n] y
New password:
Re-enter new password:
Password updated successfully!
Reloading privilege tables..
... Success!
By default, a MariaDB installation has an anonymous user, allowing anyone
to log into MariaDB without having to have a user account created for
them. This is intended only for testing, and to make the installation
go a bit smoother. You should remove them before moving into a
production environment.
Remove anonymous users? [Y/n] y
... Success!
Normally, root should only be allowed to connect from 'localhost'. This
ensures that someone cannot guess at the root password from the network.
Disallow root login remotely? [Y/n] y
... Success!
By default, MariaDB comes with a database named 'test' that anyone can
access. This is also intended only for testing, and should be removed
before moving into a production environment.
Remove test database and access to it? [Y/n] y
- Dropping test database...
... Success!
- Removing privileges on test database...
... Success!
Reloading the privilege tables will ensure that all changes made so far
will take effect immediately.
Reload privilege tables now? [Y/n] y
... Success!
Cleaning up...
All done! If you've completed all of the above steps, your MariaDB
installation should now be secure.
Thanks for using MariaDB!
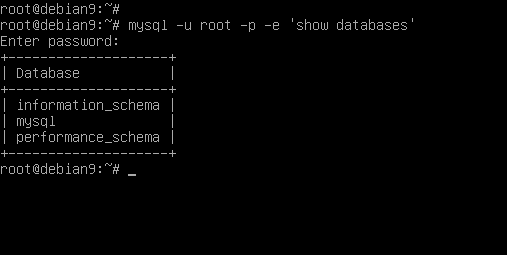
最后,为了测试MariaDB功能,请从控制台登录到数据库并执行以下命令。 默认数据库的列表应显示在MariaDB控制台中。 离开MariaDB控制台与退出语句。
mysql -u root –p
MariaDB [(none)]> show databases;
+--------------------+
| Database           |
+--------------------+
| information_schema |
| mysql              |
| performance_schema |
+--------------------+
3 rows in set (0.00 sec)

MariaDB [(none)]> exit
那一切! 您的Debian 9机器上安装了Nginx Web服务器,MariaDB数据库和PHP编程语言。 您现在可以开始为访问者建立动态网站或Web应用程序。


