单点登录是一项伟大的技术。 要求用户登录到多个应用程序是巨大的麻烦,鼓励密码重用和简单的密码。 安全需要关注可用性。 如果您可以使用户的生活更好,同时提高安全性,每个人都将赢得胜利。在这方面,我们将如何使用
WiKID强认证服务器设置
开源CAS SSO产品,用于会话的双因素身份验证和用于主机身份验证的
相互https身份验证。 显然,对于登录使用双因素身份验证会增加安全性,因为用户必须具有获取访问权限的因素,在这种情况下,知道PIN和拥有嵌入在令牌中的私钥。 不太明显的是强大的相互认证的好处。 WiKID通过使用一次性密码下载CAS网站的SSL证书的哈希值。 在呈现OTP之前,令牌将通过用户的连接进入CAS URL,抓取SSL证书并对其进行散列。 如果哈希匹配,则显示OTP,并将默认浏览器启动到CAS URL。 如果它们不匹配,则存在潜在的攻击,并且用户收到错误,指出URL已更改。 由于Wi-Fi无处不在,MiTM攻击更容易执行。 CAS服务器在Ubuntu 11.04服务器上运行,并且正在使用Radius与WiKID Strong Authentication Server Enterprise Edition进行通信。
 单击添加或修改并输入共享密钥。 确保共享密钥与
 现在我们来添加相互的https身份验证。 请注意,目前,相互的https身份验证仅支持端口443 - 假定此产品正在惠及无法检测到MiTM攻击或验证证书的普通用户。 转到WiKIDAdmin上的域选项卡,然后编辑或创建您要使用的域。 在注册URL下,您的CAS服务器的URL:
 WiKID服务器将转到该URL并存储SSL证书的散列。 请注意: Radius做了很多缓存,所以你需要重新启动WiKID。 如果WiKID控制防火墙,这也将打开一个到CAS服务器的端口。 从WiKID服务器的命令行运行:
构建CAS和cas.war文件
首先,CAS是用Maven构建的,所以你需要安装它:sudo apt-get install maven2接下来 从站点下载最新版本的 CAS 。 目前的版本是3.4.11。
wget http://downloads.jasig.org/cas/cas-server-3.4.11-release.tar.gz
untar cas-server-3.4.11-release.tar.gz
编辑pom.xml
cd cas-server-3.4.11/cas-server-webapp/
vim pom.xml我添加了以下依赖项以添加对radius的支持:
<dependency>
     <groupId>${project.groupId}</groupId>
     <artifactId>cas-server-support-radius</artifactId>
     <version>${project.version}</version>
</dependency>
编辑deployerContext.xml
vim src/main/webapp/WEB-INF/deployerConfigContext.xml在此文件中,您需要注释掉SimpleTestUsernamePasswordAuthenticationHandler,这是用于演示目的,并添加有关您的radius配置的信息。 这些bean列在验证处理程序下。
<property name="authenticationHandlers">
            <list>
                <!--
                    | This is the authentication handler that authenticates services by means of callback via SSL, thereby validating
                    | a server side SSL certificate.
                    +-->
                <bean class="org.jasig.cas.authentication.handler.support.HttpBasedServiceCredentialsAuthenticationHandler"
                    p:httpClient-ref="httpClient" />
                <!--
                    | This is the authentication handler declaration that every CAS deployer will need to change before deploying CAS
                    | into production.  The default SimpleTestUsernamePasswordAuthenticationHandler authenticates UsernamePasswordCredentials
                     | where the username equals the password.  You will need to replace this with an AuthenticationHandler that implements your
                    | local authentication strategy.  You might accomplish this by coding a new such handler and declaring
                    | edu.someschool.its.cas.MySpecialHandler here, or you might use one of the handlers provided in the adaptors modules.
                    +-->
<!--                <bean
                    class="org.jasig.cas.authentication.handler.support.SimpleTestUsernamePasswordAuthenticationHandler" /> -->

  <bean  class="org.jasig.cas.adaptors.radius.authentication.handler.support.RadiusAuthenticationHandler">
    <property name="servers">
        <bean class="org.jasig.cas.adaptors.radius.JRadiusServerImpl">
            <constructor-arg index="0" value="10.100.0.170" />
            <constructor-arg index="1" value="secret" />
            <constructor-arg index="2">
                <bean    class="net.jradius.client.auth.PAPAuthenticator" />
    </constructor-arg>
        </bean>
      </property>
   </bean>
     </list>
     </property>
</bean>
在这个例子中,CAS服务器正在与WiKID服务器直接交谈。 您也可以使用半径服务器,例如CAS和WiKID之间的freeradius或NPS进行授权。 如果您有以上的其中一个,您可以列出服务器的冗余:
<bean
        class="org.jasig.cas.adaptors.radius.authentication.handler.support.RadiusAuthenticationHandler">
        <property
                name="servers">
                <list>
                        <bean
                                class="org.jasig.cas.adaptors.radius.JRadiusServerImpl">
                                <constructor-arg index="0" value="10.100.0.170" />
                                <constructor-arg index="1" value="secret" />
                                <constructor-arg index="2">
                                        <bean
                                                class="net.jradius.client.auth.PAPAuthenticator" />
                                </constructor-arg>
                        </bean>
                        <bean
                                class="org.jasig.cas.adaptors.radius.JRadiusServerImpl">
                                <constructor-arg index="0" value="10.100.0.171" />
                                <constructor-arg index="1" value="secret" />
                                <constructor-arg index="2">
                                        <bean
                                                class="net.jradius.client.auth.PAPAuthenticator" />
                                </constructor-arg>
                        </bean>
                </list>
        </property>
        <property
                name="failoverOnException"
                value="true" />
</bean>
请注意,半径的CAS文档中有一个错误。 如果您收到以下错误:
Caused by: org.springframework.beans.factory.BeanCreationException: Error creating bean with name 'org.jasig.cas.adaptors.radius.JRadiusServerImpl#1dd7736' defined in ServletContext resource [/WEB-INF/deployerConfigContext.xml]: Cannot create inner bean 'net.sf.jradius.client.auth.PAPAuthenticator#1c958af' of type [net.sf.jradius.client.auth.PAPAuthenticator] while setting constructor argument; nested exception is org.springframework.beans.factory.CannotLoadBeanClassException: Cannot find class [net.sf.jradius.client.auth.PAPAuthenticator] for bean with name 'net.sf.jradius.client.auth.PAPAuthenticator#1c958af' defined in ServletContext resource [/WEB-INF/deployerConfigContext.xml]; nested exception is java.lang.ClassNotFoundException: net.sf.jradius.client.auth.PAPAuthenticator这是由于使用过时的行“
<bean class =”net.sf.jradius.client.auth.PAPAuthenticator“/> ”而不是“
<bean class =”net.jradius.client.auth.PAPAuthenticator“/> ” 。
配置Tomcat
首先下载最新的tomcat并解压缩。 在撰写本文时,是7.0.22。 我们将调用此目录$ tomcathome 。
sudo tar -xzvf apache-tomcat-7.0.22.tar.gz创建SSL密钥库:
keytool -genkey -alias tomcat -keyalg RSA您可能需要导入签署的生产证书,但这将用于测试。 编辑
$ tomcathome / conf / server.xml文件以创建SSL端口。
sudo vim conf/server.xml创建监听器:
    <Connector port="443" protocol="HTTP/1.1" SSLEnabled="true"
               maxThreads="150" scheme="https" secure="true"
               keystoreFile="/path/to/.keystore"
               keystorePass="keystorePassphrase"
               clientAuth="false" sslProtocol="TLS" />
    <Connector port="443" protocol="HTTP/1.1" SSLEnabled="true"
               maxThreads="150" scheme="https" secure="true"
               keystoreFile="/path/to/.keystore"
               keystorePass="keystorePassphrase"
               clientAuth="false" sslProtocol="TLS" />
启动tomcat:
sudo $tomcathome/bin/startup.sh如果一切顺利,您应该在8443端口上有一个监听器:
sudo netstat -anp | grep 8443
tcp6 0 0 :::8443 :::* LISTEN 10105/java将war文件复制到tomcat的webapps目录中将会部署它:
cp /home/username/cas-server-3.4.11/cas-server-webapp/target/cas.war $tomcathome/webapps/如果你看到
$ tomcathome / logs / catalina.out ,你应该看到这一行:
“INFO:部署Web应用程序归档cas.war” 。
配置WiKID
添加半径网络客户端
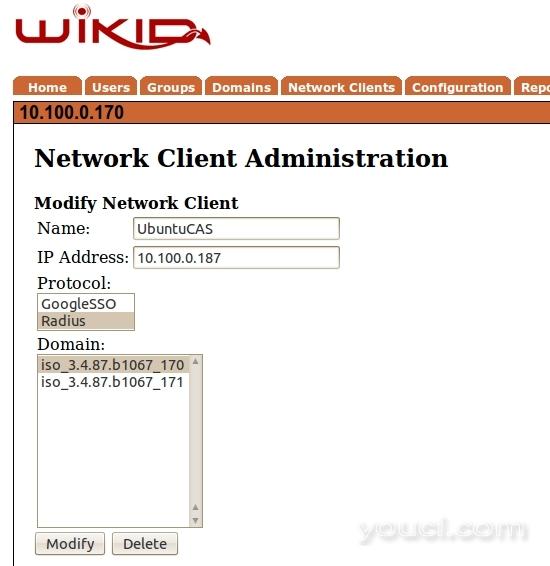
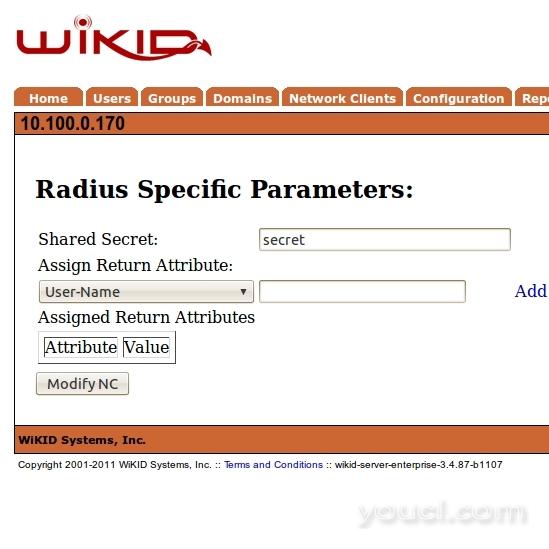
有关设置WiKID服务器的完整说明, 请点击此处 。 我们只会覆盖网络客户端部分。 CAS服务器将是WiKID强认证服务器的半径网络客户端。 在WiKIDAdmin Web ui上,获取网络客户端选项卡,选择“创建新的网络客户端”,然后输入适合您的CAS服务器的信息,选择RADIUS作为协议。 单击添加或修改并输入共享密钥。 确保共享密钥与
deployerContext.xml文件中的
一样 。 将返回属性留空。
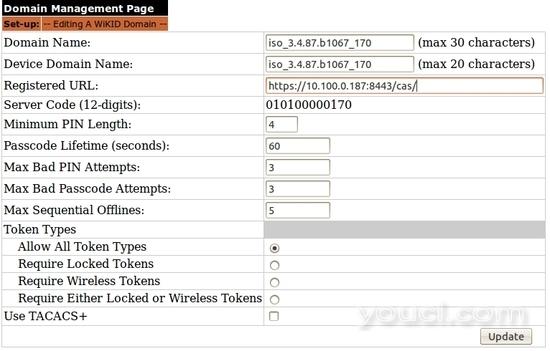
现在我们来添加相互的https身份验证。 请注意,目前,相互的https身份验证仅支持端口443 - 假定此产品正在惠及无法检测到MiTM攻击或验证证书的普通用户。 转到WiKIDAdmin上的域选项卡,然后编辑或创建您要使用的域。 在注册URL下,您的CAS服务器的URL:
WiKID服务器将转到该URL并存储SSL证书的散列。 请注意: Radius做了很多缓存,所以你需要重新启动WiKID。 如果WiKID控制防火墙,这也将打开一个到CAS服务器的端口。 从WiKID服务器的命令行运行:
wikidctl restart


