OTRS或开源机票申请系统是用于客户服务,帮助台和IT服务管理的开源票务软件。 该软件是用Perl和javascript编写的。 对于必须管理票据,投诉,支持请求或其他类型的报告的公司和组织,这是一个票务解决方案。 OTRS支持包括MySQL,PostgreSQL,Oracle和SQL Server在内的多个数据库系统,它是可以安装在Windows和Linux上的多平台软件。
在本教程中,我将向您展示如何在Ubuntu 16.04上安装和配置OTRS。 我将使用PostgreSQL作为OTRS的数据库,将Apache Web服务器用作Web服务器。
先决条件
- Ubuntu 16.04。
- 最小2GB内存
- 根权限
第1步 - 安装Apache和PostgreSQL
在第一步中,我们将安装Apache Web服务器和PostgreSQL。 我们将使用ubuntu存储库中的最新版本。
使用SSH登录到您的Ubuntu服务器:
ssh root@192.168.33.14
更新Ubuntu信息库。
sudo apt-get update
安装Apache2和PostgreSQL与apt:
sudo apt-get install -y apache2 libapache2-mod-perl2 postgresql
然后通过检查服务器端口确保Apache和PostgreSQL正在运行。
netstat -plntu
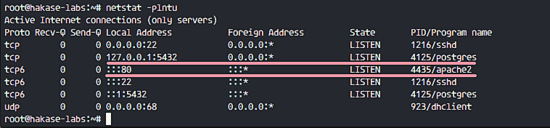
您将看到apache使用端口80,postgresql数据库使用端口5432。
第2步 - 安装Perl模块
OTRS基于Perl,所以我们需要安装OTRS所需的一些Perl模块。
使用此apt命令为OTRS安装perl模块:
sudo apt-get install -y libapache2-mod-perl2 libdbd-pg-perl libnet-dns-perl libnet-ldap-perl libio-socket-ssl-perl libpdf-api2-perl libsoap-lite-perl libgd-text-perl libgd-graph-perl libapache-dbi-perl libarchive-zip-perl libcrypt-eksblowfish-perl libcrypt-ssleay-perl libencode-hanextra-perl libjson-xs-perl libmail-imapclient-perl libtemplate-perl libtemplate-perl libtext-csv-xs-perl libxml-libxml-perl libxml-libxslt-perl libpdf-api2-simple-perl libyaml-libyaml-perl
安装完成后,我们需要为apache激活Perl模块,然后重新启动apache服务。
a2enmod perl
systemctl restart apache2
接下来,检查apache模块是否加载了以下命令:
apachectl -M | sort
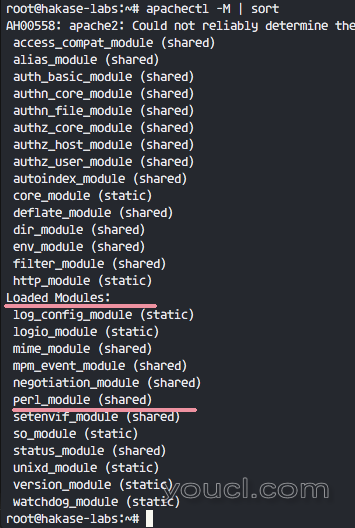
而您将在“加载模块”部分中看到perl_module 。
第3步 - 为OTRS创建新用户
OTRS是一个基于Web的应用程序,并在apache Web服务器下运行。 为了获得最佳安全性,我们需要在普通用户(而不是root用户)下运行它。
使用useradd命令创建一个名为'otrs'的新用户:
useradd -r -d /opt/otrs -c 'OTRS User' otrs
-r :将用户作为系统帐户。
-d / opt / otrs :为'/ opt / otrs'上的新用户定义主目录。
-c :评论。
接下来,将otrs用户添加到“www-data”组,因为apache正在“www-data”用户和组下运行。
usermod -a -G www-data otrs
检查在/ etc / passwd文件中otrs用户是否可用。
grep -rin otrs /etc/passwd
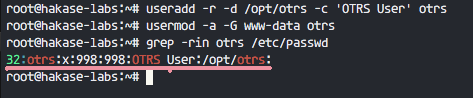
创建OTRS的新用户。
第4步 - 创建和配置数据库
在本节中,我们将为OTRS系统创建一个新的PostgreSQL数据库,并在PostgreSQL数据库配置中进行一些小的更改。
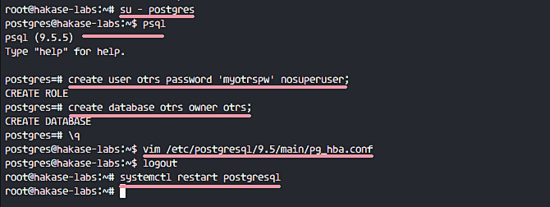
登录到postgres用户并访问PostgreSQL shell。
su - postgres
psql
使用密码' myotrspw '和nosuperuser选项创建名为' otrs '的新角色。
create user otrs password 'myotrspw' nosuperuser;
然后在“ otrs ”用户权限下创建一个名为“ otrs ”的新数据库:
create database otrs owner otrs;
\q
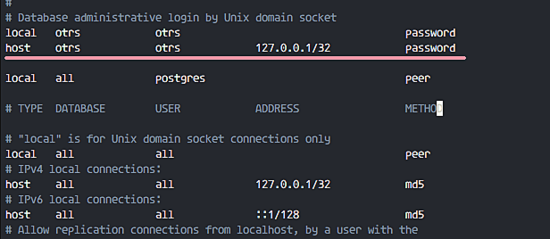
接下来,编辑PostgreSQL配置文件以获取otrs角色身份验证。
vim /etc/postgresql/9.5/main/pg_hba.conf
将第84行后面的cConfiguration粘贴到
local   otrs            otrs                                    password
host    otrs            otrs            127.0.0.1/32            password
保存文件并退出vim。
使用“退出”返回到root权限并重新启动PostgreSQL:
exit
systemctl restart postgresql
PostgreSQL已准备好进行OTRS安装。
第5步 - 下载并配置OTRS
在本教程中,我们将使用OTRS网站上提供的最新的OTRS版本。
转到'/ opt'目录并使用wget命令下载OTRS 5.0:
cd /opt/
wget http://ftp.otrs.org/pub/otrs/otrs-5.0.16.tar.gz
提取otrs文件,重命名目录,并更改所有otrs文件和目录'otrs'用户的所有者。
tar -xzvf otrs-5.0.16.tar.gz
mv otrs-5.0.16 otrs
chown -R otrs:otrs otrs
接下来,我们需要检查系统,并确保它已准备好进行OTRS安装。
使用以下otrs脚本命令检查OTRS安装的系统软件包:
/opt/otrs/bin/otrs.CheckModules.pl
确保所有结果都可以,这意味着我们的服务器可以为OTRS准备。
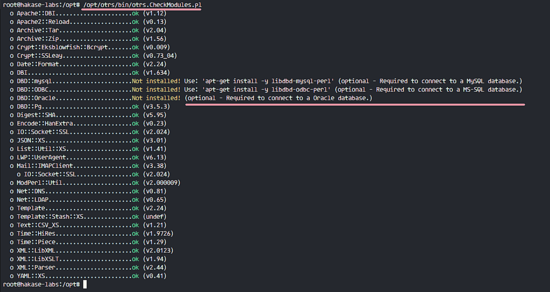
OTRS被下载,我们的服务器已准备好进行OTRS安装。
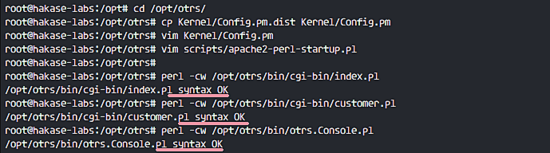
接下来,转到otrs目录并复制配置文件。
cd /opt/otrs/
cp Kernel/Config.pm.dist Kernel/Config.pm
使用vim编辑“Config.pm”文件:
vim Kernel/Config.pm
更改数据库密码第42行:
$Self->{DatabasePw} = 'myotrspw';
评论MySQL数据库支持线45:
# $Self->{DatabaseDSN} = "DBI:mysql:database=$Self->{Database};host=$Self->{DatabaseHost};";
Uncomment PostgreSQL数据库支持49行:
$Self->{DatabaseDSN} = "DBI:Pg:dbname=$Self->{Database};";
保存文件并退出vim。
然后编辑apache启动文件以启用PostgreSQL支持。
vim scripts/apache2-perl-startup.pl
取消第60行和第61行:
# enable this if you use postgresql
use DBD::Pg ();
use Kernel::System::DB::postgresql;
保存文件并退出编辑器。
最后,检查任何缺少的依赖关系和模块。
perl -cw /opt/otrs/bin/cgi-bin/index.pl
perl -cw /opt/otrs/bin/cgi-bin/customer.pl
perl -cw /opt/otrs/bin/otrs.Console.pl
你应该会看到结果是下面的截图中的“ OK ”:
第6步 - 导入样本数据库
在本教程中,我们将使用示例数据库,它在脚本目录中可用。 因此,我们只需要将所有示例数据库和方案导入到在第4步中创建的现有数据库。
登录到postgres用户并转到otrs目录。
su - postgres
cd /opt/otrs/
使用psql命令将数据库和表方案插入为otrs用户。
psql -U otrs -W -f scripts/database/otrs-schema.postgresql.sql otrs
psql -U otrs -W -f scripts/database/otrs-initial_insert.postgresql.sql otrs
psql -U otrs -W -f scripts/database/otrs-schema-post.postgresql.sql otrs
请求时键入数据库密码“ myotrspw ”。

第7步 - 启动OTRS
数据库和OTRS被配置,现在我们可以启动OTRS。
将otrs文件和目录的权限设置为www-data用户和组。
/opt/otrs/bin/otrs.SetPermissions.pl --otrs-user=www-data --web-group=www-data
然后通过创建文件的新符号链接到apache虚拟主机目录来启用otrs apache配置。
ln -s /opt/otrs/scripts/apache2-httpd.include.conf /etc/apache2/sites-available/otrs.conf
启用虚拟主机并重新启动apache。
a2ensite otrs
systemctl restart apache2
确保apache没有错误。

第8步 - 配置OTRS Cronjob
OTRS已经安装,现在在apache web服务器上运行,但是我们仍然需要配置OTRS Cronjob。
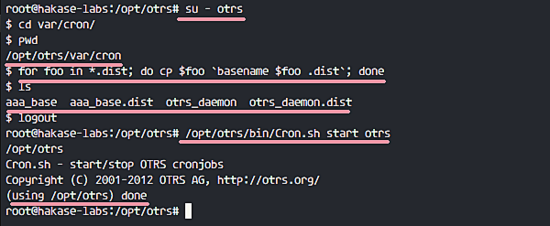
登录到'otrs'用户,然后转到'var / cron'目录作为otrs用户。
su - otrs
cd var/cron/
pwd
使用以下命令复制所有cronjob .dist脚本:
for foo in *.dist; do cp $foo `basename $foo .dist`; done
使用exit返回到root权限,然后以otrs用户身份启动cron脚本。
exit
/opt/otrs/bin/Cron.sh start otrs
接下来,手动为PostMaster创建一个新的cronjob,它将获取电子邮件。 我会配置它tp获取电子邮件每2分钟。
su - otrs
crontab -e
粘贴以下配置:
*/2 * * * * $HOME/bin/otrs.PostMasterMailbox.pl >> /dev/null
保存并退出。
现在停止otrs守护进程并重新启动它。
bin/otrs.Daemon.pl stop
bin/otrs.Daemon.pl start
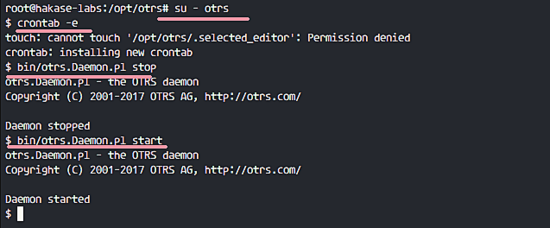
OTRS安装和配置完成。
第9步 - 测试OTRS
打开您的Web浏览器并键入您的服务器IP地址:
使用默认用户“ root @ localhost ”和密码“ root ”进行登录。
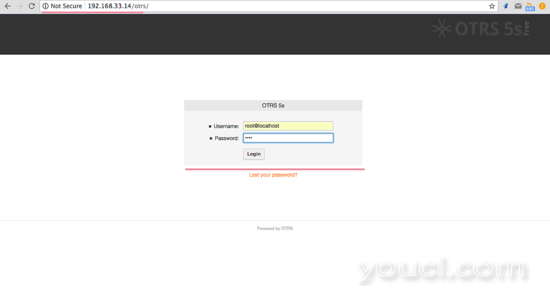
您将看到有关使用默认root帐户的警告。 单击该警告消息以创建新的admin root用户。
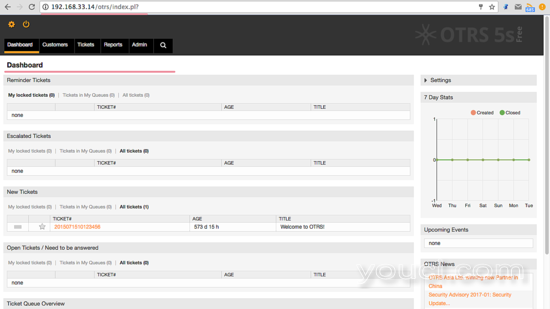
在使用不同的admin root用户登录后,在管理页面下方,并且没有错误信息。
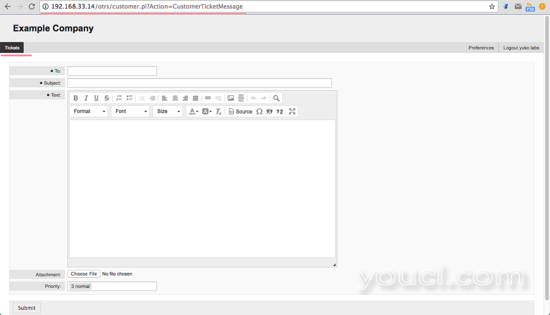
如果您想以客户身份登录,可以使用'customer.pl'。
http://192.168.33.14/otrs/customer.pl
您将看到客户登录页面。 输入客户的用户名和密码。

以下是创建新票证的客户页面。
第10步 - 故障排除
如果仍然出现'OTRS守护程序未运行'的错误,则可以在OTRS守护程序中启用这样的调试。
su - otrs
cd /opt/otrs/
停止OTRS守护进程:
bin/otrs.Daemon.pl stop
并使用--debug选项启动OTRS守护程序。
bin/otrs.Daemon.pl start --debug


