OTRS(开源故障单系统软件)是一种复杂的开源软件,用于公司改进与客户支持,帮助台,呼叫中心等相关的操作。 OTRS是在PERL中编写的,并提供以下重要功能:
- 客户可以通过客户门户和每个队列(Attendants / Technicians post box)的电子邮件,电话和传真来注册和创建/与票务交互。
- 门票可以由他们的优先权,转让,传送和后续管理。 票据可以拆分,合并,可以应用批量操作,并且可以设置彼此的链接和通知。 服务可以通过服务目录进行配置。
- 要增加团队能力,可以配置自动电子邮件(自动答案),文本模板和签名。 系统支持票据上的注释和附件。
- 其他功能包括:统计和报告(CSV / PDF),SLA等许多功能。
环境
本文介绍了OTRS 5的安装和基本配置。 本文是基于以下环境编写的:具有CENTOS 7最小,2GB RAM,8GB高清和2个网络接口(仅主机和NAT)的虚拟盒VM。
制备
假设您使用Centos 7 Minimal的全新安装,要安装OTRS,请运行以下命令更新系统并安装附加软件包:
yum update
Transaction Summary ================================================================================ Install 1 Package Upgrade 39 Packages Total download size: 91 M Is this ok [y/d/N]: y
安装文本编辑器或使用VI。 在本文中,我们使用VIM,运行以下命令来安装它:
yum install vim
要安装WGET软件包,请运行以下命令:
yum install wget
要配置Centos 7网络,请运行以下命令打开NMTUI(网络管理器文本用户界面)工具,并编辑接口和主机名(如果需要):
nmtui
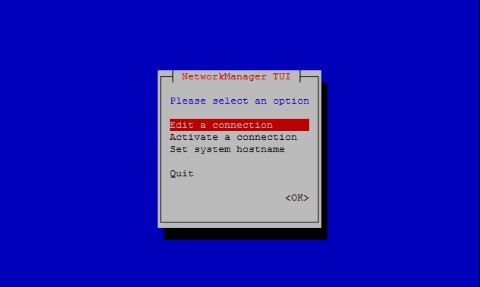
在CentOS 7上设置网络设置和主机名后,运行以下命令应用更改:
service networks restart
要验证网络信息,请运行以下命令:
ip addr
输出在我的系统上看起来像这样:
1: lo: <LOOPBACK,UP,LOWER_UP> mtu 65536 qdisc noqueue state UNKNOWN qlen 1
    link/loopback 00:00:00:00:00:00 brd 00:00:00:00:00:00
    inet 127.0.0.1/8 scope host lo
       valid_lft forever preferred_lft forever
    inet6 ::1/128 scope host
       valid_lft forever preferred_lft forever
2: enp0s3: <BROADCAST,MULTICAST,UP,LOWER_UP> mtu 1500 qdisc pfifo_fast state UP qlen 1000
    link/ether 08:00:27:67:bc:73 brd ff:ff:ff:ff:ff:ff
    inet 10.0.2.15/24 brd 10.0.2.255 scope global dynamic enp0s3
       valid_lft 84631sec preferred_lft 84631sec
    inet6 fe80::9e25:c982:1091:90eb/64 scope link
       valid_lft forever preferred_lft forever
3: enp0s8: <BROADCAST,MULTICAST,UP,LOWER_UP> mtu 1500 qdisc pfifo_fast state UP qlen 1000
    link/ether 08:00:27:68:88:f3 brd ff:ff:ff:ff:ff:ff
    inet 192.168.56.101/24 brd 192.168.56.255 scope global dynamic enp0s8
       valid_lft 1044sec preferred_lft 1044sec
    inet6 fe80::a00:27ff:fe68:88f3/64 scope link
       valid_lft forever preferred_lft forever
在Centos 7上禁用SELINUX(安全增强型Linux),编辑以下配置文件:
vim /etc/selinux/config"/etc/selinux/config" 14L, 547C# This file controls the state of SELinux on the system. # SELINUX= can take one of these three values: # enforcing - SELinux security policy is enforced. # permissive - SELinux prints warnings instead of enforcing. # disabled - No SELinux policy is loaded. SELINUX=enforcing # SELINUXTYPE= can take one of three two values: # targeted - Targeted processes are protected, # minimum - Modification of targeted policy. Only selected processes are prootected. # mls - Multi Level Security protection. SELINUXTYPE=targeted
将指令SELINUX的值更改为禁用 ,保存文件并重新启动服务器。
要在Centos 7上检查SELinux的状态,请运行以下命令:
getenforce
输出必须是:
Disabled
在Centos 7上安装MariaDB
要在Centos 7上安装MariaDB,请运行以下命令:
yum -y install mariadb-server
在以下目录中创建名称为zotrs.cnf的文件:
/etc/my.cnf.d/
要创建和编辑文件,请运行以下命令:
vim /etc/my.cnf.d/zotrs.cnf
使用以下内容填写文件并保存:
max_allowed_packet = 20M
query_cache_size = 32M
innodb_log_file_size = 256M
要启动MariaDB,请运行以下命令:
systemctl start mariadb
要增加MariaDB的安全性,请运行以下命令:
/usr/bin/mysql_secure_installation
设置以下输出的选项:
NOTE: RUNNING ALL PARTS OF THIS SCRIPT IS RECOMMENDED FOR ALL MariaDB
      SERVERS IN PRODUCTION USE!  PLEASE READ EACH STEP CAREFULLY!

In order to log into MariaDB to secure it, we'll need the current
password for the root user.  If you've just installed MariaDB, and
you haven't set the root password yet, the password will be blank,
so you should just press enter here.

Enter current password for root (enter for none):<Press Enter>
OK, successfully used password, moving on...

Setting the root password ensures that nobody can log into the MariaDB
root user without the proper authorisation.

Set root password? [Y/n] <Press Y>
设置root密码:
New password:
Re-enter new password:
Password updated successfully!
Reloading privilege tables..
 ... Success!

By default, a MariaDB installation has an anonymous user, allowing anyone
to log into MariaDB without having to have a user account created for
them.  This is intended only for testing, and to make the installation
go a bit smoother.  You should remove them before moving into a
production environment.

Remove anonymous users? [Y/n] <Press Y>
 ... Success!

Normally, root should only be allowed to connect from 'localhost'.  This
ensures that someone cannot guess at the root password from the network.

Disallow root login remotely? [Y/n] <Choose acording your needs>
 ... Success!

By default, MariaDB comes with a database named 'test' that anyone can
access.  This is also intended only for testing, and should be removed
before moving into a production environment.

Remove test database and access to it? [Y/n] <Press Y>
 - Dropping test database...
 ... Success!
 - Removing privileges on test database...
 ... Success!

Reloading the privilege tables will ensure that all changes made so far
will take effect immediately.

Reload privilege tables now? [Y/n] <Press Y>
 ... Success!

Cleaning up...

All done!  If you've completed all of the above steps, your MariaDB
installation should now be secure.

Thanks for using MariaDB!
设置MariaDB在启动时自动启动:
systemctl enable mariadb.service
要下载OTRS,请运行以下命令:
wget http://ftp.otrs.org/pub/otrs/RPMS/rhel/7/otrs-5.0.15-01.n oarch.rpm
安装EPEL
在安装OTRS之前,请在Centos 7上设置EPEL仓库。运行以下命令:
[root@centos7 ~]# yum -y http://mirror.globo.com/epel/7/x86_64/e/epel-r release-7-9.noarch.rpm
安装OTRS
使用以下命令安装OTRS:
yum install -nogpgcheck otrs-5.0.15-01.noarch.rpm
将安装软件包列表,例如。 Apache和所有依赖关系将自动解决,在输出结束时按Y:
Transaction Summary
================================================================================
Install  1 Package (+143 Dependent packages)

Total size: 148 M
Total download size: 23 M
Installed size: 181 M
Is this ok [y/d/N]: y
要启动Apache(httpd),请运行以下命令:
systemctl start httpd.service
要使用Centos7上的systemd启用Apache(httpd)启动,请运行以下命令:
systemctl enable httpd.service
在Apache中启用SSL并配置SelfSigned证书。 安装Apache HTTP Server的Mod_SSL 模块 ,运行以下命令:
yum -y install mod_ssl
要生成自签名SSL证书,请转到以下目录:
cd /etc/pki/tls/certs/
并运行以下命令生成密钥(centos7.key是我的证书的名称,随时更改它):
make centos7.key
umask 77 ; \ /usr/bin/openssl genrsa -aes128 2048 > centos7.key Generating RSA private key, 2048 bit long modulus .+++ .........................................................................................+++ e is 65537 (0x10001) Enter pass phrase: <Insert your Own Password>
Verifying - Enter pass phrase:<Retype the Password>
要使用OpenSSL生成服务器SSL私钥,请运行以下命令:
openssl rsa -in centos7.key -out centos7.key
Enter pass phrase for centos7.key: <Type the Password> writing RSA key
运行以下命令创建CSR (证书签名请求)文件( centos7.csr是我的证书的名称,随意更改 ):
make centos7.csr
填写满足您需求的问题:
umask 77 ; \ /usr/bin/openssl req -utf8 -new -key centos7.key -out centos7.csr You are about to be asked to enter information that will be incorporated into your certificate request. What you are about to enter is what is called a Distinguished Name or a DN. There are quite a few fields but you can leave some blank For some fields there will be a default value, If you enter '.', the field will be left blank. -----
Country Name (2 letter code) [XX]:
State or Province Name (full name) []:
Locality Name (eg, city) [Default City]:
Organization Name (eg, company) [Default Company Ltd]:
Organizational Unit Name (eg, section) []:
Centos7 Common Name (eg, your name or your server's hostname) []:
Email Address []:
Please enter the following 'extra' attributes to be sent with your certificate request A challenge password []: <press enter>
An optional company name []:
使用OpenSSL 工具为服务器生成CSR(证书签名请求):
openssl x509 -in centos7.csr -out centos7.crt -req -signkey centos7.key
输出为:
Signature ok subject=/C=BR/ST=SP/L=Campinas/O=Centos7/OU=Centos7/CN=centos7.local Getting Private key
在编辑ssl.conf文件之前,请使用以下命令创建该文件的副本:
cp /etc/httpd/conf.d/ssl.conf /etc/httpd/conf.d/ssl.conf.old
然后编辑文件:
vim /etc/httpd/conf.d/ssl.conf
查找以下指令,取消注释每一个,并编辑它们:
SSLCertificateKeyFile /etc/pki/tls/certs/centos7.key
SSLCertificateFile /etc/pki/tls/certs/centos7.csr
SSLProtocol -All +TLSv1 +TLSv1.1 +TLSv1.2
ServerName centos7.local:443
使用以下命令重新启动Apache:
systemctl restart httpd
要强制OTRS以https模式运行,请编辑以下文件:
vim /etc/httpd/conf/httpd.conf
在文件末尾,不符合以下指令:
IncludeOptional conf.d/*.conf
编辑文件zzz_otrs.conf :
vim /etc/httpd/conf.d/zzz_otrs.conf
第26行(在模块mod_version.c之前)添加以下指令:
RewriteEngine On
RewriteCond %{HTTPS} off
RewriteRule (.*) https://%{HTTP_HOST}%{REQUEST_URI}
重新启动Apache:
[root@centos7 ~]# systemctl restart httpd
要在OTRS中使用扩展功能,我们必须安装一些PERL模块。 运行以下命令安装它们:
yum -y install "perl(Text::CSV_XS)" "perl(Crypt::Eksblowfish::Bcrypt)" "perl(YAML::XS)" "perl(JSON::XS)" "perl(Encode::HanExtra)" "perl(Mail::IMAPClient)" "perl(ModPerl::Util)"
OTRS系统有一个检查PERL模块的工具,运行它来验证系统要求:
cd /opt/otrs/bin
运行:
./otrs.CheckModules.pl
我们的配置输出必须是:
o Apache::DBI......................ok (v1.12) o Apache2::Reload..................ok (v0.13) o Archive::Tar.....................ok (v1.92) o Archive::Zip.....................ok (v1.30) o Crypt::Eksblowfish::Bcrypt.......ok (v0.009) o Crypt::SSLeay....................ok (v0.64) o Date::Format.....................ok (v2.24) o DBI..............................ok (v1.627) o DBD::mysql.......................ok (v4.023) o DBD::ODBC........................Not installed! (optional - Required to connect to a MS-SQL database.) o DBD::Oracle......................Not installed! (optional - Required to connect to a Oracle database.) o DBD::Pg..........................Not installed! Use: 'yum install "perl(DBD::Pg)"' (optional - Required to connect to a PostgreSQL database.) o Digest::SHA......................ok (v5.85) o Encode::HanExtra.................ok (v0.23) o IO::Socket::SSL..................ok (v1.94) o JSON::XS.........................ok (v3.01) o List::Util::XS...................ok (v1.27) o LWP::UserAgent...................ok (v6.13) o Mail::IMAPClient.................ok (v3.37) o IO::Socket::SSL................ok (v1.94) o ModPerl::Util....................ok (v2.000010) o Net::DNS.........................ok (v0.72) o Net::LDAP........................ok (v0.56) o Template.........................ok (v2.24) o Template::Stash::XS..............ok (undef) o Text::CSV_XS.....................ok (v1.00) o Time::HiRes......................ok (v1.9725) o Time::Piece......................ok (v1.20_01) o XML::LibXML......................ok (v2.0018) o XML::LibXSLT.....................ok (v1.80) o XML::Parser......................ok (v2.41) o YAML::XS.........................ok (v0.54)
要使用“otrs”用户启动OTRS守护程序,请运行以下命令:
su -c "/opt/otrs/bin/otrs.Daemon.pl start" -s /bin/bash otrs
要禁用CentOS 7防火墙,请运行以下命令:
systemctl stop firewalld
要使CentOS 7防火墙自动启动,请运行:
systemctl disable firewalld.service
启动OTRS守护进程:
su -c "/opt/otrs/bin/otrs.Daemon.pl start" -s /bin/bash otrsCron.sh
命令的输出必须是:
/opt/otrs/bin Cron.sh - start/stop OTRS cronjobs Copyright (C) 2001-2012 OTRS AG, http://otrs.org/ (using /opt/otrs) done
如果要检查OTRS守护程序状态,请运行以下命令:
su -c "/opt/otrs/bin/otrs.Daemon.pl status" -s /bin/bash otrsCron.sh
在crontab中配置OTRS。 将用户root更改为otrs并开始编辑crontab:
su otrs
crontab -e
填写以下内容的crontab并保存:
# --
# Copyright (C) 2001-2016 OTRS AG, http://otrs.com/
# --
# This software comes with ABSOLUTELY NO WARRANTY. For details, see
# the enclosed file COPYING for license information (AGPL). If you
# did not receive this file, see http://www.gnu.org/licenses/agpl.txt.
# --

# Who gets the cron emails?
MAILTO="root@localhost"
# --
# Copyright (C) 2001-2016 OTRS AG, http://otrs.com/
# --
# This software comes with ABSOLUTELY NO WARRANTY. For details, see
# the enclosed file COPYING for license information (AGPL). If you
# did not receive this file, see http://www.gnu.org/licenses/agpl.txt.
# --

# check OTRS daemon status
*/5 * * * *    $HOME/bin/otrs.Daemon.pl start >> /dev/null
在CentOS 7上配置OTRS
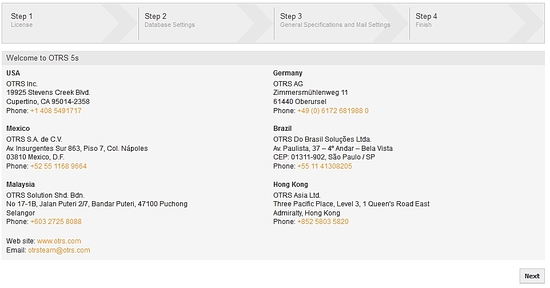
打开Web浏览器并打开URL https://centos7.local/otrs/installer.pl 。 请记住,centos7.local是我的服务器的名称,插入您的主机名或IP地址。 第一个屏幕显示完成OTRS安装的4个步骤,按Next。
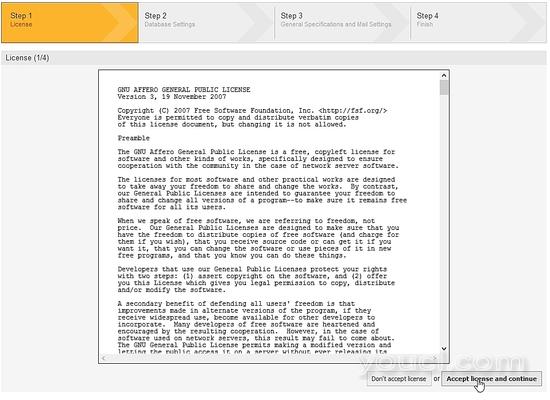
许可证:继续阅读并接受许可证继续执行:
数据库选择:选择MySQL选项,在安装类型中,标记为OTRS创建新数据库选项,然后单击下一个按钮:

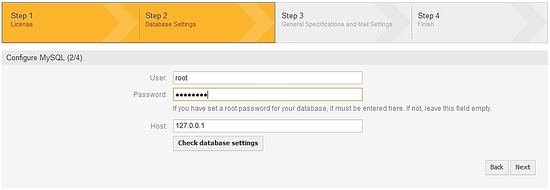
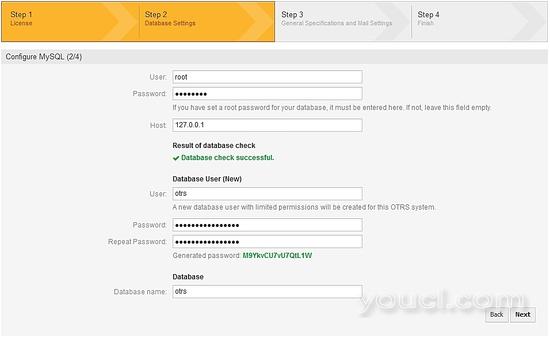
配置MySQL:填写用户,密码和主机(记住我们制作的MariaDB配置的数据),然后按检查数据库设置:
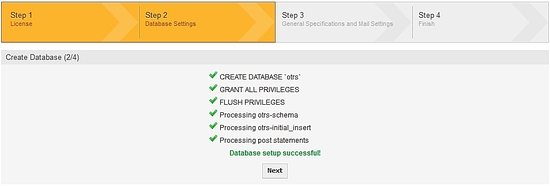
OTRS安装程序将在MariaDB中创建数据库,按下一个按钮:
OTRS数据库成功创建:
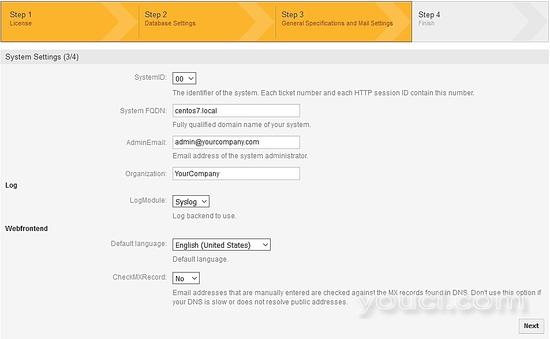
配置系统设置:使用您自己的信息填写字段,然后按下一步:
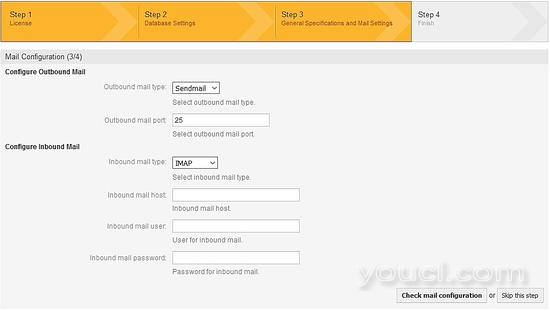
OTRS电子邮件配置:填写您的电子邮件服务器的字段。 在我的设置中,对于出站电子邮件,我使用SMPTTLS和端口587,对于入站电子邮件,我使用pop3,您将需要一个电子邮件帐户。 检查邮件配置或跳过此步骤:
要完成,请记录用户和密码以访问OTRS,登录后您可以更改密码:
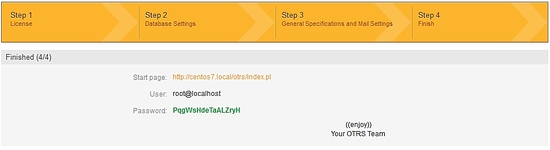
OTRS网址登录名是https://centos7.local/otrs/index.pl? 。 请记住,centos7.local是我的服务器的名称,插入您的hostnamen或IP地址。 :
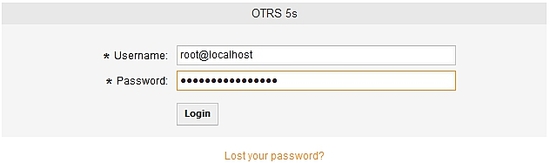
登录OTRS:
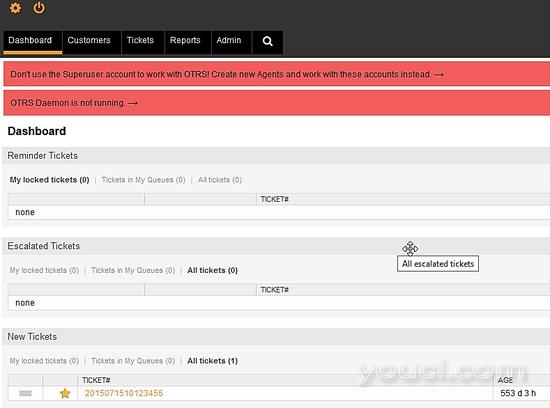
OTRS已安装并准备配置您的支持规则或业务模型。


