介绍
在本教程的第二部分中,自动启动Linux服务,我们将退后一步,更详细地解释init进程。 你应该很好地了解它们如何控制守护进程的启动行为。
在第一部分本系列教程我们分享使用MySQL的如何崩溃或重启后启用的Linux服务自动启动一些实际的例子。
我们看到了如何从三个不同的初始化方式做到这一点:System V的,Upstart,和systemd。 阅读第一个教程在其上分布在默认情况下使用的init系统的复习。
在本教程中,我们将退后一步,解释为什么我们运行命令并编辑我们所做的配置文件。 我们将从System V init守护进程开始。 我们还将看到为什么它随着时间的推移被更新的init模式所取代。
先决条件
要学习本教程,你需要你创建的三个DigitalOceanDroplet之前 。
我们有:
- 运行MySQL的Debian 6服务器
- 一个运行MySQL的Ubuntu 14.04服务器
- 运行MySQL的CentOS 7服务器
我们建议您回到本系列的第1部分,先创建Droplets。
此外,您将需要是root用户或在服务器上具有sudo权限。 要了解sudo的权限是如何工作的看到有关这个Sudo教程DigitalOcean 。
您不应在生产Linux服务器上运行本教程中的任何命令,查询或配置。
运行级别
运行级别代表了Linux系统的当前状态。
该概念来自System V init,其中Linux系统引导,初始化内核,然后输入一个(且只有一个)运行级别。
例如,运行级可以是Linux服务器的关闭状态,单用户模式,重新启动模式等。每个模式将指示什么服务可以在该状态下运行。
某些服务可以在一个或多个运行级别运行,但不能在其他运行级别运行。
运行级别由单个数字表示,它们可以具有介于0和6之间的值。以下列表显示了这些级别各自的含义:
- 运行级别0:系统关闭
- 运行级别1:单用户,救援模式
- 运行级别2,3,4:多用户,与网络文本模式下启用
- 运行级别5:多用户,启用网络,图形模式
- 运行级别6:系统重启
运行级别2,3和4因分布而异。 例如,一些Linux发行版不实现运行级别4,而其他的。 一些分布在这三个级别之间有明显的区别。 通常,运行级别2,3或4意味着Linux已在多用户,启用网络的文本模式下引导的状态。
当我们启用一个服务自动启动,我们实际上是将它添加到运行级别。 在系统V中,OS将以特定的运行级别开始; 并且,当它启动时,它将尝试启动与该运行级别相关联的所有服务。
运行级别成为systemd 的目标 ,我们将在systemd部分讨论。
Init和PID 1
初始化是在计算机启动和内核加载到内存中后,开始在Linux系统中的第一个进程。
除此之外,它决定了用户进程或系统服务应该按什么顺序加载,以及是否应该自动启动。
在Linux中每个进程都有一个进程ID(PID)和init有1. PID就这么随后产卵系统自带的在线所有其他进程的父。
Init的历史
随着Linux的发展,init守护进程的行为也发生了变化。 最初,Linux开始使用System V init,与UNIX中使用的相同。 自那时以来,Linux已经实施了Upstart的init守护进程(被Ubuntu创建)现在systemd的init守护进程(最初由Fedora的实现)。
大多数Linux发行版已逐渐从System V迁移或逐步淘汰,只保留向后兼容性。 FreeBSD是UNIX的一种变体,它使用System V的不同实现,称为BSD init。 旧版本的Debian也使用SysVinit。
每个版本的init守护程序都有不同的管理服务的方式。 这些变化背后的原因是需要一个强大的服务管理工具,不仅处理服务,而且处理设备,端口和其他资源; 这将并行加载资源,这将从崩溃恢复。
系统V初始化序列
系统V使用了inittab文件,它像Upstart后的init方法已经保持向后兼容性。
让我们通过System V的启动顺序:
- 在init守护进程从二进制文件创建
/sbin/init - 第一个文件在init守护进程是读取
/etc/inittab - 此文件中的一个条目决定机器应引导到的运行级别。 例如,如果运行级别的值指定为3,则Linux将在启用了联网的多用户文本模式下启动。 (此运行级别称为默认运行级别)
- 接下来,init守护进程会进一步眺望
/etc/inittab的文件和在读什么初始化它需要为运行级别的脚本
因此,当init守护进程找到它需要为给定的运行级别运行的init脚本时,它基本上找出了启动它需要什么服务。 这些init脚本是您可以在其中配置单个服务的启动行为,就像我们在第一个教程中对MySQL的启动行为一样。
接下来,让我们详细了解init脚本。
系统V配置文件:Init脚本
init脚本是控制系统V中的特定服务(如MySQL服务器)的脚本。
服务的Init脚本由应用程序的供应商提供,或者带有Linux发行版(适用于本地服务)。 我们还可以为自定义创建的服务创建自己的init脚本。
当一个进程或服务(如MySQL服务器)启动时,其二进制程序文件必须加载到内存中。
根据服务的配置,此程序可能必须持续在后台执行(并接受客户端连接)。 启动,停止或重新加载此二进制应用程序的任务由服务的init脚本处理。 这就是所谓的初始化脚本,因为它初始化服务。
在System V中,init脚本是shell脚本。
初始化脚本也被称为RC(运行命令)的脚本。
目录结构
将/etc目录是启动脚本的父目录。
init的shell脚本的实际位置是在/etc/init.d 。 这些脚本符号链接到rc目录。
内/etc目录下,我们有一些rc目录,每一个在其名称中的数字。
数字表示不同的运行级别。 因此,我们有/etc/rc0.d , /etc/rc1.d , /etc/rc2.d等等。
然后,每个内rc n .d目录,我们有一个既具有开始的文件K或S在他们的文件名,后面两个数字。 这些是指向实际init shell脚本的符号链接文件。 为什么K和S ? K表示停止(即停止),“S”表示开始。
两个数字表示脚本的执行顺序。 因此,如果我们有一个名为K25 some_script文件,它将K99 another_script之前执行。
启动
让我们回来跟我们的启动顺序。 那么如何调用init脚本呢? 谁叫他们?
在K和S脚本不会由init守护程序直接调用,而是由另外一个脚本:在/etc/init.d/rc脚本。
如果你还记得,在/etc/inittab的文件通知init守护进程的运行级别,系统默认情况下应进入。 对于每一个运行级别,在一条线/etc/inittab文件调用/etc/init.d/rc脚本,传递上的运行级别作为参数。 基于此参数,脚本然后调用相应的下的文件/etc/rc n .d目录。 所以,如果服务器靴子的runlevel 2,根据脚本/etc/rc2.d会被调用; 为级别3,根据脚本/etc/rc3.d被执行,等等。
在一个rc目录,首先,所有K个脚本都按数字顺序以“一站式”的参数运行,然后所有的S脚本都以类似的方式用的参数运行“开始。” 在后台,将分别使用stop和start参数调用相应的init shell脚本。
现在,因为下的文件/etc/rc n .d目录( K nn和S nn文件)符号链接而已,美其名曰意味着调用与站的实际初始化shell脚本和启动参数。
总而言之,当Linux服务器进入运行级别时,将运行某些脚本以停止某些服务,而其他脚本将运行以启动其他服务。
启动脚本中调用这个也恰好当系统切换到一个新的运行级别:对应/etc/rc<n>.d目录的脚本执行。 而且,由于这些钾和硫的文件是什么,但环节,根据实际的shell脚本/etc/init.d目录与相应的启动执行或停止争论。
整个过程确保任何不应该在该运行级别运行的服务被停止,并且所有服务应该在该运行级别运行。
系统V自动启动
由于我们使服务在引导时自动启动,我们实际上是修改init行为。
因此,例如,当我们在运行级别3使能自动启动服务,幕后的过程中会在适当的环节/etc/rc3.d目录。
如果这听起来很混乱,不要担心 - 我们会在一分钟内看到这一切意味着什么。
系统V示例
我们将回到我们的MySQL服务示例,这次有更多的理论。
第1步 - 登录Debian Droplet
为了本教程的这一部分,我们将回到我们在第1部分中创建的Debian 6 Droplet。使用SSH命令连接到服务器(Windows用户可以使用像PuTTy这样的工具连接)。
ssh sammy@your_server_ip
第2步 - 查看inittab
运行以下命令来查看inittab文件的内容:
cat /etc/inittab | grep initdefault
输出应该是这样的:
Outputid:2:initdefault:
2后的id字段显示系统被配置为以runlevel 2开始。这是默认的运行级别。 在这种情况下,Debian将2指定为多用户文本模式。 如果执行以下命令:
cat /etc/inittab | grep Runlevel
输出确认:
Output# Runlevel 0 is halt.
# Runlevel 1 is single-user.
# Runlevels 2-5 are multi-user.
# Runlevel 6 is reboot.
第3步 - 查看rc目录
运行以下命令列出rc目录。 你应该看到有以下六个:
ls -ld /etc/rc*.d
Outputdrwxr-xr-x 2 root root 4096 Jul 31 07:09 /etc/rc0.d
drwxr-xr-x 2 root root 4096 Jul 31 07:09 /etc/rc1.d
drwxr-xr-x 2 root root 4096 Jul 31 07:21 /etc/rc2.d
drwxr-xr-x 2 root root 4096 Jul 31 07:21 /etc/rc3.d
drwxr-xr-x 2 root root 4096 Jul 31 07:21 /etc/rc4.d
drwxr-xr-x 2 root root 4096 Jul 31 07:21 /etc/rc5.d
drwxr-xr-x 2 root root 4096 Jul 31 07:09 /etc/rc6.d
drwxr-xr-x 2 root root 4096 Jul 23  2012 /etc/rcS.d
由于在运行级别2(从inittab文件默认的init)在系统启动时,根据脚本/etc/rc2.d的目录会在系统启动时执行。
列出此目录的内容:
ls -l /etc/rc2.d
这显示文件只是符号链接,每个指向/etc/init.d下的脚本文件:
Output. . .
lrwxrwxrwx 1 root root  17 Jul 23  2012 S01rsyslog -> ../init.d/rsyslog
lrwxrwxrwx 1 root root  22 Jul 23  2012 S02acpi-support -> ../init.d/acpi-support
lrwxrwxrwx 1 root root  15 Jul 23  2012 S02acpid -> ../init.d/acpid
lrwxrwxrwx 1 root root  17 Jul 23  2012 S02anacron -> ../init.d/anacron
lrwxrwxrwx 1 root root  13 Jul 23  2012 S02atd -> ../init.d/atd
lrwxrwxrwx 1 root root  14 Jul 23  2012 S02cron -> ../init.d/cron
lrwxrwxrwx 1 root root  15 Jul 31 07:09 S02mysql -> ../init.d/mysql
lrwxrwxrwx 1 root root  13 Jul 23  2012 S02ssh -> ../init.d/ssh
. . .
我们可以看到这里没有K脚本,只有S(start)脚本。 脚本启动知名的服务,如rsyslog现在 ,cron的 ,或ssh。
记住,S之后的两个数字决定起始顺序:例如,rsyslog在cron守护程序之前启动。 我们还可以看到MySQL在这里列出。
第4步 - 查看Init脚本
现在我们知道,安装在系统V兼容的服务时,它会创建下shell脚本/etc/init.d目录。 检查MySQL的shell脚本:
ls -l /etc/init.d/my*
Output-rwxr-xr-x 1 root root 5437 Jan 14 2014 /etc/init.d/mysql
要查看启动脚本的外观,请阅读文件:
cat /etc/init.d/mysql | less
从输出,你会看到它是一个大的bash脚本。
第5步 - 使用chkconfig或sysv-rc-conf
在基于RHEL的发行像CentOS的,一个命令调用chkconfig可以用来启用或系统五,禁用服务,它还可以列出已安装的服务和他们的运行级别。
检查CentOS系统上所有运行级别的服务状态的语法如下:
chkonfig --list | grep service_name
没有这样的工具附带的Debian本身( update-rc.d安装或只从运行级别删除服务)。 我们可以,但是,安装定制的工具,称为sysv-rc-conf帮助我们管理服务。
运行以下命令来安装sysv-rc-conf :
sudo apt-get install sysv-rc-conf -y
安装工具后,只需执行此命令即可查看各种服务的运行级别行为:
sudo sysv-rc-conf
输出将是一个漂亮的图形窗口,如下所示。 从这里,我们可以清楚地看到什么服务启用了什么运行级别(标记为X)。
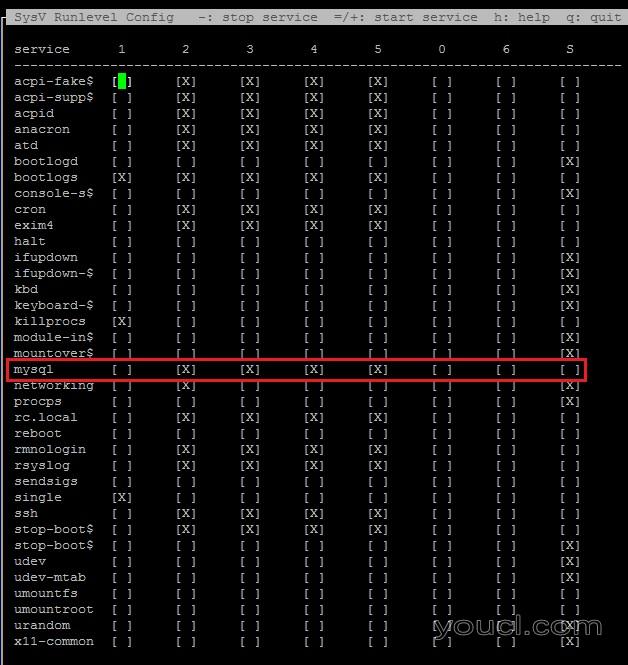
利用箭头键和SPACEBAR ,可以启用或对一个或多个运行级别禁用服务。
现在,按离开屏幕Q 。
第7步 - 在引导时测试MySQL启动行为
从上一节的截图中可以看出,根据我们在本教程第1部分的测试,MySQL目前在运行级别2-5上启用。
运行下面的命令关闭 MySQL服务:
sudo update-rc.d mysql disable
Outputupdate-rc.d: using dependency based boot sequencing
insserv: warning: current start runlevel(s) (empty) of script `mysql' overwrites defaults (2 3 4 5).
insserv: warning: current stop runlevel(s) (0 1 2 3 4 5 6) of script `mysql' overwrites defaults (0 1 6).
现在运行命令:
ls -l /etc/rc2.d
输出应显示从符号链接/etc/rc2.d以/etc/init.d/mysql已更改为K :
Output. . .
lrwxrwxrwx 1 root root  15 Jul 31 07:09 K02mysql -> ../init.d/mysql
. . .
换句话说,MySQL将不再在默认runlevel(2)启动。
这是当我们启用和禁用服务时,在System V的幕后发生的。 只要在服务的缺省runlevel目录下有一个S脚本,init将在启动时启动该服务。
再次启用服务:
sudo update-rc.d mysql enable
第8步 - 测试崩溃时MySQL启动行为
让我们看看System V如何处理服务崩溃。
请记住,我们做了一个改变了/etc/inittab在本教程的第1部分文件,以使MySQL的系统崩溃后自动启动。 我们添加了以下行:
ms:2345:respawn:/bin/sh /usr/bin/mysqld_safe
这是为了确保MySQL服务在崩溃后启动。 要检查是否发生这种情况,请首先重新启动服务器:
sudo reboot
一旦服务器回来,SSH到它并检查MySQL进程ID像之前一样:
ps -ef | grep mysql
注意进程ID mysqld_safe和mysqld 。 在我们的例子中,分别是895和1019:
Outputroot       907     1  0 07:30 ?        00:00:00 /bin/sh /usr/bin/mysqld_safe
mysql     1031   907  0 07:30 ?        00:00:00 /usr/sbin/mysqld --basedir=/usr --datadir=/var/lib/mysql --user=mysql --pid-file=/var/run/mysqld/mysqld.pid --socket=/var/run/mysqld/mysqld.sock --port=3306
root      1032   907  0 07:30 ?        00:00:00 logger -t mysqld -p daemon.error
root      2550  2532  0 07:31 pts/0    00:00:00 grep mysql
有一次终止这些进程-9开关(替代与Debian系统的PID):
sudo kill -9 907
sudo kill -9 1031
<! - 标记变量为红色 - >
等待五分钟左右,然后执行命令:
sudo service mysql status
输出将显示MySQL服务正在运行,从这行开始:
Output/usr/bin/mysqladmin Ver 8.42 Distrib 5.1.73, for debian-linux-gnu on x86_64
如果您运行ps -ef | grep mysql ps -ef | grep mysql命令再次,你会看到,无论是mysqld_safe和mysqld进程已经上来了。
尝试杀死进程几次,在每种情况下,它应该在五分钟后重生。
这是我们增加的原因,额外行/etc/inittab :你这是怎么配置的System V服务崩溃重生。 还有就是语法此行的详细解释第1部分 。
但是,为服务添加自动重新启动时请小心:如果服务尝试重新生成并在两分钟内失败超过十次,则Linux将禁用在接下来的五分钟内重新启动。 这就是系统保持稳定,不会耗尽计算资源。
如果您碰巧在控制台中收到有关此类事件的消息或在系统日志中找到该消息,您将知道应用程序存在需要修复的问题,因为它会持续崩溃。
Upstart简介
经典SysVinit在Upstart出现之前已经成为主流Linux发行版的一部分。
随着Linux市场的增长,加载作业和服务的序列化方法变得更加耗时和复杂。 与此同时,随着越来越多的现代设备(如可热插拔的存储介质)激增了市场,SysVinit被发现无法快速处理它们。
需要更快的加载操作系统,正常清理崩溃的服务,以及可预测的系统服务之间的依赖驱动了对更好的服务管理器的需要。 Ubuntu的开发人员提出了另一种初始化方法,即Upstart守护进程。
Upstart init在几个方面优于System V init:
- Upstart不处理奥术shell脚本加载和管理服务。 相反,它使用易于理解和修改的简单配置文件
- Upstart不像System V一样连续加载服务。这减少了系统引导时间
- Upstart的采用了灵活的事件系统定制服务是如何在各种状态下处理
- Upstart有更好的方式来处理崩溃的服务应该重生的方式
- 没有必要保留一些冗余的符号链接,都指向同一个脚本
- Upstart与System V的向后兼容
/etc/init.d/rc脚本仍然运行管理本地系统V服务
Upstart活动
Upstart允许将与服务相关联的多个事件 。 这种基于事件的架构允许Upstart灵活地处理服务管理。
每个事件都可以触发一个处理该事件的shell脚本。
Upstart活动包括:
- 开始
- 开始
- 停止
- 停止
在这些事件之间,服务可以是在许多州 ,像:
- 等候
- 预启动
- 开始
- 运行
- 预停
- 停止
- 等等
Upstart也可以对这些状态中的每一个采取行动,创建一个非常灵活的架构。
Upstart Init序列
如System V,也Upstart运行/etc/init.d/rc在启动脚本。 此脚本正常执行任何System V init脚本。
Upstart也期待下/etc/init目录,并在每个服务配置文件执行shell命令。
Upstart配置文件
Upstart使用配置文件来控制服务。
Upstart不使用系统V的方式使用Bash脚本。 相反,Upstart使用服务配置文件与命名标准service_name .conf 。
该文件的纯文本内容不同的部分,称为节 。 每节描述了服务的不同方面以及它应该如何运行。
不同的控制节为服务不同的事件,如预启动 , 启动 ,前期停止或停止后 。
节本身包含shell命令。 因此,可以为每个服务的每个事件调用多个操作。
每个配置文件还指定了两件事:
- 服务应该启动和停止的运行级别
- 无论它是否崩溃服务应该重生
目录结构
Upstart配置文件位于下/etc/init目录(不要与混淆/etc/init.d )。
Upstart示例
让我们来看看Upstart如何再次处理MySQL Server,这次有更多的背景知识。
第1步 - 登录到Ubuntu Droplet
回到我们在第1部分中创建的Ubuntu 14.04 Droplet。
使用SSH命令连接到服务器(Windows用户可以使用像PuTTy这样的工具进行连接)。
ssh sammy@your_server_ip
第2步 - 查看init和rc目录
大多数Upstart的config文件在/etc/init目录中。 这是创建新服务时应使用的目录。
登录服务器后,执行以下命令:
sudo ls -l /etc/init/ | less
结果将显示大量的服务配置文件,一次一屏。 这些是在Upstart下本机运行的服务:
Outputtotal 356
. . .
-rw-r--r-- 1 root root  297 Feb  9  2013 cron.conf
-rw-r--r-- 1 root root  489 Nov 11  2013 dbus.conf
-rw-r--r-- 1 root root  273 Nov 19  2010 dmesg.conf
. . .
-rw-r--r-- 1 root root 1770 Feb 19  2014 mysql.conf
-rw-r--r-- 1 root root 2493 Mar 20  2014 networking.conf
按Q退出less 。
将其与系统中的本机System V init服务进行比较:
sudo ls -l /etc/rc3.d/* | less
将只有少数:
Output-rw-r--r-- 1 root root 677 Jun 14 23:31 /etc/rc3.d/README
lrwxrwxrwx 1 root root  15 Apr 17  2014 /etc/rc3.d/S20rsync -> ../init.d/rsync
lrwxrwxrwx 1 root root  24 Apr 17  2014 /etc/rc3.d/S20screen-cleanup -> ../init.d/screen-cleanup
lrwxrwxrwx 1 root root  19 Apr 17  2014 /etc/rc3.d/S70dns-clean -> ../init.d/dns-clean
lrwxrwxrwx 1 root root  18 Apr 17  2014 /etc/rc3.d/S70pppd-dns -> ../init.d/pppd-dns
lrwxrwxrwx 1 root root  26 Apr 17  2014 /etc/rc3.d/S99digitalocean -> ../init.d//rc.digitalocean
lrwxrwxrwx 1 root root  21 Apr 17  2014 /etc/rc3.d/S99grub-common -> ../init.d/grub-common
lrwxrwxrwx 1 root root  18 Apr 17  2014 /etc/rc3.d/S99ondemand -> ../init.d/ondemand
lrwxrwxrwx 1 root root  18 Apr 17  2014 /etc/rc3.d/S99rc.local -> ../init.d/rc.local
第3步 - 查看Upstart文件
我们已经看到了mysql.conf在本教程的第1部分文件。 所以,让我们打开另一个配置文件:一个为cron守护进程。
sudo nano /etc/init/cron.conf
如你所见,这是一个相当简单的配置文件的cron守护进程:
# cron - regular background program processing daemon
#
# cron is a standard UNIX program that runs user-specified programs at
# periodic scheduled times

description     "regular background program processing daemon"

start on runlevel [2345]
stop on runlevel [!2345]

expect fork
respawn

exec cron
最重要的领域要留意这里start on , stop on和respawn 。
在start on指令告诉Ubuntu的启动crond当系统进入运行级别2,3,4或5。2,图3,和图4是多用户文本模式启用联网守护程序,和图5是多用户的图形模式。 该服务不运行在任何其他运行级别(如0,1或6)。
该fork指令告诉Upstart过程中应该从控制台分离并在后台运行。
接下来是respawn指令。 这告诉系统cron应该自动启动,如果它崩溃的任何原因。
退出编辑器,不进行任何更改。
cron配置文件是一个相当小的配置文件。 MySQL配置文件在结构上类似于cron配置文件; 它也有开始,停止和重生的节。 此外,它还有两个脚本块用于启动前和启动后事件。 这些代码块告诉系统当mysqld进程正在启动或已经启动时要执行什么。
有关使自己的Upstart文件实际的帮助,请参阅本教程的Upstart 。
第4步 - 在引导时测试MySQL启动行为
我们知道我们的Ubuntu 14.04服务器上的MySQL实例默认设置为在启动时自动启动。 让我们看看如何禁用它。
在Upstart,禁用服务依赖于文件的下存在/etc/init/称为service_name .override 。 该文件的内容应该是一个简单的单词: manual 。
要查看我们如何使用此文件来禁用MySQL,请执行以下命令为MySQL创建此覆盖文件:
sudo nano /etc/init/mysql.override
添加这一行:
manual
保存更改。
接下来,重新启动服务器:
sudo reboot
服务器恢复在线后,请检查服务的状态
sudo initctl status mysql
输出应为:
Outputmysql stop/waiting
这意味着MySQL没有启动。
检查start指令MySQL的服务配置文件中已经改变:
sudo cat /etc/init/mysql.conf | grep start\ on
它应该是相同的:
Outputstart on runlevel [2345]
这意味着,选中.conf在文件init目录是不希望看到,如果服务将在适当水平开始的唯一因素。 您还需要确保.override文件不存在。
要重新启用MySQL,请删除覆盖文件并重新启动服务器:
sudo rm -f /etc/init/mysql.override
sudo reboot
一旦服务器重新启动,远程连接到它。
运行sudo initctl status mysql命令将显示该服务已自动启动。
第5步 - 测试崩溃崩溃的MySQL启动行为
默认情况下,MySQL在崩溃后自动启动。
要停止MySQL的,请打开/etc/init/mysql.conf服务配置文件:
sudo nano /etc/init/mysql.conf
注释掉两个respawn指令。
# respawn
# respawn limit 2 5
运行以下命令重新启动服务:
sudo initctl stop mysql
sudo initctl start mysql
我们明确地停止和启动服务,因为我们的测试表明initctl restart或initctl reload就不会在这里工作。
第二个启动服务的命令显示PID启动的MySQL:
Outputmysql start/running, process 1274
注意你的MySQL实例的PID。 如果你崩溃mysql ,现在的过程,它不会自动来了。 删除进程ID(将其替换为您自己的数字):
sudo kill -9 1274
现在检查其状态:
sudo initctl status mysql
Outputmysql stop/waiting
尝试找到状态几次,在每个之间给一些时间。 在每种情况下,MySQL仍然会停止。 这是发生因为该服务配置文件没有respawn的指令了。
1份的教程的具有的一个更详细的解释respawn指令。
当你不想要一个Upstart的服务上来重新启动后还是崩溃?
说你已经升级你的Linux内核或放最新的补丁。你不想要任何戏剧; 你只是服务器来了。 您可以通过禁用任何Upstart进程的自动启动来大大消除风险。
如果你的服务出现但仍然崩溃,你可以先停止它,然后改变它的重生行为。
systemd简介
最新的Linux init守护进程是systemd。 事实上,它不仅仅是一个init守护进程:systemd是一个全新的框架,包含了现代Linux系统的许多组件。
它的作用之一是为Linux的系统和服务经理 。 在这种情况下,systemd控制的一个东西是服务崩溃或机器重新启动时的行为。 你可以读到这里systemd的systemctl 。
systemd向后兼容System V命令和初始化脚本。 这意味着任何System V服务也将在systemd下运行。 这是可能的,因为大多数Upstart和System V管理命令已被修改为在systemd下工作。
事实上,如果我们运行ps -ef | grep systemd ps -ef | grep systemd在支持它的操作系统命令,我们将不会看到任何东西,因为systemd重命名自己init在启动时。 有一个/sbin/init文件,这是一个符号链接到/bin/systemd 。
systemd配置文件:单元文件
在systemd的心脏是单元文件 。 每个单元文件表示系统资源。 systemd和其他两个init方法之间的主要区别是,systemd不仅负责服务守护程序,而且负责其他类型的资源(如套接字,设备操作系统路径,安装点,套接字等)的初始化。资源可以是这些。
在单元文件中跟踪有关资源的信息。
每个单元文件代表一个特定的系统资源,拥有的命名风格service name . unit type 。
因此,我们将有像文件dbus.service , sshd.socket或home.mount 。
正如我们将在后面看到,服务单元文件是简单的文本文件(如Upstart.conf文件)具有声明语法。 这些文件很容易理解和修改。
目录结构
在基于Red Hat的系统(如CentOS)中,单元文件位于两个位置。 主要位置是/lib/systemd/system/ 。
由系统管理员修改自定义创建单元文件或现有的单元文件将生活下/etc/systemd/system 。
如果具有相同名称的单元文件在两个位置存在,systemd将使用下一个/etc 。 如果服务已启用在启动时或任何其他的目标/运行级别启动,一个符号链接将被该服务单元下的文件在适当的目录中创建/etc/systemd/system 。 在单元文件/etc/systemd/system实际上是符号链接的文件下同名/lib/systemd/system 。
初始序列:目标单位
一种特殊类型的单元文件是一个目标单位 。
一个目标单位的文件名是由Stapling.target 。 目标单位与其他单位文件不同,因为它们不代表一个特定的资源。 相反,它们代表系统在任何时间的状态。
目标单元通过分组和启动应该是该状态的一部分的多个单元文件来做到这一点。 systemd 目标 ,因此可以松散相比系统V运行级别,尽管它们并不相同。
每个目标都有一个名称,而不是一个数字。 例如,我们已经multi-user.target ,而不是运行级别3或reboot.target ,而不是运行级别6。
当Linux服务器靴子说, multi-user.target ,它本质上使服务器到运行级别2,3或4,这是多用户的文本模式与网络启用。
如何将服务器带到这个阶段是差异在哪里。 与System V不同,systemd不会按顺序启动服务。 一路上,它可以检查其他服务或资源的存在,并决定其加载的顺序。 这使得服务可以并行加载。
目标单元和运行级别之间的另一个区别是,在System V中,Linux系统只能存在一个运行级别。 您可以更改运行级别,但系统将仅存在于该新的运行级别。 与systemd,目标单元可以包容的,这意味着当一个目标单元激活,它可以确保其他目标单元被加载为它的一部分。
例如,在Linux的系统,与图形用户界面靴将具有graphical.target激活,这反过来会自动确保multi-user.target被加载并激活为好。
(在系统V术语中,这将类似地具有同时激活运行级别3和5)。
下表比较运行级别和目标:
| 运行级别(System V init) | 目标单位(Systemd) |
|---|---|
| 运行级0 | poweroff.target |
| 运行级1 | resuce.target |
| 运行级2,3,4 | multi-user.target |
| 运行级5 | graphical.target |
| 运行级6 | reboot.target |
systemd default.target
default.target等同于默认的运行级别。
在System V,我们在一个叫做文件中定义的默认运行级别inittab 。 在systemd,该文件被替换default.target 。 默认的目标单元文件家住下/etc/systemd/system目录下。 这是一个符号链接在目标单位的一个文件/lib/systemd/system 。
当我们更改默认目标时,我们基本上重新创建该符号链接并更改系统的运行级别。
在系统V inittab文件还指定哪个目录的Linux将执行其启动脚本:它可以是任何RCñ.D目录。 在systemd中,默认目标单元确定在引导时加载哪些资源单元。
所有这些单元被激活,但不是全部并行或全部顺序。 如何资源单位负载可能依赖于其他资源的单位,它希望或需要 。
systemd依赖关系:需要
关于单元文件和目标单元的讨论的原因是突出显示systemd如何解决其守护进程之间的依赖。
正如我们之前看到的,Upstart确保使用配置文件并行加载服务。 在系统V中,服务可以在特定运行级别开始,但也可以使其等待直到另一个服务或资源可用。 以类似的方式,可以使系统服务在一个或多个目标中加载,或者等待直到另一个服务或资源变为活动。
在systemd, 需要另一个单位的单位将无法启动,直到所需的单元被加载并激活。 如果在第一个单元激活时所需单元由于某种原因而失效,则第一个单元也将停止。
如果你考虑它,这可以确保系统的稳定性。 因此,可以使需要存在特定目录的服务等待,直到该目录的安装点是活动的。 在另一方面, 希望其他单位不会强加这样的限制单位。 如果当主叫方活动时,所需单元停止,它不会停止。 一个例子是在图形目标模式下出现的非必要服务。
systemd示例
现在是我们深入研究MySQL在systemd下的启动行为的时候了。
第1步 - 登录CentOS Droplet
要了解所有这些概念以及它们如何与启用服务自动启动相关,让我们回到我们在第1部分中创建的CentOS 7 Droplet。
使用SSH命令连接到服务器(Windows用户可以使用像PuTTy这样的工具进行连接)。
ssh sammy@your_server_ip
第2步 - 查看default.target文件和依赖关系
这是一个长的路段,因为我们要遵循.target兔踪迹,据我们可以。 systemd的启动顺序遵循一个长链的依赖关系。
defaul.target
该default.target正常的服务器引导过程中哪些服务启动文件控制。
执行以下命令以列出默认目标单元文件:
sudo ls -l /etc/systemd/system/default.target
这将显示如下输出:
Outputlrwxrwxrwx. 1 root root 37 Jul 8 2014 /etc/systemd/system/default.target -> /lib/systemd/system/multi-user.target
正如我们所看到的,默认的目标实际上是一个符号链接下的多用户目标文件/lib/systemd/system/ 。 所以,该系统应该下引导multi-user.target ,这类似于运行级别3。
multi-user.target.wants
接下来,执行下面的命令检查所有的服务multi-user.target文件要 :
sudo ls -l /etc/systemd/system/multi-user.target.wants/*.service
这应该显示这样的输出:
Output. . .
lrwxrwxrwx. 1 root root  37 Jul  8  2014 /etc/systemd/system/multi-user.target.wants/crond.service -> /usr/lib/systemd/system/crond.service
. . .
lrwxrwxrwx  1 root root  38 Jul 31 22:02 /etc/systemd/system/multi-user.target.wants/mysqld.service -> /usr/lib/systemd/system/mysqld.service
lrwxrwxrwx. 1 root root  46 Jul  8  2014 /etc/systemd/system/multi-user.target.wants/NetworkManager.service -> /usr/lib/systemd/system/NetworkManager.service
lrwxrwxrwx. 1 root root  39 Jul  8  2014 /etc/systemd/system/multi-user.target.wants/postfix.service -> /usr/lib/systemd/system/postfix.service
lrwxrwxrwx. 1 root root  39 Jul  8  2014 /etc/systemd/system/multi-user.target.wants/rsyslog.service -> /usr/lib/systemd/system/rsyslog.service
lrwxrwxrwx. 1 root root  36 Jul  8  2014 /etc/systemd/system/multi-user.target.wants/sshd.service -> /usr/lib/systemd/system/sshd.service
. . .
我们可以看到,这些都是符号链接文件,指回单位实际文件下的/lib/systemd/system/ 。 我们还可以看到, mysqld.service是一部分multi-user.target 。
如果您执行此命令过滤输出,可以找到相同的信息:
sudo systemctl show --property "Wants" multi-user.target | fmt -10 | grep mysql
Outputmysqld.service
除了multi-user.target ,有不同类型的像目标system-update.target或basic.target 。
要查看我们的多用户目标取决于什么目标,请执行以下命令:
sudo systemctl show --property "Requires" multi-user.target | fmt -10
OutputRequires=basic.target
于是,开始在系统multi-user.target模式, basic.target将必须先加载。
basic.target
看看其他目标basic.target依赖,执行以下命令:
sudo systemctl show --property "Requires" basic.target | fmt -10
输出将是:
OutputRequires=sysinit.target
sysinit.target
展望递归,我们可以看到,如果有任何需要的单位sysinit.target 。 没有。 However, we can see what services are wanted by sysinit.target :
sudo systemctl show --property "Wants" sysinit.target | fmt -10
This will show a number of services wanted by sysinit.
OutputWants=local-fs.target
swap.target
cryptsetup.target
systemd-udevd.service
systemd-update-utmp.service
systemd-journal-flush.service
plymouth-read-write.service
. . .
As you can see, the system does not stay in one target only. It loads services in a dependent fashion as it transitions between targets.
Step 3 — Looking at a Unit File
Going a step further now, let's look inside a service unit file. We saw the MySQL service unit file in Part 1 of this tutorial, and we will use it again shortly, but for now let's open another service unit file, the one for sshd:
sudo nano /etc/systemd/system/multi-user.target.wants/sshd.service
它看起来像这样:
Output[Unit]
Description=OpenSSH server daemon
After=syslog.target network.target auditd.service

[Service]
EnvironmentFile=/etc/sysconfig/sshd
ExecStartPre=/usr/sbin/sshd-keygen
ExecStart=/usr/sbin/sshd -D $OPTIONS
ExecReload=/bin/kill -HUP $MAINPID
KillMode=process
Restart=on-failure
RestartSec=42s

[Install]
WantedBy=multi-user.target
Just like an Upstart daemon config file, this service unit file is clean and easy to understand.
The first important bit to understand is the After clause. This says the SSHD service needs to load after the system and network targets and the audit logging service are loaded.
The file also shows the service is wanted by the multi-user.target , which means the target will load this service, but it won't shut down or crash if sshd fails.
Since multi-user.target is the default target, sshd daemon is supposed to start at boot time.
Exit the editor.
Step 4 — Testing MySQL Startup Behavior at Boot
In Part 1 of the tutorial, we left the MySQL service enabled and running. Let's see how to change that.
In the last section, we ran a command to confirm that mysqld.service is wanted by multi-user.target . When we listed the contents of the /etc/systemd/system/multi-user.target.wants/ directory, we saw a symbolic link pointing back to the original service unit under /usr/lib/systemd/system/ .
Run the following command to disable the service so it does not auto-start at boot time:
sudo systemctl disable mysqld.service
Now, run this command to check if MySQL is still wanted by multi-user.target :
sudo systemctl show --property "Wants" multi-user.target | fmt -10 | grep mysql
Nothing will be returned. Run the command below to check if the symbolic link still exists:
sudo ls -l /etc/systemd/system/multi-user.target.wants/mysql*
The link doesn't exist:
Outputls: cannot access /etc/systemd/system/multi-user.target.wants/mysql*: No such file or directory
If you'd like, try rebooting the server. MySQL should not come up.
Now reenable the service:
sudo systemctl enable mysqld.service
The link will come back:
sudo ls -l /etc/systemd/system/multi-user.target.wants/mysql*
Outputlrwxrwxrwx 1 root root 38 Aug 1 04:43 /etc/systemd/system/multi-user.target.wants/mysqld.service -> /usr/lib/systemd/system/mysqld.service
(If you rebooted before, you should start MySQL again.)
As you can see, enabling or disabling a systemd service creates or removes the symbolic link from the default target's wants directory.
Step 5 — Testing MySQL Startup Behavior on Crash
MySQL will currently come up automatically after a crash. Let's see how to disable that.
Open the MySQL service unit file in an editor:
sudo nano /etc/systemd/system/multi-user.target.wants/mysqld.service
After the header information, the contents of the file looks like this:
[Unit]
Description=MySQL Community Server
After=network.target
After=syslog.target

[Install]
WantedBy=multi-user.target
Alias=mysql.service

[Service]
User=mysql
Group=mysql

# Execute pre and post scripts as root
PermissionsStartOnly=true

# Needed to create system tables etc.
ExecStartPre=/usr/bin/mysql-systemd-start pre

# Start main service
ExecStart=/usr/bin/mysqld_safe

# Don't signal startup success before a ping works
ExecStartPost=/usr/bin/mysql-systemd-start post

# Give up if ping don't get an answer
TimeoutSec=600

Restart=always
PrivateTmp=false
As we saw in Part 1, the value of the Restart parameter is set to always (for sshd, this was set to on-failure only). This means the MySQL service will restart for clean or unclean exit codes or timeouts.
The man page for systemd service shows the following table for Restart parameters:
| Restart settings/Exit causes | 没有 | 总是 | on-success | on-failure | on-abnormal | on-abort | on-watchdog |
|---|---|---|---|---|---|---|---|
| Clean exit code or signal | X | X | |||||
| Unclean exit code | X | X | |||||
| Unclean signal | X | X | X | X | |||
| 暂停 | X | X | X | ||||
| Watchdog | X | X | X | X |
In a systemd service unit file, the two parameters - Restart and RestartSec - control crash behaviour. The first parameter specifies when the service should restart, and the second parameter defines how long it should wait before restarting.
Comment out the Restart directive, save the file, and exit the editor. This will disable the restart behavior.
# Restart=always
Next, reload the systemd daemon, followed by a restart of the mysqld service:
sudo systemctl daemon-reload
sudo systemctl restart mysqld.service
Next, find the Main PID of the service by running this command:
sudo systemctl status mysqld.service
Output. . .
Main PID: 11217 (mysqld_safe)
Using the kill -9 command, kill the main PID, using your own number.
sudo kill -9 11217
Running the sudo systemctl status mysqld.service again will show that the service has failed:
sudo systemctl status mysqld.service
Outputmysqld.service - MySQL Community Server
   Loaded: loaded (/usr/lib/systemd/system/mysqld.service; enabled)
   Active: failed (Result: signal) since Sun 2015-06-21 02:28:17 EDT; 1min 33s ago
  Process: 2566 ExecStartPost=/usr/bin/mysql-systemd-start post (code=exited, status=0/SUCCESS)
  Process: 2565 ExecStart=/usr/bin/mysqld_safe (code=killed, signal=KILL)
  Process: 2554 ExecStartPre=/usr/bin/mysql-systemd-start pre (code=exited, status=0/SUCCESS)
 Main PID: 2565 (code=killed, signal=KILL)

Jun 21 02:20:09 test-centos7 systemd[1]: Starting MySQL Community Server...
Jun 21 02:20:09 test-centos7 mysqld_safe[2565]: 150621 02:20:09 mysqld_safe Logging to '/var/log/mysqld.log'.
Jun 21 02:20:09 test-centos7 mysqld_safe[2565]: 150621 02:20:09 mysqld_safe Starting mysqld daemon with databases from /var/lib/mysql
Jun 21 02:20:10 test-centos7 systemd[1]: Started MySQL Community Server.
Jun 21 02:28:16 test-centos7 systemd[1]: mysqld.service: main process exited, code=killed, status=9/KILL
Jun 21 02:28:17 test-centos7 systemd[1]: Unit mysqld.service entered failed state.
Try to find the service status a few times, and each time the service will be shown as failed.
So, we have emulated a crash where the service has stopped and hasn't come back. This is because we have instructed systemd not to restart the service.
Now, if you edit the mysqld.service unit file again, uncomment the Restart parameter, save it, reload the systemctl daemon, and finally start the service, it should be back to what it was before.
This is how a native systemd service can be configured to auto-start after crash. All we have to do is to add an extra directive for Restart (and optionally RestartSec ) under the [Service] section of the service unit file.
结论
So this is how Linux handles service startup. We have seen how System V, Upstart, and systemd init processes work and how they relate to auto-starting a service after a reboot or crash.
The declarative syntax of Upstart config files or systemd unit files is an improvement over the arcane System V init scripts.
As you work with your own Linux environment, check your distribution's version and see what init daemon it supports.
It will be worthwhile to think about where would you want to enable a service and where would you want to disable it. In most cases, you don't have to change anything for third-party applications or native Linux daemons. It's only when you create your own service-based applications that you have to think about their startup and respawn behavior.


