介绍
监控系统在运行时接收和累积大量数据。监控系统运行时间越长,其收集的数据越多。 大多数监测系统没有用于长期数据分析和存储的工具。他们将保持每次读取,这导致存储问题,或在达到某个阈值时删除旧数据,这使我们无法在长时间内分析我们的系统性能。 一些监控系统,如Zabbix,提供了存储精确和平均数据值的能力,但是他们的定制能力非常有限。
时间序列数据库帮助我们解决存储大量历史数据的问题。时间序列仅仅是随时间的数据点序列,并且时间序列数据库被优化以存储这种类型的数据。 在本教程中,我们将向您展示如何安装和配置Graphite - 一种用于存储数字时间序列数据和渲染此数据图形的工具。它由三个软件组件组成:
- Carbon -监听时间序列数据,并使用存储后端写入磁盘守护进程
- Whisper -一个简单的数据库类似于RRDTool的用于存储的时间序列数据
- Graphite-Web -呈现的图表,并提供所获得的数据的功能丰富的可视化和分析一个Django的web应用程序
在我们的最终配置中,我们的监控代理向Carbon发送数据点,其中包含 Carbon中继, Carbon聚合器和 Carbon缓存组件。 Carbon将数据写入Whisper数据库。 Graphite-Web在网页上显示数据,用户可以查看。
先决条件
开始之前,请确保您已完成以下步骤:
- 部署CentOS 7 Droplet
- 通过遵循添加Sudo用户初始服务器设置
- 添加交换空间到你的服务器;示例4 GB的量是罚款
- 启用EPEL(企业Linux的额外软件包)存储库:
sudo yum -y install epel-release
更新系统:
sudo yum -y update
关于EPEL资源库的更多信息,请访问
fedoraproject.org 。
第1步 - 安装Graphite和 Carbon
安装所需的应用程序,包括与Python相关的工具和Apache Web服务器:
sudo yum install httpd mod_wsgi python-pip python-devel git pycairo libffi-devel
从GitHub获取Graphite和Carbon的最新源文件:
cd /usr/local/src
sudo git clone https://github.com/graphite-project/graphite-web.git
sudo git clone https://github.com/graphite-project/carbon.git
检查要求:
python /usr/local/src/graphite-web/check-dependencies.py
您将看到以下消息:
[REQUIRED] Unable to import the 'whisper' or 'ceres' modules, please download this package from the Graphite project page and install it.

    . . .

    6 optional dependencies not met. Please consider the optional items before proceeding.
    5 necessary dependencies not met. Graphite will not function until these dependencies are fulfilled.
所以你必须安装缺少的模块。首先安装
gcc :
sudo yum install gcc
然后安装模块:
sudo pip install -r /usr/local/src/graphite-web/requirements.txt
然后检查的版本
django-tagging包:
pip show django-tagging
如果包的版本小于0.3.4,那么您应该更新它:
sudo pip install -U django-tagging
再次检查要求:
python /usr/local/src/graphite-web/check-dependencies.py
现在你应该看到以下输出:
[OPTIONAL] Unable to import the 'ldap' module, do you have python-ldap installed for python 2.7.5? Without python-ldap, you will not be able to use LDAP authentication in the graphite webapp.
[OPTIONAL] Unable to import the 'python-rrdtool' module, this is required for reading RRD.
2 optional dependencies not met. Please consider the optional items before proceeding.
All necessary dependencies are met.
在本教程中,我们不需要LDAP认证或RRD数据库。 安装 Carbon:
cd /usr/local/src/carbon/
sudo python setup.py install
安装Web应用程序:
cd /usr/local/src/graphite-web/
sudo python setup.py install
现在所有组件都已安装,您已准备好配置Graphite。 Graphite包含几个示例配置文件。所有你需要的是复制和编辑它们,如下一步所示。
第2步 - 配置 Carbon
Carbon包括几项服务:
carbon-cache -接受的指标,并将其写入到磁盘carbon-relay -将数据复制carbon-aggregator -在前台运行carbon-cache在转发他们到 Whisper缓冲前一段时间指标
最后两个是可选的。
Carbon配置文件
主要的配置文件是
carbon.conf 。它定义每个Carbon守护程序的设置。 让我们复制一个示例文件:
sudo cp /opt/graphite/conf/carbon.conf.example /opt/graphite/conf/carbon.conf
此文件中的每个设置都通过文件本身中的信息注释来记录。您可以检查它们,但对于我们的教程,默认设置是合适的。
存储模式
接下来,您将需要编辑
storage-schemas.conf描述存储指标回头率文件。它匹配度量路径到模式,并告诉Whisper什么频率和数据点的历史存储。 数据占用的磁盘空间大小取决于此文件中的设置。 首先,复制示例文件的副本:
sudo cp /opt/graphite/conf/storage-schemas.conf.example /opt/graphite/conf/storage-schemas.conf
让我们打开文件进行编辑:
sudo vi /opt/graphite/conf/storage-schemas.conf
默认情况下,它包含两个部分:
[carbon]
pattern = ^carbon\.
retentions = 60:90d

[default_1min_for_1day]
pattern = .*
retentions = 60s:1d
每个部分具有:
- 一个名称,在方括号内指定
- 正则表达式,之后指定
pattern=
- 保留率线,经过指定的
retentions=
例如,让我们添加一个新的部分:
[zabbix_server]
pattern = ^Zabbix_server\.
retentions = 30s:7d,5m:30d,10m:1y
正则表达式模式将匹配以启动任何指标
Zabbix_server 。此外,此示例使用多个保留:
- 每个数据点表示30秒,并且我们希望保持高达7天的具有这样的频率的数据
- 过去30天的所有历史数据以5分钟间隔存储
- 所有过去一年的历史数据以10分钟为间隔存储
Whisper将在超过保留阈值时对指标进行降采样。
注意:部分是为了施加从顶部向底部和匹配度量名称用于第一图案!
存储聚合(可选)
接下来,您可能需要
storage-aggregation.conf文件定义如何聚合数据,以较低精度保留期限。此文件是可选的。如果不存在,将使用默认值。 创建示例文件的副本:
sudo cp /opt/graphite/conf/storage-aggregation.conf.example /opt/graphite/conf/storage-aggregation.conf
让我们来看看这个文件:
sudo vi /opt/graphite/conf/storage-aggregation.conf
默认情况下,它包含4个部分:
[min]
pattern = \.min$
xFilesFactor = 0.1
aggregationMethod = min

[max]
pattern = \.max$
xFilesFactor = 0.1
aggregationMethod = max

[sum]
pattern = \.count$
xFilesFactor = 0
aggregationMethod = sum

[default_average]
pattern = .*
xFilesFactor = 0.5
aggregationMethod = average
类似于
storage-schemas.conf文件中,每个部分具有方括号内指定的名称,以及之后指定正则表达式
pattern= 。每个部分还有两个附加参数:
xFilesFactor指定了先前的保留级别的插槽部分必须有非空值,以聚合为一个非空值。 默认值是0.5aggregationMethod指定函数( average , sum , min , max , last用于聚合值下一个保留级别)。 默认值是average
默认情况下,作为数据遇到下一个保留间隔,Graphite将总结与结尾的所有指标
.count ,得到的最小/最大结尾所有指标的
.min/.max分别与其他一切平均值。
继电器(可选)
carbon-relay用于复制和分片。
carbon-relay可与(或代替)一起运行
carbon-cache和继电器传入指标多个后端
carbon-caches在不同的端口或主机上运行。 要配置到其他主机的数据传输,必须编辑相应的配置文件。首先,复制示例文件的副本:
sudo cp /opt/graphite/conf/relay-rules.conf.example /opt/graphite/conf/relay-rules.conf
打开文件进行编辑:
sudo vi /opt/graphite/conf/relay-rules.conf
默认情况下,它包含一个单元,它将数据发送到localhost:
[default]
default = true
destinations = 127.0.0.1:2004:a, 127.0.0.1:2104:b
(
:a与
:b意味着相同的主机上可以运行 Carbon缓存的多个实例) 下面的例子显示了
carbon-relay设置,从发送数据
Zabbix_server到一个主机,而所有其他数据到其他三台主机:
[zabbix]
pattern = ^Zabbix_server\.
destinations = 10.0.0.4:2004

[default]
default = true
destinations = 127.0.0.1:2004, 10.0.0.2:2024, 10.0.0.3:2004
在第一部分中的正则表达式模式将匹配以启动任何指标
Zabbix_server ,所有数据将被传输到IP地址的主机
10.0.0.4 。所有其他数据将传输到localhost和两个其他主机。 中列出的所有目的地
relay-rules.conf也必须在上市
/opt/graphite/conf/carbon.conf文件,在
DESTINATIONS的设定
[relay]部分:
sudo vi /opt/graphite/conf/carbon.conf
我们添加了三个新的IP:
[relay]
...
DESTINATIONS = 127.0.0.1:2004, 10.0.0.2:2024, 10.0.0.3:2004, 10.0.0.4:2004
...
聚合(可选)
carbon-aggregator用于并报 Whisper数据库之前缓冲一段时间指标。 它可以在前面运行
carbon-cache 。汇总规则允许您将多个指标添加在一起,从而减少在每个网址中汇总多个指标的需要。 要配置数据聚合,首先复制示例文件:
sudo cp /opt/graphite/conf/aggregation-rules.conf.example /opt/graphite/conf/aggregation-rules.conf
此文件中每行的形式应如下所示:
output_template (frequency) = method input_pattern
这将捕获匹配任何所接收的度量
input_pattern用于计算聚合度。 计算将每发生
frequency秒。 可用聚合的方法有:
sum或
avg 。 总指标的名称将从中得到
output_template灌装从任何捕获领域
input_pattern 。 例如,让我们假设您的组织有25个分支机构,并且想要构建他们的总互联网流量的图表。
- collectd.monitoring-host.branch-01.if_octets.rx
- collectd.monitoring-host.branch-02.if_octets.rx
- collectd.monitoring-host.branch-03.if_octets.rx
- ... ...
- collectd.monitoring-host.branch-25.if_octets.rx
您可以存储来自每个分公司的数据,为每个分公司构建图形,然后对它们求和。 然而,这种类型的操作是昂贵的:为了呈现汇总图,您首先需要读取25个不同的度量,那么您需要通过应用求和函数来组合结果,最后构建图。 如果您只对总流量感兴趣,可以预先计算值。为此,您可以定义与正则表达式上的度量标准匹配的规则,将其缓冲指定的时间量,对缓冲的数据应用函数,并将结果存储在单独的度量标准中。所以配置如下:
collectd.monitoring-host.branches.if_octets.rx (60) = sum collectd.monitoring-host.*.if_octets.rx
给定此配置,度量将缓存60秒,使用sum函数组合,并存储到新的度量标准文件。
第3步 - 启动 Carbon服务
配置Carbon的init脚本。 首先,将它们复制到
/etc/init.d/ ,让他们的可执行文件:
sudo cp /usr/local/src/carbon/distro/redhat/init.d/carbon-* /etc/init.d/
sudo chmod +x /etc/init.d/carbon-*
启动
carbon-cache :
sudo systemctl start carbon-cache
如果您选择使用它们,启动
carbon-relay和
carbon-aggregator :
sudo systemctl start carbon-relay
sudo systemctl start carbon-aggregator
Carbon的配置已完成: Carbon正在运行并准备好接收数据。您现在可以配置Web界面。
第4步 - 配置Graphite-Web应用程序
Graphite-Web是在Apache / mod_wsgi下运行的Django Web应用程序。 复制示例设置文件:
sudo cp /opt/graphite/webapp/graphite/local_settings.py.example /opt/graphite/webapp/graphite/local_settings.py
打开文件进行编辑:
sudo vi /opt/graphite/webapp/graphite/local_settings.py
找到
SECRET_KEY并输入一个独特的价值。 这用于提供加密签名; 你可以把任何东西在这里只要它是独一无二的。 找到
TIME_ZONE它更新到安装的时区。 查看
时区的列表 ,如果需要的。
. . .

SECRET_KEY = 'enter_your_unique_secret_key_here'

. . .

TIME_ZONE = 'America/Chicago'

. . .
初始化新数据库:
cd /opt/graphite
sudo PYTHONPATH=/opt/graphite/webapp/ django-admin.py syncdb --settings=graphite.settings
您将看到以下输出。提示将询问您为数据库创建超级用户帐户的一些问题:
    Operations to perform:
      Synchronize unmigrated apps: url_shortener, account, dashboard, tagging, events
      Apply all migrations: admin, contenttypes, auth, sessions
    Synchronizing apps without migrations:
      Creating tables...
        Creating table account_profile

      . . .

      Applying sessions.0001_initial... OK

    You have installed Django's auth system, and don't have any superusers defined.
    Would you like to create one now? (yes/no): yes
    Username (leave blank to use 'root'): root
    Email address: sammy@example.com
    Password: password
    Password (again): password
    Superuser created successfully.
运行以下命令以收集单个目录中的所有静态文件:
sudo PYTHONPATH=/opt/graphite/webapp/ django-admin.py collectstatic --settings=graphite.settings
您将看到以下输出。回答
yes提示时:
You have requested to collect static files at the destination
location as specified in your settings:

/opt/graphite/static

This will overwrite existing files!
Are you sure you want to do this?

Type 'yes' to continue, or 'no' to cancel: yes
Copying '/opt/graphite/webapp/content/js/browser.js'
Copying '/opt/graphite/webapp/content/js/completer.js'
...
407 static files copied to '/opt/graphite/static'.
使所拥有适当的Graphite
apache用户:
sudo chown -R apache:apache /opt/graphite/storage/
sudo chown -R apache:apache /opt/graphite/static/
sudo chown -R apache:apache /opt/graphite/webapp/
要运行Web应用程序所需的
graphite.wsgi文件。 该文件包含代码
mod_wsgi在启动时执行中获得了应用对象。复制示例文件:
sudo cp /opt/graphite/conf/graphite.wsgi.example /opt/graphite/conf/graphite.wsgi
配置Apache。要了解一般更多关于Apache虚拟主机,请参阅
本教程 。从Graphite复制示例虚拟主机文件:
sudo cp /opt/graphite/examples/example-graphite-vhost.conf /etc/httpd/conf.d/graphite.conf
打开文件进行编辑:
sudo vi /etc/httpd/conf.d/graphite.conf
确保你的
ServerName设为您的域名或IP地址。 该
Alias行应该已正确设置。 添加
<Directory>下方块。
. . .

ServerName your_server_ip

. . .

Alias /static/ /opt/graphite/static/

<Directory /opt/graphite/static/>
   Require all granted
</Directory>
保存并关闭文件。
第5步 - 密码保护Graphite(推荐)
默认情况下,任何知道运行Web应用程序的服务器的地址的人都可以查看任何数据。为了防止这种情况,您可以设置密码访问。 创建一个新文件夹并设置权限:
sudo mkdir /opt/graphite/secure
sudo chown -R apache:apache /opt/graphite/secure
使用
htpasswd创建一个新的用户名和密码,这将限制访问 Graphite-Web应用程序。 在下面你的例子中可以看到如何创建用户
sammy并添加一个新的密码:
sudo htpasswd -c /opt/graphite/secure/.passwd sammy
New password: password
Re-type new password: password
Adding password for user sammy
配置Apache。在
Require user线,则必须为在上一步中指定同一个名字:
sudo vi /etc/httpd/conf.d/graphite.conf
加入这个新的
<Location>块主虚拟主机块的任何地方:
<Location "/">
     AuthType Basic
     AuthName "Private Area"
     AuthUserFile /opt/graphite/secure/.passwd
     Require user sammy
</Location>
保存并关闭文件。
第6步 - 运行Graphite-Web
启动Apache服务并将其包括在启动时启动:
sudo systemctl start httpd
sudo systemctl enable httpd
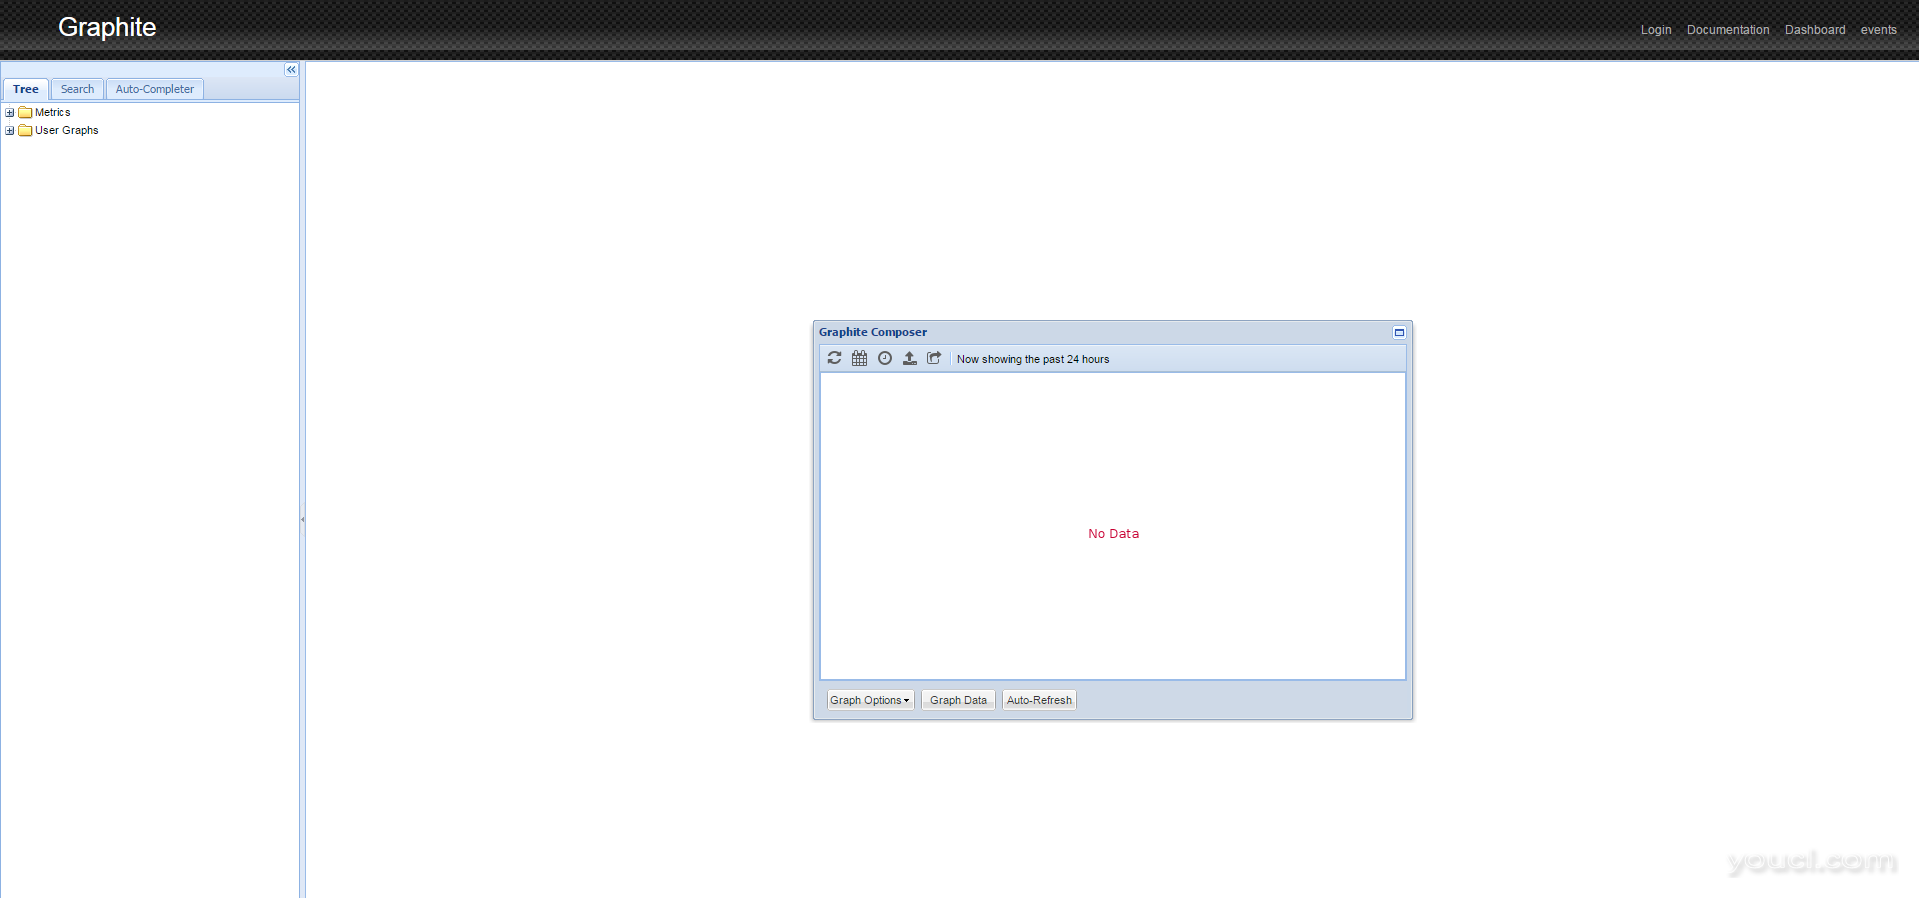
安装完成!启动浏览器并转到地址
http:// your_server_ip / 。 输入您在第5步中设置的用户名和密码。 您将看到以下内容:

第7步 - 从collectd发布指标
Graphite可以使用来自许多不同监测服务的数据。在这个例子中,我们将使用collectd。它是一个守护进程,它定期收集系统性能统计信息,并提供以各种方式存储或发送值的机制。 有关collectd更多信息可在
官方网站 。 安装collectd:
sudo yum install collectd
配置文件包含许多设置。打开文件进行编辑:
sudo vi /etc/collectd.conf
完成以下操作:
- 设置
Hostname在全局设置。这可以是任何您想要的名称,并将在Web界面中用于指定此主机。
Hostname "Monitor"
LoadPlugin write_graphite
- 编辑在设置
<Plugin write_graphite>块以下几点:
<Plugin write_graphite>
  <Node "localhost">
    Host "localhost"
    Port "2003"
  Protocol "tcp"
 LogSendErrors true
  Prefix "collectd."
    # Postfix "collectd"
  StoreRates true
   AlwaysAppendDS false
  EscapeCharacter "_"
  </Node>
</Plugin>
所述的主要参数
write_graphite插件:
Host ( 必需 ) - Carbon收集代理的主机名。在我们的例子中,它在localhost上工作Port ( 必需 ) -用于 Carbon收集代理的端口。 在我们的例子中, carbon-relay侦听端口2003Prefix -追加到发送到 Carbon的主机名的前缀字符串。我们已经添加了点,因此Graphite可以自动分组主机Postfix -追加到发送到 Carbon的主机名的Stapling串。我们不需要这个选项,因为我们设置了前缀,所以你可以禁用它
开始收集以开始向Graphite发送指标:
sudo systemctl start collectd.service
注意:要解决问题,检查ollectd状态的状态用命令sudo systemctl status collectd.service 。
这将告诉你,如果它有任何麻烦写入Graphite。 Collectd立即开始向Graphite发送数据。刷新网页。如果展开
度量文件夹,你应该看到
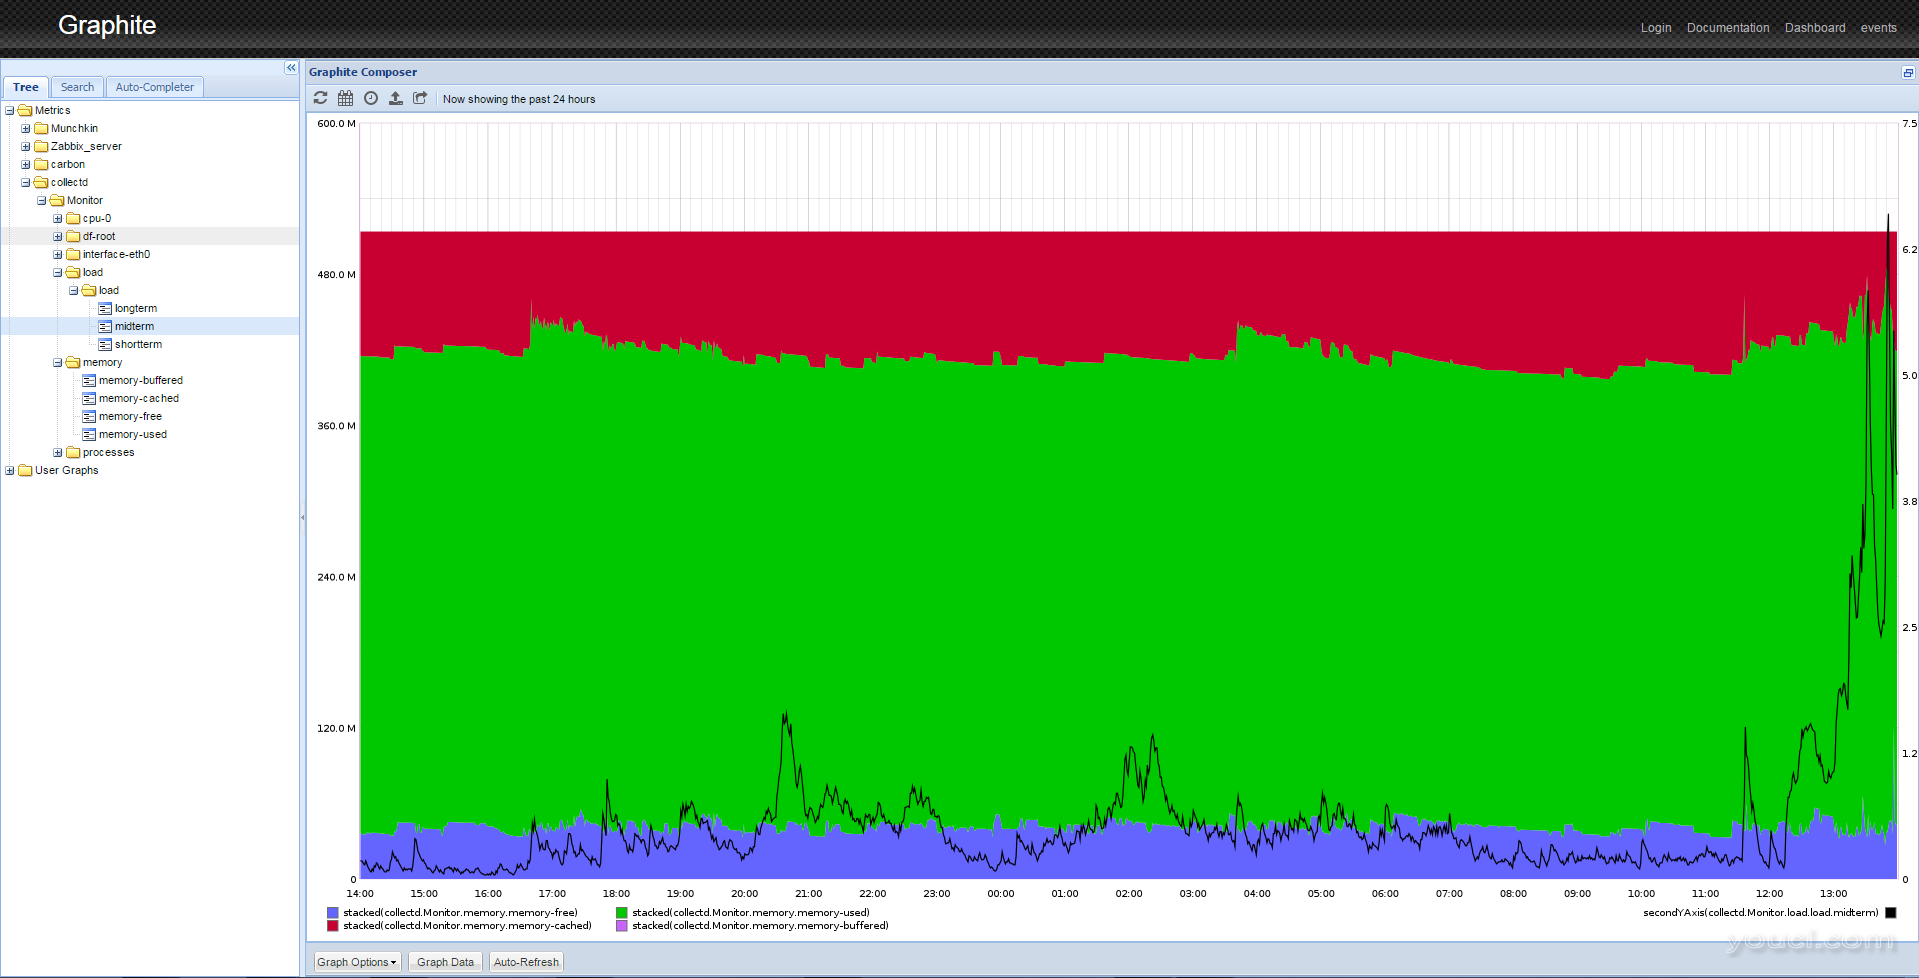
collectd上市。一段时间后,您将能够看到数据的漂亮图形,如下所示。

第8步 - 处理数据
Graphite具有复杂的数据显示选项。例如,要获取类似于上图所示的图像,您需要执行几个操作。
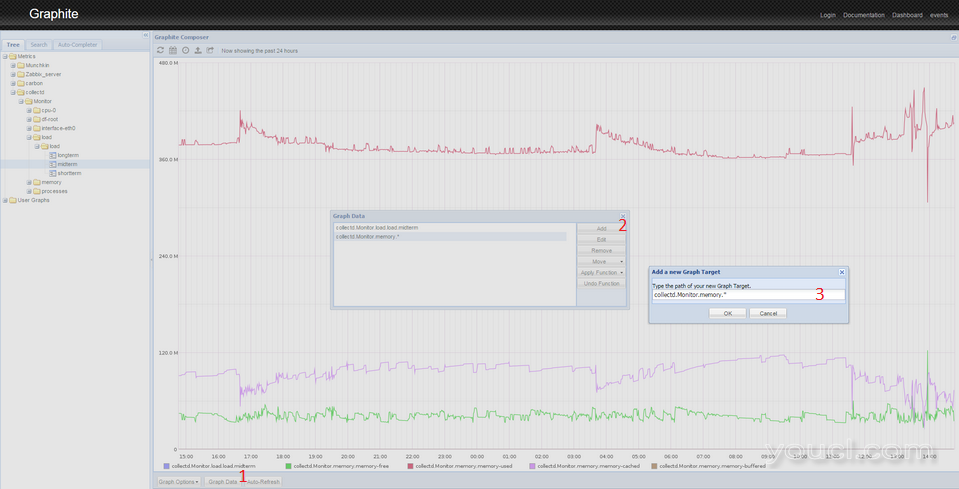
- 从左边的面板中,单击度量 > collectd> 监视器 (或
Hostname > 负载 > 负载 > 中期在第7步配置)。您将看到负载平均值的图表。

- 单击图形下方的图表数据按钮。
- 点击弹出右侧的添加按钮。
- 粘贴以下行:
collectd. Monitor .memory.* 。 这将选择所有与内存相关的图形。 如果你的主机使用了不同的名称,使用该名称,而不是Monitor 。
- 按OK。您将在单个屏幕上看到几个图形。由于尺度的差异,负载曲线变成线。要解决这个问题,您必须对图进行以下操作。
- 再次单击图表数据按钮。
- 选择
collectd. Monitor .load.load.midterm线。
- 单击应用功能按钮。
- 选择特殊 > 绘制在第二Y轴
- 再次单击应用功能 。
- 选择特殊 > 颜色 。
- 进入
black ,按OK。
- 选择
collectd.Monitor.memory.*线。
- 单击应用功能 。
- 选择特殊 > 绘制堆积 。
- 您将看到类似于第7步结束时显示的图像。
这只是一种显示服务器数据的方法。您可以在同一图表上混合和组合不同的数据,应用不同的函数,缩放数据,计算移动平均值,预测数据等。
结论
Graphite是一种用于存储和分析时间序列数据的强大工具。完成本教程后,您应该大致了解如何安装它,进行基本设置,将数据导入其中,以及操作累积的数据。 Graphite可用作仪表板。您可以监控关键指标:CPU利用率,内存使用率,网络接口利用率等。 Graphite具有许多用于数据分析的功能。您可以使用这些函数来对序列数据进行变换,组合和执行计算。大多数函数可以顺序应用。例如,您可以汇总来自所有分支机构的传入流量,然后将其与传出流量的总和进行比较。或者,您可以汇总来自所有分支机构的所有传入和传出流量,在长时间内构建摘要图表,并查看未来容量规划的趋势。


