Elasticsearch是灵活的,功能强大的开源,分布式实时搜索和分析引擎。使用一个简单的API集,它提供了全文搜索的能力。在Apache 2中弹性搜索免费提供许可,它提供了最大的灵活性。
 本教程将帮助你在CentOS,RedHat,Ubuntu,Debian和LinuxMint系统安装Elasticsearch单节点集群。
1.验证Java
Java是用于安装Elasticsearch的主要要求。因此,请确保你已经在系统上安装了Java。
# java -version

java version "1.8.0_31"
Java(TM) SE Runtime Environment (build 1.8.0_31-b13)
Java HotSpot(TM) 64-Bit Server VM (build 25.31-b07, mixed mode)
如果您没有在系统上安装Java,使用下面的一个环节先安装它。
2.下载Elasticsearch
现在,从
官方下载页面下载最新的Elasticsearch存档。在这篇文章中Elasticsearch 2.3.1版本的最后一次更新的时间是最新的版本可供下载。
$ /tmp
$ wget https://download.elastic.co/elasticsearch/elasticsearch/elasticsearch-2.3.1.tar.gz
现在,提取您的系统上下载的存档Elasticsearch。
$ tar xzf elasticsearch-2.3.1.tar.gz
3.配置Elasticsearch
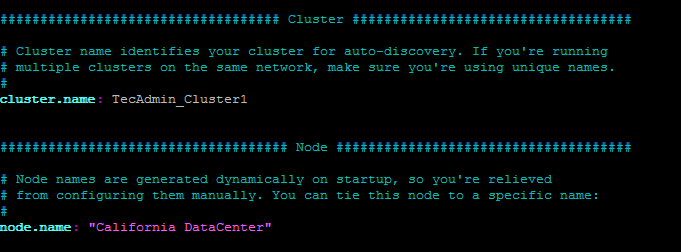
现在,我们需要设置Elasticsearch集群和节点名称。 Elasticsearch 使用“elasticsearch“作为默认群集名称,我们建议根据您的设置改变它。
$ mv elasticsearch-2.3.1 /usr/share/elasticsearch
$ cd /usr/share/elasticsearch
要更改以下值集群命名编辑
config/elasticsearch.yml文件并更新。节点名称是动态生成的,但为了保持一个固定的用户友好的名称。您可能还需要从远程主机更改网络主机访问elasticsearch。
$ vim config/elasticsearch.yml
  network.host: 192.168.10.100
  cluster.name: youcl_Cluster1
  node.name: "California DataCenter"

4.安装Elasticsearch-Head Plugin
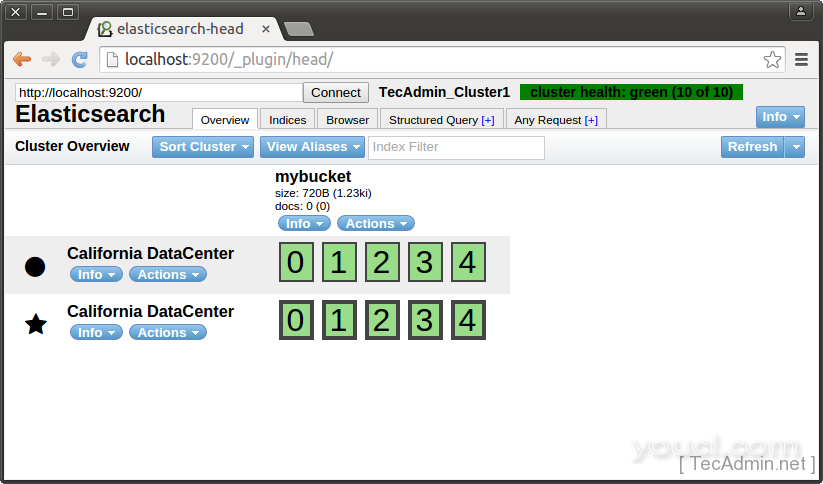
elasticsearch头是一个Web前端浏览和有弹性的搜索集群。使用下面的命令来安装它。
$ bin/plugin install mobz/elasticsearch-head
5.启动Elasticsearch集群
Elasticsearch安装完成。让我们启动Elasticsearch集群,使用以下命令。
$ ./bin/elasticsearch &
6.验证安装
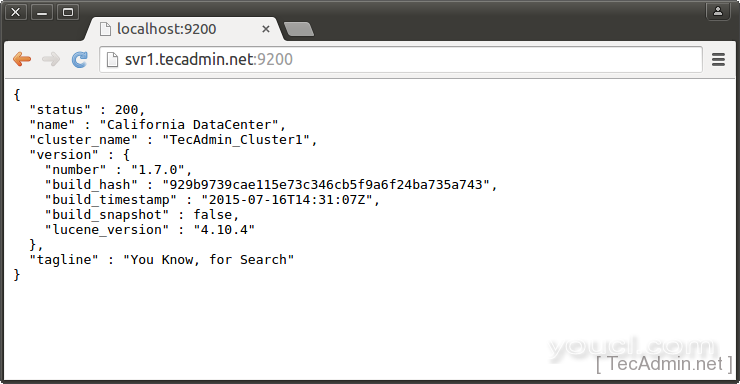
你已经全部完成,只需要验证设置。 Elasticsearch工作在端口默认端口9200,打开浏览器指向端口9200的服务器,你会发现有些东西,像下面的输出
http://localhost:9200/_plugin/head/

http://svt1.youcl.com:9200/

7. Elasticsearch使用的基本例子
下面的例子将帮助你在Elasticsearch集群添加,获取和检索数据。
创建桶
curl -XPUT http://localhost:9200/mybucket
输出:
{"acknowledged":true}
将数据添加到Elasticsearch
使用下面的命令来在Elasticsearch添加一些数据。
命令1:
curl -XPUT 'http://localhost:9200/mybucket/user/johny' -d '{ "name" : "Rahul Kumar" }'
输出:
{"_index":"mybucket","_type":"user","_id":"johny","_version":1,"created":true}
命令2:
curl -XPUT 'http://localhost:9200/mybucket/post/1' -d '
{
    "user": "Rahul",
    "postDate": "01-15-2015",
    "body": "This is Demo Post 1 in Elasticsearch" ,
    "title": "Demo Post 1"
}'
输出:
{"_index":"mybucket","_type":"post","_id":"1","_version":1,"created":true}
命令3:
curl -XPUT 'http://localhost:9200/mybucket/post/2' -d '
{
    "user": "youcl",
    "postDate": "01-15-2015",
    "body": "This is Demo Post 2 in Elasticsearch" ,
    "title": "Demo Post 2"
}'
输出:
{"_index":"mybucket","_type":"post","_id":"2","_version":1,"created":true}
从Elasticsearch获取数据
使用以下命令从ElasticSearch获取数据,读取输出。
curl -XGET 'http://localhost:9200/mybucket/user/johny?pretty=true'
curl -XGET 'http://localhost:9200/mybucket/post/1?pretty=true'
curl -XGET 'http://localhost:9200/mybucket/post/2?pretty=true'
在Elasticsearch中搜索
使用以下命令从弹性搜索中搜索数据。下面的命令将搜索与用户关联和Johny所有数据。
curl 'http://localhost:9200/mybucket/post/_search?q=user:youcl&pretty=true'
输出:
{
  "took" : 145,
  "timed_out" : false,
  "_shards" : {
    "total" : 5,
    "successful" : 5,
    "failed" : 0
  },
  "hits" : {
    "total" : 1,
    "max_score" : 0.30685282,
    "hits" : [ {
      "_index" : "mybucket",
      "_type" : "post",
      "_id" : "2",
      "_score" : 0.30685282,
      "_source":
{
    "user": "youcl",
    "postDate": "01-15-2015",
    "body": "This is Demo Post 2 in Elasticsearch" ,
    "title": "Demo Post 2"
}
    } ]
  }
}
祝贺您!您已成功在Linux系统上安装配置elasticsearch单节点集群。
 本教程将帮助你在CentOS,RedHat,Ubuntu,Debian和LinuxMint系统安装Elasticsearch单节点集群。


