我们继续PyGObject编程系列与你在Linux桌面上,在系列中,我们将解释如何打包,我们使用PyGObject作为Debian软件包Linux桌面创建的程序和应用程序的第四部分。
包装应用程序作为Deb包
Debian软件包(.deb文件 )的Linux上, 使用“dpkg”系统,该系统具有.deb软件包交易是所有基于Debian的Linux发行版如Ubuntu和Linux Mint的默认下安装程序最常用的格式。 这就是为什么我们将只解释如何打包我们的程序为Debian。
从PyGObject应用程序创建Debian软件包
首先,你应该有一些关于创建Debian软件包的基本知识,下面的指南将帮助你。
简单地说,如果你有项目,称为“myprogram”,它必须包含以下文件和文件夹,这样就可以打包。
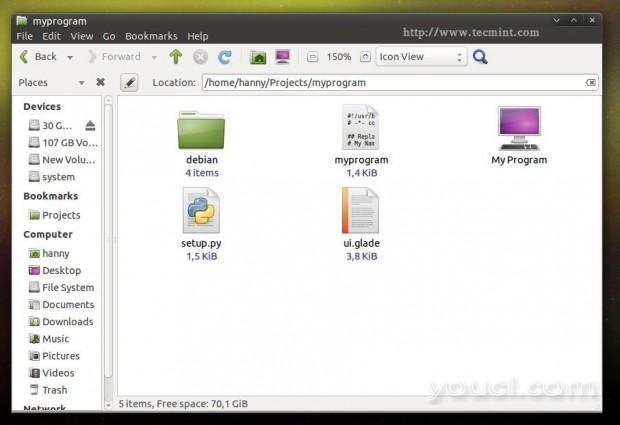
创建Deb包
- Debian的 (文件夹):此文件夹包含有关Debian包分为多个子文件中的所有信息。
- PO(文件夹):蒲文件夹包含该程序的翻译文件(我们将在第5部分解释)。
- myprogram(文件):这是我们创建使用PyGObject Python的文件,这是该项目的主文件。
- ui.glade(文件):图形用户界面的文件。如果您已使用格莱德应用程序的界面,你必须在这个文件
您的项目。 - bMyprogram.desktop(文件):这是表示在应用程序菜单的应用程序负责文件。
- setup.py(文件):这个文件是负责安装任何Python程序到本地系统,它在任何Python程序非常重要,它有使用的许多其他方面也。
当然..有很多其他文件和文件夹,你可以包括在你的项目(事实上,你可以包括任何你想要的),但那些是基本的。
现在,让我们开始打包一个项目。 创建一个名为“myprogram”新文件夹,创建一个名为“myprogram”文件,下面的代码添加到它。
#!/usr/bin/python
# -*- coding: utf-8 -*-
## Replace your name and email.
# My Name <myemail@email.com>
## Here you must add the license of the file, replace "MyProgram" with your program name.
# License:
#    MyProgram is free software: you can redistribute it and/or modify
#    it under the terms of the GNU General Public License as published by
#    the Free Software Foundation, either version 3 of the License, or
#    (at your option) any later version.
#
#    MyProgram is distributed in the hope that it will be useful,
#    but WITHOUT ANY WARRANTY; without even the implied warranty of
#    MERCHANTABILITY or FITNESS FOR A PARTICULAR PURPOSE.  See the
#    GNU General Public License for more details.
#
#    You should have received a copy of the GNU General Public License
#    along with MyProgram.  If not, see <http://www.gnu.org/licenses/>.
from gi.repository import Gtk
import os
class Handler:
def openterminal(self, button):
## When the user clicks on the first button, the terminal will be opened.
os.system("x-terminal-emulator ")
def closeprogram(self, button):
Gtk.main_quit()
# Nothing new here.. We just imported the 'ui.glade' file.
builder = Gtk.Builder()
builder.add_from_file("/usr/lib/myprogram/ui.glade")
builder.connect_signals(Handler())
window = builder.get_object("window1")
window.connect("delete-event", Gtk.main_quit)
window.show_all()
Gtk.main()
创建一个ui.glade文件,并使用此代码填充它。
<?xml version="1.0" encoding="UTF-8"?>
<!-- Generated with glade 3.16.1 -->
<interface>
<requires lib="gtk+" version="3.10"/>
<object class="GtkWindow" id="window1">
<property name="can_focus">False</property>
<property name="title" translatable="yes">My Program</property>
<property name="window_position">center</property>
<property name="icon_name">applications-utilities</property>
<property name="gravity">center</property>
<child>
<object class="GtkBox" id="box1">
<property name="visible">True</property>
<property name="can_focus">False</property>
<property name="margin_left">5</property>
<property name="margin_right">5</property>
<property name="margin_top">5</property>
<property name="margin_bottom">5</property>
<property name="orientation">vertical</property>
<property name="homogeneous">True</property>
<child>
<object class="GtkLabel" id="label1">
<property name="visible">True</property>
<property name="can_focus">False</property>
<property name="label" translatable="yes">Welcome to this Test Program !</property>
</object>
<packing>
<property name="expand">False</property>
<property name="fill">True</property>
<property name="position">0</property>
</packing>
</child>
<child>
<object class="GtkButton" id="button2">
<property name="label" translatable="yes">Click on me to open the Terminal</property>
<property name="visible">True</property>
<property name="can_focus">True</property>
<property name="receives_default">True</property>
<signal name="clicked" handler="openterminal" swapped="no"/>
</object>
<packing>
<property name="expand">False</property>
<property name="fill">True</property>
<property name="position">1</property>
</packing>
</child>
<child>
<object class="GtkButton" id="button3">
<property name="label">gtk-preferences</property>
<property name="visible">True</property>
<property name="can_focus">True</property>
<property name="receives_default">True</property>
<property name="use_stock">True</property>
</object>
<packing>
<property name="expand">False</property>
<property name="fill">True</property>
<property name="position">2</property>
</packing>
</child>
<child>
<object class="GtkButton" id="button4">
<property name="label">gtk-about</property>
<property name="visible">True</property>
<property name="can_focus">True</property>
<property name="receives_default">True</property>
<property name="use_stock">True</property>
</object>
<packing>
<property name="expand">False</property>
<property name="fill">True</property>
<property name="position">3</property>
</packing>
</child>
<child>
<object class="GtkButton" id="button1">
<property name="label">gtk-close</property>
<property name="visible">True</property>
<property name="can_focus">True</property>
<property name="receives_default">True</property>
<property name="use_stock">True</property>
<signal name="clicked" handler="closeprogram" swapped="no"/>
</object>
<packing>
<property name="expand">False</property>
<property name="fill">True</property>
<property name="position">4</property>
</packing>
</child>
</object>
</child>
</object>
</interface>
到目前为止没有什么新东西。我们刚刚创建了一个Python文件及其接口文件。 现在创建在同一文件夹一个“setup.py”的文件,并将下面的代码添加到它,每一行中的注释说明。
# Here we imported the 'setup' module which allows us to install Python scripts to the local system beside performing some other tasks, you can find the documentation here: https://docs.python.org/2/distutils/apiref.html
from distutils.core import setup
setup(name = "myprogram", # Name of the program.
version = "1.0", # Version of the program.
description = "An easy-to-use web interface to create & share pastes easily", # You don't need any help here.
author = "youcl", # Nor here.
author_email = "myemail@mail.com",# Nor here :D
url = "http://example.com", # If you have a website for you program.. put it here.
license='GPLv3', # The license of the program.
scripts=['myprogram'], # This is the name of the main Python script file, in our case it's "myprogram", it's the file that we added under the "myprogram" folder.
# Here you can choose where do you want to install your files on the local system, the "myprogram" file will be automatically installed in its correct place later, so you have only to choose where do you want to install the optional files that you shape with the Python script
data_files = [ ("lib/myprogram", ["ui.glade"]), # This is going to install the "ui.glade" file under the /usr/lib/myprogram path.
("share/applications", ["myprogram.desktop"]) ] ) # And this is going to install the .desktop file under the /usr/share/applications folder, all the folder are automatically installed under the /usr folder in your root partition, you don't need to add "/usr/ to the path.
现在创建在同一文件夹一个“myprogram.desktop”的文件,并添加以下代码,它在评论中解释为好。
# This is the .desktop file, this file is the responsible file about showing your application in the applications menu in any desktop interface, it's important to add this file to your project, you can view more details about this file from here: https://developer.gnome.org/integration-guide/stable/desktop-files.html.en
[Desktop Entry]
# The default name of the program.
Name=My Program
# The name of the program in the Arabic language, this name will be used to display the application under the applications menu when the default language of the system is Arabic, use the languages codes to change the name for each language.
Name[ar]=برنامجي
# Description of the file.
Comment=A simple test program developed by me.
# Description of the file in Arabic.
Comment[ar]=برنامج تجريبي بسيط تم تطويره بواسطتي.
# The command that's going to be executed when the application is launched from the applications menu, you can enter the name of the Python script or the full path if you want like /usr/bin/myprogram
Exec=myprogram
# Do you want to run your program from the terminal?
Terminal=false
# Leave this like that.
Type=Application
# Enter the name of the icon you want to use for the application, you can enter a path for the icon as well like /usr/share/pixmaps/icon.png but make sure to include the icon.png file in your project folder first and in the setup.py file as well. Here we'll use the "system" icon for now.
Icon=system
# The category of the file, you can view the available categories from the freedesktop website.
Categories=GNOME;GTK;Utility;
StartupNotify=false
我们这里几乎现在完成了。我们只是为了提供有关我们包了“dpkg的 ”系统信息打造的“Debian的 ”文件夹下的一些小文件。
打开“Debian的 ”文件夹中,并创建以下文件。
control
compat
changelog
rules
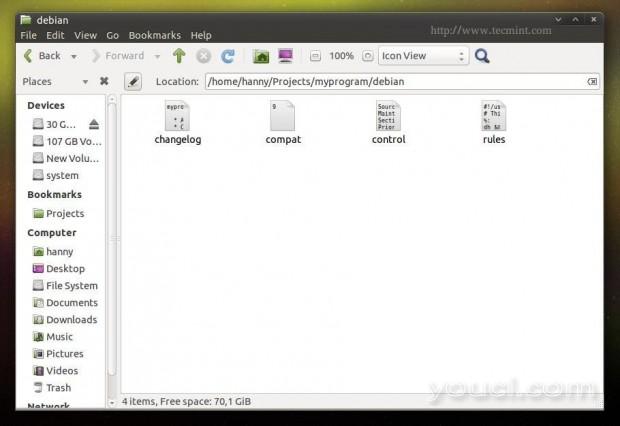
Deb包的项目文件
控制 :此文件提供了有关Debian软件包的基本信息,了解更多详情,请访问Debian软件包控制领域 。
Source: myprogram
Maintainer: My Name <myemail@email.com>
Section: utils
Priority: optional
Standards-Version: 3.9.2
Build-Depends: debhelper (>= 9), python2.7
Package: myprogram
Architecture: all
Depends: python-gi
Description: My Program
Here you can add a short description about your program.
COMPAT:这只是一个重要文件,为dpkg的系统,它只是包含了神奇的9数字,离开它这样。
9
更新日志 :在这里你就可以添加你做的变化对你的程序,以获取更多信息,请访问Debian软件包更新日志源 。
myprogram (1.0) trusty; urgency=medium
* Add the new features here.
* Continue adding new changes here.
* And here.
-- My Name Here <myemail@mail.com>  Sat, 27 Dec 2014 21:36:33 +0200
规则 :这个文件是负责有关运行在本地计算机上安装过程中安装的软件包,您可以查看更多信息
有关此文件从这里: Debian软件包的默认规则 。
虽然你不需要任何更多的Python程序。
#!/usr/bin/make -f
# This file is responsible about running the installation process on the local machine to install the package, you can view more information about this file from here: https://www.debian.org/doc/manuals/maint-guide/dreq.en.html#defaultrules Though you won't need anything more for your Python program.
%:
dh $@
override_dh_auto_install:
python setup.py install --root=debian/myprogram --install-layout=deb --install-scripts=/usr/bin/ # This is going to run the setup.py file to install the program as a Python script on the system, it's also going to install the "myprogram" script under /usr/bin/ using the --install-scripts option, DON'T FORGET TO REPLACE "myprogram" WITH YOUR PROGRAM NAME.
override_dh_auto_build:
现在我们为我们的程序成功创建了所有必要的文件,现在让我们开始打包它。 首先,确保在开始之前已经为构建过程安装了一些依赖关系。
$ sudo apt-get update
$ sudo apt-get install devscripts
现在想象一下,在“myprogram”文件夹中的个人文件夹(/ home / user中/ myprogram),以打包作为一个Debian软件包,运行以下命令。
$ cd /home/user/myprogram
$ debuild -us -uc
示例输出
hanny@hanny-HP-Pavilion-15-Notebook-PC:~/Projects/myprogram$
debuild -us -uc dpkg-buildpackage -rfakeroot -D -us -uc
dpkg-buildpackage: source package myprogram
dpkg-buildpackage: source version 1.0
dpkg-buildpackage: source distribution trusty
dpkg-buildpackage: source changed by My Name Here
<myemail@email.com>
dpkg-source --before-build myprogram
dpkg-buildpackage: host architecture i386
fakeroot debian/rules clean
dh clean
dh_testdir
dh_auto_clean
....
.....
Finished running lintian.
就是这样! 您的Debian软件包已成功创建:
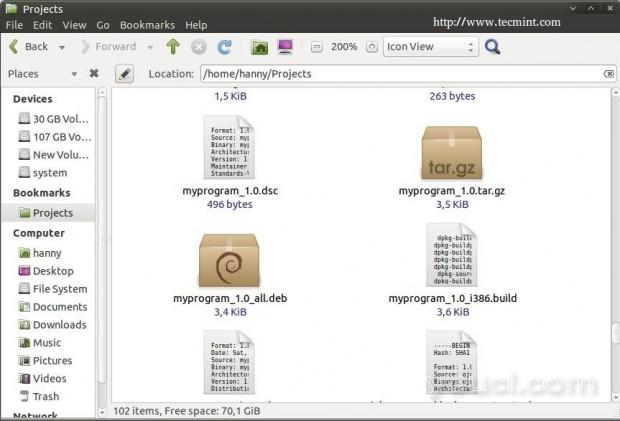
创建Debian软件包
为了安装在任何基于Debian的分发,运行。
$ sudo dpkg -i myprogram_1.0_all.deb
不要忘记用软件包的名称替换上述文件。现在安装软件包后,可以从应用程序菜单运行该程序。
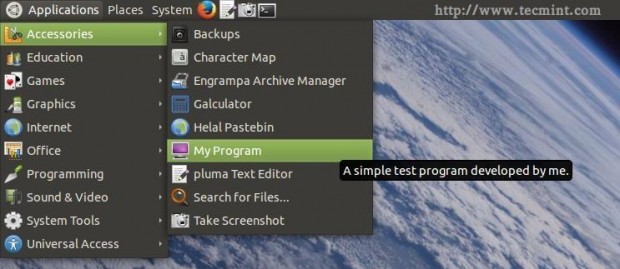
运行程序
它会工作..
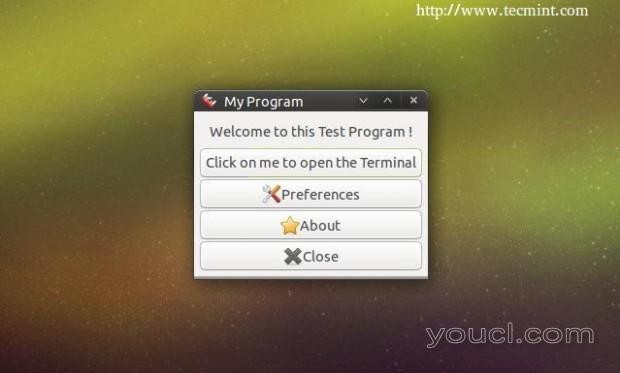
第一个包装程序
在这里,我们结束对PyGObject系列的第四部分。在下一课,我们将解释如何轻松地本地化应用PyGObject,直到再留tunned它...


