我们继续PyGObject编程系列与你在这里在这个第五部分,我们将学习如何给我们的PyGObject应用程序翻译成不同的语言。 翻译您的应用程序是重要的,如果你要发布它的世界,它将更加用户友好的最终用户,因为不是每个人都理解英语。

翻译PyGObject应用程序语言
翻译过程如何运作
我们可以总结在Linux桌面下翻译任何程序的步骤:
- 从Python文件中提取可翻译字符串。
- 保存字符串成.POT文件,该文件格式,使您可以在以后翻译成其他语言。
- 开始翻译字符串。
- 导出新的字符串翻译成时将系统语言改变自动使用一个.po文件。
- 添加到主Python的文件和.desktop文件一些小的方案变化。
就是这样! 完成这些步骤后,您的应用程序将准备好为来自全球各地的最终用户使用(将..您必须将您的程序翻译为全球各地的所有语言!),听起来容易吗? :-)
首先,要节省一些时间,请从下面的链接下载项目文件,并解压缩到您的主目录中。
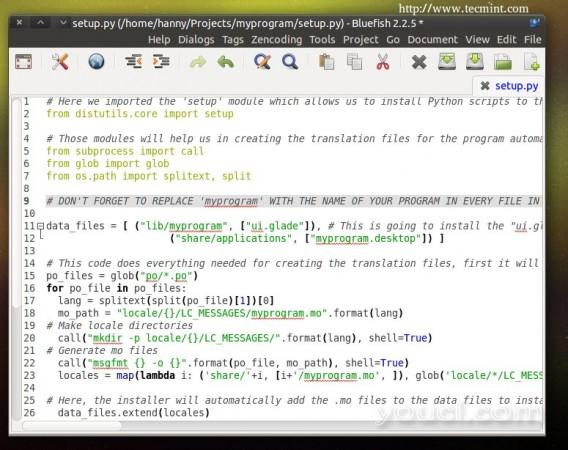
打开“setup.py”的文件,并注意我们做的更改:

翻译代码
# Here we imported the 'setup' module which allows us to install Python scripts to the local system beside performing some other tasks, you can find the documentation here: https://docs.python.org/2/distutils/apiref.html
from distutils.core import setup
# Those modules will help us in creating the translation files for the program automatically.
from subprocess import call
from glob import glob
from os.path import splitext, split
# DON'T FOTGET TO REPLACE 'myprogram' WITH THE NAME OF YOUR PROGRAM IN EVERY FILE IN THIS PROJECT.
data_files = [ ("lib/myprogram", ["ui.glade"]), # This is going to install the "ui.glade" file under the /usr/lib/myprogram path.
("share/applications", ["myprogram.desktop"]) ]
# This code does everything needed for creating the translation files, first it will look for all the .po files inside the po folder, then it will define the default path for where to install the translation files (.mo) on the local system, then it's going to create the directory on the local system for the translation files of our program and finally it's going to convert all the .po files into .mo files using the "msgfmt" command.
po_files = glob("po/*.po")
for po_file in po_files:
lang = splitext(split(po_file)[1])[0]
mo_path = "locale/{}/LC_MESSAGES/myprogram.mo".format(lang)
# Make locale directories
call("mkdir -p locale/{}/LC_MESSAGES/".format(lang), shell=True)
# Generate mo files
call("msgfmt {} -o {}".format(po_file, mo_path), shell=True)
locales = map(lambda i: ('share/'+i, [i+'/myprogram.mo', ]), glob('locale/*/LC_MESSAGES'))
# Here, the installer will automatically add the .mo files to the data files to install them later.
data_files.extend(locales)
setup(name = "myprogram", # Name of the program.
version = "1.0", # Version of the program.
description = "An easy-to-use web interface to create & share pastes easily", # You don't need any help here.
author = "youcl", # Nor here.
author_email = "myemail@mail.com",# Nor here :D
url = "http://example.com", # If you have a website for you program.. put it here.
license='GPLv3', # The license of the program.
scripts=['myprogram'], # This is the name of the main Python script file, in our case it's "myprogram", it's the file that we added under the "myprogram" folder.
# Here you can choose where do you want to install your files on the local system, the "myprogram" file will be automatically installed in its correct place later, so you have only to choose where do you want to install the optional files that you shape with the Python script
data_files=data_files) # And this is going to install the .desktop file under the /usr/share/applications folder, all the folder are automatically installed under the /usr folder in your root partition, you don't need to add "/usr/ to the path.
同时打开“myprogram”文件,看到我们所做的,所有的变化都在评论中解释了方案变动:
#!/usr/bin/python
# -*- coding: utf-8 -*-
## Replace your name and email.
# My Name <myemail@email.com>
## Here you must add the license of the file, replace "MyProgram" with your program name.
# License:
#    MyProgram is free software: you can redistribute it and/or modify
#    it under the terms of the GNU General Public License as published by
#    the Free Software Foundation, either version 3 of the License, or
#    (at your option) any later version.
#
#    MyProgram is distributed in the hope that it will be useful,
#    but WITHOUT ANY WARRANTY; without even the implied warranty of
#    MERCHANTABILITY or FITNESS FOR A PARTICULAR PURPOSE.  See the
#    GNU General Public License for more details.
#
#    You should have received a copy of the GNU General Public License
#    along with MyProgram.  If not, see <http://www.gnu.org/licenses/>.
from gi.repository import Gtk
import os, gettext, locale
## This is the programmatic change that you need to add to the Python file, just replace "myprogram" with the name of your program. The "locale" and "gettext" modules will take care about the rest of the operation.
locale.setlocale(locale.LC_ALL, '')
gettext.bindtextdomain('myprogram', '/usr/share/locale')
gettext.textdomain('myprogram')
_ = gettext.gettext
gettext.install("myprogram", "/usr/share/locale")
class Handler:
def openterminal(self, button):
## When the user clicks on the first button, the terminal will be opened.
os.system("x-terminal-emulator ")
def closeprogram(self, button):
Gtk.main_quit()
# Nothing new here.. We just imported the 'ui.glade' file.
builder = Gtk.Builder()
builder.add_from_file("/usr/lib/myprogram/ui.glade")
builder.connect_signals(Handler())
label = builder.get_object("label1")
# Here's another small change, instead of setting the text to ("Welcome to my Test program!") we must add a "_" char before it in order to allow the responsible scripts about the translation process to recognize that it's a translatable string.
label.set_text(_("Welcome to my Test program !"))
button = builder.get_object("button2")
# And here's the same thing.. You must do this for all the texts in your program, elsewhere, they won't be translated.
button.set_label(_("Click on me to open the Terminal"))
window = builder.get_object("window1")
window.connect("delete-event", Gtk.main_quit)
window.show_all()
Gtk.main()
现在..让我们开始翻译我们的程序。 首先创建.POT文件(包含程序中所有的翻译字符串的文件),这样你
可以使用以下命令开始翻译:
$ cd myprogram
$ xgettext --language=Python --keyword=_ -o po/myprogram.pot myprogram
这将创造一个包含以下代码的主要项目文件夹中的“PO”文件夹中的“myprogram.pot”文件:
# SOME DESCRIPTIVE TITLE.
# Copyright (C) YEAR THE PACKAGE'S COPYRIGHT HOLDER
# This file is distributed under the same license as the PACKAGE package.
# FIRST AUTHOR <EMAIL@ADDRESS>, YEAR.
#
#, fuzzy
msgid ""
msgstr ""
"Project-Id-Version: PACKAGE VERSION\n"
"Report-Msgid-Bugs-To: \n"
"POT-Creation-Date: 2014-12-29 21:28+0200\n"
"PO-Revision-Date: YEAR-MO-DA HO:MI+ZONE\n"
"Last-Translator: FULL NAME <EMAIL@ADDRESS>\n"
"Language-Team: LANGUAGE <LL@li.org>\n"
"Language: \n"
"MIME-Version: 1.0\n"
"Content-Type: text/plain; charset=CHARSET\n"
"Content-Transfer-Encoding: 8bit\n"
#: myprogram:48
msgid "Welcome to my Test program !"
msgstr ""
#: myprogram:52
msgid "Click on me to open the Terminal"
msgstr ""
现在,为了开始翻译字符串..创建要你的程序转换为使用“ 宝 ”文件夹中的“ISO-639-1”语言代码,例如每种语言分隔的文件,如果你想翻译你的程序阿拉伯语 ,创建一个名为“ar.po”文件,内容从“myprogram.pot”文件复制。
如果你想你的程序翻译成德文 ,创建“de.po”文件,内容从“myprogram.pot”文件复制到它..等等,你必须创建要为每种语言文件将您的程序翻译成。
现在,我们将在“ar.po”文件时,将内容从“myprogram.pot”文件复制,并把它放在那个文件里面并编辑以下内容:
- 一些描述性标题 :如果你想你可以在这里输入你的项目的冠军。
- 年包的版权所有者 :与您所创建的项目在今年更换。
- 包装 :用包的名称替换它。
- 第一作者<EMAIL @地址>,YEAR:与您的真实姓名,电子邮件和你翻译的文件替换每年这个。
- 包版本 :与从debian /控制文件的包版本来替换它。
- YEAR-MO-DA议员:MI + ZONE:不需要解释,你可以把它改成你想要的任何日期。
- 全名<EMAIL @ ADDRESS>:也更换您的姓名和电子邮件。
- 语言团队 :与你的翻译,例如“阿拉伯语”或“法国”的语言的名称替换它。
- 语言 :在这里,你必须插入的,你要翻译的语言ISO-639-1代码,例如“AR”,“FR”,“德”。等等,你可以找到一个完整的列表在这里 。
- 字符集 :这一步是很重要的,以“UTF-8”(不带引号),它支持大多数语言替换此字符串。
现在开始翻译! 添加您的翻译为“msgstr”引号后的每个字符串。 保存文件并退出。 一个好的翻译文件的
阿拉伯语作为示例应该是这样的:
# My Program
# Copyright (C) 2014
# This file is distributed under the same license as the myprogram package.
# Hanny Helal <youremail@mail.com<, 2014.
#
#, fuzzy
msgid ""
msgstr ""
"Project-Id-Version: 1.0\n"
"Report-Msgid-Bugs-To: \n"
"POT-Creation-Date: 2014-12-29 21:28+0200\n"
"PO-Revision-Date: 2014-12-29 22:28+0200\n"
"Last-Translator: M.Hanny Sabbagh <hannysabbagh<@hotmail.com<\n"
"Language-Team: Arabic <LL@li.org<\n"
"Language: ar\n"
"MIME-Version: 1.0\n"
"Content-Type: text/plain; charset=UTF-8\n"
"Content-Transfer-Encoding: 8bit\n"
#: myprogram:48
msgid "Welcome to my Test program !"
msgstr "أهلًا بك إلى برنامجي الاختباري!"
#: myprogram:52
msgid "Click on me to open the Terminal"
msgstr "اضغط عليّ لفتح الطرفية"
没有什么更多的事情,只需使用以下命令打包程序:
$ debuild -us -uc
现在尝试使用以下命令安装新创建的包。
$ sudo dpkg -i myprogram_1.0_all.deb
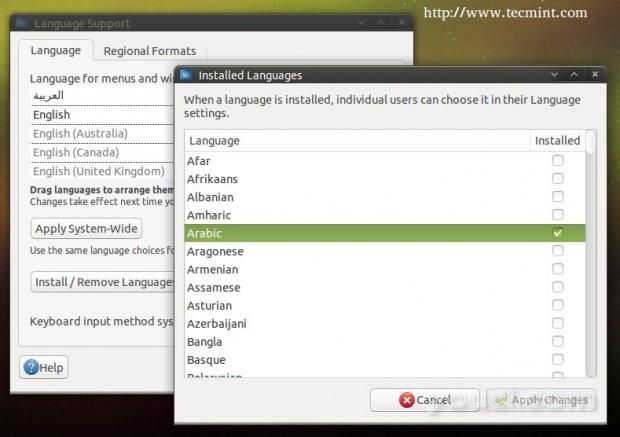
并使用“ 语言支持 ”程序或使用任何其他程序来阿拉伯语 (或者语言你翻译的文件)更改系统语言:

语言支持
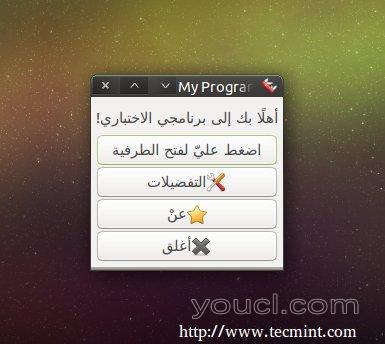
选择后,您的程序将被翻译成阿拉伯语。

翻译成阿拉伯语
在这里,我们结束对PyGObject编程Linux桌面系列,当然也有很多,你可以从学习其他东西的官方文件和Python的GI API参考..
你对这个系列有什么看法? 你觉得它有用吗? 您是否可以通过以下系列创建您的第一个应用程序? 分享我们的想法!


