这是一系列关于使用PyGObject Linux桌面下创建GUI应用程序的第三部分。 今天我们就来谈谈使用我们像' 操作系统 ','WebKit的 ',' 请求 '等,对编程的一些其他有用的信息旁边的程序的一些先进的Python模块和库。
创建自己的Web浏览器和记录器 - 第3部分
要求
您必须从这里阅读本系列的所有这些部分,以继续有关创建更多高级应用程序的进一步说明:
Python中的模块和库非常有用,而不是编写许多子程序来做一些复杂的工作,这将需要很多时间和工作,你可以导入它们! 是的,只需将您需要的模块和库导入到您的程序中,您就可以节省大量的时间和精力来完成您的程序。
有许多著名的模块Python中,你可以找到在Python模块指数 。
您可以导入库,也为你的Python程序,从“gi.repository进口的Gtk”这一行导入GTK库到Python程序,有喜欢GDK,WebKit的..等等许多其他图书馆
创建高级GUI应用程序
今天,我们将创建2个程序:
- 一个简单的网络浏览器; 这将使用WebKit库。
- 使用“桌面刻录avconv ”命令; 这将使用Python的'os'模块。
我不会解释如何在格莱德设计师从现在开始拖放窗口小部件,我只想告诉你,你需要创建一个小部件的名称,此外,我会给你每个程序的.glade文件和Python文件肯定。
创建简单的Web浏览器
为了创建一个网页浏览器,我们将不得不用“ 的WebKit引擎”,它是一个开源渲染引擎为网络,这是它在Chrome / 铬 ,用于有关它的更多信息是同一个你可以参考官方Webkit.org网站。
首先,我们必须创建GUI,打开格莱德设计师并添加下面的小部件。 有关如何创建小部件的更多信息,请按照第1部分和本系列(上面给出的链接)的第2部分 。
- 创建'window1'小部件。
- 创建“box1”和“box2”小部件。
- 创建'button1'和'button2'小部件。
- 创建'entry1'小部件。
- 创建“scrolledwindow1”小部件。
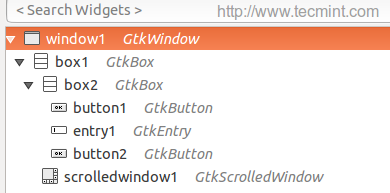
添加小部件
创建小部件后,您将获得以下界面。

Glade接口
没有什么新的,除了“ 滚动窗口 ”窗口小部件; 这个小部件是为了让里面被植入的WebKit引擎,使用“ 滚动窗口 ”小工具,你还可以在您浏览网站,水平和垂直滚动重要。
现在,您必须添加“backbutton_clicked”处理程序后退按钮“ 点击 ”的信号,“refreshbutton_clicked”处理程序的刷新按钮“ 点击信号 ”和“enterkey_clicked”处理程序“ 激活 ”信号的输入。
接口的完整.glade文件是在这里。
<?xml version="1.0" encoding="UTF-8"?>
<!-- Generated with glade 3.16.1 -->
<interface>
  <requires lib="gtk+" version="3.10"/>
  <object class="GtkWindow" id="window1">
    <property name="can_focus">False</property>
    <property name="title" translatable="yes">Our Simple Browser</property>
    <property name="window_position">center</property>
    <property name="default_width">1000</property>
    <property name="default_height">600</property>
    <property name="icon_name">applications-internet</property>
    <child>
      <object class="GtkBox" id="box1">
        <property name="visible">True</property>
        <property name="can_focus">False</property>
        <property name="orientation">vertical</property>
        <child>
          <object class="GtkBox" id="box2">
            <property name="visible">True</property>
            <property name="can_focus">False</property>
            <child>
              <object class="GtkButton" id="button1">
                <property name="label">gtk-go-back</property>
                <property name="visible">True</property>
                <property name="can_focus">True</property>
                <property name="receives_default">True</property>
                <property name="relief">half</property>
                <property name="use_stock">True</property>
                <property name="always_show_image">True</property>
                <signal name="clicked" handler="backbutton_clicked" swapped="no"/>
              </object>
              <packing>
                <property name="expand">False</property>
                <property name="fill">True</property>
                <property name="position">0</property>
              </packing>
            </child>
            <child>
              <object class="GtkButton" id="button2">
                <property name="label">gtk-refresh</property>
                <property name="visible">True</property>
                <property name="can_focus">True</property>
                <property name="receives_default">True</property>
                <property name="relief">half</property>
                <property name="use_stock">True</property>
                <property name="always_show_image">True</property>
                <signal name="clicked" handler="refreshbutton_clicked" swapped="no"/>
              </object>
              <packing>
                <property name="expand">False</property>
                <property name="fill">True</property>
                <property name="position">1</property>
              </packing>
            </child>
            <child>
              <object class="GtkEntry" id="entry1">
                <property name="visible">True</property>
                <property name="can_focus">True</property>
                <signal name="activate" handler="enterkey_clicked" swapped="no"/>
              </object>
              <packing>
                <property name="expand">True</property>
                <property name="fill">True</property>
                <property name="position">2</property>
              </packing>
            </child>
          </object>
          <packing>
            <property name="expand">False</property>
            <property name="fill">True</property>
            <property name="position">0</property>
          </packing>
        </child>
        <child>
          <object class="GtkScrolledWindow" id="scrolledwindow1">
            <property name="visible">True</property>
            <property name="can_focus">True</property>
            <property name="hscrollbar_policy">always</property>
            <property name="shadow_type">in</property>
            <child>
              <placeholder/>
            </child>
          </object>
          <packing>
            <property name="expand">True</property>
            <property name="fill">True</property>
            <property name="position">1</property>
          </packing>
        </child>
      </object>
    </child>
  </object>
</interface>
现在复制上面的代码,并将其粘贴在你的主文件夹“ui.glade”文件。 现在创建一个名为“mywebbrowser.py”的新文件,其内部,所有的解释是在评论中输入以下代码。
#!/usr/bin/python
# -*- coding: utf-8 -*-
## Here we imported both Gtk library and the WebKit engine.
from gi.repository import Gtk, WebKit
class Handler:
def backbutton_clicked(self, button):
## When the user clicks on the Back button, the '.go_back()' method is activated, which will send the user to the previous page automatically, this method is part from the WebKit engine.
browserholder.go_back()
def refreshbutton_clicked(self, button):
## Same thing here, the '.reload()' method is activated when the 'Refresh' button is clicked.
browserholder.reload()
def enterkey_clicked(self, button):
## To load the URL automatically when the "Enter" key is hit from the keyboard while focusing on the entry box, we have to use the '.load_uri()' method and grab the URL from the entry box.
browserholder.load_uri(urlentry.get_text())
## Nothing new here.. We just imported the 'ui.glade' file.
builder = Gtk.Builder()
builder.add_from_file("ui.glade")
builder.connect_signals(Handler())
window = builder.get_object("window1")
## Here's the new part.. We created a global object called 'browserholder' which will contain the WebKit rendering engine, and we set it to 'WebKit.WebView()' which is the default thing to do if you want to add a WebKit engine to your program.
browserholder = WebKit.WebView()
## To disallow editing the webpage.
browserholder.set_editable(False)
## The default URL to be loaded, we used the 'load_uri()' method.
browserholder.load_uri("http://youcl.com")
urlentry = builder.get_object("entry1")
urlentry.set_text("http://youcl.com")
## Here we imported the scrolledwindow1 object from the ui.glade file.
scrolled_window = builder.get_object("scrolledwindow1")
## We used the '.add()' method to add the 'browserholder' object to the scrolled window, which contains our WebKit browser.
scrolled_window.add(browserholder)
## And finally, we showed the 'browserholder' object using the '.show()' method.
browserholder.show()
## Give that developer a cookie !
window.connect("delete-event", Gtk.main_quit)
window.show_all()
Gtk.main()
保存文件,并运行它。
$ chmod 755 mywebbrowser.py
$ ./mywebbrowser.py
这是你会得到的。
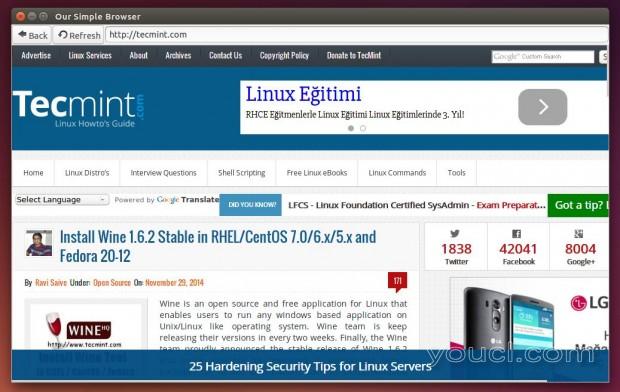
创建自己的Web浏览器
你可以参考,以发现更多的选项WebKitGtk官方文档。
创建简单的桌面记录器
在本节中,我们将学习如何运行使用' 操作系统 '模块,这将帮助我们创建使用“avconv”命令在桌面上一个简单的屏幕录像机Python的文件本地系统命令或shell脚本。
打开Glade设计器,并创建以下小部件:
- 创建'window1'小部件。
- 创建“box1”小部件。
- 创建'button1','button2'和'button3'小部件。
- 创建'entry1'小部件。
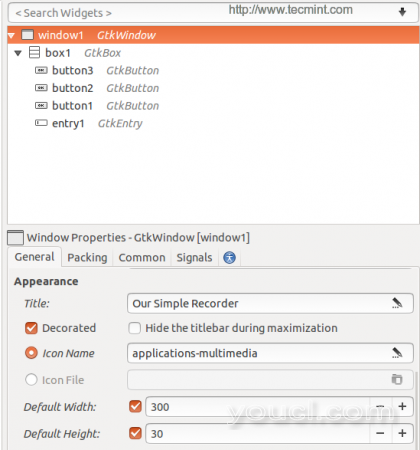
创建窗口小部件
创建上面的小部件后,你会得到下面的界面。
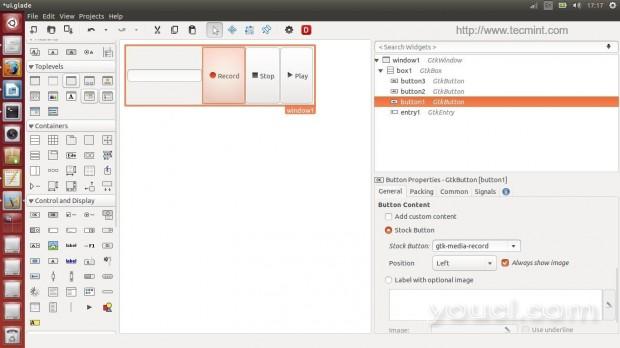
Glade UI界面
下面是完整的ui.glade文件。
<?xml version="1.0" encoding="UTF-8"?>
<!-- Generated with glade 3.16.1 -->
<interface>
<requires lib="gtk+" version="3.10"/>
<object class="GtkWindow" id="window1">
<property name="can_focus">False</property>
<property name="title" translatable="yes">Our Simple Recorder</property>
<property name="window_position">center</property>
<property name="default_width">300</property>
<property name="default_height">30</property>
<property name="icon_name">applications-multimedia</property>
<child>
<object class="GtkBox" id="box1">
<property name="visible">True</property>
<property name="can_focus">False</property>
<child>
<object class="GtkEntry" id="entry1">
<property name="visible">True</property>
<property name="can_focus">True</property>
</object>
<packing>
<property name="expand">False</property>
<property name="fill">True</property>
<property name="position">0</property>
</packing>
</child>
<child>
<object class="GtkButton" id="button1">
<property name="label">gtk-media-record</property>
<property name="visible">True</property>
<property name="can_focus">True</property>
<property name="receives_default">True</property>
<property name="use_stock">True</property>
<property name="always_show_image">True</property>
<signal name="clicked" handler="recordbutton" swapped="no"/>
</object>
<packing>
<property name="expand">True</property>
<property name="fill">True</property>
<property name="position">1</property>
</packing>
</child>
<child>
<object class="GtkButton" id="button2">
<property name="label">gtk-media-stop</property>
<property name="visible">True</property>
<property name="can_focus">True</property>
<property name="receives_default">True</property>
<property name="use_stock">True</property>
<property name="always_show_image">True</property>
<signal name="clicked" handler="stopbutton" swapped="no"/>
</object>
<packing>
<property name="expand">True</property>
<property name="fill">True</property>
<property name="position">2</property>
</packing>
</child>
<child>
<object class="GtkButton" id="button3">
<property name="label">gtk-media-play</property>
<property name="visible">True</property>
<property name="can_focus">True</property>
<property name="receives_default">True</property>
<property name="use_stock">True</property>
<property name="always_show_image">True</property>
<signal name="clicked" handler="playbutton" swapped="no"/>
</object>
<packing>
<property name="expand">True</property>
<property name="fill">True</property>
<property name="position">3</property>
</packing>
</child>
</object>
</child>
</object>
</interface>
像往常一样,复制上面的代码,并将其粘贴在你的主目录中的文件“ui.glade”,创建一个新的“myrecorder.py”文件,并进入里面的下面的代码(每一个新行是注释解释)。
#!/usr/bin/python
# -*- coding: utf-8 -*-
## Here we imported both Gtk library and the os module.
from gi.repository import Gtk
import os
class Handler:
def recordbutton(self, button):
## We defined a variable: 'filepathandname', we assigned the bash local variable '$HOME' to it + "/" + the file name from the text entry box.
filepathandname = os.environ["HOME"] + "/" + entry.get_text()
## Here exported the 'filepathandname' variable from Python to the 'filename' variable in the shell.
os.environ["filename"] = filepathandname
## Using 'os.system(COMMAND)' we can execute any shell command or shell script, here we executed the 'avconv' command to record the desktop video & audio.
os.system("avconv -f x11grab -r 25 -s `xdpyinfo | grep 'dimensions:'|awk '{print $2}'` -i :0.0 -vcodec libx264 -threads 4 $filename -y & ")
def stopbutton(self, button):
## Run the 'killall avconv' command when the stop button is clicked.
os.system("killall avconv")
def playbutton(self, button):
## Run the 'avplay' command in the shell to play the recorded file when the play button is clicked.
os.system("avplay $filename &")
## Nothing new here.. We just imported the 'ui.glade' file.
builder = Gtk.Builder()
builder.add_from_file("ui.glade")
builder.connect_signals(Handler())
window = builder.get_object("window1")
entry = builder.get_object("entry1")
entry.set_text("myrecording-file.avi")
## Give that developer a cookie !
window.connect("delete-event", Gtk.main_quit)
window.show_all()
Gtk.main()
现在通过在终端中应用以下命令运行该文件。
$ chmod 755 myrecorder.py
$ ./myrecorder.py
你有你的第一台台式机。
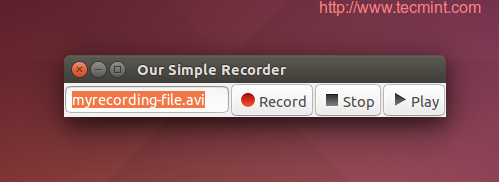
创建桌面记录器
你可以找到有关在“ 操作系统 ”模块的详细信息Python的OS库 。
就是这样,是不是很难使用PyGObject创建Linux桌面应用程序,你只需要创建GUI,进口一些模块和Python的文件与GUI,仅此而已,无所不及链接。 大约有在做这许多有用的教程PyGObject网站:
你试过使用PyGObject创建应用程序? 你认为这样做是什么? 你以前开发过什么应用程序?


