Ubuntu 14.10上的Samba服务器安装
本指南介绍如何在Ubuntu 14.10上安装和配置samba服务器,并使用匿名和安全的samba共享。 Samba是一个开源/免费软件套件,可为SMB / CIFS客户端提供无缝文件和打印服务。 与其他SMB / CIFS实现不同,Samba可以免费使用,并允许Linux / Unix服务器和基于Windows的客户端之间的互操作性。
1初步说明
我有新安装的Ubuntu 14.10服务器,我将在其上安装samba服务器。 当然,您需要有一台Windows机器来检查必须可以使用Ubuntu服务器访问的samba服务器。 我的Ubuntu服务器的主机名server1.example.com和IP为192.168.0.100
您可以从教程中安装Ubuntu服务器。
注意:
- Windows机器必须在同一个工作组上。 要检查Windows机器中的值,请在cmd提示符下运行命令
net config workstation
会是这样的
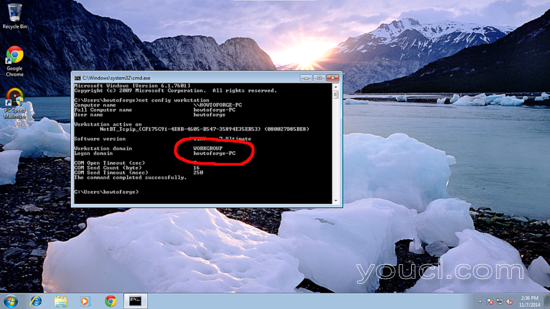
WORKGROUP 。
- 要使Windows机器在Windows中可以进行如此进行。 在运行终端并添加您的服务器IP地址的条目
notepad C:\\Windows\System32\drivers\etc\hosts
在我的情况下,就是这样,只是保存值。
[...]
192.168.0.100 	server1.example.com	ubuntu
2匿名Samba分享
首先,我将解释安装Samba与匿名分享的方法。 要安装samba run,
apt-get install samba samba-common python-glade2 system-config-samba
它将安装版本4.1.11-Ubuntu的 samba。
现在要在进行更改之前配置samba编辑文件/etc/samba/smb.conf ,我将把原始文件备份为 /etc/samba/smb.conf.bak
cp /etc/samba/smb.conf /etc/samba/smb.conf.bak
cat /dev/null  > /etc/samba/smb.conf
进一步给出这样的条目
vi /etc/samba/smb.conf
[global]
workgroup = WORKGROUP
server string = Samba Server %v
netbios name = ubuntu
security = user
map to guest = bad user
dns proxy = no
#============================ Share Definitions ==============================
[Anonymous]
path = /samba/anonymous
browsable =yes
writable = yes
guest ok = yes
read only = no
mkdir -p /samba/anonymous
service smbd restart
现在您可以访问Windows中的Ubuntu共享,如下所示:
从Windows机器只是浏览文件夹并尝试创建一个文本文件,但你会得到一个权限被拒绝的错误。

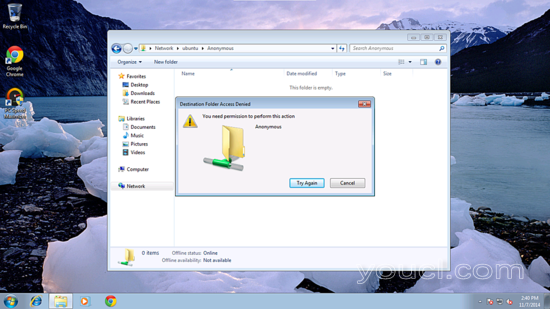
检查共享文件夹的权限。
ls -l / samba /
root@server1:~# ls -l /samba/
total 4
drwxr-xr-x 2 root root 4096 Nov  7 08:33 anonymous
root@server1:~#
允许匿名用户授予权限如下:
cd /samba
chmod -R 0755 anonymous/
chown -R nobody:nogroup anonymous/
ls -l
root@server1:/samba# ls -l
total 4
drwxr-xr-x 2 nobody nogroup 4096 Nov  7 08:33 anonymous
root@server1:/samba#
现在匿名用户可以浏览并创建文件夹内容。
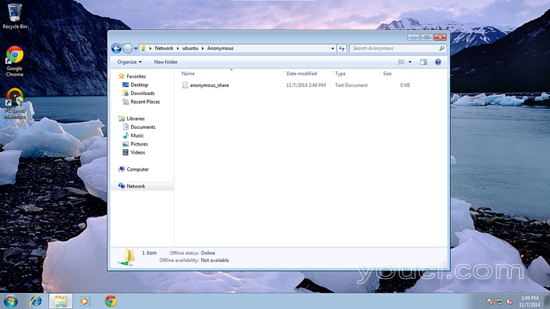
您也可以在服务器上检查内容。
ls -l anonymous/
root@server1:/samba# ls -l anonymous/
total 0
-rwxr--r-- 1 nobody nogroup 0 Nov  7 10:19 anonymous_share.txt
root@server1:/samba#
3.安全的Samba服务器
为此,我将创建一个组smbgrp和用户srijan以正确的身份验证访问samba服务器
addgroup smbgrp
useradd srijan -G smbgrp
smbpasswd -a srijan
root@server1:~# smbpasswd -a srijan
New SMB password:<--yoursambapassword
Retype new SMB password:<--yoursambapassword
Added user srijan.
root@server1:~#
现在创建文件夹viz 保护在/ samba文件夹中,并给出这样的权限
mkdir -p /samba/secured
cd /samba
chmod -R 0770 secured/
再次编辑配置文件,并在文件末尾添加条目:
nano /etc/samba/smb.conf
[...]
[secured]
 path = /samba/secured
 valid users = @smbgrp
 guest ok = no
 writable = yes
 browsable = yes
service smbd restart
进一步交叉检查设置检查如下:
cd
testparm
root@server1:~# testparm
Load smb config files from /etc/samba/smb.conf
rlimit_max: increasing rlimit_max (1024) to minimum Windows limit (16384)
Processing section "[Anonymous]"
Processing section "[secured]"
Loaded services file OK.
Server role: ROLE_STANDALONE
Press enter to see a dump of your service definitions<--ENTER

[global]
    netbios name = UBUNTU
    server string = Samba Server %v
    map to guest = Bad User
    dns proxy = No
    idmap config * : backend = tdb

[Anonymous]
    path = /samba/anonymous
    read only = No
    guest ok = Yes

[secured]
    path = /samba/secured
    valid users = @smbgrp
    read only = No
root@server1:~#
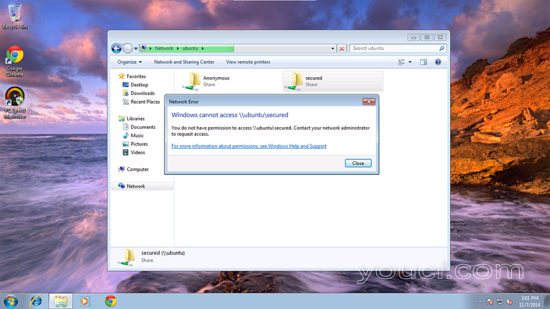
现在在Windows机器上检查文件夹,并具有正确的凭据,如上所述。 在我的情况下,值为user = srijan和password = yoursambapassword
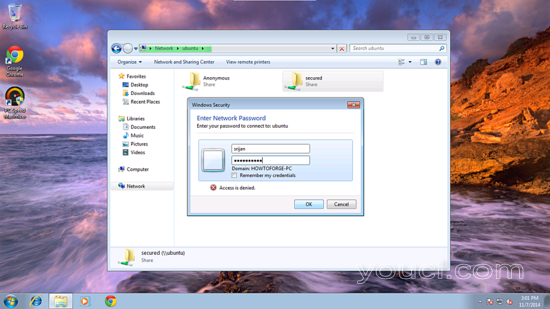
你会再次面临权限的问题给用户srijan的写权限:
cd /samba
chown -R srijan:smbgrp secured/
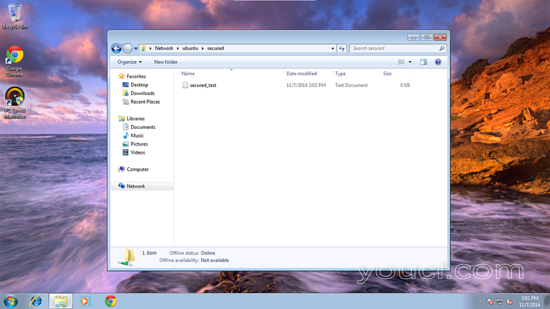
现在samba用户
srijan有权写入文件夹。
我们可以在Ubuntu服务器上检查文件:
ls -l /samba/secured/
root@server1 # ls -l /samba/secured
total 0
-rwxr--r-- 1 srijan srijan 0 Nov  7 11:32 secured_test.txt
root@server1 #
欢呼现在我们有一个成功配置的samba服务器在Ubuntu 14.10 :)
4链接
- Ubuntu: http : //www.ubuntu.com/
- Samba: http : //www.samba.org/samba/


