使用GitlabHQ在Debian 7(Wheezy)上运行您自己的Git服务器
版本1.0
作者:Srijan Kishore
本文档介绍如何安装和配置Git和GitHub。 这些是管理和管理整个Git存储库和相关权限的好工具。 因此,这些对于编写开源软件的用户来说仍然是真正的祝福,但是,在编写封闭的源代码软件时,在将代码信任给第三方服务器可能不太舒服。 为了获得非常需要的灵活性和控制,如Github / BitBucket,而不是在用户控制的服务器上托管git存储库,GitLab仍然是一个Godsend!
GitLab是一个奇迹工具,为您的服务器上的Git存储库(即GitHub)提供了一个简单且用户友好而强大的基于Web的界面。 用户可以在自己的云服务器上自由托管它,以自定义的方式控制访问,唯一限制备份大小的因素是服务器的内置存储空间。
1初步说明
本教程基于Debian 7服务器,因此您应该在继续本教程之前设置基本的Debian 7服务器安装。 系统应该有一个静态IP地址。 我在本教程中使用192.168.0.100作为我的IP地址,将server1.example.com用作主机名。 必须安装所有必需的软件才能使GitLab工作。 因此,使用现有VPS(Droplet)/完全不同的Linux发行版的用户可能会面临中断问题,明确表示使用不兼容的Python和Ruby版本。 因此,必须首先安装Ruby 2.0和Python 2.7 。
2安装Ruby 2.0或更高版本,Python 2.7和Bundler Gem
我们将首先在Git Hub的配置之前安装预配置。安装所需软件包的过程如下所述。
apt-get update
apt-get install -y build-essential zlib1g-dev libyaml-dev libssl-dev libgdbm-dev libreadline-dev libncurses5-dev libffi-dev curl git-core openssh-server redis-server checkinstall libxml2-dev libxslt-dev libcurl4-openssl-dev libicu-dev
注意:用户必须确保在系统上未安装Ruby 1.8,尽管在默认的Debian 7.6中可能存在很大差距
您可以按照以下方式检查您的Python版本(在我的例子中是Python 2.7.3):
python --version
root@server1:~# python --version
Python 2.7.3
root@server1:~#
这可以做到如下图所示,安装Ruby 2.1.2,Ruby可以安装如下:
mkdir /tmp/ruby && cd /tmp/ruby
wget http://ftp.ruby-lang.org/pub/ruby/2.1/ruby-2.1.2.tar.gz
tar zxvf ruby-2.1.2.tar.gz
cd ruby-2.1.2
./configure
make
make install
此外,我们将检查ruby版本为:
ruby -vroot @ server1:/tmp/ruby/ruby-2.1.2# ruby -v
ruby 2.1.2p95(2014-05-08修订版45877)[x86_64-linux]
root @ server1:/tmp/ruby/ruby-2.1.2#
接下来我们将安装Bundler Gem,如下所示:
gem install bundler --no-ri --no-rdocroot @ server1:/tmp/ruby/ruby-2.1.2# gem install bundler --no-ri --no-rdoc
抓取:bundler-1.6.5.gem(100%)
成功安装bundler-1.6.5
1Gem安装
root @ server1:/tmp/ruby/ruby-2.1.2#
现在我们将为Gitlab创建一个用户= git用户,用于进一步的配置,如下所示:
adduser --disabled-login --gecos 'GitLab' git
3安装GitLab Shell
我们将使用以下命令下载GitLab shell:
cd /home/git
apt-get install sudo
sudo -u git -H git clone https://github.com/gitlabhq/gitlab-shell.git
cd gitlab-shell
sudo -u git -H git checkout v1.7.0
sudo -u git -H cp config.yml.example config.yml
此外,我们将备份原始文件config.yml.example并将其复制到config.yml中 。 编辑文件如下:
vi config.yml
现在我们需要将值从gitlab_url:“http:// localhost /”更改为git值,如下所示:
# GitLab user. git by default
user: git

# Url to gitlab instance. Used for api calls. Should end with a slash.
#gitlab_url: "http://localhost/"
gitlab_url:     "http://server1.example.com"

[....]
现在我们将运行GitLab shell安装如下:
sudo -u git -H ./bin/install
它会有这样的输出:
root@server1:/home/git/gitlab-shell# sudo -u git -H ./bin/install
mkdir -p /home/git/repositories: true
mkdir -p /home/git/.ssh: true
chmod 700 /home/git/.ssh: true
touch /home/git/.ssh/authorized_keys: true
chmod 600 /home/git/.ssh/authorized_keys: true
chmod -R ug+rwX,o-rwx /home/git/repositories: true
find /home/git/repositories -type d -print0 | xargs -0 chmod g+s: true
root@server1:/home/git/gitlab-shell#
4 MySQL安装GitLab
现在,我们将设置GitLab以使用MySQL在后台使用。 第一步是使用下面给出的命令来安装MySQL。 在安装过程中,它将提示您设置MySQL根密码,您可以根据个人喜好设置,但是您必须在后续步骤中使用相同的注释。
apt-get install mysql-server mysql-client libmysqlclient-dev
New password for the MariaDB "root" user: <--mysqlpassword
Repeat password for the MariaDB "root" user: <--mysqlpassword
Gitlab数据库创建:
mysql -u root -p
在MySQL提示符下使用database = gitlabdb user = gitlabuser和password = gitlabuserpassword :
CREATE DATABASE gitlabdb DEFAULT CHARACTER SET utf8 COLLATE utf8_unicode_ci;
GRANT SELECT, LOCK TABLES, INSERT, UPDATE, DELETE, CREATE, DROP, INDEX, ALTER ON gitlabdb.* TO 'gitlabuser'@'localhost' IDENTIFIED BY 'gitlabuserpassword';
flush privileges;
quit
现在我们将进行以下安装:
cd /home/git
sudo -u git -H git clone https://github.com/gitlabhq/gitlabhq.git gitlab
cd /home/git/gitlab
sudo -u git -H git checkout 6-0-stable
sudo -u git -H cp config/gitlab.yml.example config/gitlab.yml
正如GitLab shell设置一样,如果您有为VPS配置的域,则必须编辑config.yml才能使用该域(如下面给出的命令所示):
sudo -u git -H vi config/gitlab.yml
[...]
# # GitLab settings
#  gitlab:
#    ## Web server settings
#    host: localhost
#    port: 80
#    https: false

  gitlab:
    ## Web server settings
    host: server1.example.com
    port: 80
    https: false

[...]
在这里,您还需要设置几个Linux文件权限,配置git用户的Gitconfig,并为git用户设置一些GitLabconfig和目录(如下所示):
cd /home/git/gitlab
chown -R git log/
chown -R git tmp/
chmod -R u+rwX  log/
chmod -R u+rwX tmp/
sudo -u git -H mkdir /home/git/gitlab-satellites
sudo -u git -H mkdir tmp/pids/
sudo -u git -H mkdir tmp/sockets/
chmod -R u+rwX tmp/pids/
chmod -R u+rwX tmp/sockets/
sudo -u git -H mkdir public/uploads
chmod -R u+rwX  public/uploads
sudo -u git -H cp config/unicorn.rb.example config/unicorn.rb
sudo -u git -H git config --global user.name "GitLab"
sudo -u git -H git config --global user.email "gitlab@localhost"
sudo -u git -H git config --global core.autocrlf input
sudo -u git cp config/database.yml.mysql config/database.yml
接下来,我们需要告诉GitLab使用您之前设置的gitlab Mariadb用户。 为此,我们将编辑文件config / database.ymlfile (如下所示):
sudo -u git -H vi config/database.yml
[...]
#production:
#  adapter: mysql2
#  encoding: utf8
#  reconnect: false
#  database: gitlabhq_production
#  pool: 10
#  username: root
#  password: "secure password"


production:
  adapter: mysql2
  encoding: utf8
  reconnect: false
  database: gitlabdb
  pool: 10
  username: gitlabuser
  password: "gitlabuserpassword"
[...]
请放置在创建数据库时给出的值,如果在创建数据库时使用其他值,则上述值可能不同。 将文件权限更改为:
sudo -u git -H chmod o-rwx config/database.yml
现在,我们可以安装更多需要的Gem,这可能是一个相当长的步骤(如下图所示):
cd /home/git/gitlab下载包并安装它:
gem install charlock_holmes --version '0.6.9.4'
wget https://downloads-packages.s3.amazonaws.com/ubuntu-14.04/gitlab_7.1.1-omnibus-1_amd64.deb
apt-get install openssh-server
apt-get install postfix # Select 'Internet Site', using sendmail instead also works, exim has problems
这里将要求一些用户输入,请选择Internet站点 ,使用系统邮件作为server1.example.com您也可以使用sendmail而不是安装postfix。 在这种情况下,exim不工作。 接下来安装git lab:
dpkg -i gitlab_7.1.1-omnibus-1_amd64.deb编辑配置文件以添加我们的主机名,即
hostname = server1.example.com :
vi /etc/gitlab/gitlab.rb
[....]
#external_url 'http://gitlab.example.com'
external_url 'http://server1.example.com'
然后我们将重新配置启动GitLab,如下所示:
gitlab-ctl reconfigure
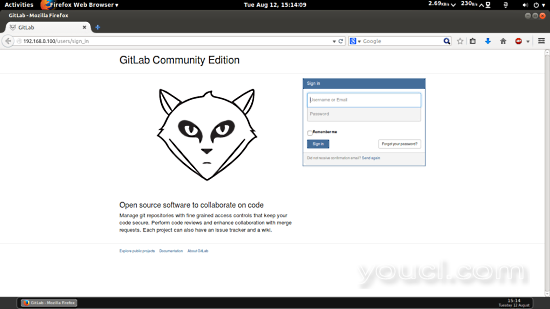
您可以浏览登录页面http://192.168.0.100/users/sign_on使用凭证作为username = root和password = 5iveL!fe
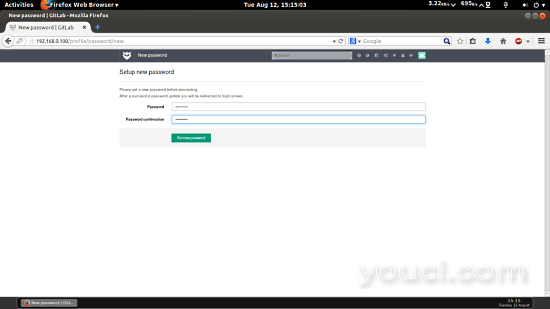
更改原始密码:
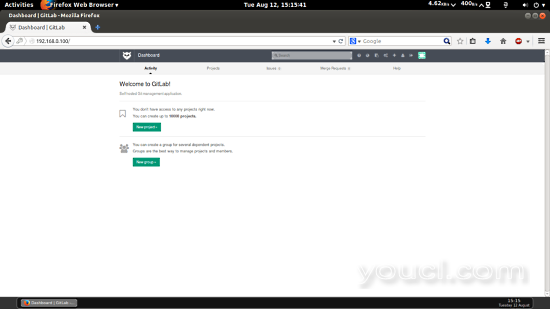
这将是您的默认欢迎页面。
5链接
- gitlab: https : //about.gitlab.com/
- Debian: https : //www.debian.org/


